Automated HDR

I was visiting New York City with my camera and I had a meeting in the morning with a client who has asked to see what I was shooting. Since I didn’t have enough time to create hand layers and masks, I simply ran a bracketed sequence shot in New York’s Central Park through Photomatix before processing the image further in Photoshop.
18mm, six images shot at shutter speeds ranging from 1/2 of a second to 1/320 of a second, each image shot at f/13 and ISO 200, tripod mounted; images combined using Photomatix and Photoshop.
Sometimes a multi-shot sequence shot for HDR involves more compositional complexity than can easily be blended using hand layering. In other cases, a hand-HDR blended image needs a “kick in the pants” to add more structure in specific areas. These are examples of some of the times that it makes sense to call in the heavy guns of automated HDR programs such as Photomatix, Nik HDR Efex Pro and Photoshop’s HDR Pro.
Each of these automated HDR programs works in two steps. First, the bracketed sequence of images is combined into a high bit-depth file. This file cannot be accurately rendered or viewed on a monitor, or printed.
The second step is to choose from a number of settings and downscale the high bit-depth HDR image into a normal file that can be viewed on a monitor, modified in a program such as Photoshop, and reproduced.
As a practical matter, once you’ve specified the files to be blended, the first part of this process is essentially automatic.
The second step—sometimes called “applying a tone curve”—usually works by choosing a preset, and then modifying the settings, much as you would with a conventional filter. In fact, it is worth noting that you can use the tone-curve portion of automated HDR software as a filter on a single image to generate pseudo-HDR effects, even if you didn’t shoot a series of bracketing images.
While I seldom use automated HDR as the only arrow in my post-production quiver, there are many situations in which a touch of automated HDR adds greatly to the impact of an image that has been primarily processed by hand.
Meditation
“Never trust anything that can think for itself if you can’t see where it keeps its brain.”—Arthur Weasley in J. K. Rowling’s Harry Potter and the Chamber of Secrets.
Automated HDR programs
Probably the most widely used HDR programs are Photomatix from HDR Soft and HDR Efex Pro 2 from Nik Software. There are many similarities between how these two programs work, and also some differences.
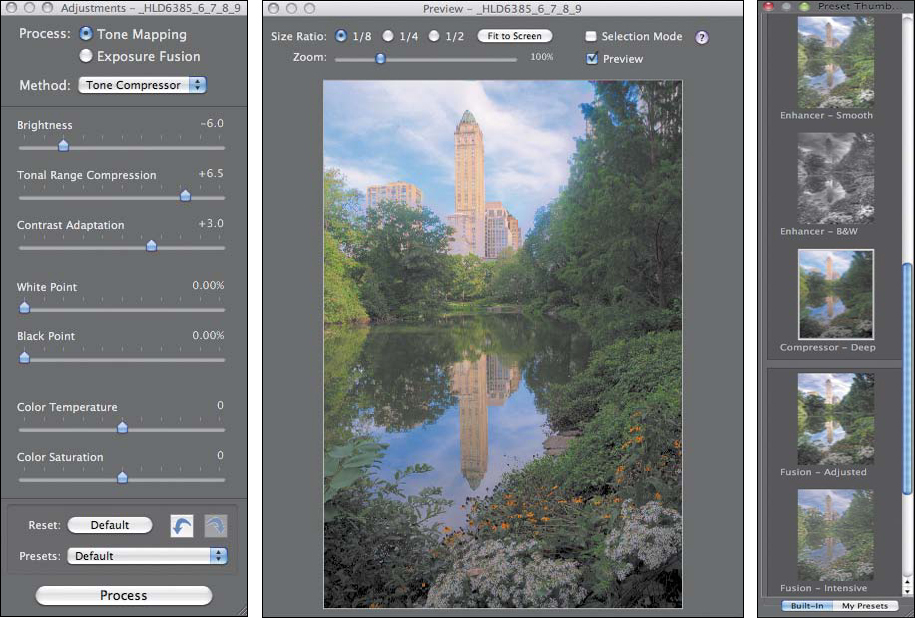
As a quick and effective way to combine a bracketed sequence of images shot in New York’s Central Park, I used Photomatix to preprocess the images. Next, I applied tone curve settings as shown here.
The tone curve I selected was arrived at by first choosing the Compressor–Deep preset, shown as a thumbnail on the right panel above. With this thumbnail selected, I adjusted Tonal Range Compression and Color Temperature to create an image that was in line with my vision. The finished image is shown on page 124.
Photomatix is the “grand-daddy” of automated HDR programs. It’s been around for a while. This program runs as standalone software. Once you’ve combined your image sequence in Photomatix and applied a tone curve, you can save the resulting file in the TIFF format and bring it into Photoshop.
In contrast, Nik’s HDR Efex Pro runs as a plug-in with Adobe Lightroom, Adobe Bridge, and Adobe Photoshop. You can’t use it as a standalone program.
Both HDR Efex Pro and Photomatix can be used as a filter within Photoshop—essentially this is applying the “tone curve” portion of the software to an image that already exists. This capability can be used to run an HDR image through the software for a second pass.

Nik HDR Efex Pro provides the starting point for an HDR image blend that otherwise would involve quite a complex bit of blending. In fact, if you look at the finished image to the right, the complexity of the curves and shapes of the trees make hand masking a daunting proposition.
With both programs, the best approach until you really get to know them is to merge your image sequence and then browse the preset thumbnails that the software provides (some of these preset thumbnails are shown in both programs to the right). Once you’ve selected the preset that is closest to your artistic vision, you can then use the slider controls to fine-tune what you are going to get.

On my way to give a workshop at Carmel-by-the-Sea, California, I was fortunate to be able to spend some time photographing at Point Lobos State Preserve near Big Sur, California.
Point Lobos was one of the favorite subjects of classic photographers, including Ansel Adams and Edward Weston, and it is truly one of the most beautiful locations that I know.
The day had been raining, but as I got to Point Lobos the weather cleared. Conditions were bright but overcast, so that colors were saturated but muted.
My idea in capturing this image of one of the trails around Point Lobos was to render the colors and saturation as vividly as I saw them when I was photographing.
The level of detail in the trees, moss, and lichen seemed potentially tedious to process by hand, so I used Nik HDR Efex Pro as a Photoshop plug-in to help me on the way.
34mm, nine exposures shot at shutter speeds ranging from 1.3 seconds to 1/250 of a second, each exposure at f/18 and ISO 200, tripod mounted; exposures combined using Photoshop and Nik HDR Efex Pro 2.

This image of peonies and campanulas is a panoramic HDR composite. The image was so wide that I had to shoot it in three sections. I shot a bracketed sequence for each section and hand-blended each section individually. Once each section was finished, I masked in a version created using Nik HDR Efex Pro to add definition to the flower centers. With each of the three sections complete, I stitched them together, finally adding a scanned background in Photoshop.
40mm macro lens, three sections of five exposures each for a total of fifteen combined exposures, each section at shutter speeds ranging from 1/4 of a second to 4 seconds, all exposures shot at f/11 and ISO 100, tripod mounted; images combined primarily using hand layering in Photoshop with a version created using Nik HDR Efex Pro to add definition to the flower centers.

Wandering the slopes of Mount Tamalpais, north of San Francisco, California, my companion and I stopped to admire the view from an overlook often used as a launch spot by hang gliders.
While notionally we were peering straight down at the Pacific Ocean, in fact there was a solid wall of white clouds all the way to the horizon.
As I stood watching, I noticed that the clouds were beginning to break up slightly, perhaps parted by the same thermal winds that makes this place such a successful one for hang gliders.
Since the ocean and beach were beginning to come into partial view, I decided to set up my tripod and wait for sunset.
As the sun dipped lower, I realized that the dynamic range from the bright fiery ball of the sun to the dark mountainside in deep shadow would be untenable in a single shot—so I bracketed an exposure sequence that (on the dark side) was able to capture the sun without blowing out (at 1/400 of a second) and was also able to render the very dark parts of the scene (at 1/6 of a second).
28mm, ten exposures at shutter speeds ranging from 1/400 of a second to 1/6 of a second, each exposure at f/8 and ISO 200, tripod mounted; exposures combined using hand-HDR in Photoshop and Nik HDR Efex Pro.

The highlight of the San Francisco Cable Car Museum is the wheels that power the cable cars. These have a somewhat Victorian steam punk look, despite the fact that they are actually powered by General Electric diesel engines. The constantly turning wheels and cables pass through underground tunnels to power San Francisco’s famous cable cars.
This kind of Victorian steam punk industrial environment is a great subject for HDR because big wheels, gears, and bizarre-looking machine parts seem to be the kind of subject that even conventional HDR makes look good.
It’s important to recognize the possibility of making this kind of image even in low-light conditions, as was the case in the Cable Car Museum.
I combined these manually bracketed images in post-production to create a single HDR image using tools provided by Nik Software, as well as hand-HDR layering in Photoshop.
There were several challenges in post-production. One was to retouch out a man in a red shirt, who appeared as a “ghost”—he was partially rendered—in two of the frames. Another issue involved the motion of the big wheels themselves. Normally, motion is anathema to automated HDR programs because the software just doesn’t know what pixels to combine. In this case, however, the blur of the flywheels in motion was actually rendered fairly attractively—particularly as I pasted in a single frame in a couple of places where it needed it.
12mm, seven exposures at shutter speeds ranging from 1/13 of a second to 10 seconds, each exposure at f/9 and ISO 200, tripod mounted; exposures combined using Nik HDR Efex Pro and Photoshop.