Hand-HDR

To render this image of a strongly backlit window and the dark interior of a reconstructed historic apothecary at Laws Train Museum near Bishop, California, I shot an extensive bracketed sequence (the bracketed files are shown on page 119 in Adobe Bridge). I processed the sequence by hand, using elements from each of the exposures.
22mm, eight exposures at shutter speeds ranging from 1.6 seconds to 1/640 of a second, each exposure shot at f/8 and ISO 200, tripod mounted; exposures combined in Photoshop.
The things that hurt, instruct.
—Benjamin Franklin
If one RAW exposure is good, then many exposures are indeed better. Look at it this way: within a single RAW file there is a potential exposure range of 8 f-stops.
Each f-stop lets in half the light of the previous f-stop. Just so you are clear on the notation, from the viewpoint of letting in light, a full f-stop is the equivalent of one EV (Exposure Value).
However, the range within a RAW file is not entirely usable because image quality deteriorates as you press the limits of what it is possible to recover from the RAW file. So the effective usable range within a single RAW file is more like 4 EVs than 8 EVs.
Whatever the specific limitation of exposure range within a single file, it just stands to reason that you can get a greater range from light to dark by combining layers from multiple files that were created from bracketing—the process of progressively varying exposures—rather than from a single exposure.
It’s possible to put the files created using a bracketing sequence through an automated HDR (High Dynamic Range) program as explained starting on page 125. However, results that consistently match your aesthetic are more easily obtainable using the very same layering techniques—using layers, layer masks, the Brush Tool, and gradients—that I’ve already shown you. I call this process “hand-HDR.”
I’ve been told in my workshops that my hand-HDR process is a “pain in the keister” and “too much work.” On that note, a prominent reviewer once called my workflow “HDR the hard way.” All this may or may not be true—actually I think you’ll find the process pretty intuitive and straightforward once you get the hang of it—but it is the only way to get exactly the blend you can see in your mind’s eye from a sequence of bracketed files. No automated process is going to do it for you. Creating the blend you want depends on your eye, your imagination, and your Photoshop skills.
Shooting a bracketed sequence for hand-HDR
There are a number of issues to consider in shooting a bracketed sequence for hand-HDR blending in post-production workflow. These include:
![]() The tonal range you want to capture
The tonal range you want to capture
![]() Spacing the exposure sequence
Spacing the exposure sequence
![]() The mechanism that is best to use to make an exposure sequence
The mechanism that is best to use to make an exposure sequence
Before I show you how to approach these issues, let me mention that multi-shot HDR blending (whether by hand or automated) tends to be most successful when the original sequence is shot using a tripod. Also, subjects that move usually don’t work so well—with some exceptions, because these techniques can be used to create attractive images of moving water and clouds.
Tonal range
The idea is to capture the entire range from light to dark. You can determine this range by metering the lightest lights and the darkest darks in your subject. The light meter in many DSLR cameras in spot-metering mode works well for this purpose. You need to go a bit darker than the darkest dark obtained this way, and a bit lighter than the lightest light.
Generally, the exposure range in most situations with variegated lighting will be in the 10–20 EV range. Note that this is far greater than the usable range within a single RAW file. Since EVs are logarithmic, this translates to at least one hundred times from lightest to darkest.
A caveat is that in some situations one doesn’t care about the entire dynamic range, rather only portions of it—for example, just the light half of the exposure histogram (see page 120).
Spacing the exposure sequence
Ideally, you want to capture every exposure in the range in such a way that the exposure value is rendered somewhere in the middle of the histogram. At the same time, overlap doesn’t cause problems—you can never have too much information because you can always discard redundant data. So the strategy should be to overshoot. As I like to say in my digital photography workshops, “Film is so expensive!”
I find that a 1 EV exposure differential works well to fit this requirement. It is better to bracket shutter speed than aperture or ISO. For example, if the aperture and ISO are fixed, a sequence I might use would be 1/250 of a second, 1/125 of a second, 1/60 of a second, and so on.
The mechanics of capture
To actually create a sequence there are two approaches. You can use the auto-bracketing function in your camera—which is in some respects easier because it means you don’t have to do the math, or touch the camera controls while exposures are sequencing. On the other hand, auto-bracketing may not extend the sequence as far as you’d like, and may not provide pinpoint control over exposure settings.
The second approach is to put your camera in manual exposure mode, and manually adjust the shutter speed between shots. This can work very well if you use a delicate touch, but you do need to be sure that the camera is firmly in place on its tripod so you don’t create any shake when adjusting the shutter speed.
Understanding the apothecary sequence
If you look carefully at the fine print in the exposure data below each of the frames that I shot of the apothecary shop (right), you’ll see that most of the exposure data doesn’t vary. Each exposure was shot at 22mm, f/8, and ISO 200. What varies between the exposures is the shutter speed.

For this sequence, I used a shutter speed of 1/640 of a second at the darkest end and 1.6 seconds at the lightest end. If you do the math, you’ll see that this is a variation of 1,024 times from the darkest exposure to the lightest exposure.
Actually, the tonal range is even broader than the 1,024 multiplier makes it seem because each RAW exposure has a considerable potential tonal range.
This kind of exposure sequence is much more feasible if both the subject and the camera are completely stationary. It can be trickier than meets the eye. For example, in the case of the apothecary sequence, I had a hard time getting the tripod physically in position.
Successfully creating an exposure sequence requires mastering manual exposure because the exposure range cannot be accomplished using auto bracketing.
Finally, it’s important to understand that shooting a bracketed sequence such as the one to the right has potential benefits beyond extending dynamic range. This kind of sequence, if correctly processed, can be used to add resolution to the final image, and also to greatly improve the lighting conditions present in any single one of the exposures.
May the force be with your florals
The idea behind using multiple exposures to extend your dynamic range is to end up with a final image that shows more variations between lights and darks than a single image could.
But it is a fact of life that sometimes you don’t want to use the entire dynamic range of a subject. Images that are intentionally skewed toward darkness are called low-key, and images that embrace the light side are referred to as high-key.
It is not often recognized that using multiple exposures, hand-HDR, layers, layer masks, and painting in the layers starting from the lightest exposure first is a great way to create extended tonal range high-key images.
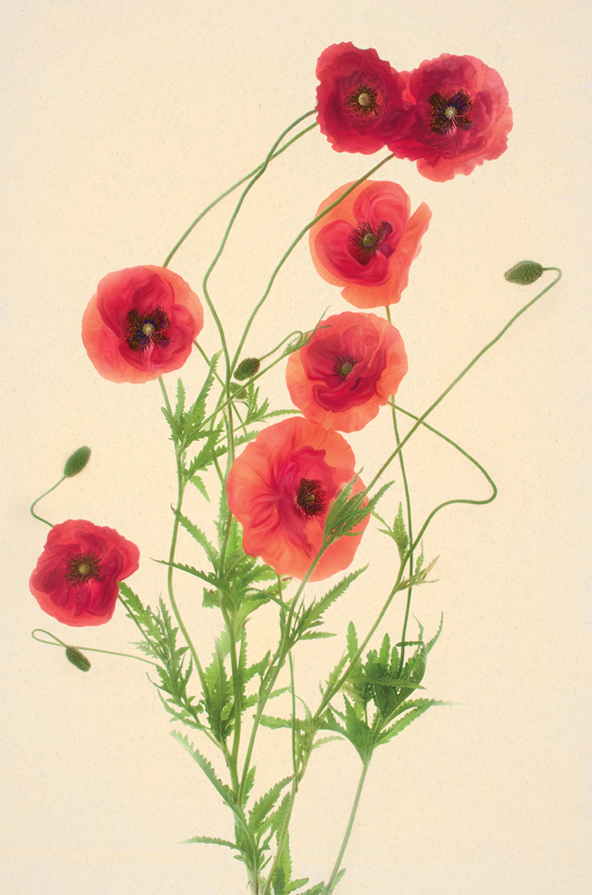
This is a technique that works particularly well with floral images that have a partial translucence such as the image of red poppies shown here.

In creating this image of red poppies, I knew I was only interested in lighter exposures. So, while I shot eight exposures (at shutter speeds ranging from 1/100 of a second to 1 second), I only used the five exposures shown in the Layers panel above to blend the image.
Once the images had been blended using layer masks and painting, I added a background created from a flatbed scan of a sheet of Japanese rice paper to ease the harshness of the stark white background.
40mm macro lens, five exposures at shutter speeds ranging from 1/25 of a second to 1/2 of a second, each exposure at f/13 and ISO 200, tripod mounted; exposures combined in Photoshop.


On a sunny summer day, I shot a bracketed sequence of this beautiful, hand-crafted one-of-a-kind Falcon motorcycle in open shade light.
You would think that the shooting conditions would have been pretty easy, but many people were interested in this beautiful machine and were circling it, looking at the amazing details. In fact, one onlooker tripped over my tripod legs, nearly dumping my camera.
When shooting the HDR sequence, I decided not to use the camera’s auto-bracketing feature because I knew it would not capture the entire tonal range. Even though I shot a total of ten captures, I knew I probably wouldn’t use them all. But it’s better to take the time to shoot as many captures as possible, because once the shooting is over, there are no redos. I’d rather have too much material to work with than not enough.
Back at my studio, I combined seven of the ten captures using hand-HDR techniques to bring out the full tonal range of the burnished metal and reflections.
80mm, seven exposures at shutter speeds ranging from 2.5 seconds to 1/200 of a second, each exposure at f/16 and ISO 200, tripod mounted; exposures combined in Photoshop.