It all starts with a layer
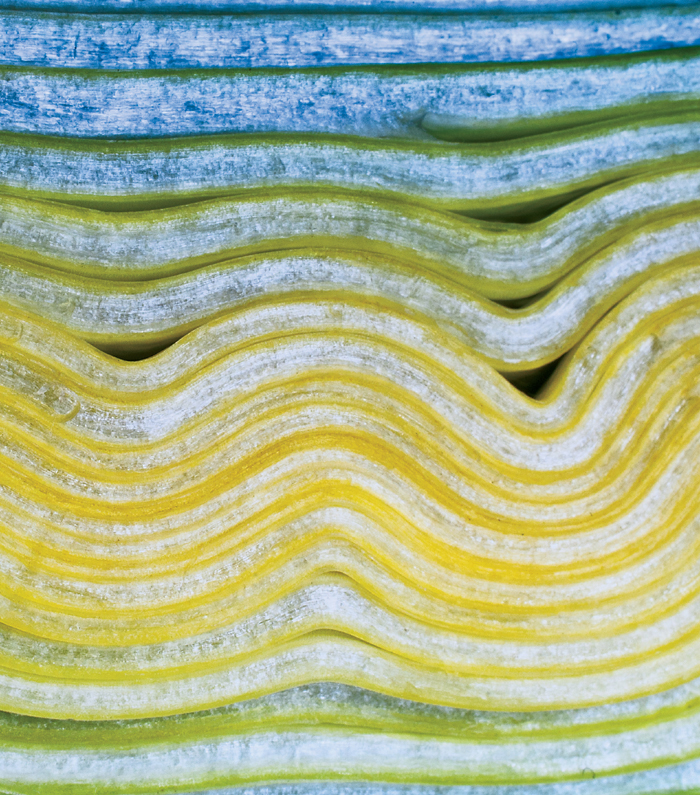
This leek, like many things in nature such as plants and geologic formations, is composed of layers. The view you see in this photo is a cross-section, clearly showing the layers. However, if you looked at the leek from the top down, you would see only the topmost layer. Pursuing this analogy a little further, leeks are a member of the onion family and often have some degree of transparency. If the topmost layer of the leek were partly transparent—or removed—you would begin to see the layers farther down the leek’s layer stack. This is pretty much the way layers work in Photoshop.
By the way, my wife was cooking soup when I saw this cross-section of leek on the cutting board. I quickly removed (i.e., stole) it to my studio. When my wife regained possession of the leek in question, it turned out to be quite tasty when added to the soup.
40mm macro lens, 2.5 seconds at f/29 and ISO 100, tripod mounted.
Okay. Let’s recap a bit. I started by observing that photographs cannot be taken in darkness, or of a subject that is unlit because exposures actually capture light that is emitted or reflected by objects (see page 27) rather than the objects themselves.
Once you understand that in a significant sense the subject of any photo is light itself, then you’ll understand the necessity of starting to make sense of the patterns of light—and the absence of light—that make up any photo.
Good observation of these patterns makes for compelling compositions at the time of exposure. Beyond the initial exposure, enhancing a digital photo in post-production means enhancing these patterns, and bringing out the internal coherence of the patterns of light. If you are skillful—or lucky—that coherence was there in the first place; but, it may not be apparent except to an adept in the way of the digital photographer.
Understanding the possibilities of manipulating light in post-processing informs the digital photographer at the point of exposure by making it reasonable to take chances on light patterns that need post-production “teasing” to be made manifest.
This conceptual approach holds true across many kinds of photography, whether you like to shoot landscapes, flowers, or portraits.
But to make the concept a reality, you’ll need a post-processing scaffolding. It turns out that this scaffolding is easily available, and starts with the layer.
A layer can be thought of as a transparency on which images, portions of an image, or imaging effects are applied and placed over or under an image. Layers have been available in Photoshop since 1994, and are an integral feature of most powerful image-editing software programs.
Every time you open a photo in Photoshop it becomes a layer. Photoshop documents are made up of layers that are stacked on top of each other. At the end of the day, what I end up with in Photoshop after processing an image (and before printing it) is a stack of layers that have been precisely aligned. Technically, these layers have to be flattened—reduced to a single, combined layer—before an image can be reproduced or printed.
A Photoshop layer has literally hundreds of properties—meaning, characteristics—that can be set. My plan in The Way of the Digital Photographer is to keep things simple. To understand the way layers work, you really don’t need to know anything about most of these characteristics. But there are a few things you do need to know about Photoshop layers to get started.
When you open an image in Photoshop for the first time, the image automatically becomes a special kind of layer within a Photoshop document. This special kind of layer is called a Background layer, and is denoted as such in the Layers panel (if you don’t see the Layers panel, press F7).
Background layers can easily be converted to normal layers by choosing Layer ![]() New
New ![]() Layer From Background.
Layer From Background.
One important property of Photoshop layers is the layer Opacity setting, which controls the translucency of the layer. For example, with 100% Opacity there is no layer translucency, at 0% Opacity the layer is completely transparent, and at 50% Opacity the layer is 50% translucent.
As I’ve noted, Photoshop documents are made up of a layer stack. When you bring a photo into Photoshop, it becomes the Background (bottom) layer of the stack. The screen shots shown to the right give an idea of how a stack of layers works. You’ll also see part of the stack of layers shown in the Photoshop Layers panel that I used to create the image of the Jaguar wheels shown on pages 36–37.
Meditation
If the top layer of a layer stack is translucent because it has less than 100% opacity, what do you see in the image window?
Below is the Layers panel showing four layers: a “Background” layer at the bottom of the layer stack, an “Add blue” layer, an “Add red” layer, and on the top, a “Blur” layer. A thumbnail image gives a quick look at each layer.
The “Background” layer is highlighted in blue because it is selected. When a layer is selected, it is the active layer—meaning that any editing, such as painting, will happen on that layer.
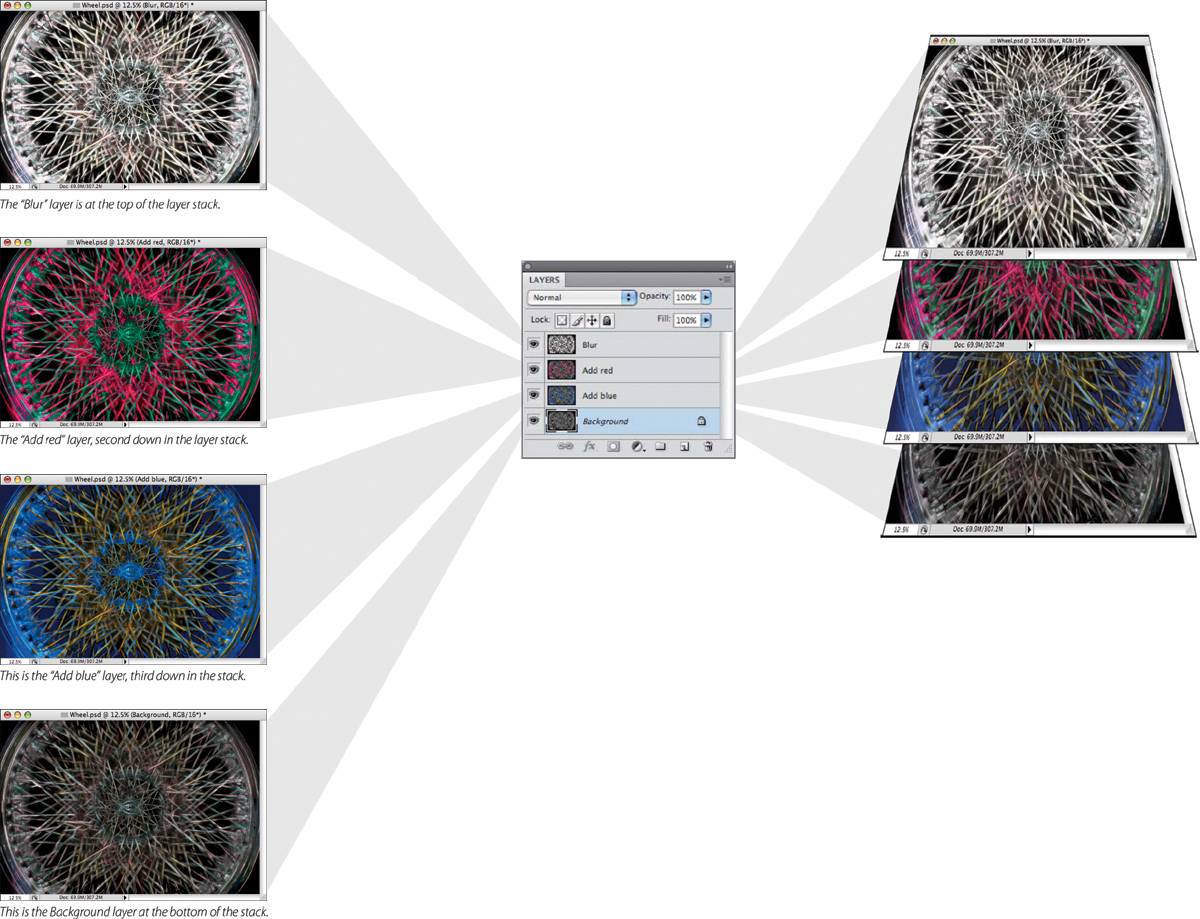
As a general practice, it is always good to name layers meaningfully. That way, if you come back to work on an image at a later date, you have some idea of what each layer does.
At the top left of the Layers panel is the Blending Mode drop-down list. By default this is set to Normal. (For more about the power of blending modes, turn to pages 71–95.)
To the right of the Blending Mode drop-down list is the Opacity slider. The default setting is 100%. You can use this to adjust how transparent or opaque a layer is. Select a layer and drag the slider to the left to reduce the layer’s opacity.
The small eyes to the left of each layer show that all the layers are visible. If you click on an eye, that layer will become hidden.
It’s easy to confuse hiding a layer using the eye with layer transparency set using the Opacity slider. These two are very different. When you use the eye to hide a layer, it is no longer available for editing and becomes inactive (even though it is still there in the layer stack). You can’t paint on it, or copy or select it, and it isn’t included in the rendered image. When you make a layer transparent using the Opacity slider, the layer is still active. You can paint on it and manipulate it in any way that you like—and, provided it has at least some opacity, it will be included in the image as it is displayed.
Meditation
Yoda says, “Do or do not. There is no try.” Plunge in. Don’t hesitate to play around with the settings in the Layers panel. One only learns by doing, and experimentation is the best teacher.
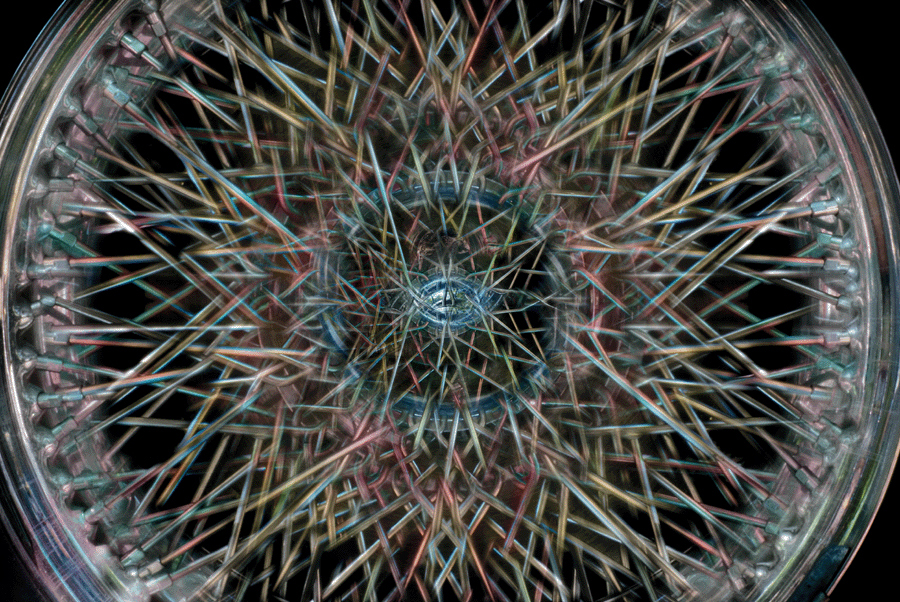
I shot this image of the wheel of an antique Jaguar in the driveway of a classic car collector. Looking at the photo on my computer, I decided that the spokes in the complex wheel needed more color as well as a motion blur. I used many different layers to add the color and blur effects; some of the layers are shown in the Layers panel on pages 34–35.
85mm, 4/5 of a second at f/45 and ISO 100, tripod mounted.
We put thirty spokes together and call it a wheel; But it is on the space where there is nothing that the usefulness of the wheel depends.
—Tao Te Ching, Arthur Waley translation
You may think that the purpose of a stack of layers is to control which parts of different layers are used in a final image; for example, I created a composite image including the sun as part of a landscape, where previously there was no sun. Certainly, layers are used in this way as part of compositing technique—but as the single core feature of Photoshop, layers are also used in many other ways. Compositing to create “impossible” imagery is a major subject by itself and will not be covered in The Way of the Digital Photographer, as there are other books on this topic (see the Notes section on page 188 for a suggestion).
The best way to think of a layer stack is from the top down. If the layer on the top of a stack has 100% opacity overall (and is blended normally), then the image is entirely made up of the top layer on the stack. In this situation, you could delete all the layers underneath the top layer on the stack without changing the appearance of the image.
Each layer can be associated with a layer mask. Another term for a layer mask is an alpha channel—if you really want to impress your non-Photoshop-savvy friends, just start dropping “alpha channel” into your casual conversation!
The purpose of a layer mask is to control how much of the associated layer is visible. Layer masks are monochromatic in nature. They only care about whites and blacks, and values on the grayscale.
A white layer mask means the associated layer is entirely visible, and a black layer mask means the associated layer is entirely hidden. I like to use the mnemonic “White reveals, and black conceals” in connection with the layer that is connected to the mask.
A layer mask that is 50% gray is 50% revealed.
The blacks, whites, and grayscale pattern you apply—by digital painting or some other mechanism—to a layer mask controls which areas of the associated layer are visible, which are partially visible, and which are invisible.
I’ll be walking you through the mechanisms of how I work with layers, layer masks, and layer stacks in a few pages. Don’t worry! This part of the journey is really quite straightforward. But in the meantime, I think a simple layer example would be helpful to lock in the crucial concepts that I just explained.
If you’ve ever photographed San Francisco’s magnificent Golden Gate Bridge, you’ll know that some of the best vantage points are from the old fortifications along the Marin Headlands, across the Golden Gate from the city of San Francisco. These old forts are great for exploration, and also provide plenty of foreground contrast to the Golden Gate Bridge in the background.
Photographing as the sun goes down, or even well after sunset, this contrast can be problematic. Usually, the detail in the foreground is lost in deep shadow, while the Golden Gate Bridge in the background picks up the last light of twilight, and is illuminated in any case.
For example, when I was scrambling around Battery Spencer with camera and tripod I saw a composition that I thought would work, with the foreground detail juxtaposed with the bridge in the background. But when I exposed for the fortifications (right) the bridge was overexposed. A second exposure for the bridge made the foreground details completely black and underexposed (far right).
The answer was to combine the two exposures using layers, a simple layer mask, and a gradient (turn to page 59 for information on how to work with gradients). This created the dramatic image shown on pages 40–41 that shows detail in the foreground as well as the Golden Gate Bridge against a dramatic night sky.

First, I put both images in a layer stack in Photoshop with the darker bridge image on the bottom and the fortification image above (right). (Turn to pages 33–38 for a general discussion of layers and layer stacks, and turn to pages 44–45 for instructions about how to combine two different photos in a singe document with two stacked layers.)
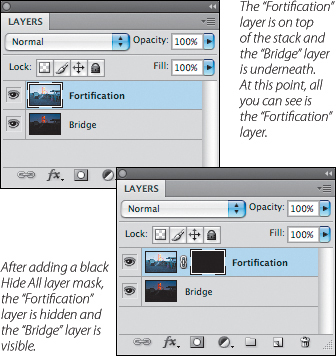
Next, I added a black Hide All layer mask to the “Fortification” layer (center right). (For more about working with layer masks, turn to pages 43–47.)
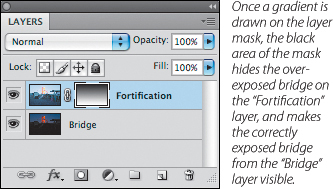
Finally, I used the Gradient Tool to drag a black to white gradient from top to bottom on the layer mask (pages 59–63). This hid the overexposed bridge on the “Fortifications” layer and revealed the correctly exposed bridge from the “Bridge” layer (bottom right). This created the correctly exposed composite image shown on pages 40–41.
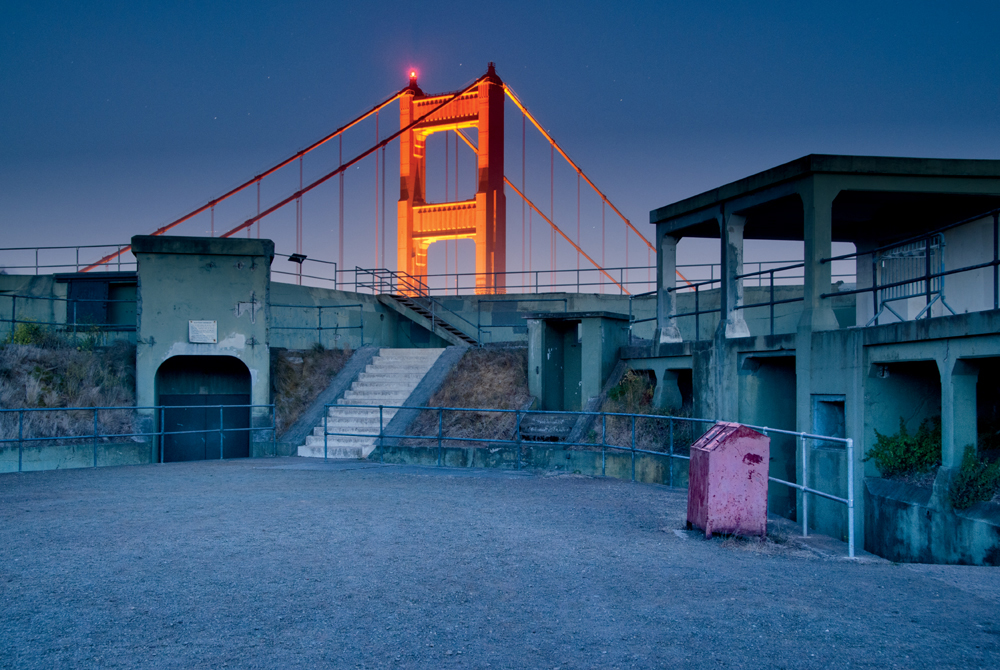
On a dark but clear night, I scrambled around Battery Spencer, an old fortification finished in the late 1800s and abandoned after the end of World War II. The fort is located in the Marin Headlands right next to the Golden Gate Bridge and is across the bay from San Francisco.
As I walked around the fort, climbing stairs and exploring, I kept looking at the Golden Gate Bridge. There are millions of photographs of the bridge, but I was on the lookout for a different angle that would show a different point of view.
Settling in below the area where the second gun emplacement used to be, I pulled out my tripod and set up my camera. Looking around, I could see the bright red-orange tower of the bridge above me, but the area of the fort right in front of me was pitch black. This was a bit of an exposure conundrum.
The only way I was going to be able to create an image that showed both the fort in the foreground and the tower in the background was to shoot two photos—one exposed properly for the bridge and one exposed for the fort. Later, when I returned to my studio, I knew I could combine the two images in Photoshop to create a composite image showing both the foreground and background.
Knowing that I could combine two exposures (as explained on page 39) using layers and a layer mask allowed me to conceptualize an image with my “boots on the ground” that would never have occurred to me without immersion in the way of the digital photographer.
31mm, two exposures, one exposure at 15 seconds and one at 60 seconds, both at f/8 and ISO 200, tripod mounted; exposures combined in Photoshop.