Using the Brush Tool
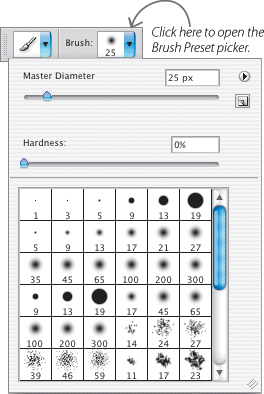
The Brush Preset picker lets you quickly get going with brushes in Photoshop. You can use it to set the width of the brush, how hard the brush is (the higher the percentage, the harder the brush), and the brush tip shape.
An artist is a dreamer consenting to dream of the actual world.
—George Santayana
To recapitulate, layer masks determine how much of a layer shows in a final version of an image. A black layer mask conceals the layer it is associated with—and white or gray applied to that layer mask wholly or partially reveals the layer. Conversely, a white layer reveals the associated layer, with black or gray selectively hiding the layer—and revealing the layers beneath. (For more about layer masks, turn to pages 43–47.)
So how do you create the nuance in an otherwise solid layer mask? What tools do you use to reveal or hide parts of a layer?
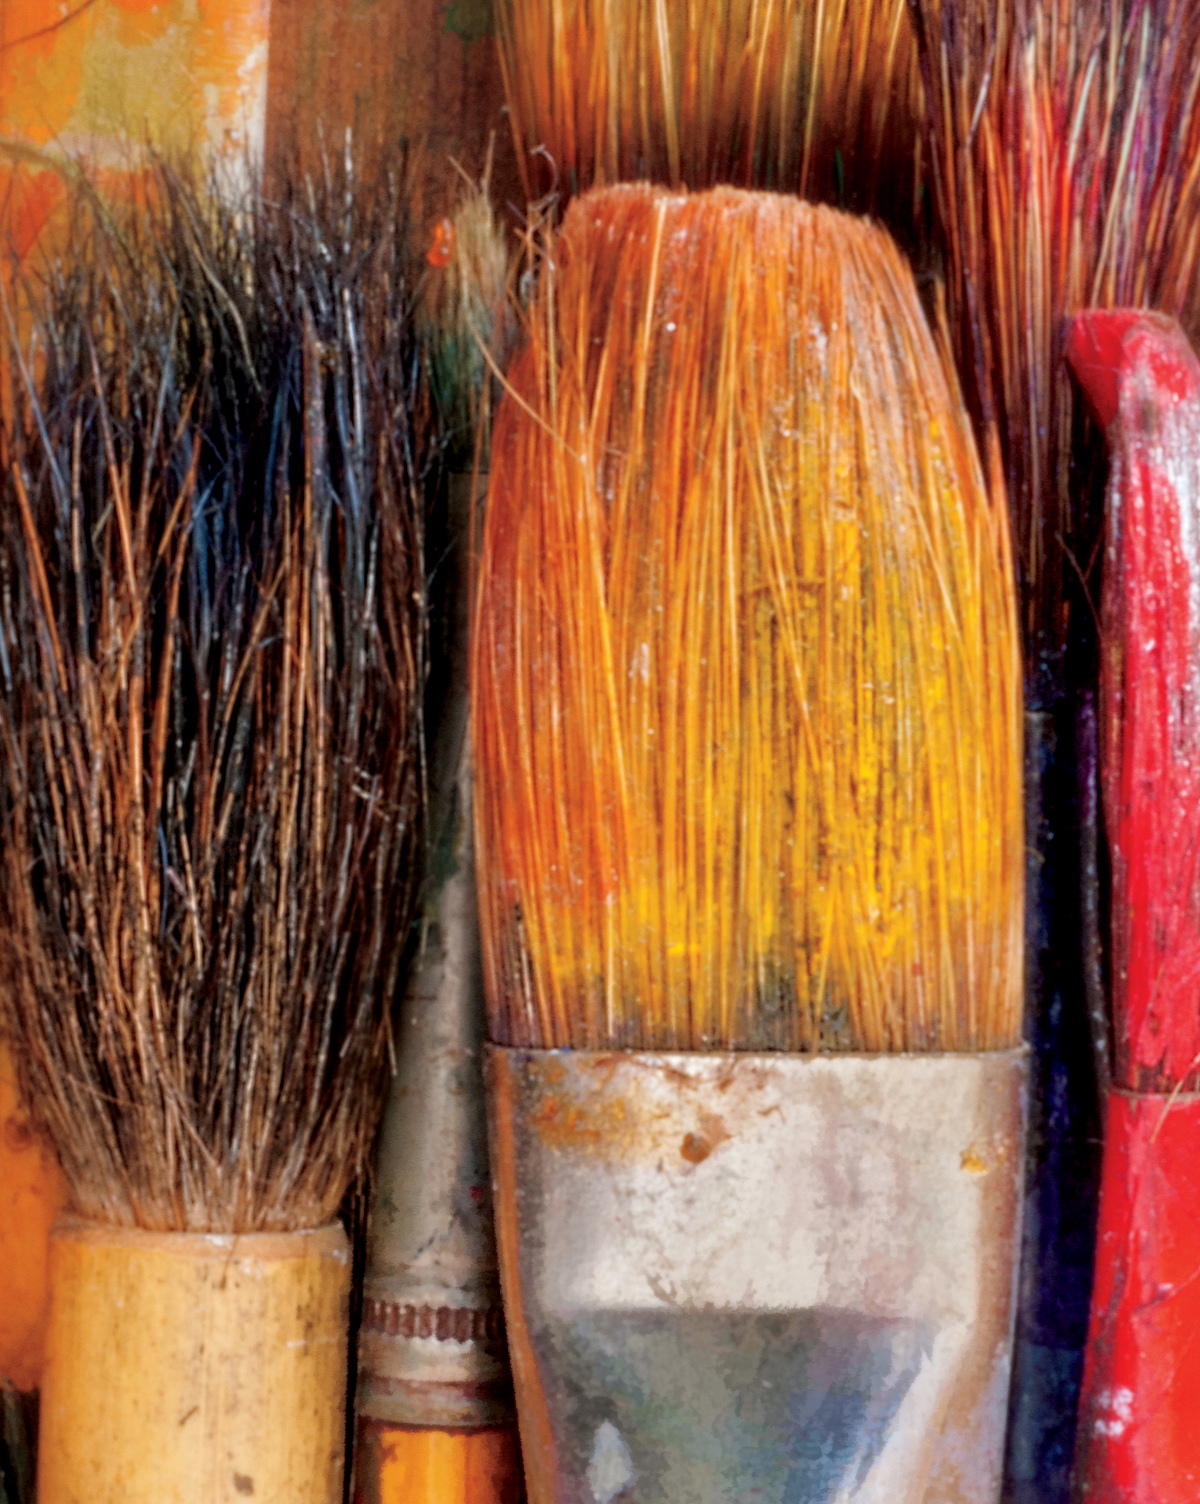
Far Left: In this portrait of my painting brushes, I selectively sharpened the brushes. Also, I slightly blurred the background to make the brushes seem even sharper. With what you know so far about layers and layer masks, how do you think I did this?
The first tool I reach for when I create my layer masks is the Brush Tool. It is shown to the left in the Photoshop Tools panel, circled in red.

Left: The Brush Tool is one of the most important tools when using layer masks.
When you select the Brush Tool in the Tool panel, the Options bar at the top of the Photoshop screen changes, showing Brush Tool options. One of these is the Brush Preset picker, which displays the active brush tip (above left).
To open the Brush Preset picker, click the blue arrow. Using the picker, you can select several options. These include:
![]() Brush tip—There is a vast selection of possible brush tips and shapes that determine what is drawn by the brush.
Brush tip—There is a vast selection of possible brush tips and shapes that determine what is drawn by the brush.
![]() Diameter—The width of the brush tip.
Diameter—The width of the brush tip.
![]() Hardness—The harder the brush, the more abrupt the edge transition is when you paint. I usually paint on layer masks with a very soft brush, from 0% to 10% hardness.
Hardness—The harder the brush, the more abrupt the edge transition is when you paint. I usually paint on layer masks with a very soft brush, from 0% to 10% hardness.

The Options bar (shown above) also sports several important Brush Tool settings:
![]() Blending Modes—Generally, I leave the Brush blending mode at Normal, and change blending modes at the layer level using the Layers panel. (Turn to pages 71–95 for an explanation of this very important feature.)
Blending Modes—Generally, I leave the Brush blending mode at Normal, and change blending modes at the layer level using the Layers panel. (Turn to pages 71–95 for an explanation of this very important feature.)
![]() Opacity—Controls the translucency of the brush (see page 35 for a further discussion about opacity).
Opacity—Controls the translucency of the brush (see page 35 for a further discussion about opacity).
![]() Flow—This sets how fast the virtual “paint” flows out of the Brush Tool. With layer masks, I like to leave Flow at 50% unless I am creating a solid, completely opaque effect.
Flow—This sets how fast the virtual “paint” flows out of the Brush Tool. With layer masks, I like to leave Flow at 50% unless I am creating a solid, completely opaque effect.
Several different brush sets come with Photoshop. The one loaded by default into the Brush Preset picker is a basic set containing some round and square brushes, some star tips, and a few dry brushes.
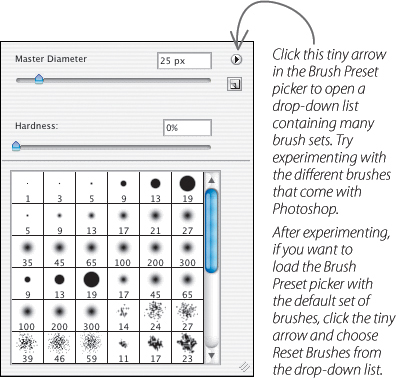
You can load a different set of brushes into the picker by clicking the tiny arrow at the upper right of the picker, and selecting a brush set from the drop-down list (below).
Many of the brush tips in these different sets try to mimic real-world brush strokes that you would see in oil, acrylic, or watercolor painting, as well as textures that you would create if you were working with chalk, charcoal, or pastels.
As a small sample of what you can do with the Brush tool, I created some rectangular color shapes. I then picked several brush tips, each using a different color, to create the brush sampler shown below.
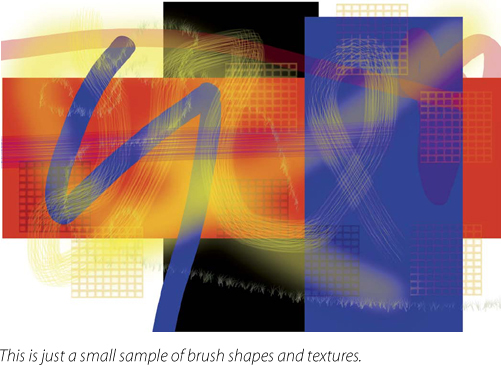
Brushes are fun, easy to use, and powerful. Once you start experimenting with them, you’ll find uses that go beyond layer masks—but painting on a layer mask is one of the most powerful possibilities in Photoshop for the digital photographer.
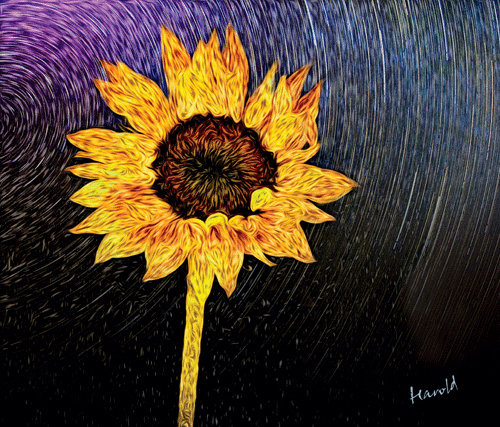
To create this homage to the great painter Vincent van Gogh, which I call Go van Gogh, I combined an image of a sunflower with an image of star trails at night. Starting with this composite image, I duplicated the Background layer. On the duplicate layer, I applied the Adobe Labs Pixel Bender OilPaint filter (see page 149) to create simulated brush strokes à la Vincent. Next, I used a black Hide All layer mask to hide the OilPaint effects, and then selectively painted in the brush strokes I wanted at a moderate opacity. To add that touch of simulated authenticity, I added a digital signature—in this case, “Harold” rather than “Vincent.”
Flower: 65mm, 4/5 of a second at f/32 and ISO 100, tripod mounted; Star trails: 10.5mm fisheye lens, 2 hours at f/2.8 and ISO 400, tripod mounted; images combined in Photoshop.
Selective sharpening
There are many reasons to sharpen an image, although sharpening probably won’t save an image that is unintentionally out of focus. I like to differentiate between output sharpening and aesthetic sharpening.
Output sharpening is performed at the end of a workflow to meet the demands of a specific printing need. In contrast, aesthetic sharpening is intended simply to create a visual effect.
It turns out that folks viewing a photo look at sharp areas sooner and with more concentration than unsharp areas. So provided you don’t overdo it, you can use selective sharpening to emphasize particular areas of your image, often without your viewers consciously realizing you have employed this tactic.
One of the most compelling things about the selective sharpening technique is that it operates subliminally—viewers usually don’t even know they are responding to your technique.
For example, to create the image of paint brushes shown on page 57, I wanted to make the bristles and ferules on the brushes seem sharp while leaving the rest of the image was somewhat soft.
Here’s how you can easily incorporate selective sharpening in your quiver of post-processing tools and techniques.
1. To get started, open the image you want to sharpen in Photoshop. For this example, the paintbrush photo on page 57 will be used.

As you can see in the Layers panel to the right, there is one layer, the Background layer.
2. Select Image ![]() Mode
Mode ![]() LAB Color to convert the image from the RGB color space to the LAB color space. (For a discussion of color spaces, LAB color, and some of LAB’s exciting uses, turn to pages 155–163.)
LAB Color to convert the image from the RGB color space to the LAB color space. (For a discussion of color spaces, LAB color, and some of LAB’s exciting uses, turn to pages 155–163.)
If you take a look at the Channels panel, you will see that the LAB color space has three channels: Lightness (L), A, and B. (If the Channels panel is not available on your Photoshop desktop, choose Window ![]() Channels to open the panel.)
Channels to open the panel.)
The Lightness channel contains all the black and white color information for the photo from the darkest darks to the lightest lights. This is the channel that you will use to sharpen the image.

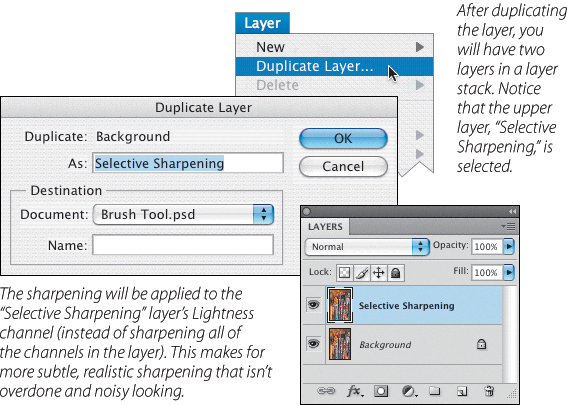
3. Duplicate the “Background” layer by selecting Layer ![]() Duplicate. A Duplicate Layer dialog box will open. Name the new layer something memorable. For this example, the duplicate layer is named “Selective Sharpening.” You should now have two layers in the Layers panel, “Background” and “Selective Sharpening.”
Duplicate. A Duplicate Layer dialog box will open. Name the new layer something memorable. For this example, the duplicate layer is named “Selective Sharpening.” You should now have two layers in the Layers panel, “Background” and “Selective Sharpening.”
4. Make sure the “Selective Sharpening” layer is selected in the Layers panel. Then, click the Lightness channel in the Channels panel to select it (it will be highlighted in blue).
Notice that when you select the Lightness channel, the eyeballs next to the other channels disappear, and the photo in the image window appears gray. This is because the other channels that contain the color information, a and b, are inactive—the color is still there, though, waiting for later!

5. Select Filter ![]() Sharpen
Sharpen ![]() Unsharp Mask.
Unsharp Mask.
The Unsharp Mask filter works by increasing the contrast between pixels that are next to one another. This is a simulation of an old photographic technique that was used in the darkroom.

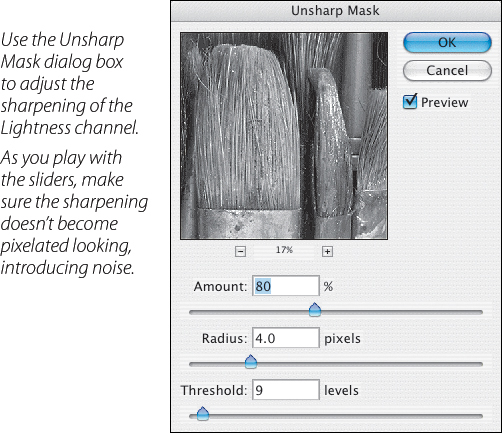
6. After selecting the Unsharp Mask menu item, an Unsharp Mask dialog box opens. There are three settings in this box: Amount, Radius, and Threshold.
When sharpening with the Unsharp Mask filter, start by setting the Threshold to 9 levels and the Radius to 4.0 pixels. Next, use the Amount slider to adjust the sharpening. Usually the Amount should be set between 50% and 100%. For this example, 80% works well.
Once you have the sharpness of the Lightness channel adjusted to your satisfaction, click OK to close the dialog box and apply the sharpening.
7. In the Channels panel, click the Lab channel to reactivate all the channels. The photo will now be in color in the image window.
8. In the Layers panel with the “Selective Sharpening” layer selected, add a black Hide All layer mask to the layer (step 2 on page 45).
9. Select the Brush Tool from the Tools panel ![]() and using the Options Bar, set both Opacity and Flow to 100% (page 52), and then press X to change the Foreground color to white.
and using the Options Bar, set both Opacity and Flow to 100% (page 52), and then press X to change the Foreground color to white.
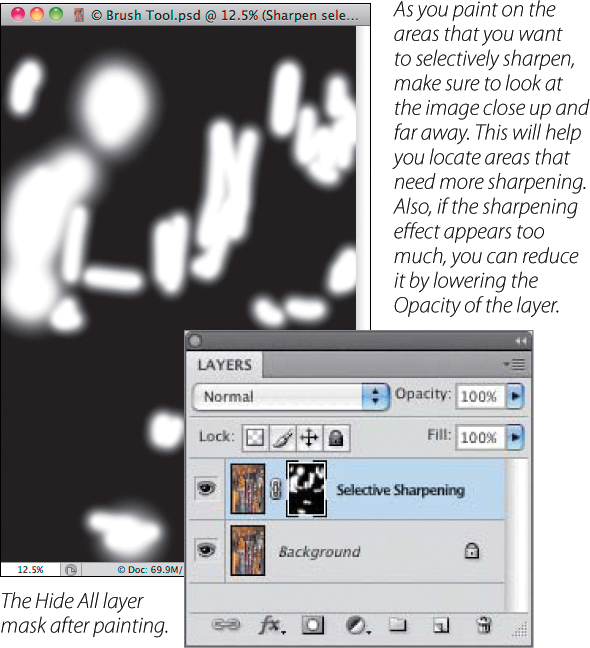
10. With the layer mask selected in the Layers panel, paint on the areas you want to selectively sharpen in the image window.
If you like the sharpening, but it seems a bit too strong, you can reduce it by lowering the Opacity setting of the “Selective Sharpening” layer (page 35).
11. When you are pleased with the sharpening effect, flatten the layers by selecting Layer ![]() Flatten Image. Then return the photo to the RGB color space by selecting Image
Flatten Image. Then return the photo to the RGB color space by selecting Image ![]() Mode
Mode ![]() RGB Color.
RGB Color.

To create this image of my well-used paintbrushes, I wanted to make the bristles and ferules seem sharp while the rest of the image was somewhat soft. To achieve this effect, I duplicated the original image’s Background layer and sharpened the duplicate layer. I then added a black Hide All layer mask to the duplicate layer, and used the Brush Tool to selectively paint in the areas that I wanted to seem extra sharp.
85mm macro lens, 8 seconds at an effective aperture of f/64, ISO 200, tripod mounted.