
Applying Root Motion to your character is a very practical and accurate way of animating it. However, every now and then you might need to manually control one or more aspects of the character's movement. Perhaps you only have an in-place animation to work with, or maybe you want the character's movement to be affected by other variables. In such cases, you will need to override Root Motion via script.
In this recipe, we will control the character's movement via script, making it rotate and jump.
For this recipe, we have prepared a project named MixamoProject, containing several assets such as levels, animated characters, and props. You can find it inside the 0423_05_codes folder.
To apply Root Motion via script, perform the following steps:
- Open the project, and then open the level named
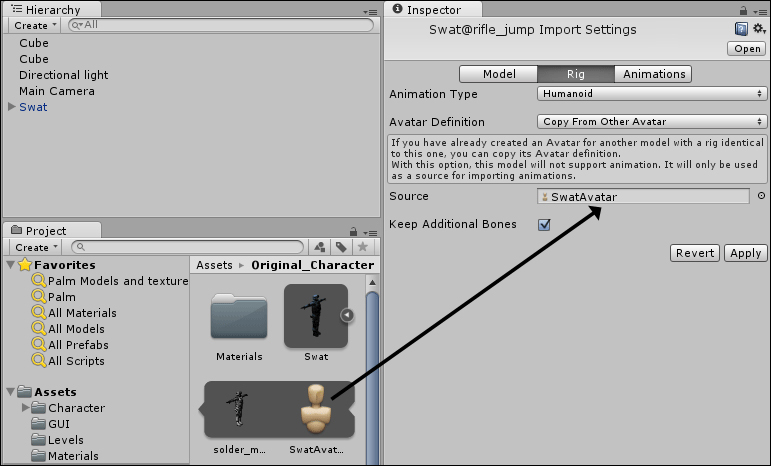
05_04(inside theLevelsfolder). Note that it includes a S.W.A.T. character, featuring the Animator component using the swatController03 Controller. - We need to configure our animation clips. From the Original_Character folder, select the Swat@rifle_jump file.
- Click on the Rig tab. Change Animation Type to Humanoid and Avatar Definition to Copy From Other Avatar. Then, select swatAvatar for Source by choosing it from the list or dragging it from the Project view into the slot. Confirm the changes by clicking on Apply.
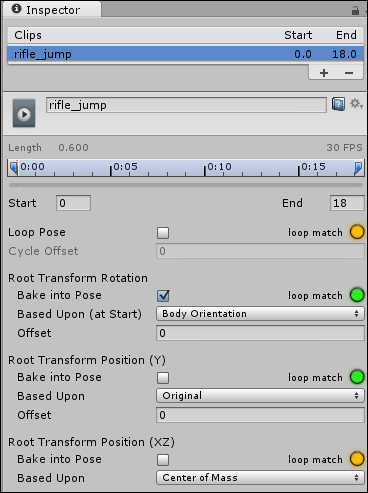
- Now activate the Animations section. Select the clip rifle_jump from the Clips list and leave the Loop Pose checkbox deselected. Under Root Transform Rotation, check Bake into Pose and set Body Orientation for Baked Upon (at Start); Under Root Transform Position (Y), leave Bake into Pose deselected; Under Root Transform Position (XZ), leave Bake into Pose deselected. Finally, click on the Clamp Range button to adjust the timeline. Click on Apply to confirm the changes.
- Now, from the Original_Character folder, select the Swat@turn_left file.
- Repeat step 3 of this recipe, applying SwatAvatar to Swat@turn_left as the Source for the Humanoid Rig.
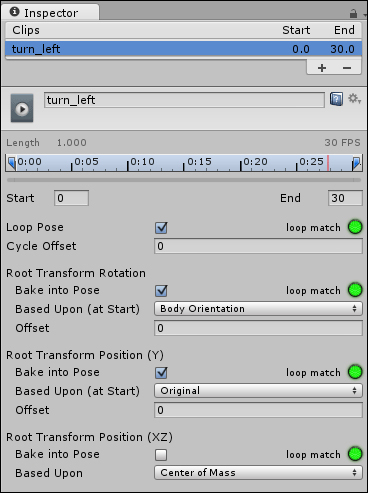
- Now click on the Animations tab. Select the clip turn_left from the Clips list and select the Loop Pose checkbox. Under Root Transform Rotation, check Bake into Pose and set Body Orientation for Baked Upon (at Start); Under Root Transform Position (Y), check Bake into Pose and set Original for Baked Upon (at Start); Under Root Transform Position (XZ), leave Bake into Pose deselected. Finally, click on the Clamp Range button to adjust the timeline. Click on Apply to confirm the changes.
- Repeat steps 6 and 7 of this recipe for the
Swat@turning_right_45_degreesfile. - From the Hierarchy view, select the Swat model. Then, from the Animator component in the Inspector view, open the swatController04 controller.
- Using the Parameters widget, create the Boolean parameters
Jump,TurnLeft, andTurnRight. Then, in the gridded area, create the states Jump, TurnLeft, and TurnRight.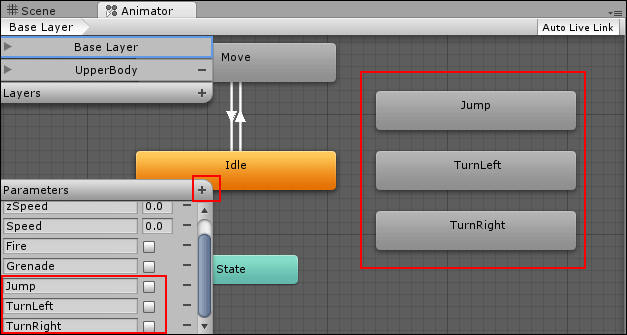
- By right-clicking on each state and selecting the Make Transition option, create transitions between Jump and Idle, Jump and Move, Turn Left and Idle, and Turn Right and Idle. You should add return transitions as well.
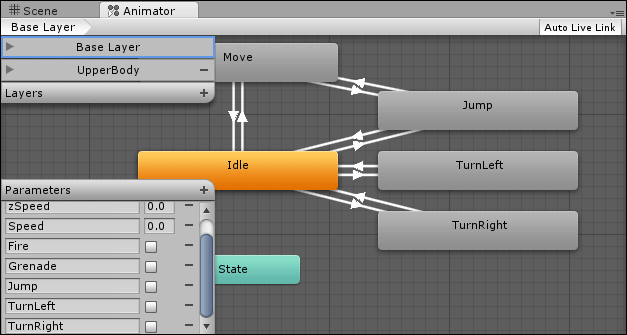
- Select the arrow that goes from Idle to Jump. It should turn blue in color. Then, in the Inspector view, in the Conditions box, select the options Jump and true. Now select the arrow that goes back from Jump to Idle, and select Jump and false in its Conditions box.

- Repeat the previous step with the arrow that goes from Move to Jump and vice-versa.
- Again, apply the instructions from step 12 onwards to the arrows that go from TurnLeft and TurnRight to Idle and vice-versa. In the Conditions box, use TurnLeft and TurnRight (instead of Jump) according to the selected state.
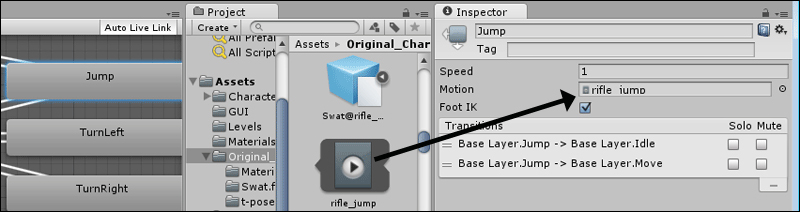
- Select the Jump state and, in the Inspector view, apply the animated clip from Swat:rifle_jump to its Motion field.
- As described in the previous step, apply the animation clips from Swat:turn_left and Swat:turning_right_45_degrees to the Motion clips of TurnLeft and TurnRight respectively.
- From the Hierarchy view, select the Swat model. Then, in the Inspector view, open the script from the Basic Controller 04 component.
- Immediately after the line
public float transitionTime = 0.25f;, add the following code:public float jumpSpeed = 4.0F; public float gravity = 20.0F; private float jumpPos = 0.0f; private float verticalSpeed = 0; private float xVelocity = 0.0f; private float zVelocity = 0.0f;
- Immediately after the line
if(controller.isGrounded){, add the following code:if (Input.GetKey(KeyCode.Space)) { animator.SetBool("Jump", true); verticalSpeed = jumpSpeed; }else{ animator.SetBool("Jump", false); } if(Input.GetKey(KeyCode.Q)){ animator.SetBool("TurnLeft", true); transform.Rotate(Vector3.up * (Time.deltaTime * -45.0f), Space.World); } else { animator.SetBool("TurnLeft", false); } if(Input.GetKey(KeyCode.E)){ animator.SetBool("TurnRight", true); transform.Rotate(Vector3.up * (Time.deltaTime * 45.0f), Space.World); } else { animator.SetBool("TurnRight", false); } - Finally, add the following lines immediately before the final closing bracket of the code:
void OnAnimatorMove(){ Vector3 deltaPosition = animator.deltaPosition; if(controller.isGrounded){ xVelocity = animator.GetFloat("Speed") * controller.velocity.x * 0.25f; zVelocity = animator.GetFloat("Speed") * controller.velocity.z * 0.25f; } verticalSpeed += Physics.gravity.y * Time.deltaTime; if(verticalSpeed <= 0){ animator.SetBool("Jump", false); } deltaPosition.y = verticalSpeed * Time.deltaTime; if(!controller.isGrounded){ deltaPosition.x = xVelocity * Time.deltaTime; deltaPosition.z = zVelocity * Time.deltaTime; } controller.Move(deltaPosition); if ((controller.collisionFlags & CollisionFlags.Below) != 0){ verticalSpeed = 0; } transform.rotation = animator.rootRotation; } - Save your script and play the scene. You should be able to jump and turn around by using the Space bar, Q, and E keys respectively. Observe how the character can also turn around while moving.
We took two different paths to modify our character's transform settings. First, we used the Rotate command, as in transform.Rotate(Vector3.up * (Time.deltaTime * -45.0f), Space.World), to make the character actually turn around when the Q and E keys are held down. This command was used in conjunction with animator.SetBool("TurnLeft", true), which triggered the correct animation clip.
Also, we used Unity's OnAnimatorMove() function for overriding the animation's original Root Motion. Observe that, once this function is added to the script, the field Apply Root Motion on the Animator component changes from a checked box to Handled by Script. In our case, we used it to learn about the character's speed and direction while he is grounded, in order to apply it once he jumps. We also apply gravity when calculating his position, in case his feet are not touching any surface.