
When you're playing a third person character, you might want your character to aim his weapon at a target that is not directly in front of him, without making him change his direction. In those cases, you will need to apply what is known as procedural animation; it does not rely on pre-made animation clips, but rather on the processing of other data such as player input, to animate the character. In this recipe, we will use this technique to rotate the character's torso.
For this recipe, we have prepared a project named MixamoProject, containing several assets such as levels, animated characters, and props. You can find it inside the 0423_05_codes folder.
- Open the MixamoProject project, and then open the level named 05_08 (under the Levels folder).
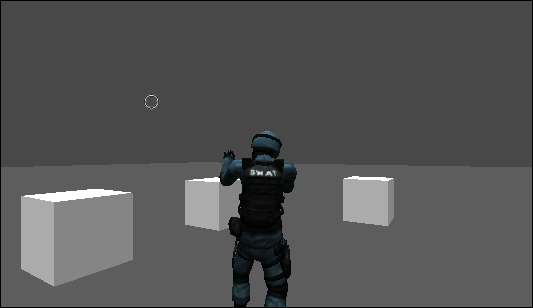
- You should see Mixamo's animated S.W.A.T. soldier. We have included three different cameras for you to experiment with (they are children of the Character game object).
- In the Project view, create a new C# script named
MouseAim.cs. - Open the script and add the following code:
using UnityEngine; using System.Collections; public class MouseAim : MonoBehaviour { public Transform spine; public Transform armedHand; public bool lockY = false; public float compensationYAngle = 20.0f; public float minAngle = 308.0f; public float maxAngle = 31.0f; public Texture2D targetAim; private Vector2 aimLoc; private bool onTarget = false; public void LateUpdate(){ Vector3 point = Camera.main.ScreenToWorldPoint(new Vector3(Input.mousePosition.x, Input.mousePosition.y, Camera.main.farClipPlane)); if(lockY) point.y = spine.position.y; Vector3 relativePoint = transform.InverseTransformPoint(point.x, point.y, point.z); if(relativePoint.z < 0){ Vector3 inverseZ = transform.InverseTransformPoint(relativePoint.x,relativePoint.y,-relativePoint.z); point = inverseZ; } spine.LookAt(point, Vector3.up); Vector3 comp = spine.localEulerAngles; comp.y = spine.localEulerAngles.y + compensationYAngle; spine.localEulerAngles = comp; if(spine.localEulerAngles.y > maxAngle && spine.localEulerAngles.y < minAngle){ if(Mathf.Abs((spine.localEulerAngles.y - minAngle)) < Mathf.Abs((spine.localEulerAngles.y - maxAngle))){ Vector3 min = spine.localEulerAngles; min.y = minAngle; spine.localEulerAngles = min; } else { Vector3 max = spine.localEulerAngles; max.y = maxAngle; spine.localEulerAngles = max; } } RaycastHit hit; if (Physics.Raycast (armedHand.position, point, out hit)) { onTarget = true; aimLoc = Camera.main.WorldToViewportPoint(hit.point); } else { onTarget = false; aimLoc = Camera.main.WorldToViewportPoint(point); } //Debug.DrawRay (armedHand.position, point, Color.red); } void OnGUI(){ int sw = Screen.width; int sh = Screen.height; GUI.DrawTexture(new Rect(aimLoc.x * sw - 8, sh-(aimLoc.y * sh) -8, 16, 16), targetAim, ScaleMode.StretchToFill, true, 10.0F); } } - Save and close the script.
- Attach the MouseAim.cs script by dragging it from the Project view into the Swat game object.
- Select the character, and in the Mouse Aim component (located in the Inspector view), fill in or assign the variables as follows: Spine: swat:Spine; Armed Hand: swat:RightHand; Lock Y: leave it deselected (unless you're using Camera_top); Compensation Y Angle:
20; Min Angle:308; Max Angle:31. Also, drag the crossAim texture from the GUI folder in the Project view, into the Target Aim field.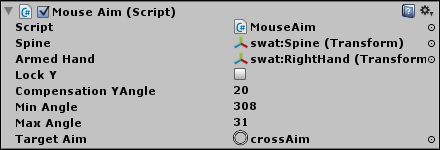
- Play the scene. You should now be able to rotate the character's torso by moving the mouse cursor around the screen. Even better, a GUI texture will be displayed wherever he is aiming at.
Our script starts by converting our bi-dimensional mouse cursor screen's coordinates to three-dimensional world space coordinates (stored in the point variable). Then, it rotates the character's torso towards the point's location using the LookAt() command. Additionally, it makes sure the spine does not extrapolate Min Angle and Max Angle, which could cause distortions to the character model.
In the process, we convert the target point from its absolute world coordinates to its position in relation to the character, and vice-versa. This is done so that we can detect whether the target point is located behind the character, and if it is, manipulate the point so that the character keeps aiming forwards.
Also, we have included a Compensation YAngle variable that makes it possible for us to fine-tune the character's alignment with the mouse cursor.
Please note that all the commands are inside the LateUpdate() method. This is done to make sure that our transform manipulations override the character's animation clips.
In case you want to implement shooting, we have provided you with a place to start by casting a ray from the character's armed hand to the target point. To see it as you test the scene, uncomment the line Debug.DrawRay (armedHand.position, point, Color.red);.
The ray cast detects collisions with surrounding objects for which the targetAim texture map, usually drawn over the mouse cursor location, should snap.