
Sound volume adjustment can be a very important feature, especially if your game is a standalone. After all, it can be very frustrating needing to access the operational system volume control. In this recipe, we will create a sound volume control GUI that can be switched from a single volume bar to independent music and effects controls.
For this recipe, you'll need the soundFX.wav and soundtrack.mp3 audio files, available in the 0423_06_02 folder.
To add volume control sliders to your scene, follow these steps:
- Import the required
soundtrack.mp3audio file. - In the Project view, select the
soundtrack.mp3file. Make sure the 3D Sound option of the Audio Importer (in the Inspector view) is unselected. If not, unselect it. - Let's now import the
soundFX.wavaudio clip. This time, we will make sure to leave the 3D Sound option checked. - Make sure the First Person Controller prefab is available in your project. You can do that by importing it from Assets | Import Package… | Character Controller.
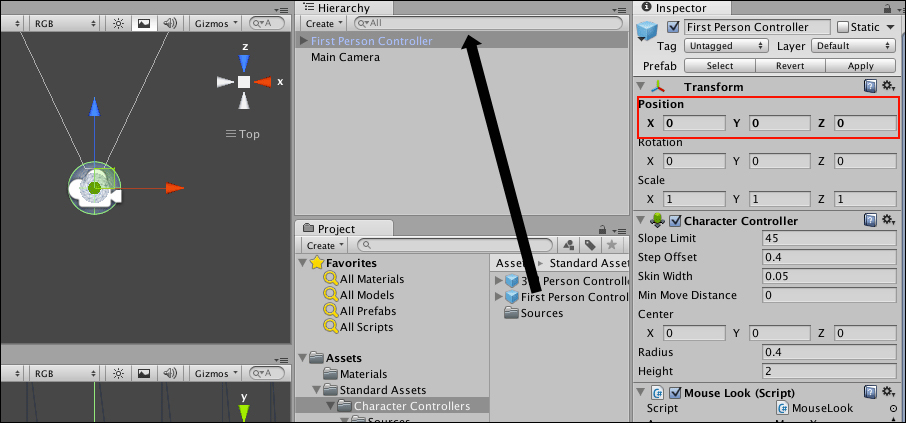
- Add the First Person Controller prefab to your scene by dragging it from the Project view to the Hierarchy view. Then, in the Inspector view, reset its position to X: 0, Y:0, Z:0, as shown in the following screenshot:
- Delete the original Main Camera from the scene.
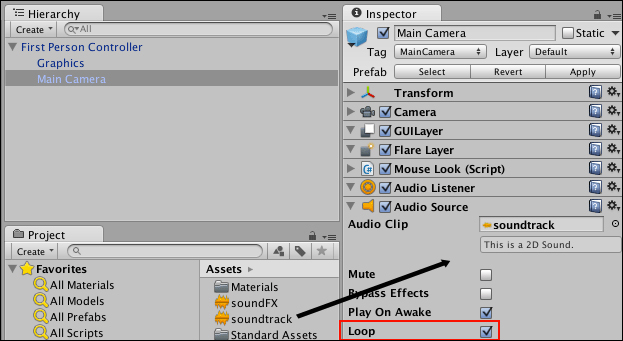
- Expand the First Person Controller object in the Hierarchy view and select the Main Camera child.
- Drag the soundtrack audio clip file from the Project view to the bottom of the Main Camera Inspector view, adding it as an Audio Source component. Check the Loop option:
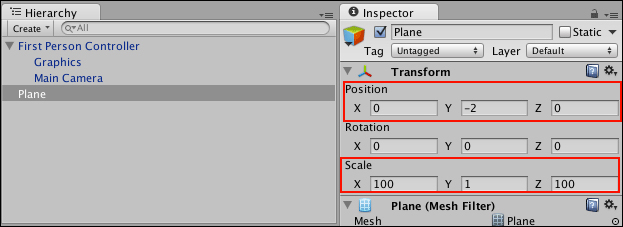
- Using the Create drop-down of the Hierarchy view, add a Plane to your scene.
- In the Transform component of the Inspector view, change the Plane's Scale X and Z values to 100. Also, change its position to X:0, Y: -2, Z:0. The Plane object will be the ground for our scene:
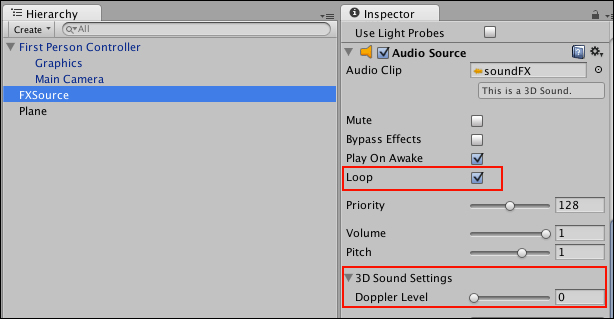
- Using the Create drop-down of the Hierarchy view, add a Cube to your scene and rename it to
FXSource. Set its position to X:0, Y:0, Z:6. - Drag the soundFX clip from the Project view to bottom of the FXSource Inspector view, adding it as an Audio Source component.
- In the Audio Source component of the FXSource cube, check the Loop option and set Doppler Level to 0:
- Add a Directional Light to the scene.
- In the Project view, create a new C# script and rename it
VolumeControl. - Open the script in your editor and replace everything with the following code:
using UnityEngine; [RequireComponent(typeof(AudioSource))] public class VolumeControl : MonoBehaviour{ bool separateSoundtrack = true; float minVolume = 0.0f; float maxVolume = 1.0f; float initialVolume = 1.0f; float soundtrackVolume = 1.0f; bool displaySliders = false; void Start(){ if (separateSoundtrack){ audio.ignoreListenerVolume = true; } } void Update(){ AudioListener.volume = initialVolume; if (separateSoundtrack){ audio.volume = soundtrackVolume; }else{ audio.volume = initialVolume; } } void OnGUI(){ Event e = Event.current; if (e.type == EventType.KeyUp && e.keyCode == KeyCode.Escape){ displaySliders = !displaySliders; } if (displaySliders){ if (!separateSoundtrack){ GUI.Label(new Rect(10, 0, 100, 30), "Volume"); initialVolume = GUI.HorizontalSlider(new Rect(10, 20, 100, 30), initialVolume, minVolume, maxVolume); }else{ GUI.Label(new Rect(10, 0, 100, 30), "Sound FX"); initialVolume = GUI.HorizontalSlider(new Rect(10, 20, 100, 30), initialVolume, minVolume, maxVolume); GUI.Label(new Rect(10, 40, 100, 30), "Music"); soundtrackVolume = GUI.HorizontalSlider(new Rect(10, 60, 100, 30), soundtrackVolume, minVolume, maxVolume); } } } } - Save your script and attach it to the Main Camera by dragging it from the Project view to camera game object in the Hierarchy view.
- Play the scene and hit Esc in your keyboard. You'll see the volume slidebars on the top-left of the game's viewport.
By default, every sound in the scene has its volume controlled by the Volume parameter of the camera's Audio Listener component. With our script, we assign the Volume slidebar value to that parameter. Also, we create a separate volume bar for the soundtrack.mp3 file, making it independent from the camera's Audio Listener component.
Here is some information on how to fine-tune and customize this recipe.
If you need to simplify the volume controls even more, you can use a single volume bar by leaving the Separate Soundtrack option unchecked.