
Here we set the background color and the depth test properties as follows:
gl.clearColor(0.3,0.3,0.3, 1.0);
gl.clearDepth(1.0);
gl.enable(gl.DEPTH_TEST);
gl.depthFunc(gl.LEQUAL);
The camera variable needs to be global so we can access it later on from the GUI functions that we will write. For instance, we want to be able to click on a button (different function in the code) and use the camera variable to update the camera position:
camera = new Camera(CAMERA_ORBITING_TYPE);
camera.goHome([0,0,7]);
camera.setFocus([0.0,0.0,0.0]);
camera.setAzimuth(25);
camera.setElevation(-30);
The azimuth and elevation of the camera are relative to the negative z-axis, which will be the default pose if you do not specify any other. An azimuth of 25 degrees and elevation of -30 degrees will give you a nice initial angle to see the cars. However, you can set any combination that you prefer as the default pose in here.
Here we make sure that the camera's rendering callback is our rendering function:
camera.hookRenderer = render;
We create a CameraInteractor that will bind the mouse gestures to camera actions. The first argument here is the camera we are controlling and the second element is a DOM reference to the canvas in our webpage:
var interactor = new CameraInteractor(camera, document.getElementById('the-canvas'),
Once we have instantiated the camera, we create a new SceneTransforms object passing the camera to the SceneTransforms constructor as follows:
transforms = new SceneTransforms(camera);
transforms.init();
The transforms variable is also declared globally so we can use it later in the rendering function to retrieve the current matrix transformations and pass them to the shaders.
We will create four lights using the Light object from our infrastructure code. The scene will look like in the following image:
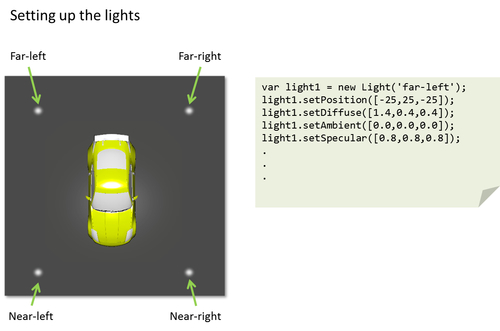
For each light we will create a Light object:
var light1 = new Light('far-left'),
light1.setPosition([-25,25,-25]);
light1.setDiffuse([1.4,0.4,0.4]);
light1.setAmbient([0.0,0.0,0.0]);
light1.setSpecular([0.8,0.8,0.8]);
var light2 = new Light('far-right'),
light2.setPosition([25,25,-25]);
light2.setDiffuse([0.4,1.4,0.4]);
light2.setAmbient([0.0,0.0,0.0]);
light2.setSpecular([0.8,0.8,0.8]);
var light3 = new Light('near-left'),
light3.setPosition([-25,25,25]);
light3.setDiffuse([0.5,0.5,1.5]);
light3.setAmbient([0.0,0.0,0.0]);
light3.setSpecular([0.8,0.38,0.38]);
var light4 = new Light('near-right'),
light4.setPosition([25,25,25]);
light4.setDiffuse([0.2,0.2,0.2]);
light4.setAmbient([0.0,0.0,0.0]);
light4.setSpecular([0.38,0.38,0.38]);
Then, we add them to the Lights list (also defined in Lights.js):
Lights.add(light1);
Lights.add(light2);
Lights.add(light3);
Lights.add(light4);
The last thing to do inside configure function is to map the JavaScript variables that we will use in our code to the attributes and uniforms that we will use in the shaders.
Using the Program object from our infrastructure code, we will set up the JavaScript variables that we will use to map attributes and uniforms to the shaders. The code looks like this:
var attributeList = ["aVertexPosition",
"aVertexNormal",
"aVertexColor"];
var uniformList = [ "uPMatrix",
"uMVMatrix",
"uNMatrix",
"uLightPosition",
"uWireframe",
"uLa",
"uLd",
"uLs",
"uKa",
"uKd",
"uKs",
"uNs",
"d",
"illum"];
Program.load(attributeList, uniformList);
Note
When creating your own shaders, make sure that the shader attributes and uniforms are properly mapped to JavaScript variables. Remember that this mapping step allows us referring to attributes and uniforms through their location. In this way, we can pass attribute and uniform values to the shaders. Please check the methods setAttributeLocations and setUniformLocations, which are called by load in the Program object (Program.js) to see how we do the mapping in the infrastructure code.
After the mapping, we can initialize shader uniforms such as lights:
gl.uniform3fv(Program.uLightPosition, Lights.getArray('position'));
gl.uniform3fv(Program.uLa, Lights.getArray('ambient'));
gl.uniform3fv(Program.uLd, Lights.getArray('diffuse'));
gl.uniform3fv(Program.uLs, Lights.getArray('specular'));
The default material properties are as follows:
gl.uniform3fv(Program.uKa , [1.0,1.0,1.0]);
gl.uniform3fv(Program.uKd , [1.0,1.0,1.0]);
gl.uniform3fv(Program.uKs , [1.0,1.0,1.0]);
gl.uniform1f(Program.uNs , 1.0);
}