
Let's create a simple model: a 3D line. Here we will be focusing on how we do JSON encoding and decoding. Follow the given steps:
- Go to your Internet browser and open the interactive JavaScript console. Use the following table for assistance:
Web browser
Menu option
Shortcut keys (PC / Mac)
Firefox
Tools | Web Developer | Web Console
Ctrl + Shift + K / Command + Alt + K
Safari
Develop | Show Web Inspector
Ctrl + Shift + C / Command + Alt + C
Chrome
Tools | JavaScript Console
Ctrl + Shift + J / Command + Alt + Js
- Create a JSON object by typing:
var model = {"vertices":[0,0,0,1,1,1], "indices":[0,1]}; - Verify that the
modelis an object by writing:typeof(model)
- Now, let's print the
modelattributes. Write this in the console (press Enter at the end of each line):model.vertices model.indices
- Now, let's create a JSON text:
var text = JSON.stringify(model)
alert(text)
- What happens when you type
text.vertices?As you can see, you get an error message saying that
text.verticesis not defined. This happens because text is not a JavaScript object but a string with the peculiarity of being written according to JSON notation to describe an object. Everything in it is text and therefore it does not have any fields. - Now let's convert the JSON text back to an object. Type the following:
var model2 = JSON.parse(text)
typeof(model2)
model2.vertices
We have learned to encode and decode JSON objects. The example that we have used is relevant because this is the way we will define our geometry to be loaded from external files. In the next section, we will see how to download geometric models specified with JSON from a web server.
The following diagram summarizes the asynchronous loading of files by the web browser using AJAX:
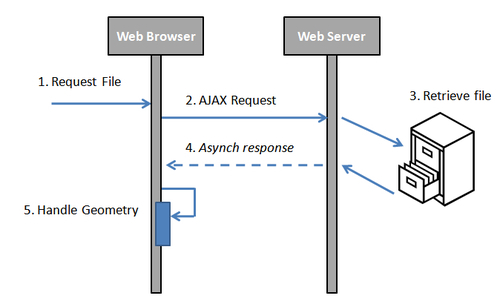
- Let's analyze this more closely:
Request file: First of all, we should indicate the filename that we want to load. Remember that this file contains the geometry that we will be loading from the web server instead of coding the JavaScript arrays (vertices and indices) directly into the web page.
- AJAX request: We need to write a function that will perform the AJAX request. Let's call this function
loadFile. The code can look like this:function loadFile(name) { var request = new XMLHttpRequest(); var resource = http:// + document.domain + name; request.open("GET",resource); request.onreadystatechange = function() { if (request.readyState == 4) { if(request.status == 200 || (request.status == 0 && document.domain.length == 0) { handleLoadedGeometry(name,JSON.parse(request.responseText)); } else { alert ('There was a problem loading the file :' + name); alert ('HTML error code: ' + request.status); } } } request.send(); }If the
readyStateis4, it means that the file has finished downloading.More about this function later. Let's say for now that this function will perform the AJAX request.
- Retrieve file: The web server will receive and treat our request as a regular HTTP request. As a matter of fact, the server does not know that this request is asynchronous (it is asynchronous for the web browser as it does not wait for the answer). The server will look for our file and whether it finds it or not, it will generate a response. This will take us to step 4.
- Asynchronous response: Once a response is sent to the web browser, the callback specified in the
loadFilefunction is invoked. This callback corresponds to the request methodonreadystatechange. This method examines the answer. If we obtain a status different from200(OK according to the HTTP specification), it means that there was a problem. Hopefully the specific error code that we get on the status variable (instead of200)can give us a clue about the error. For instance, code404means that the resource does not exist. In that case, you would need to check if there is a typo, or you are requesting a file from a directory different from the directory where the page is located on the web server. Different error codes will give you different alternatives to treat the respective problem. Now if we get a200status, we can invoke thehandleLoadedGeometryfunction. - Handling the loaded model: In order to keep our code looking pretty, we can create a new function to process the file retrieved from the server. Let's call this
handleLoadedGeometryfunction. Please notice that in the previous segment of code, we used the JSON parser in order to create a JavaScript object from the file before passing it along to thehandleLoadedGeometryfunction. This object corresponds to the second argument (model) as we can see here. The code for thehandleLoadedGeometryfunction looks like this:function handleLoadedGeometry(name,model){ alert(name + ' has been retrieved from the server'), modelVertexBuffer = gl.createBuffer(); gl.bindBuffer(gl.ARRAY_BUFFER, modelVertexBuffer); gl.bufferData(gl.ARRAY_BUFFER, new Float32Array(model.vertices), gl.STATIC_DRAW); modelIndexBuffer = gl.createBuffer(); gl.bindBuffer(gl.ELEMENT_ARRAY_BUFFER, modelIndexBuffer); gl.bufferData(gl.ELEMENT_ARRAY_BUFFER, new Uint16Array(model.indices), gl.STATIC_DRAW); gl.bindBuffer(gl.ELEMENT_ARRAY_BUFFER, null); gl.bindBuffer(gl.ARRAY_BUFFER,null); }If you look closely, this function is very similar to one of our functions that we saw previously: the
initBuffersfunction. This makes sense because we cannot initialize the buffers until we retrieve the geometry data from the server. Just likeinitBuffers, we bind our VBO and IBO and pass them the information contained in the JavaScript arrays of ourmodelobject.
If you do not have a web server, we recommend you install a lightweight web server such as lighttpd ( http://www.lighttpd.net/).
Please note that if you are using Windows:
- The installer can be found at http://en.wlmp-project.net/downloads.php?cat=lighty
- Once installed, you should go to the subfolder
binand double-click onService-Install.exeto install lighttpd as a Windows service. - You should copy Chapter 2's exercises in the subfolder
htdocsor change lighttpd's configuration file to point to your working directory (which is the one you have used to run the examples so far). - To be able to edit
server.document-rootin the fileconf/lighttpd-inc.confyou need to run a console with administrative privileges.