
- Open the file
ch6_Cube.htmlusing your HTML5 Internet browser. You will see a page like the one shown in the following screenshot: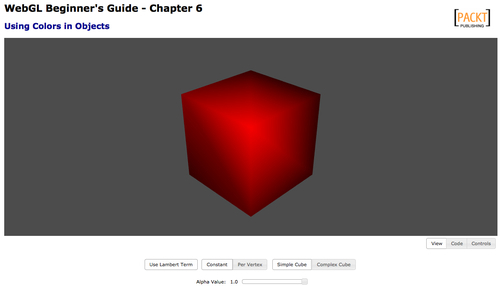
In this exercise, we are going to compare constant versus per-vertex coloring. Let's talk about the page's widgets:
- Use Lambert Coefficient: When selected it will include the Lambert coefficient in the calculation of the final color.
- Constant/Per-Vertex: The two options to color objects explained before.
- Simple Cube: Corresponds to a JSON object where the vertices are defined once.
- Complex Cube: Loads a JSON object where the vertices are repeated with the goal of obtaining multiple normals and multiple colors per vertex. We will explain how this works later.
- Alpha Value: This slider is mapped to the float uniform
uAlphain the vertex shader.uAlphasets the alpha value for the vertex color.
- Disable the use of the Lambert coefficient by clicking on Use Lambert Coefficient. Rotate the cube clicking on it with the mouse and dragging it around. As you see, there is loss of depth perception when the Lambert coefficient is not included in the final color calculation. The Use Lambert Coefficient button is mapped to the Boolean uniform
uUseLambert. The code that calculates the Lambert coefficient can be found in the vertex shader included in the page:float lambertTerm = 1.0; if (uUseLambert){ //Transformed normal position vec3 normal = vec3(uNMatrix * vec4(aVertexNormal, 1.0)); //light direction: pointing at the origin vec3 lightDirection = normalize(-uLightPosition); //weighting factor lambertTerm = max(dot(normal,-lightDirection),0.20); } - If the uniform
uUseLambertis false, thenlambertTermkeeps being1.0and then it will not affect the final diffuse term which is calculated later on:Id = uLightDiffuse * uMaterialDiffuse * lambertTerm;
- Otherwise,
Idwill have the Lambert coefficient factored in. - Having Use Lambert Coefficient disabled, click on the button Per Vertex. Rotate the cube to see how ESSL interpolates the vertex colors. The vertex shader key code fragment that allows us to switch from a constant diffuse color to per- vertex colors uses the Boolean uniform
uUseVertexColorsand theaVertexColorattribute. This fragment is shown here:if (uUseVertexColor){ Id = uLightDiffuse * aVertexColor * lambertTerm; } else { Id = uLightDiffuse * uMaterialDiffuse * lambertTerm; }Take a look at the file
/models/simpleCube.js.There, the eight vertices of the cube are defined in theverticesarray and there is an element in thescalarsarray for every vertex. As you may expect, each one of these elements correspond to the respective vertex color, as shown in the following diagram: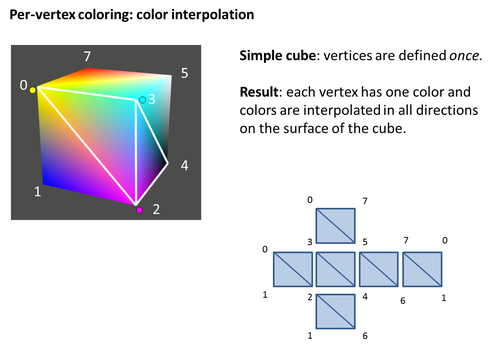
- Make sure that the Use Lambert Coefficient button is not active and then click on the button Complex Cube. By repeating vertices in the vertex array in the corresponding JSON file
/models/complexCube.js, we can achieve independent face coloring. The following diagram explains how the vertices are organized incomplexCube.js. Also note that as the definition of colors occurs by vertex (as we are using theshaderattribute), we need to repeat each color four times, because each face has four vertices. This idea is depicted in the following diagram: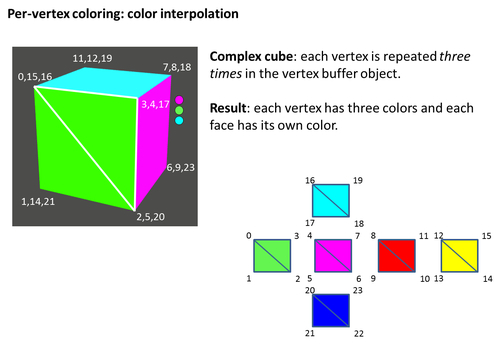
- Activate the Use Lambert Coefficient button and see how the Lambert coefficient affects the color of the object. Try different button configurations and see what happens.
- Finally, let's quickly explore the effect of changing the alpha channel to a value less than
1.0. For that, click-and-drag the slider to the left that appears at the bottom of the page. What do you see? Please notice that the object does not become transparent but instead it starts losing its color. To obtain transparency, we need to activate blending. We will discuss blending in depth later in this chapter. For now, uncomment these lines in theconfigurefunction, in the source code://gl.disable(gl.DEPTH_TEST); //gl.enable(gl.BLEND); //gl.blendFunc(gl.SRC_ALPHA, gl.ONE_MINUS_SRC_ALPHA);
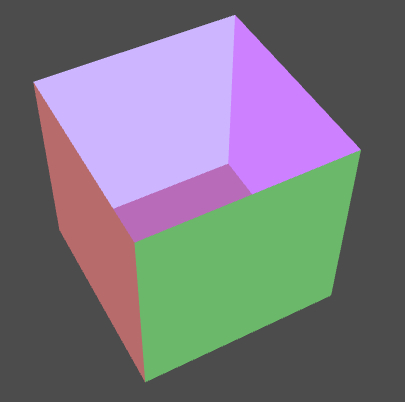
- Save the page and reload it in your Internet browser. If you select Per Vertex, Complex Cube and reduce the alpha value to
0.25you will see something like the following screenshot:
We have studied two different ways for coloring objects: constant coloring and per-vertex coloring. In both cases, the final color for each fragment is assigned by using the fragment shader gl_FragColor variable.
We also saw how, by activating the calculation of the Lambert coefficient, we can obtain sensory depth information.
By repeating vertices in our object, we can obtain different coloring effects. For instance, we can color an object by faces instead of doing it by vertices.