
Once you finish reading the book you will be able to create scenes like the one we are going to play with next. This scene shows one of the cars from the book's virtual car showroom.
- Open the file
ch1_Car.htmlin one of the supported Internet web browsers. - You will see a WebGL scene with a car in it as shown in the following screenshot. In Chapter 2, Rendering Geometry we will cover the topic of geometry rendering and we will see how to load and render models as this car.
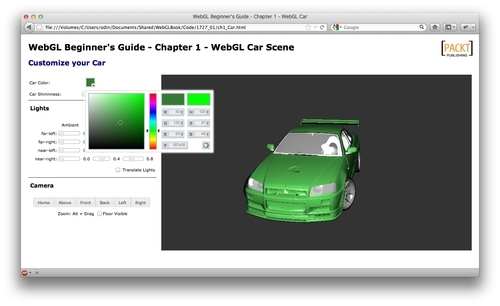
- Use the sliders to interactively update the four light sources that have been defined for this scene. Each light source has three elements: ambient, diffuse, and specular elements. We will cover the topic about lights in Chapter 3, Lights!.
- Click and drag on the canvas to rotate the car and visualize it from different perspectives. You can zoom by pressing the Alt key while you drag the mouse on the canvas. You can also use the arrow keys to rotate the camera around the car. Make sure that the canvas is in focus by clicking on it before using the arrow keys. In Chapter 4, Camera we will discuss how to create and operate with cameras in WebGL.
- If you click on the Above, Front, Back, Left, or Right buttons you will see an animation that stops when the camera reaches that position. For achieving this effect we are using a JavaScript timer. We will discuss animation in Chapter 5, Action.
- Use the color selector widget as shown in the previous screenshot to change the color of the car. The use of colors in the scene will be discussed in Chapter 6, Colors, Depth Testing, and Alpha Blending. Chapters 7-10 will describe the use of textures ( Chapter 7, Textures), selection of objects in the scene (Chapter 8, Picking), how to build the virtual car show room (Chapter 9, Putting It All Together) and WebGL advanced techniques ( Chapter 10,
We have loaded a simple scene in an Internet web browser using WebGL.
This scene consists of:
- A canvas through which we see the scene.
- A series of polygonal meshes (objects) that constitute the car: roof, windows, headlights, fenders, doors, wheels, spoiler, bumpers, and so on.
- Light sources; otherwise everything would appear black.
- A camera that determines where in the 3D world is our view point. The camera can be made interactive and the view point can change, depending on the user input. For this example, we were using the left and right arrow keys and the mouse to move the camera around the car.
There are other elements that are not covered in this example such as textures, colors, and special light effects (specularity). Do not panic! Each element will be explained later in the book. The point here is to identify that the four basic elements we discussed previously are present in the scene.
..................Content has been hidden....................
You can't read the all page of ebook, please click here login for view all page.