
Follow the given steps:
- Open the file
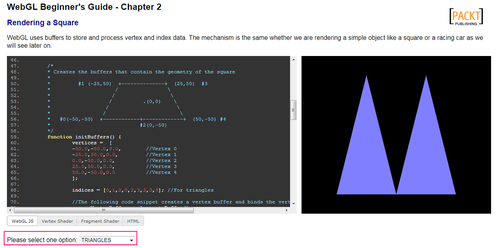
ch_RenderingModes.htmlin the HTML5 browser of your preference. This example follows the same structure as discussed in the previous section. - Select the WebGL JS button and scroll down to the
initBufferfunction. - You will see here that we are drawing a trapezoid. However, on screen you will see two triangles! We will see how we did this later.
- At the bottom of the page, there is a combobox that allows you to select the different rendering modes that WebGL provides, as shown in the following screenshot:
- When you select any option from this combobox, you are changing the value of the
renderingModevariable defined at the top of the WebGL JS code (scroll up if you want to see where it is defined). - To see how each option modifies the rendering, scroll down to the
drawScenefunction. - You will see there that after binding the IBO
trapezoidIndexBufferwith the following instruction:gl.bindBuffer(gl.ELEMENT_ARRAY_BUFFER, trapezoidIndexBuffer);
you have a switch statement where there is a code that executes, depending on the value of the
renderingModevariable:case 'TRIANGLES': { ... } case 'LINES': { ... } case'POINTS': { ... } - For each mode, you define the contents of the JavaScript array indices. Then, you pass this array to the currently-bound buffer (
trapezoidIndexBuffer) by using thebufferDatafunction. Finally, you call thedrawElementsfunction. - Let's see what each mode does:
Mode
Example
Description
TRIANGLES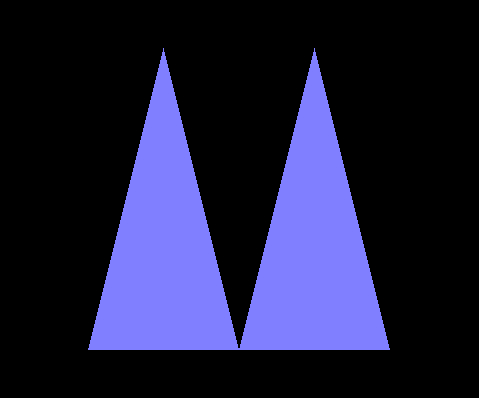
When you use the
TRIANGLESmode, WebGL will use the first three indices defined in your IBO for constructing the first triangle, the next three for constructing the second triangle, and so on. In this example, we are drawing two triangles, which can be verified by examining the followingindicesJavaScript array that populates the IBO:indices = [0,1,2,2,3,4];LINES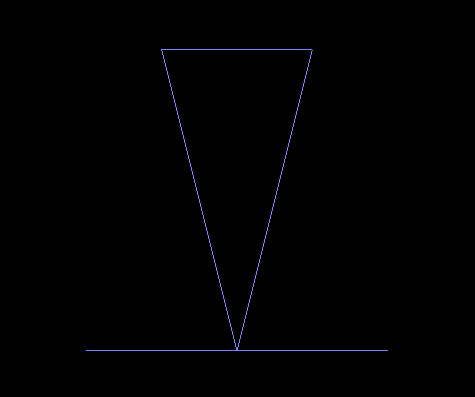
The
LINESmode will instruct WebGL to take each consecutive pair of indices defined in the IBO and draw lines taking the coordinates of the corresponding vertices.For instance
indices = [1,3,0,4,1,2,2,3]; will draw four lines: from vertex number 1 to vertex number 3, from vertex number 0 to vertex number 4, from vertex number 1 to vertex number 2, and from vertex number 2 to vertex number 3.POINTS
When we use the
POINTSmode, WebGL will not generate surfaces. Instead, it will render the vertices that we had defined using the index array.In this example, we will only render vertices number 1, number 2, and number 3 with
indices = [1,2,3];LINE_LOOP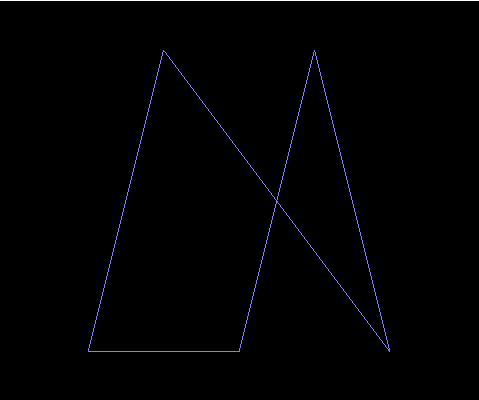
LINE_LOOPdraws a closed loop connecting the vertices defined in the IBO to the next one. In our case, it will beindices = [2,3,4,1,0];LINE_STRIP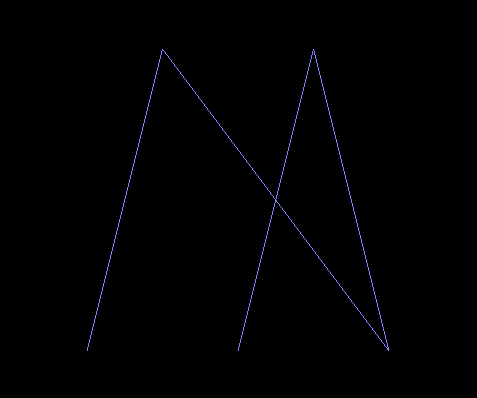
It is similar to
LINE_LOOP. The difference here is that WebGL does not connect the last vertex to the first one (not a closed loop).The
indicesJavaScript array will beindices = [2,3,4,1,0];TRIANGLE_STRIP
TRIANGLE_STRIPdraws connected triangles. Every vertex specified after the first three (in our example, vertices number 0, number 1, and number 2) creates a new triangle.If we have
indices = [0,1,2,3,4];, then we will generate the triangles:(0,1,2) , (1,2,3), and (2,3,4).
TRIANGLE_FAN
TRIANGLE_FANcreates triangles in a similar way toTRIANGLE_STRIP. However, the first vertex defined in the IBO is taken as the origin of the fan (the only shared vertex among consecutive triangles).In our example,
indices = [0,1,2,3,4];will create the triangles: (0,1,2) and (0,3,4).
- Now let's make some changes:
- Edit the web page (
ch_RenderingModes.html) so that when you select the optionTRIANGLES, you render the trapezoid instead of two triangles. - Save the file and test it in the HTML5 browser of your preference.
- Edit the web page so that you draw the letter 'M' using the option
LINES. - Just like before, save your changes and test them in your HTML5 browser.
- Using the
LINE_LOOPmode, draw only the boundary of the trapezoid.