
Creating Your Own Music CDs
Although CD players are becoming less and less popular (because of smartphones, MP3 players, iPhones, and the like), many people still have CD players in their vehicles. For that reason, you may want to opt for a custom CD of your favorite music. Creating your own custom music CDs is a lot of fun. It’s also a great way to protect any new CDs you purchase from getting scratched and ruined. When you buy a new CD, rip it to your Media Library, and then put it back in its case for safe-keeping. Burn a copy of the CD (or just your favorite songs from the CD along with some other favorite songs), and use the copy in your home or car stereo. In some cases, you can also copy songs you purchased online to CDs.
If you buy blank CDs in spindles of 50 or more, they are typically very inexpensive. You won’t get the little plastic jewel case, but you can buy paper sleeves or jewel cases separately. Or you can keep all the CDs in a CD binder.
Types of music CDs
Before we get into the specifics of burning CDs, it’s important to understand that you can create two different types of music CDs:
- Audio CD: This type of CD plays in any home stereo, car stereo, portable CD player, or computer. You must burn songs to a CD-R disk (preferably an Audio CD-R) to create this type of CD because most non-computer players can’t play CD-RW disks or DVD disks.
- Data CD: This type of music CD plays in computers, or in any stereo that’s capable of playing this type of CD. You can use CD-R or CD-RW disks. However, you must choose a disk type that is compatible with both your computer’s CD/DVD burner and the device on which you want to play the disk.
If you don’t know what type of disks your stereo can play, refer to the instructions that came with that device. Optionally, create an RW (Read/Write) disk and try it out. There’s no loss if the disk doesn’t play because you can always erase the disk and use it for something else. Once burned, R (Recordable) disks cannot be erased or changed.
Choosing music disk options
The first step in creating a music CD is to specify which type of disk you want to create, and perhaps some other options. In Media Player, click the Burn tab, and then click Burn Options to see the menu shown in Figure 24.29. Choose options as summarized in the following list:
FIGURE 24.29 Burn options
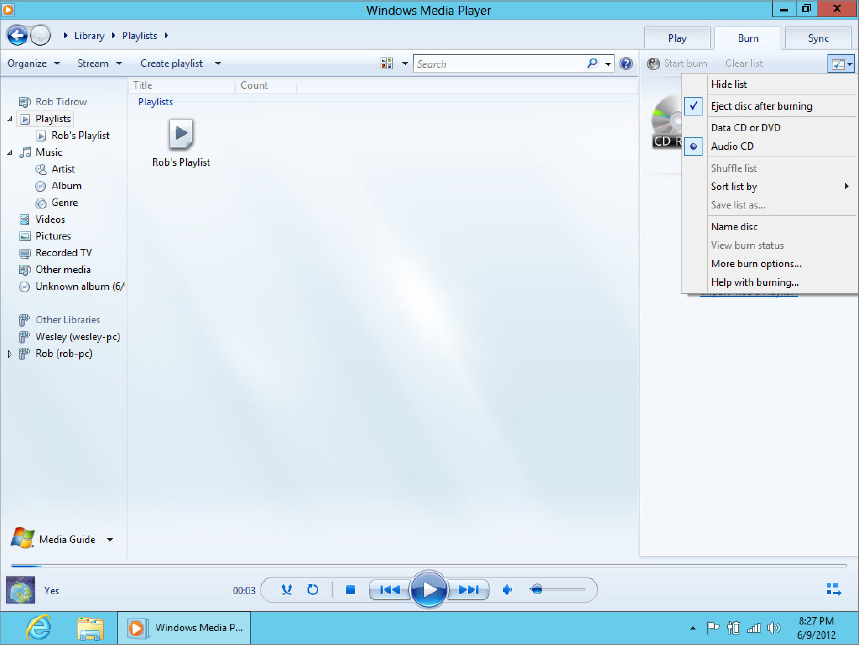
- Hide List: Hide the burn list.
- Eject Disc After Burning: Have the CD ejected automatically when it’s ready for use. This is especially useful when burning multiple CDs from a single Burn list.
- Data CD Or DVD: Choose this option if you want to create a music CD or DVD that plays only on computers and devices that are capable of playing non-traditional music CDs.
- Audio CD: Create the type of CD that all stereos and players can play. For best results, use an 80-minute Audio CD-R disk.
- Name Disc: Specify a name for the disk.
- More Burn Options: Choose this option to choose additional options described following this list.
- Help with Burning: Choose this option for help with burning music CDs.
Choosing More Burn Options takes you to the Burn tab of Media Player’s Options dialog box, shown in Figure 24.30. Most of the options duplicate options on the menu. The ones that are unique are summarized in the following list.
FIGURE 24.30 Burn tab of the Options dialog box
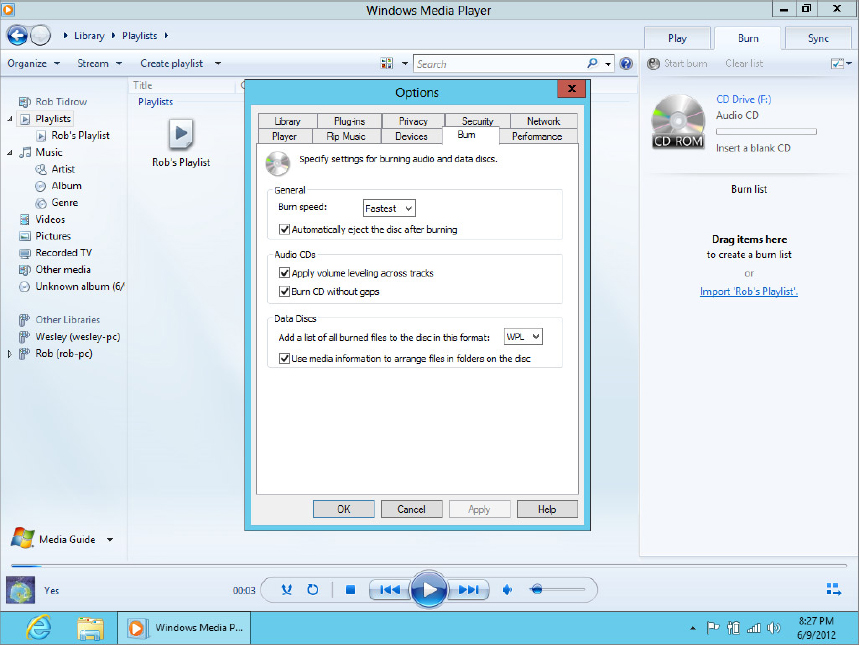
- Burn Speed: The default setting is Fastest. But if you have problems burning disks, or the sound quality isn’t up to par on the disks you burn, consider reducing this to a slower speed.
- Automatically Eject The Disc After Burning: Instruct Windows to open the disc tray after the CD burning completes.
- Apply Volume Leveling Across Tracks: Ensure that the volume of each song is the same when listening to the finished CD.
- Burn CD Without Gaps: Omit the two-second gap normally inserted between audio tracks.
- Add A List Of All Burned Files To The Disc In This Format: Choose WPL if your player can read Windows playlists. Choose M3U if your player can only read MP3-style playlists.
- Use Media Information To Arrange Files In Folders On The Disc: If selected, items on the CD will be organized into folders. If you are unsure about whether or not your player can handle folders, clear the check box for this option.
Click OK in the Options dialog box to save any settings you changed. With your options selected and squared away, you’re ready to choose which songs you want to copy to your custom CD.
Choosing songs to put on the CD
The skills needed to choose songs to put on a CD are the same as those for creating a custom playlist. You can drag songs individually, or you can drag an entire album or other category. But you have to make sure you’re dragging to the Burn list, not just any playlist. Here’s the basic process:
Your Media Player window should look something like Figure 24.31. The songs that appear in the center Contents pane will, of course, be songs you have in your own library. How your icons look depends on what category you’re viewing and what option you’ve selected from the View Options drop-down list.
FIGURE 24.31 Ready to copy songs to a Burn list
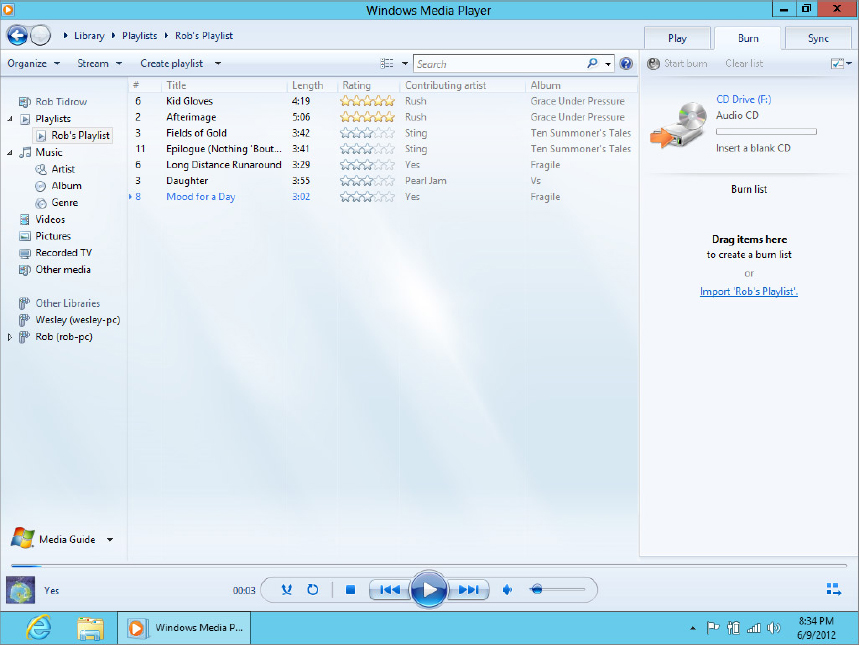
At this point, just drag the songs you want to burn to your custom CD to the Burn list, or right-click any song title and choose Add To Burn List. As you add songs, the indicator at the top of the Burn list keeps you informed of how much space will be used on the CD. You can keep adding songs until the disk capacity is exhausted. Any additional songs you add at that point are added to a new disk. Media Player numbers the disk sequentially in the list.
Options that apply to custom playlists also apply to the Burn list. For example, to remove a song from the Burn list, right-click its title and choose Remove From List. To change the order of songs, click Burn Options, choose Sort List By, and choose a sort option. Or, drag any song title up or down within the list.
When you’re happy with the songs you’ve selected and their order, you’re ready to burn the CD.
Creating the disk
When the Burn list contains all the songs you want to copy to the CD, click the Start Burn button at the top of the Burn list. Then wait. How long it takes depends on the type of CD you’re creating, the speed of your drive, and other factors. The status column in the Contents pane and an indicator below the Burn list keep you apprised of progress.
When the CD is finished, remove it from the CD drive. If you created a standard audio disk, you can insert and play it in a stereo as you would any other disk. If you created a data disk, you can play it in any device that supports the type of disk you created.
Saving a Burn list
It’s a good idea to save each Burn list you create. That way, if you ever want to create another copy of the same CD, you can just open the saved Burn list. To save a Burn list, click the Burn Options button and choose Save List As. Change the name to something that describes the Burn list and click Save. Then, to create a new Burn list, click the Clear List Pane button.