Mapping Drive Letters to Shared Folders
Some programs require that you assign a drive letter to remote resources. You can assign any unused drive letter to a resource. For example, if you already have drives A: through F: in use, you can assign drive letters G: through Z: to any shared resource. Use the following steps to map a drive letter to a shared folder:
1. Go to the computer on which you need to assign a drive letter to a remote shared resource.
2. Open any folder (such as the Computer folder), choose the Computer tab, and click Map Network Drive. The Map Network Drive dialog box opens.
3. Click the Browse button if the Folder entry is not filled in already to open the Browse For Folder dialog box.
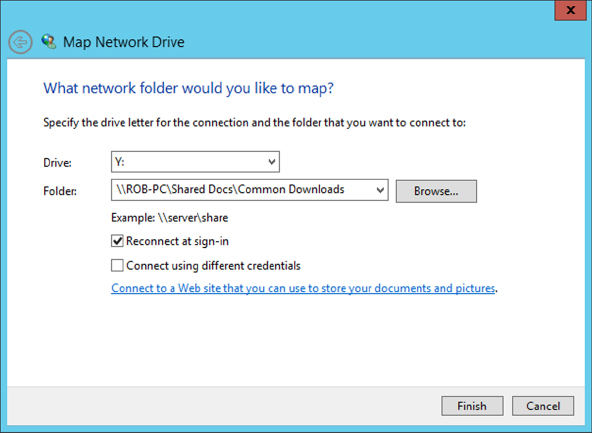
4. In the Browse For Folder dialog box, click the name of the shared resource to which you want to map a drive letter, so its name is selected (highlighted). For example, in
Figure 51.5, we’re about to map the drive letter Y: to the shared Download folder on a computer named Rob-PC.
5. Click OK.
6. If you want the drive to be mapped automatically each time you log on, select the Reconnect At Sign-In check box.
7. Click Finish.
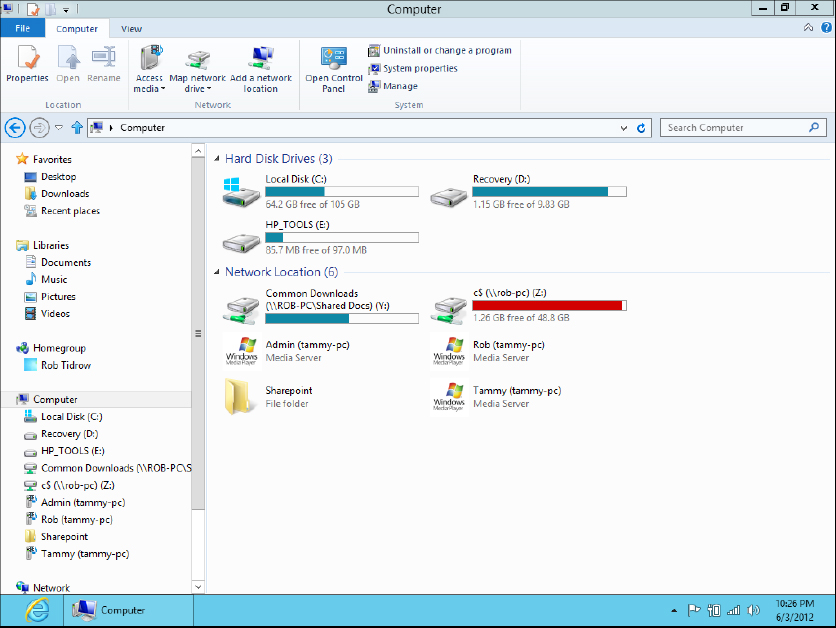
The remote resource will open. You can close that folder and also close the Network folder. Because you’ve mapped a drive letter to the remote resource, it will appear in your Computer folder. In Figure 51.6, we’ve mapped two resources: Y: is mapped to the Download folder on the computer named Rob-PC, and Z: is mapped to the hidden root share of drive C: on the computer with an IP address of 192.168.0.2.
Hidden Shares
Windows creates a hidden administrative share for each drive connected to the computer. These shares, which share the root of the drive, take the name of the drive letter followed by a $ sign. For example, the administrative share for drive C: is C$, for drive E: would be E$, and so on. If you have an administrative account (or have access to the administrative shares) on the remote computer, you can map to its hidden share using the UNC path. For example, to connect to drive C: on a computer named Spock, you would use the UNC path \SpockC$.
These shares are called “hidden shares” because they do not appear when you browse the network for resources. For example, you won’t see these shares in the Network folder. In addition, you can create your own hidden shares. When you share the resource, just add a $ sign at the end of the share name. See Chapter 50, “Sharing Resources on a Network” to learn more about sharing resources on the network.
From that point on, you can access the folder either by going through the Network folder as usual, or you can just open your Computer folder and open the resource’s icon under Network Location.
Note
Even though a mapped network drive shows up as a disk drive in the Computer folder, a shared network resource need not be a disk drive at all. It can be a folder. The term “network drive” just refers to the fact that the shared resource “looks like” a drive, by virtue of the fact that it has a drive letter and icon in your Computer folder.
Disconnecting from a Network Drive
In your Computer folder, you can disconnect from any network drive by right-clicking the drive’s icon and choosing Disconnect. If you chose the option Reconnect At Sign-In when you previously mapped the drive, the shared resource will no longer be mapped the next time you log on to the computer.