
Copying Music to Portable Devices
A portable device is an MP3 player or similar device that lets you take your music with you. To put songs (or other media) on your portable device, you sync songs from Media Player’s library to the device. You can put any songs you wish onto your player. The only limit is the storage capacity of the device.
Windows Media Player works with many MP3 players. However, it does not work with the Apple iPhone, iPod, or iPad (you use iTunes to sync to those). Nor does it work with some older devices.
If you don’t already have a portable device but are thinking of getting one, visit http://windows.microsoft.com/en-US/windows/products/windows-media-player and click the Find Devices That Are Compatible link (below the “Top Solutions” heading on the web page). There you can see the full range of devices that work with Media Player.
Different devices work a little differently. So if you already have a device, the first step is to learn the basics of using it and connecting it to your computer. That information you can get only from the instructions that came with the device. Despite the differences among devices, we can tell you generally how synchronization works with Media Player.
The first step is to open Windows Media Player and click the Sync tab. Then connect your device to the computer and turn it on. If a dialog box opens asking you to name the device, type in a name of your own choosing and click Finish. What happens next depends on the storage capacity of the device:
- If the device capacity is 4GB or greater, and your media library can fit within that capacity, Media Player automatically copies your entire library to the device. Each time you connect the device in the future, Media Player copies any new songs you’ve acquired since the last connection so that the device stays in sync with your library.
- If the device capacity is less than 4GB, or your library is too large to fit in the device, nothing is copied automatically. But you can manually copy any songs you like to the device.
You can change what happens when you connect your device. We’ll get to that in a moment. First, let’s look at how you manually choose songs to put on your device.
Manual syncing
When your device is connected to your computer and you want to choose songs to copy to the device, click the Sync tab. The List pane at the right side of the program window shows the storage capacity of the device, and the amount of space that’s currently on the device. Beneath that is an empty playlist, called the Sync list.
To add songs to the device, you need to drag them from the contents pane to the Sync list, just as you would when burning a CD or creating a custom playlist. As always, you can select multiple songs and drag them all at once. You can also right-click any song, album, icon, or category name and choose Add To Sync List.
As you add songs, an indicator near the top of the Sync list shows you how much space you have remaining. If the indicator turns red and shows “Filled,” you’ve gone over the limit. To remove a song from the Sync list, right-click its title and choose Remove From List. Do so until the indicator turns green again. Figure 24.32 shows an example with many songs already chosen and about 26.5GB of space left on a portable player.
FIGURE 24.32 Songs added to the Sync list
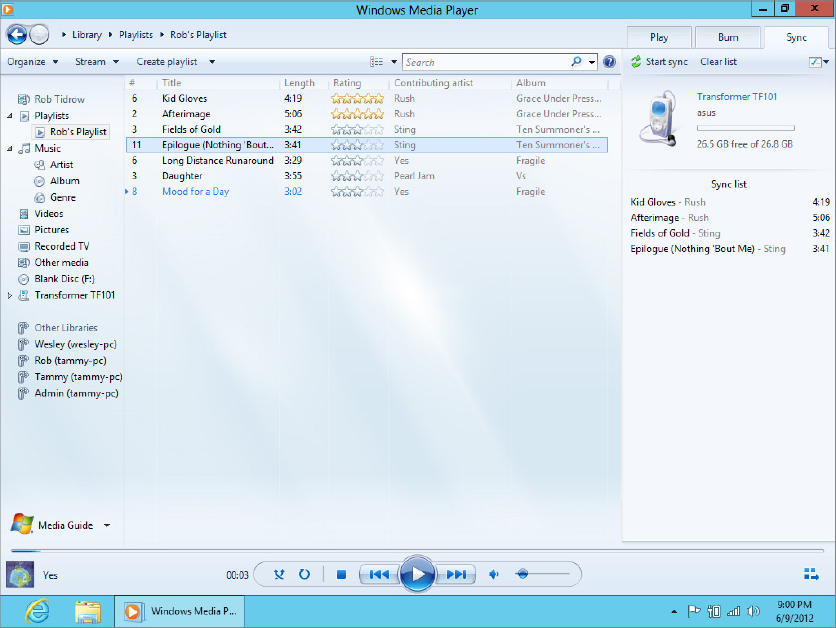
As always, you can arrange songs in the Sync list by dragging them up or down. Optionally, click Sync List, choose Sort, and choose a sort order. When you’re happy with the songs you’ve selected and their order, click the Start Sync button at the bottom of the Sync list.
The Contents pane of Media Player shows the synchronization progress as songs are copied to the device. When the Status column shows “Synchronized to Device” for every song, you’re done. You can disconnect the device from the computer, plug in your headphones, and take your music with you.
Managing songs on a device
Portable media players are much more flexible than CDs. For example, you can delete individual songs from a portable device and replace them with other songs. When your device is connected, it shows up as its own set of categories in the Navigation pane. When you click a category name under the device name, the Contents pane to the right shows the contents of the device only, not the contents of your entire library.
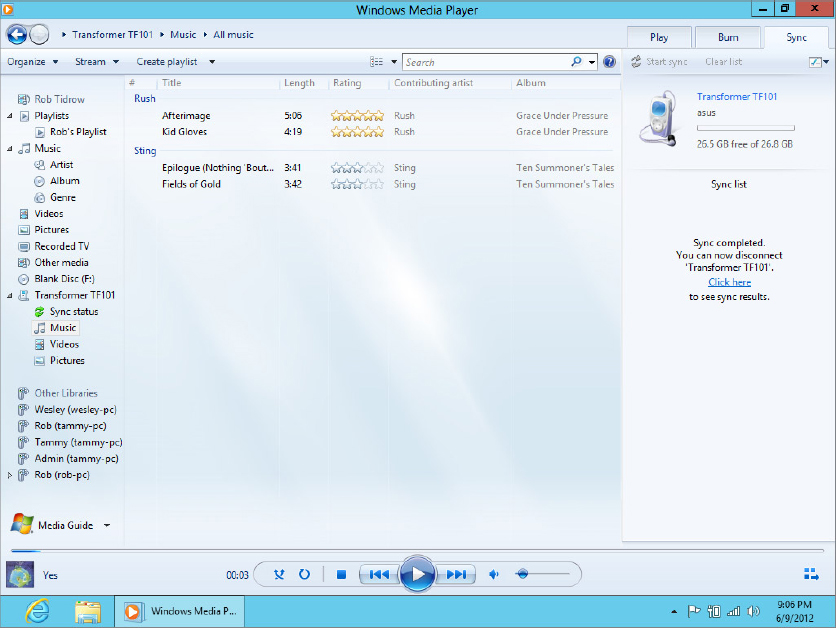
Figure 24.33 shows an example. In the Navigation pane at left, we’ve clicked the Transformer TF101 device and clicked the All Music category name. The Contents pane to the right is showing songs that are currently on the synced device. When viewing songs in that manner with your own device, you can right-click any song title and choose Delete to remove it from the device.
FIGURE 24.33 Music on an MP3 player
Manual syncing is easy (once you’ve played around with it a bit). Most people like to choose exactly what’s on their portable player so manual syncing is also the most commonly used method. To use auto syncing, you need to enable automatic syncing and specify what syncs automatically. Let’s look at that next.
Auto-syncing devices
Auto-sync is a method of keeping a portable player up to date with whatever content is currently available in your Media Player library. If your device doesn’t have enough capacity to store your entire library, exactly what you end up with can be somewhat arbitrary. The first step is to connect the device to the computer and make sure it’s turned on.
Next, click the Sync tab and then click Sync Options, point to your device name, and choose Set Up Sync. If you have not set up the device previously, you’ll see the Windows Media Player - Device Setup dialog box, which asks if you want to sync temporarily (this session only) or permanently. If you choose the latter, you’ll have additional options available for syncing, including the capability to specify which playlists are synced.
The Device Setup dialog box opens. The left column shows available playlists. The right column shows playlists that are currently used to sync songs to the device. To remove a playlist from the right column, click its name and choose Remove.
To add a playlist to the right column, click its name in the left column and click Add. To see Auto Playlists specifically designed for syncing, click the My Playlists button under Available Playlists and choose Sync Playlists.
If no playlist defines the kinds of songs you want to sync automatically, you can create your own. Click New Auto Playlist and give your playlist a name. For example, to make an Auto Playlist that copies new songs added to your library in the last week, create a criterion that specifies Date Added To Library Is After Last 7 Days.
Give the new playlist a name, perhaps New This Week, and save it. Then click the Add button to copy it from Available Playlists to Playlists To Sync. If that’s the only playlist you put in the right column, then each time you connect your device, Media Player copies only songs that you’ve added to your library within the last week.
Optionally, choose Shuffle What Syncs. If you do, each time you connect the device, files that are currently on the device are removed automatically and replaced with songs that match the criteria of your selected Auto Playlists. So each time you connect the device, you automatically get however many songs your playlist provides added to the device.
Click Finish when you’re done, and Media Player syncs based on your selections. Remove the device when the syncing is finished. Any time you want to change the contents of your player, just connect it to the PC and click the Finish button.
Choosing between manual and auto sync
You can choose whether you want to use manual sync or auto sync at any time. Just connect your device, click the arrow under Sync, click the device name, and choose Set Up Sync. To use manual syncing, clear the checkmark next to Sync This Device Automatically. To enable auto syncing, select (check) that same check box. Then click Finish.
Setting player options
To see other options that your player supports, connect the player, right-click its name in the Navigation pane, and choose Properties. A Properties dialog box for the device opens. The options available to you will depend on the capabilities of your player. If you’re not sure what an option in the dialog box means, check the manual that came with your device or click the Help button in the dialog box for more information.