Building the First Hyper-V Host
Starting with a stand-alone host is probably the best approach if you are new to Hyper-V, because this deployment is very straightforward. It also helps you to more quickly understand how Hyper-V works—and how to evolve building a bigger Hyper-V farm.
Preparing Windows Server
Because Hyper-V is a role of Windows Server, the first requirement is to have a freshly installed operating system. This task is not different from installing a new Windows Server used for Active Directory or a file server, for example. There are no Hyper-V-specific options available. Unless you use the free Hyper-V Server, the Hyper-V role is also not enabled by default, even when you use the Datacenter edition (see Figure 2-6).
Figure 2-6 Windows Server installation
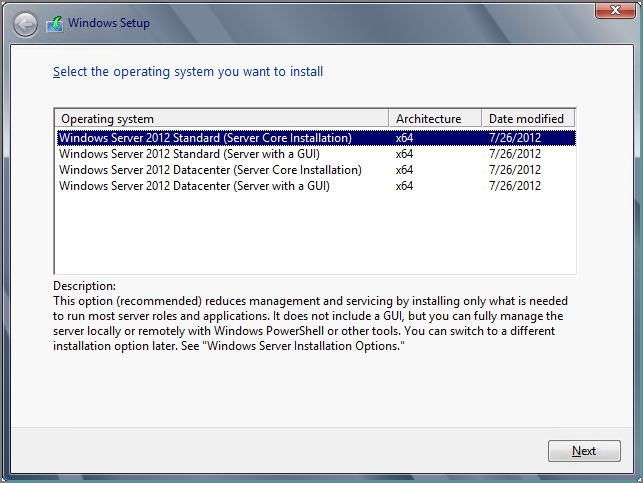
As mentioned earlier in this chapter, Server Core installation mode is preferred for a Hyper-V deployment. However, you might want to start with the Server with a GUI mode and then switch to the Server Core mode after you’ve completed all the configuration.
In general, we recommend configuring just the bare minimum of the operating system. Then directly proceed with the Hyper-V role installation and finish the advanced configuration later. To proceed, the host should be configured as follows:
For end-to-end power management, as explained earlier in this chapter, also configure the operating system for high-performance. This can be done using the control panel, or the following command, which applies the high performance power schema:
powercfg /S 8c5e7fda-e8bf-4a96-9a85-a6e23a8c635cWindows NIC Teaming
The built-in teaming in Windows Server 2012, called Windows NIC teaming, enables multiple network adapters to be grouped into a team. Also known as load balancing and failover (LBFO), this feature helps ensure the network’s availability and the aggregation of network bandwidth across multiple network adapters, without requiring any third-party software. This is new to Windows Server 2012. In Windows Server 2008 R2 and earlier, vendor driver support was required, which could have caused lots of issues.
The built-in network adapter teaming solution supports up to 32 network adapters and even works across different types and manufacturers. There are three teaming modes:
- Static Teaming
- Switch-Independent
- Link Aggregation Control Protocol (LACP)
NIC teaming in Windows Server 2012 supports a Hyper-V-optimized traffic distribution method called Hyper-V Port, as shown in Figure 2-7. This method allows the switch to determine whether specific source MAC addresses are on only one connected network adapter. The switch will then balance the load on multiple links, based on the destination MAC address for the virtual machine. In combination with the virtual machine queue (VMq), there is a particular benefit. However, this method is limited to a single virtual machine on a single network adapter.
Figure 2-7 Windows NIC teaming
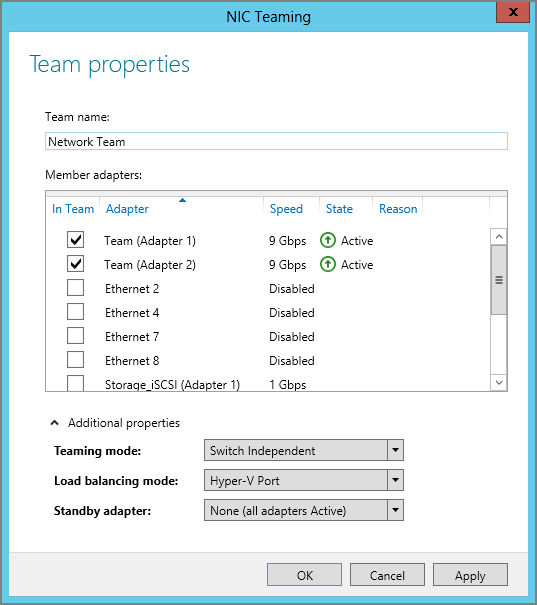
This network adapter teaming can be enabled from Server Manager or by using Windows PowerShell. In the following example, we create a new network team called Network Team with the members Ethernet 3 and Ethernet 4. There is no need to install a feature, because all components are available by default.
The network team creation process may take several minutes, during which time the connection to the server might be lost. As soon as the network connection has been restored, click Refresh Now in the NIC Teaming window to verify the configuration.
The new network adapter teaming can also be created easily by using PowerShell:
New-NetLbfoTeam -Name “Network Team” -TeamMembers “Ethernet 3”, “Ethernet 4” -TeamingMode SwitchIndependent -LoadBalancingAlgorithm HyperVPortChapter 4, “Networking,” goes into more detail on how Windows NIC teaming works.
Paging File
When you install Windows Server, the default setting for the page file is configured to Automatically Manage Paging File Size For All Drives. Hyper-V hosts often are loaded with lots of memory. Therefore, in previous versions of Windows Server, the operating system created a huge file for the virtual memory. But there is no advantage to Hyper-V having such a huge paging file. Keep in mind that the physical memory is allocated to the virtual machines and not used by the management OS.
As mentioned earlier in this chapter, no other software should be installed on the Hyper-V host, besides the management and backup agents. If this is the case, the general recommendation is to leave this setting at the default. There are no official statements indicating that the virtual memory settings need to be changed for Windows Server 2012 Hyper-V.
But there are always cases where this does not apply. What should be done when the virtual memory does allocate too much disk space? The paging file configuration can be done in the computer properties under Advanced—Performance Options, as shown in Figure 2-8.
Figure 2-8 Paging file configuration
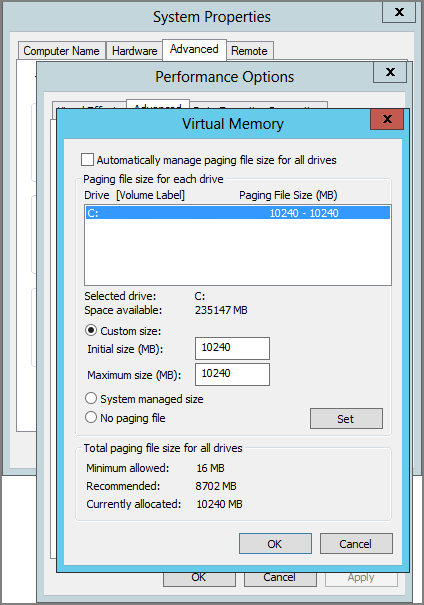
If the Hyper-V host has been installed with the Server Core installation mode, this UI will not be available. So we will use a script that can be run at the command prompt:
$Pagefile = Get-WmiObject Win32_ComputerSystem
$Pagefile.AutomaticManagedPagefile = $false
$Pagefile.Put()
$NewPagefile = gwmi -query "select * from Win32_PageFileSetting where name='C:\pagefile.sys'"
$NewPagefile.InitialSize = [int]”10240”
$NewPagefile.MaximumSize = [int]”10240”
$NewPagefile.Put()
A general good rule of thumb is to have a page file of between 4 GB and 6 GB. We usually don’t configure more than 10 GB. But again, only change the size of the paging file when the default value is not optimal configured automatically.
Installing the Hyper-V Role
At this stage, Windows Server has been installed and configured with the basic settings. The easiest way to install Hyper-V now is by using Server Manager, which opens by default when logging on to a newly installed server. The Add Roles And Features wizard simplifies the installation process and takes care of all role dependencies:
As a part of the installation, if the option has been selected, the server will reboot automatically. Verify that the installation is finished by checking Server Manager again. The Virtual Switches, Virtual Machine Migration, and Default Stores are part of the post-installation configuration that you’ll explore in the next chapter. Note that for the Hyper-V installation as well as its advanced configuration, PowerShell is a good companion on your way to mass-deploying virtualization. The sooner you explore these options, the earlier you can benefit from automated (unified) installation for multiple hosts.
As mentioned before, another way to install and configure the Hyper-V role is to leverage PowerShell. This is required on hosts installed as Server Core. The following is a ready-to-fire PowerShell command, which will work on Server Core but also on Server with a GUI:
Install-WindowsFeature Hyper-V -IncludeManagementTools -RestartUnlike when using the Add Roles And Features wizard from Server Manager, PowerShell does not include the management tools and snap-ins. To include these management tools, simply add the –IncludeManagementTools parameter to the cmdlet. On Server Core, the management tools and snap-ins cannot be run, unless you change to the minimal-shell option.
- DISM.exe
- Install-WindowsFeature
- Get-WindowsFeature
- Uninstall-WindowsFeature
Software and Tools on the Hyper-V Host
The parent partition should be dedicated to only the Hyper-V role, exclusively, without being shared with other roles such as Active Directory. Don’t even bother messing with it. Additional roles can negatively affect the performance of the server and its workload. This includes both “roles” as defined in Server Manager as well as additional software and services from third-party vendors. Minimizing the roles installed in the parent partition also keeps the attack surface low and reduces the frequency of updates required to keep the machine up-to-date. Administrators should carefully consider what software they plan to install in the parent partition. A small part of the storage role is already configured by default, which does not affect this recommendation.
Of course, a Hyper-V host needs to be monitored and protected. Therefore, management agents from the Microsoft System Center suite (or equivalent) are OK to be installed. However, don’t install other System Center components, such as the management server itself, on your Hyper-V hosts.
Configuring the Hyper-V Host
Configuring the Hyper-V host is probably one of the most important steps for your Hyper-V deployment. If you have to deploy multiple hosts, you will soon appreciate the power of PowerShell automation vs. clicking your way through installation and configuration. PowerShell is the right tool for the job, and therefore the following sections outline the equivalent PowerShell command of performing the task discussed.
Default Stores
With the previous version of Hyper-V, many customers ran into the problem that the operating system could run out of disk space, rendering Windows Server unbootable or terribly slow. The reason was that, by default, virtual machines were created on the system drive. The Hyper-V installation process in Windows Server 2012 now finally includes the option to initially change the default stores for the virtual machine and its virtual hard disks (see Table 2-5).
Table 2-5: Hyper-V default path
| Stores | Default Path |
| Virtual hard disk files | C:UsersPublicDocumentsHyper-VVirtual Hard Disks |
| Virtual machine configuration file | C:ProgramDataMicrosoftWindowsHyper-V |
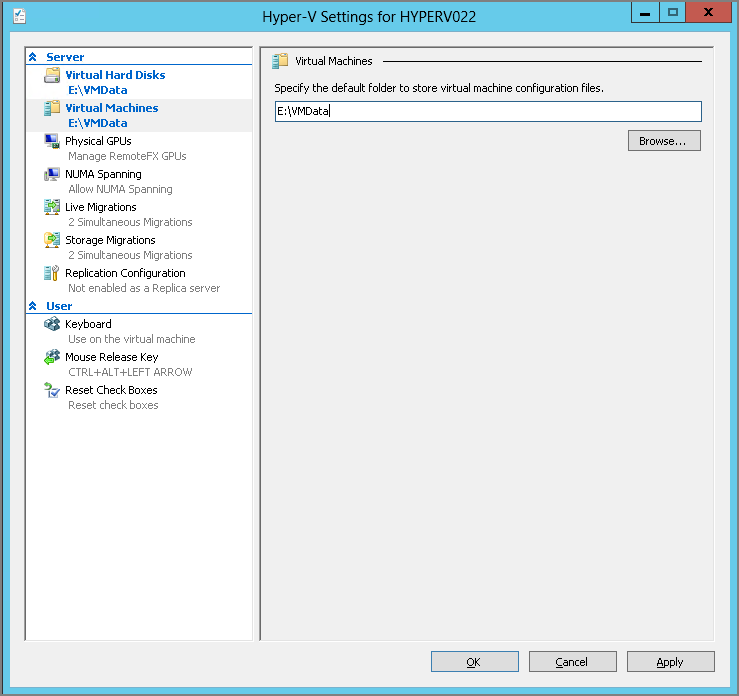
The setting can of course be changed after the installation by using the Hyper-V Manager. Select your Hyper-V host, open Hyper-V Settings, as shown in Figure 2-9, and update the path for Virtual Hard Disks as well as the path for Virtual Machines.
Figure 2-9 Hyper-V default store settings
Another option is to use PowerShell to configure the default stores:
Set-VMHost -VirtualMachinePath “E:VMData” -VirtualHardDiskPath “E:VMData”Virtual Switch
Virtual machines require a virtual switch for any kind of communication. Most common is the external switch, which is connected to a physical network adapter to access a physical network. Windows Server 2012 supports Single-Root I/O Virtualization (SR-IOV) and different switch extensions, which we’ll explain in a later chapter in detail.
Less popular are the internal virtual network, in which the communication is limited between the host and virtual machines, and the private virtual network, in which only the virtual machines on the same host can communicate with each other. Keep in mind that both switch types are not very useful in a cluster.
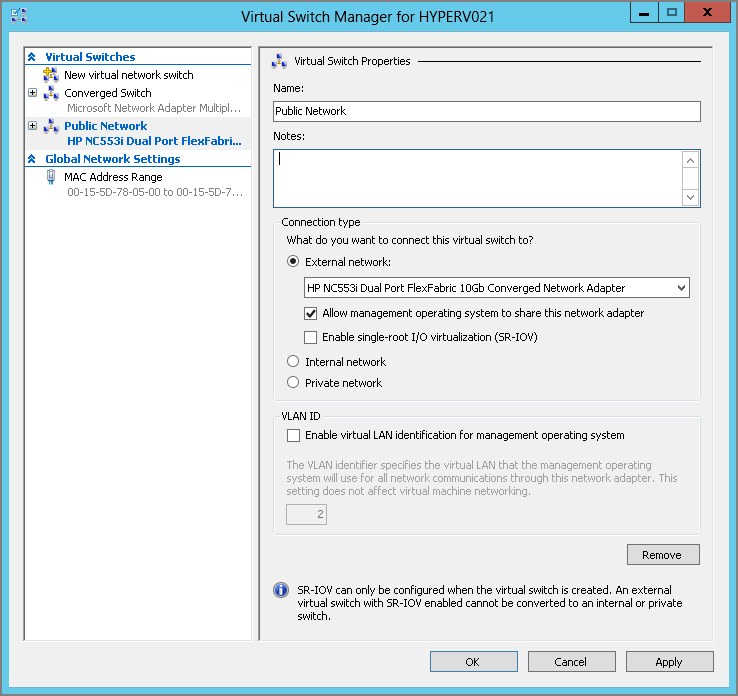
If no virtual switch has been created during the Hyper-V role installation, a new virtual switch can now be created, as shown in Figure 2-10. In the following example, we create a new virtual switch called Public Network with the corresponding network adapter Ethernet 2:
Another option is to use PowerShell to configure a new virtual switch with the name Public Network and using the network adapter Ethernet 3 (you will probably use the teamed network adapter for this):
New-VMSwitch -Name “Public Network” -NetAdapterName “Ethernet 3”If a virtual switch has already been created during the Hyper-V role installation, a name was automatically assigned to that virtual switch. To modify this name, just open the Hyper-V Management tools and select the required host. Then open Virtual Switch Manager and update the name for the virtual switch or use the PowerShell cmdlet to do so.
Figure 2-10 Create a new Hyper-V virtual switch.
MAC Address Range
Hyper-V allows a virtual machine to be created with a static or dynamic MAC address. By default, Hyper-V assigns a dynamic MAC address from its MAC address pool to the virtual machines. If required, the Hyper-V administrator can also configure or assign a fixed MAC address to a virtual machine.
All Hyper-V MAC address ranges start with the same three octets (00-15-5d), which have been registered by Microsoft. The next two octets are generated by using the last two octets from the IP address of the first network adapter, converted to hexadecimal. This would give 256 different addresses when using 00 as the MinimumMacAddress and FF as the MaximumMacAddress.
If the number of addresses is not enough or there are duplicate MAC address pools for whatever reason, the setting can be changed using the Virtual Switch Manager from the Hyper-V Manager, as shown in Figure 2-11.
Figure 2-11 Hyper-V MAC pool
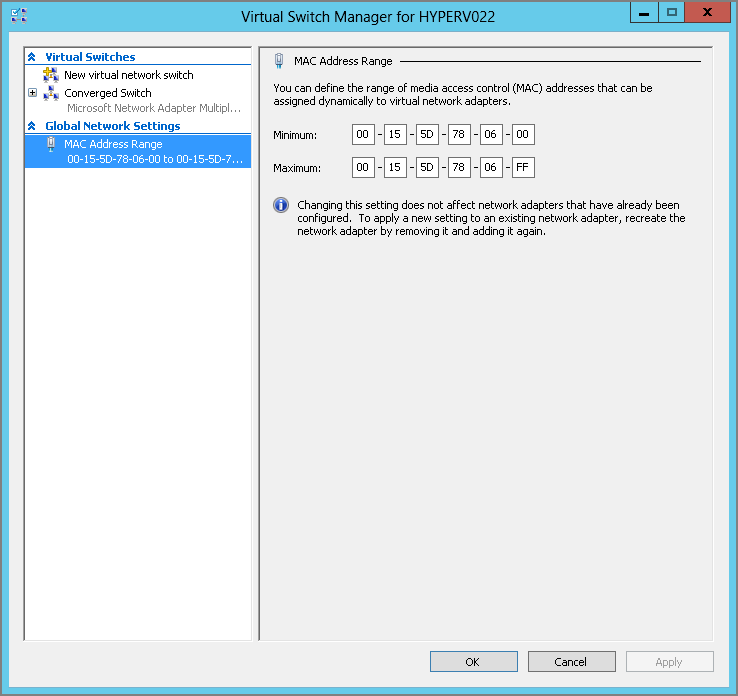
With PowerShell, the Set-VMHost command can be used to change this setting:
Set-VMHost -MacAddressMinimum “00-15-5D-78-80-00” `
-MacAddressMaximum “00-15-5D-78-8F-FF”
The preceding example would also increase the MAC address pool from 256 to 4,096 possible MAC addresses. It defines the valid MAC range from 80-00 to 8F-FF, allowing 16 × 256 addresses to be used, or 4,096. This change should be done before virtual machines or internal networks adapters are created to make use of the pool.
The Converged Network
To achieve the design of the converged network introduced at the beginning of this chapter, we will have to create a virtual switch. For this exercise, we call it Public Network and will use the Network Team created just a few pages ago. We then create virtual adapters for the management and cluster networks explained in Table 2-6.
Table 2-6: Hyper-V networks
This option is available only by using PowerShell. The first command creates the virtual switch:
New-VMSwitch -Name ”External Public” -MinimumBandwidthMode Weight `
-NetAdapterName “Network Team”
We then rename the virtual port, which has been created automatically for the parent partition:
Rename-VMNetworkAdapter -ManagementOS -Name “External Public” `
-NewName ”Management”
To create additional virtual ports for the parent partition, just use this command:
Add-VMNetworkAdapter -ManagementOS -Name “Cluster” -SwitchName “External Public”
Add-VMNetworkAdapter -ManagementOS -Name “Migration” `
-SwitchName “External Public”
If required, configure the VLAN tagging for the virtual ports:
Set-VMNetworkAdapterVlan -ManagementOS -VMNetworkAdapterName “Management” `
-Access -VlanId “100”
Before you can configure the IP addresses, the Bandwidth Weight has to be configured. Run this command for all virtual network adapters:
Set-VMNetworkAdapter -ManagementOS -Name “Management” -MinimumBandwidthWeight “5”
Set-VMNetworkAdapter -ManagementOS -Name “Cluster” -MinimumBandwidthWeight “20”
Set-VMNetworkAdapter -ManagementOS -Name “Migration” -MinimumBandwidthWeight “30”
And run the following for the virtual network switch:
Set-VMSwitch “Public External” -DefaultFlowMinimumBandwidthWeight “10”To avoid any errors and to simplify the configuration, you might want to disable all disconnected or unused network adapters. You can disable these in the Network Connections window in the Control Panel, or use PowerShell to disable all network adapters with the status Disconnected:
Get-NetAdapter -Physical | Where-Object {$_.Status -eq "Disconnected"} | `
Disable-NetAdapter }
Chapter 4 goes into more detail on how a converged network works.
Providing Security
As you can imagine, security is important, especially in a highly virtualized environment. Because Hyper-V is based on Windows Server, the existing processes and tools for delegation, antivirus protection, firewalling, and so on can be applied very well with some minor adaptations. Additional tasks include protecting the facility, having a backup and disaster recovery plan in place, developing update plans, and much more will be required to operate a datacenter securely.
Delegation
Granting just a limited group access to a hypervisor (or even a standard server) is a general practice in most enterprises. This leads to the question, what options do we have to securely delegate access to Hyper-V for other engineers?
Hyper-V in Windows Server 2012 makes it much easier as it comes with a built-in group called Hyper-V Administrators. But instead of adding an engineer to this group, you might consider using an Active Directory group to centrally manage access to all of your Hyper-V hosts. Consider this example: John Doe is a member of the Active Directory global group called GlobalHyperVAdmin. This global group is a member of the local group on each Hyper-V host called Hyper-V Administrators. By using Group Policy Preferences, this configuration could even be automated.
For more-advanced permission management, the Authorization Manager (AZMAN.msc) could be used:
To assign the definitions to a role, you have to do the following:
As mentioned before, it’s recommended that you offload the delegation to Active Directory groups to have it centrally managed rather than have to configure every host individually.
Windows Updates
The standard process would be to install the latest updates from the official channel Windows Update by using either a direct connection or the company’s internal provider like Microsoft’s Windows Server Update Services (WSUS). But not all relevant updates are published to Windows Updates as some updates are required only under certain circumstances. A hotfix is intended to correct only the problem that is described in its article and you should only apply the hotfix if you have seen the described symptoms.
Microsoft’s knowledge base is a good resource to use to find these hotfixes, as well as the blogs from the authors of this book, of course. Microsoft recently published article 2784261 with recommended hotfixes and updates for failover clustering. This will be an important article for every engineer who builds or supports Windows Server 2012 Hyper-V failover clusters. Often these hotfixes are not provided by Windows Updates and have to be downloaded and installed manually.
A simple PowerShell one-liner to install all patches from a directory could look like the following:
gci | foreach {iex ("wusa " + $_.name + " /quiet /norestart | out-null")}Antivirus Software
Although the use of antivirus software provides additional security, Hyper-V requires special configuration—for instance, certain services and files have to be excluded to avoid problems later. There have been several discussions on the Internet (blogs and communities) about whether a Hyper-V host really needs to have an antivirus scanner installed; we would say it depends on the situation and the environment. Usually a datacenter has a high level of security for external-facing communication. But what happens with internal “guests”? Because Hyper-V probably will host critical workloads, it’s important to make this service as secure as possible. You may want to ask yourself some of the following questions to help you determine the best security options:
- By using a network plug-in (for example, a meeting room), do guest devices get only limited network access?
- Do you have any other kind of security in your datacenter/network, such as IPsec?
- Are you using Server Core installation mode for the Hyper-V hosts?
- Do you restrict Internet access for the Hyper-V hosts?
- Is the Windows Firewall enabled on the Hyper-V hosts?
If you have answered no to most of these questions, you really have to think about how to make the hosts more secure. Ultimately, controlling the host means having full control over the virtual machines—all of them. Although the same does not apply the other way around (you can control a virtual machine but can’t get hold of the host), this is vital to remember when designing security for a Hyper-V host.
But as we have said, just installing antivirus software on a Hyper-V host doesn’t solve the entire problem; it may even generate new ones. In the past, virtual machines disappeared from the Hyper-V Manager or couldn’t be started anymore after such an installation. Therefore, the Virtual Machine Management Service (VMMS.exe) and VM worker process (VMWP.exe) have to be excluded from the scanner. Also exclude the directories that contain the virtual machine configuration and virtual hard disk files from active scanning.