Designing Virtual Machines
How often had engineers purchased new physical servers straight from a catalog or website without customizing them? It was very rare; each application had requirements and recommended configurations, and every organization had its own way of specializing and managing hardware. The same holds true for virtual machines. In this section, you are going to look at how to design and configure a virtual machine to suit the needs of the guest operating system, the application that will be installed, and your management system.
Virtual Machine Maximums
One of the goals of server virtualization is to replace all physical servers with virtual machines. Machine virtualization is not a new technology, but many computer rooms and datacenters have succeeded with converting only a relatively small percentage of servers into virtual machines. This can be for a number of reasons:
One of the goals of Windows Server 2012 was to enable any application that required more processor or memory to be installed in a Hyper-V virtual machine. As a result, Hyper-V now supports the following:
This increased level of support should ensure that processor and memory scalability are almost never a concern when considering the installation of applications into virtual machines if the host hardware is specified appropriately.
Other virtual machine maximums include the following:
The maximums of a virtual machine should not be considered as a goal. Microsoft recommends that you always allocate only enough resources to a virtual machine for its guest operating system and application(s) to be able to perform as required. For example, granting a virtual machine 32 virtual CPUs when it requires only 4 will waste physical processor capacity on the host. When that virtual machine is getting a quantum (a slice of time on the host processors), it will occupy 32 logical processors. That will waste the 28 occupied but unused logical processors that could have been used by other virtual machines.
The advice for sizing a virtual machine is the same as it would be for a physical server: grant only those resources that are required by the workload.
Note that you cannot hot-add resources to a running virtual machine—with two exceptions:
- You can add a disk to a SCSI controller while the virtual machine is running.
- You can increase Maximum or decrease Minimum RAM in a Dynamic Memory–enabled virtual machine’s settings while it is running.
You also can change the virtual switch connection of a virtual machine’s network cards. This is not quite hot, because there will be a brief moment of disconnection, and you might need to change the IP address(es) in the guest OS.
Auto-Start and Auto-Stop Actions
There are various ways to configure virtual machines to respond when their host is shut down or starts up.
Automatic Start Actions
There are three possible start actions you can set for a virtual machine when the host that it is placed on boots up. You can find these options under Automatic Start Action in the settings of the virtual machine:
Both of the automatic start actions allow you to define a Startup Delay. This value (in seconds) dictates how long the virtual machine will wait after the Management OS is running to start. The purpose of this Startup Delay is to prevent all virtual machines from starting at the same time and creating processor/storage/memory contention.
You can use PowerShell to configure this setting. The following example configures all virtual machines with a name starting with VM0 to start if they were running when the host stopped and delays the virtual machines’ start up by 5 minutes:
Set-VM VM0* -AutomaticStartAction StartIfRunning -AutomaticStartDelay 300Automatic Stop Actions
There are three ways to deal with virtual machines if the host they are running on is shut down. You can find these settings under Automatic Stop Action in a virtual machine’s settings:
You can configure the Automatic Stop Actions via PowerShell. This instruction configures all virtual machines on a host to shut down when the host shuts down:
Set-VM * -AutomaticStopAction -ShutDownDynamic Memory
Service Pack 1 for Windows Server 2008 R2 added the Dynamic Memory feature to Hyper-V to optimize how host memory was allocated to virtual machines by the Management OS. Dynamic Memory has been improved in Windows Server 2012 Hyper-V.
Introducing Dynamic Memory
Several host resources can limit the number of virtual machines that can be placed on, or run on, a host or cluster of hosts:
Without Dynamic Memory enabled in a virtual machine, the virtual machine must be given a large amount of RAM. For example, a SQL server might need 8 GB of Startup Memory. The virtual machine will consume all of that 8 GB, even if it is not required by the guest OS and application. That would be rather wasteful.
Microsoft introduced Dynamic Memory to accomplish several things:
- It optimizes the allocation of RAM to virtual machines. Dynamic Memory gives enabled virtual machines a startup amount of memory, allowing them to expand up to a maximum amount of memory when required, and retrieves the memory back from the virtual machine when it is no longer required.
- Dynamic Memory simplifies memory sizing. Administrators often added up the sum requirements of an application and OS, and installed RAM into a server, only to find it barely being used. Removing the RAM was difficult (because of downtime, ownership issues, and the risk that the RAM might be rarely required), so the capacity was wasted. The same holds true for virtual machines. Because Dynamic Memory allocates only what the virtual machine requires, administrators know that RAM will not be wasted on inaccurately sized virtual machines.
- Self-service and cloud computing are enabled by Dynamic Memory. Customers, as compared to administrators, are less skilled at sizing their virtual machines. Customers can start small and grow big, taking advantage of the elastic trait of a cloud. If Resource Metering is enabled (Chapter 5, “Cloud Computing”), customers will be charged for only what they use.
How Dynamic Memory Works
To understand Dynamic Memory, you must first understand the settings that are used to enable and configure it, per virtual machine. You can configure Dynamic Memory for a virtual machine in Hyper-V Manager by selecting the virtual machine, clicking Settings in the Actions pane, and clicking Memory in the left navigation pane of the settings window. The settings, shown in Figure 3-4, are as follows:
Figure 3-4 Configuring the memory of a virtual machine

You can also configure these settings in a virtual machine by using Set-VMMemory. PowerShell uses Priority instead of Memory Weight. Note that you can use MB or GB instead of entering the true byte value of the memory setting.
Set-VMMemory VM01 -StartupBytes 1GB -DynamicMemoryEnabled $True -MinimumBytes `
256MB -MaximumBytes 16GB -Buffer 5 -Priority 100
Now it’s time to see how Dynamic Memory puts these settings to use. Figure 3-5 shows a sequence of events during which memory is assigned to and removed from a virtual machine. The VM worker process (VMWP.EXE in the Management OS of the host) of each virtual machine with Dynamic Memory enabled is responsible for managing Dynamic Memory for that machine. There is a connection between the worker process and the Dynamic Memory Virtual Service Client (DMVSC) through the VMBus. (DMVSC is one of the Hyper-V integration components installed in the guest OS of the virtual machine.)
Figure 3-5 Dynamic Memory scenarios
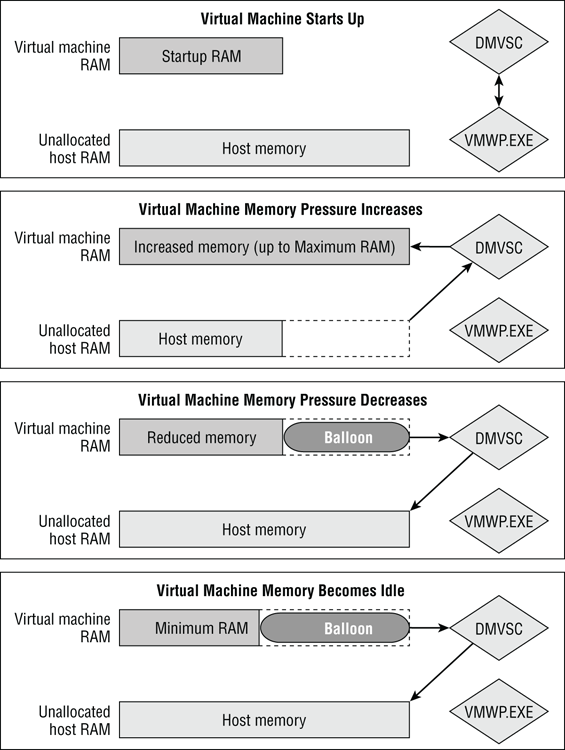
A virtual machine must be allocated with its Startup RAM for it to be able to boot up. That amount of memory is removed from the host and assigned to the virtual machine. There is a tiny, variable overhead for managing this memory (a few megabytes), whether Dynamic Memory is enabled or not.
Say that the Startup RAM setting is 1 GB, and the Maximum RAM setting is 16 GB. If you logged into the guest OS of the virtual machine, you would see that its memory (via Task Manager or Performance Monitor) is actually 1 GB and not the 16 GB that you might have expected. This is because the virtual machine has booted up with 1 GB, and the guest OS has not yet been given 16 GB of RAM by Dynamic Memory.
The memory pressure in the virtual machine might increase. This will be detected by the Management OS. Memory can be allocated to the virtual machine as long as there is unallocated memory on the host. A rapid and specially developed Plug and Play process is used to inject memory into the virtual machine. Remember that the Memory Buffer will be allocated as a percentage of the assinged RAM.
In this example, the virtual machine might have gone from Startup RAM of 1 GB and expanded up to 3 GB. Now if you looked at Task Manager or Performance Monitor in the guest OS, you would see that the memory size was 3 GB.
If the pressure in the virtual machine subsides and memory becomes idle, that memory will be removed by the DMVSC and returned to the host. This happens in one of two ways:
- Other virtual machines have high memory pressure, and memory is contended on the host. Hyper-V will immediately remove idle memory from virtual machines.
- There is no contention. Hyper-V will leave the memory in the virtual machine for several minutes, just in case it is required again. This will save some CPU cycles. The memory will eventually be removed if it is still idle.
You cannot just remove memory from a running machine, physical or virtual. Dynamic Memory, like other virtualization technologies, uses a process called ballooning, as noted earlier in this chapter. The idle memory is removed from the virtual machine and returned to the unallocated pool of RAM on the host. A balloon is put in place of the removed memory in the virtual machine. This gives the illusion that the memory is still there, but it is not available to the guest OS.
Let’s return to our example of a virtual machine that has Startup RAM of 1 GB and has increased to 3 GB. Now it has ballooned down to 1.5 GB of RAM. If you check the memory in the guest OS of the virtual machine, you will see that it is still 3 GB. Remember that you can never remove memory from a running machine; the balloon has fooled the guest OS into believing that it still has its high-water mark of RAM. The memory amount can increase, but it will not go down while the guest OS is running. The value will reset when the virtual machine’s guest OS starts up again.
If the virtual machine becomes busy again and pressure increases, Hyper-V will detect this. Memory will be allocated to the virtual machine and deflate the balloon a little at a time.
If a virtual machine becomes idle, the pressure for memory will be very low. This will enable the DMVSC to return memory to the host. If the Minimum RAM value is lower than the Startup RAM value, Dynamic Memory will continue to remove idle memory and reduce the virtual machine to a value lower than what it booted up with. This will minimize the resource consumption of the idle virtual machine and free up memory for more-active virtual machines.
How does this affect our example virtual machine?
- It booted up with 1 GB.
- It increased to 3 GB.
- It ballooned down to 1.5 GB.
Now the virtual machine might become idle and balloon further down, as far as its Minimum RAM value of 256 MB. Logging into the guest OS and checking the memory will still show us 3 GB (the previous high-water mark). Hyper-V Manager might show the virtual machine using 308 MB RAM (256 MB plus the Memory Buffer of 20 percent). At this point, we have saved 921 MB (1,229 MB, the Startup RAM plus Memory Buffer, minus 308 MB), which can be made available to other virtual machines.
A host can never assign more memory than it has. That means that the total sum of memory being used by virtual machines cannot exceed the amount of memory that is on the host—don’t forget that the Management OS will use a small amount of memory too. This means that we do not overcommit memory with Dynamic Memory.
In Hyper-V, there is no shared-paging or memory overcommitment as is found in other virtualization platforms. With shared paging, a hypervisor performs a single instance process of memory management. If two virtual machines have a common page of memory, it is stored once in the host’s physical RAM. This option is usually one of the first that you are told to turn off by other vendors when you open a support call. Shared paging at the hypervisor layer might also have problems if a guest operating system does this process internally to reduce its own memory footprint.
In memory overcommitment, a hypervisor lies to a virtual machine about the RAM that it has been assigned. With such a hypervisor, a virtual machine might be assigned 1 GB RAM at bootup, but the guest OS believes it has 16 GB RAM to use. If the guest OS tries to use it and the hypervisor does not have the physical RAM to allocate, then the hypervisor has to lie. This lie is accomplished by using second-level paging to simulate RAM; a host paging file blindly pages RAM for the virtual machine with no visibility over page usage or priority. This will hugely reduce memory performance, and requires additional (very fast) disk space on the host for the second-level paging file.
Microsoft did look at these approaches and saw the drawbacks on supportability, performance, and stability. This is why Dynamic Memory does not overcommit memory; service performance is more important than virtual machine density.
Smart Paging
Imagine that you have lots of idle virtual machines with Dynamic Memory Minimum RAM configured. Each of these virtual machines is on a host and has ballooned to below its Startup RAM as in Figure 3-6. The host’s RAM is completely filled with virtual machines. Now one of three scenarios happens:
- The host reboots, thus requiring virtual machines (if configured to automatically start) to boot up with their Startup RAM.
- One or more virtual machines reboot, each requiring its Startup RAM.
- One or more virtual machines reset, and each one requires its Startup RAM.
Figure 3-6 Virtual machines, on using Minimum RAM, have filled a host.
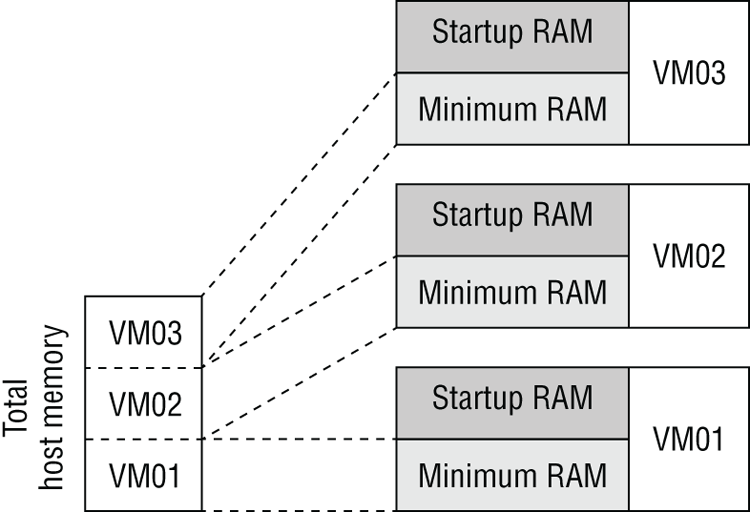
The problem is that the host RAM was already full of virtual machines, and these once idle virtual machines now need more memory than they had before—the sum of the Startup RAM values is higher than the sum of the Minimum RAM values. The host has a responsibility to get the virtual machines back up and running.
This is actually a rare, and theoretical, circumstance. Someone or something has deliberately squeezed a large number of idle virtual machines onto a host until the RAM was contended. Realistically, there will be only a few virtual machines that have ballooned down below their Startup RAM. A host might have failed in a densely populated Hyper-V cluster, causing virtual machines to be failed over to this host. System Center Power Optimization might have been used too aggressively to move virtual machines onto fewer hosts, and shut down the idle hosts, and a patching window may have caused virtual machines to reboot.
A well-sized implementation would have prevented these issues. Failover Clustering will use the “best available” host (the one with the most RAM) to fail over each virtual machine. Always ensure that you have enough host capacity in a cluster to handle a failover scenario if performance is more important to you than budget when sizing high availability. Don’t be too ambitious with System Center Power Optimization; always leave room for at least one (or more in bigger environments) failover host and be aware of automated patching windows.
A management system such as System Center will also intervene, where possible, to load-balance and move virtual machines (with no downtime) to more-suitable hosts. All of these techniques should make this Minimum RAM vs. Startup RAM contention issue a rare event. But even then, Hyper-V has to successfully give these virtual machines enough memory for their Startup RAM to get them running again.
Smart Paging is a process whereby a Smart Paging file is temporarily created to simulate memory for a virtual machine when one of the three preceding scenarios occurs and the host does not have enough memory to start up previously running virtual machines that must be auto-started. This is not second-level paging; Smart Paging exists only to enable virtual machines to start up and return to their idle state, so they can balloon back down to their previous amount of memory, below their Startup RAM. Eventually this does occur, and the Smart Paging file will be removed. If a virtual machine continues to use a Smart Paging file, alerts in Event Viewer will inform you. This would be indicative of overly aggressive placement of virtual machines on this host.
There is not a single Smart Paging file for the host. Instead, each virtual machine that requires Smart Paging will have its own Smart Paging file. You can see the default storage location (where the virtual machine is stored) in the virtual machine settings under Smart Paging File Location. You can retrieve this path by using the following PowerShell command:
(Get-VM VM01).SmartPagingPathYou can change the path (while the virtual machine is powered off) by running this:
Set-VM VM01 -SmartPagingFilePath “D:SmartPaging”Other Dynamic-Memory Side Effects
There are two other side effects of increasing and decreasing memory in a virtual machine.
The Save State BIN File
A virtual machine can be configured to automatically save its state when a host shuts down. The state of the virtual machine’s processors and memory is written to a VSV file in the Virtual Machines subfolder where the virtual machine’s configuration is stored. If the virtual machine is configured to save its state when the host shuts down, Hyper-V will maintain a BIN file. This placeholder file is a few megabytes larger than the amount of memory currently assigned to the virtual machine. It ensures that the virtual machine will always have disk space to write its save state to.
The BIN file will increase and decrease in size to roughly match the memory that is allocated to the virtual machine. You should account for this when sizing your storage. This can be quite a surprise for administrators who are creating virtual machines with very large memories. You can remove this BIN file by changing the virtual machine to use one of the alternative Automatic Stop Actions in the virtual machine settings in the GUI or via PowerShell:
Set-VM VM01 -AutomaticStopAction ShutDownThe Guest OS Paging File
If the guest OS of the virtual machine is set to automatically manage the paging file, you might see it increase in size as memory is allocated to the virtual machine. This won’t be an issue with relatively small amounts of increase, but it would be a problem if a virtual machine was expanding from 512 MB to 64 GB of RAM. The paging file could attempt to fill the drive that it is on, thus depriving you of storage and reducing the optimal size of the paging file. Here are two suggestions:
- Ensure that the paging file disk has sufficient space for growth.
- Manually configure the guest OS paging file for virtual machines that are configured to have massive potential growth.
Dynamic Memory Strategies and Considerations
There are many ways to configure Dynamic Memory. You might have a one-size-fits-all approach to all virtual machines that might be suitable for a cloud. You might perform a very granular configuration per virtual machine on a private, non-cloud environment in which IT is directly involved with the management of everything.
Self-Service and Startup RAM
Say you run a cloud with self-service. Your customers, internal or external, can use a portal to deploy their own virtual machines from a library of templates, all of which are managed by your organization. Your virtual machine templates are set up with Dynamic Memory enabled. Every virtual machine will boot up with a Startup RAM of 512 MB and maybe grow to a Maximum RAM of 4 GB, 8 GB, or more. And there’s the problem.
Just about every application (at least from Microsoft) that you install requires a SQL Server database. SQL Server will refuse to install if the prerequisites check finds less than 1 GB RAM in the guest OS of the virtual machine. The virtual machine has had no need to increase the RAM beyond 1 GB, and the installer fails. You can be guaranteed lots of calls from customers looking for help. A few of those help desk calls will be from angry people who claim that they are paying for 4 GB RAM or more and that you’re trying to con them. You could ask them to temporarily spike their memory (run MSPAINT.EXE and set the image size to 10,000 by 10,000 pixels), but that won’t calm the customers down.
Alternatively, you can try different configurations with your virtual machine templates and prevent the issue from happening at all.
You could set the virtual machine to have a Startup RAM that is the most common minimum prerequisite for an installation. 1 GB is the minimum amount of memory required by SQL Server 2012. You could combine this with Minimum RAM set to 256 MB. Any new virtual machine will quickly balloon down from 1 GB until SQL Server or a similarly demanding application is installed. Any unused virtual machine will have only a very small footprint on the host.
Some public cloud operators are concerned that Dynamic Memory shows the guest OS administrator only the high-water mark of memory allocation since the guest OS last booted up. In that case, the Startup RAM could be set to match the Maximum RAM. This will require a lot of memory to be available to start the virtual machine. Once the virtual machine is running, it can balloon down to a much lower Minimum RAM. The downside to this approach is that you are almost guaranteeing Smart Paging activity if lots of virtual machines need to start up at the same time and there is no other host to load-balance to.
Using Maximum RAM
Here are three possible approaches, using names not created by Microsoft, to setting the Maximum RAM of a virtual machine:
Using Minimum RAM
We have to consider the potential impact of Smart Paging when using Minimum RAM. Aggressive usage of this useful feature on hosts that cannot be load-balanced (for example, by System Center) will lead to Smart Paging when these hosts are overloaded. Here are some things to consider:
- Do not manually overload non-load-balanced hosts with virtual machines.
- When designing hosts, always leave enough hosts to deal with host failure. For example, a 64-node Hyper-V cluster probably needs several (N+4 maybe), and not just one (N+1), failover host.
- When using System Center Power Optimization, keep in mind that virtual machines will probably patch at night, when you have squeezed the virtual machines down to fewer hosts. Always leave enough host capacity powered up for System Center to load-balance the virtual machines as they power up. For example, you might shut down six of ten hosts and barely squeeze the virtual machines onto the remaining four hosts. That will cause Smart Paging during reboot/resets. Instead, shut down just five hosts and still reduce your power costs by 50 percent at night while avoiding Smart Paging.
Host Memory Reserve
There is a single pool of RAM on a host. From this pool, the Management OS consumes RAM for itself, and Dynamic Memory assigns memory to virtual machines. Without any controls, high-pressure virtual machines could consume the entire RAM from the host, and leave the Management OS without the ability to get any more memory. This could cause the Management OS to freeze (the virtual machines would still continue to operate) until the virtual machines balloon down.
Hyper-V has a control to prevent this from happening. The Host Memory Reserve is used by the Management OS to reserve host RAM for itself so that Dynamic Memory cannot claim it.
The formula for calculating this value has not been made public at the time of this writing. What we do know is that the setting is calculated much more conservatively than it was in Windows Server 2008 R2 with Service Pack 1. This means that a host will reserve slightly more memory for itself than it would have before. A Management OS requires at least 512 MB to start but usually requires around 2 GB RAM to run optimally.
The setting (amount of MB to be reserved specified in REG_DWORDMemoryReserve at HKLMSOFTWAREMicrosoftWindows NTCurrentVersionVirtualization) should not be tampered with and should be left to be managed by Hyper-V, unless you are instructed otherwise by Microsoft support.
Processors
You can configure the virtual CPUs of a virtual machine by editing the settings of the virtual machine and clicking Processor. Note that Processor can expand, to reveal further settings called Compatibility and NUMA.
Processor Settings
A virtual machine can have from 1 to 64 virtual processors. The number of virtual processors cannot exceed the number of logical processors in the host. Keep this in mind if you plan to move the virtual machine around different hosts by using Live Migration. Although you can configure the number of virtual CPUs in uneven numbers, this is not recommended. You can configure the number of virtual CPUs by using the Number Of Virtual Processors setting (which has a default of 1), as shown in Figure 3-7.
The Resource Control options allow you to customize how the virtual CPUs of this virtual machine access the physical logical processors that they will run on. There are three settings:
Figure 3-7 Configuring virtual processors in a virtual machine

Set-VMProcessor is the PowerShell cmdlet for configuring virtual machine CPUs. You can mimic the Processor settings in Hyper-V Manager by running this:
Set-VMProcessor VM01 -Count 4 -Reserve 100 -Maximum 100 -RelativeWeight 1000Compatibility
There is just a single setting in the GUI called Migrate To A Physical Computer With A Different Processor Version. With this setting enabled, you can use Hyper-V Live Migration to move a virtual machine to hosts with different versions of processor from the same manufacturer. For example, you could move a running virtual machine from a host with Intel E5 processors to a host with Intel Xeon 5500 processors with no impact on service availability.
This setting is off by default. This is because it reduces the physical processor functionality that the virtual machine can use. Basically, the virtual machine is reduced to the lowest set of processor features made by that manufacturer (Intel or AMD). This is quite a price to pay for Live Migration across hosts of different ages. You can avoid this in one of two ways:
If you have no choice, and you must support Live Migration between different generations of processor from the same manufacturer, you must enable the Migrate To A Physical Computer With A Different Processor Version setting. You can also do this with PowerShell:
Set-VMProcessor * -CompatibilityForMigrationEnabled $TrueHyper-V veterans might notice that one compatibility setting of the past (and for the past) is missing. Older operating systems such as Windows NT 4 Server require the virtual CPUs to run with compatibility for older operating systems enabled. Otherwise, these historic operating systems cannot be installed. You still have the setting, but it can be reached only via PowerShell; this shows you how often Microsoft expects people to use it!
Set-VMProcessor VM02 -CompatibilityForOlderOperatingSystemsEnabled $TrueNUMA
Non-Uniform Memory Access (NUMA) is a hardware architecture driven by the way that physical processors access memory on the motherboard of servers.
What is NUMA?
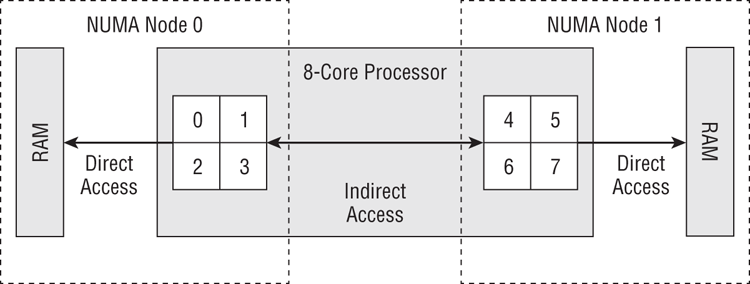
A large processor, one with many cores, may be designed by the manufacturer to divide itself up to enable parallel direct connections to different banks of memory, as shown in Figure 3-8. This example shows an 8-core processor that has been divided into two NUMA nodes. Cores 0–3 are in NUMA Node 0 and have direct access to one set of memory. Cores 4–7 are in NUMA Node 1 and have direct access to another set of memory.
If a process that is running on cores in NUMA Node 0 requests memory, a NUMA-aware operating system or hypervisor will do its best to assign RAM from NUMA Node 0. This is because there is a direct connection to the memory in that same node. If there is not enough memory available in NUMA Node 0 to meet the request, then something called NUMA node spanning will occur, and the operating system or hypervisor will assign RAM from another NUMA node, such as NUMA Node 1. The process that is running in NUMA Node 0 has indirect access to the memory in NUMA Node 1 via the cores in NUMA Node 1. This indirect access will slow the performance of the process.
Figure 3-8 A NUMA architecture
NUMA is not unique to Hyper-V. This hardware architecture is one that operating systems (Windows and Linux) and hypervisors (Hyper-V and ESXi), and even some applications (such as IIS 8, SQL Server, and Oracle) have to deal with.
The example in Figure 3-8 is a simple one. Imagine that you have two of those 8-core processors, or maybe ten 16-core processors. You could have a lot of NUMA nodes. The truth is, there is no rule for NUMA architecture and sizing. It depends on the processor that you have and the memory placement/sizing on your motherboard. You could search for information for your processor, but the quickest solution might be to discover what your hardware actually has:
- CoreInfo by Microsoft SysInternals (http://technet.microsoft.com/sysinternals/cc835722.aspx) can dump your NUMA architecture when run with the -N flag.
- You can run the Get-VMHostNumaNode PowerShell cmdlet to see the architecture and sizes of the NUMA nodes.
- The NUMA Node Memory counters in Performance Monitor show the memory size and utilization of your NUMA nodes.
Hyper-V and NUMA
Hyper-V is NUMA aware. When a virtual machine runs in a NUMA node, Hyper-V will do its best to allocate memory to that virtual machine from the same NUMA node to minimize NUMA node spanning.
Dynamic Memory can cause a virtual machine to span NUMA nodes. Refer to Figure 3-8. Imagine that both NUMA nodes have 16 GB of RAM. A virtual machine, VM01, is running in NUMA Node 0 and has been allocated 10 GB of RAM from the direct access memory. Now memory pressure grows in the virtual machine, and Dynamic Memory needs to assign more RAM. There is no more free RAM left in NUMA Node 0, so Dynamic Memory needs to assign indirect access memory from another NUMA node.
You might want to prevent this from occurring. You can do this via Hyper-V Manager:
Changing the NUMA spanning setting requires you to restart the Virtual Machine Management Service (VMMS, which runs in user mode in the management OS). You can do this as follows:
You can view the current NUMA node spanning setting by running the following PowerShell snippet:
(Get-VMHost).NumaSpanningEnabled To disable NUMA spanning on the host and restart the VMMS, you can run the following piece of PowerShell:
Set-VMHost -NumaSpanningEnabled $false
Restart-Service "Hyper-V Virtual Machine Management"
NUMA was not a big deal with Windows Server 2008 R2 Hyper-V; it was something that was dealt with under the hood. We were restricted to a maximum of four virtual CPUs per virtual machine, so NUMA node spanning was uncommon. But Windows Server 2012 Hyper-V supports up to 64 virtual CPUs and 1 TB RAM in a single virtual machine; there is no doubt that a larger virtual machine (even six or eight virtual CPUs, depending on the host hardware) will span NUMA nodes. And that could have caused a problem if Microsoft had not anticipated it.
Windows Server 2012 Hyper-V reveals the NUMA node architecture that a virtual machine resides on to the guest OS (Windows or Linux) of the virtual machine when it starts up. This allows the guest OS to schedule processes on virtual CPUs and assign memory to processes while respecting the NUMA nodes that it is running on. This means we get the most efficient connections at the virtual layer, and therefore the physical layer, between processors and memory. And this is how Microsoft can scale virtual machines out to 64 virtual processors and 1 TB RAM without making compromises.
There is one remaining consideration with NUMA and larger virtual machines that span NUMA nodes. The NUMA architecture that the guest operating system is using cannot be changed until it powers off. What happens when the running virtual machine is moved (via Live Migration) to another host with a smaller NUMA node architecture? The answer is that the guest operating system will be using invalid virtual NUMA nodes that are not aligned to the physical NUMA structure of the host, and the performance of the services provided by the virtual machine will suffer.
Ideally, you will always live-migrate virtual machines only between identical hosts, and any new hosts will be in different server footprints. And just as with processor compatibility, this can be an unrealistic ambition.
Figure 3-9 shows the NUMA settings of a virtual machine, which you can find by editing the settings of a virtual machine and browsing to Processor ⇒ NUMA. The Configuration area shows the current NUMA configuration of the virtual machine. This example shows two virtual processors that reside on a single socket (physical processor) in a single NUMA node.
Figure 3-9 Two virtual processors that reside on a single socket (physical processor) in a single NUMA node
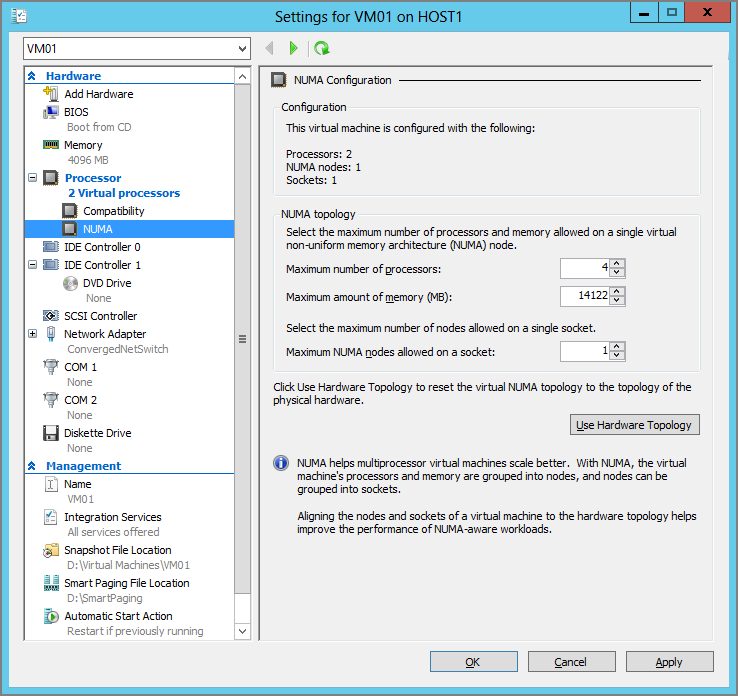
The NUMA Topology area allows you to customize the virtual NUMA node. This should be sized to match the smallest NUMA node on the hosts that your virtual machine can be moved to via Live Migration. This can be tricky to do, so Microsoft made it easy:
We could not find a PowerShell alternative at the time of this writing.
Virtual Storage
A virtual machine needs somewhere to install its operating system and applications, and somewhere to store its data. This section describes the storage of Hyper-V virtual machines.
The Storage Formats
You can use three disk formats in Hyper-V: pass-through disks, VHD format, and VHDX format.
Pass-Through Disks
A raw LUN, known as a pass-through disk, can be assigned to a virtual machine. There are two reasons to do this:
- Getting nearly 100 percent of the potential speed of the RAW disk is not enough. Pass-through disks are often used in lab environments to perform tests at the very fastest possible speed.
- You need to create guest clusters that can share a LUN, where using virtual or file server storage is not an option.
Perform the following to attach a pass-through disk to a virtual machine:
Using PowerShell you can use Get-Disk to identify the LUN (disk number). You can attach this LUN as a pass-through disk to the virtual machine by running Add-VMHardDiskDrive.
Add-VMHardDiskDrive VM02 -ControllerType SCSI -ControllerNumber 0 `
-ControllerLocation 0 -DiskNumber 2
Pass-through disks are the least flexible and most expensive to own type of storage that can be used. They cannot be moved; they require traditional backup; they require application- or storage-based DR replication; and they do not lend themselves to self-service creation/administration in a cloud.
Virtual hard disks are the alternative to pass-through disks. Virtual hard disks are just files that simulate disks. Because they are software, they are easy to manage, and they do lend themselves to thin provisioning, self-service in a cloud, and easy administration. Virtual hard disks are easy to back up (they are just files), easy to replicate to DR sites, and easy to move. And most important, virtual hard disks can run at nearly the speed of the underlying physical storage.
VHD Format
The VHD format has been around since the 1990s, when it was created by Connectix, a company that Microsoft acquired and whose technology became the foundation of Microsoft’s machine virtualization. The VHD disk format has been supported by Microsoft Virtual Server and by Hyper-V since Windows Server 2008. VHD has a major limitation—which wasn’t considered a limitation just a few years ago: VHD cannot scale beyond 2,040 GB (just under 2 TB).
VHDX Format
Windows Server 2012 adds a new disk format called VHDX that can scale out to 64 TB, which is also the maximum LUN size supported by NTFS and ReFS. The VHDX format also has the following features:
- It allows application developers to use VHDX as a container and store metadata in the file.
- VHDX maintains an internal log (within the file) to maintain consistency of the contained data. For example, it should prevent data corruption during power outages.
- VHDX (on IDE or SCSI virtual controllers) supports UNMAP to allow Windows 7 SP1 and Windows Server SP1 and later guest OSs to inform supporting underlying storage to reclaim space that used to contain data for thin provisioning (useful for dynamic VHDX—dynamically expanding disks will be explained later in the chapter). This requires the integration components to be installed in the guest OS. The unused space is reclaimed when the volume is defragged or when you run Optimize-Volume -DriveLetter <X> –ReTrim. Note that pass-through disks attached to Virtual Fibre Channel or SCSI controllers also can support Unmap.
Disk Sector Alignment
Alignment is a process whereby files are constructed in block sizes that match the way that they are physically stored on disks. Hard disks have used 512-byte sectors up to now. That means that data is read from and written to the disk in 512-byte chunks. Therefore, pretty much every operating system, hypervisor, and file type has been designed to be aligned for 512-byte sectors; for example, the VHD format is designed to be read and written in 512-byte chunks.
However, a change has been occurring in the storage business. Disks have started to adopt larger 4K-sector sizes. This allows the disks to get bigger and maintain performance. The storage industry gives us two kinds of 4K disk:
Windows Server 2012 supports native 4K disks (http://msdn.microsoft.com/library/windows/desktop/hh848035(v=vs.85).aspx). You can install Windows Server 2012 on a native 4K disk and use it as a Hyper-V host. Windows Server 2012 will read and write 4K at a time without any emulation.
The structure of a VHD file that is created on a Windows Server 2012 host is padded so that it is aligned to 4K. Microsoft has also included an RMW process in VHD to allow it to be stored on native 4K disks. Note that you will need to convert VHDs that are created or used on hosts previous to Windows Server 2012 or Hyper-V Server 2012. This is because they lose the enhancement that aligns the disk to 4K and allows native 4K storage.
Microsoft is the first virtualization manufacturer to produce a virtual hard disk format (VHDX) that is designed to allow native 4K alignment without RMW. This means that VHDX is the best storage option on 512-byte-sector disks (scalability and data consistency), on 512e disks, and on 4K disks (performance). The VHD is retained on Windows Server 2012 for backward compatibility. A best practice is to convert VHD files into the VHDX format if you do not require support for legacy versions of Hyper-V.
The Types of Virtual Hard Disk
There are three types of virtual hard disk: fixed size, dynamically expanding, and differencing. The three types are available if you choose either VHD or VHDX as your format.
Fixed-Size Virtual Hard Disk
When you create a fixed virtual hard disk of a certain size, a virtual hard disk is created that is that size on the physical storage. For example, if you create a 100 GB fixed VHDX, a 100 GB VHDX file is created.
The creation process for a fixed virtual hard disk can take some time. This is because each block of the VHDX is zeroed out to obscure whatever data may have been stored on the underlying file system.
Fixed virtual hard disks are the fastest of the virtual hard disk types, and are often recommended for read-intensive applications such as SQL Server or Exchange.
However, many virtual machines use only a small percentage of their virtual storage space. Any empty space is wasted, because the virtual hard disk file is fully utilizing the underlying physical storage (preventing SAN thin provisioning from having an effect). You could deploy small fixed virtual hard disks, monitor for free space alerts, and expand the virtual hard disks as required. However, this requires effort and the virtual hard disk to be offline (usually requiring the virtual machine to be powered off too).
Dynamically Expanding Virtual Hard Disk
The dynamically expanding (often shortened to dynamic) type of virtual hard disk starts out as a very small file of just a few megabytes and grows to the size specified at the time of creation. For example, you could create a 127 GB dynamic VHDX. The file will be 4 MB in size until you start to add data to it. The file will gradually grow to 127 GB as you add data.
The dynamic virtual hard disk has spawned a lot of debate over the years in the Hyper-V community. There are those who claim that the dynamic type is just as fast as the fixed virtual hard disk, and there are those who say otherwise. In Windows Server 2008 R2, Microsoft increased the block size in a dynamic VHD from 512 KB to 2 MB. This meant that the dynamic VHD would grow more quickly. The growth rate was increased again with dynamic VHDX in Windows Server 2012.
However, real-world experience shows that write speed is not the big concern with the dynamic type. Imagine you have lots of dynamic virtual hard disks stored on the same physical volume. They all grow simultaneously in random patterns. Over time, they fragment, and this fragmentation scatters the VHDX all over the volume. Anecdotal evidence points out that the read performance of the VHDX files will suffer greatly, and this will reduce the performance of intensive read operations such as database queries. This could reduce the performance of interactive applications to below service-level agreement levels. Fixed virtual hard disks offer superior read performance over time in a production environment.
The benefit of the dynamic virtual hard disk is that it does consume only the space required by the contained data plus a few additional megabytes. This can reduce the costs of purchase and ownership of physical storage and enable the usage of SAN thin provisioning. Dynamic virtual hard disks are very useful for those who need to minimize spending and in lab environments but are not concerned with the loss in read performance.
Differencing Virtual Hard Disk
The differencing type is used when you need to be able to rapidly provision one or more virtual machines and you need to:
- Do it quickly
- Use as little storage space as possible
When you create a differencing virtual hard disk, you must point it at a parent virtual hard disk that already has data in it. The differencing disk will start out very small with no data. A virtual machine will use the differencing disk as follows:
- Data older than the differencing disk is read from the parent disk.
- Any new data that must be stored is written to the differencing disk, causing it to grow over time.
- Any data newer than the differencing disk is read from the differencing disk.
The traits of differencing disks make them very useful for pooled VDI virtual machines (the sort that are created when a user logs in and deleted when they log out) and virtual machines used for software testing. A virtual machine is prepared with an operating system and generalized using Sysprep (if the guest OS is Windows) with an automated configuration answer file. The virtual machine is destroyed, and the hard disk is retained and stored in a fast shared location that the host(s) can access. This virtual hard disk will be the parent disk. New virtual machines are created with differencing virtual hard disks that point to the generalized virtual hard disk as their parent. This means that new virtual machines are created almost instantly and only require the guest OS to start up and be customized by the answer file.
Differencing disks are the slowest of all the virtual hard disk types. Differencing disks will also grow over time. Imagine deploying applications, security patches, service packs, and hotfixes to virtual machines that use differencing disks. Eventually they will grow to be bigger than the original parent disk, and they will run slower than the alternative dynamic or fixed types.
A common problem is that people assume that they can mess with the parent disk. For example, they try to expand it or replace it with a newer version with an updated guest OS. This will break the link between the parent and the differencing disks.
It is for these reasons that differencing disks should not be used for any virtual machine that will be retained for more than a few hours or days, such as a production server.
Virtual Hard Disk Management
You will use the same tools to create VHD and VHDX formats, and VHDX will be the default format.
Creating Virtual Hard Disks
You can create virtual hard disks in several ways, including these:
- The New Virtual Machine Wizard will create a dynamic VHDX file as the boot disk for a new virtual machine. We have already covered this earlier in the chapter.
- Disk Manager can be used to create virtual hard disks. We do not cover this method in this book.
- You can click New ⇒ Hard Disk in the Actions pane in Hyper-V Manager to start the New Virtual Hard Disk Wizard. This will create a new virtual hard disk in a location of your choosing that you can later attach to a virtual machine.
- You can edit the storage controller settings of a virtual machine, click Add to add a new Hard Drive, and click New to start the New Virtual Hard Disk Wizard. This will add the new virtual hard disk (stored in your preferred location) and attach it to the controller with the Location (channel) of your choosing.
- You can use the New-VHD PowerShell cmdlet.
The New Virtual Hard Disk wizard will step you through the decision-making process of creating a new virtual hard disk:
If you are creating a differencing virtual hard disk, you are simply asked to enter the path and filename of the desired parent disk.
If you are creating a dynamic or fixed virtual hard disk, the screen is different. If you want a new empty virtual hard disk, you enter the desired size of the disk. Alternatively, you can create a new virtual hard disk that is made using the contents of a LUN that is attached to the server or from another virtual hard disk. These options can be used in a few ways, including the following:
- You want to convert a pass-through disk or a LUN into a virtual hard disk. This might be useful for people who used pass-through disks in past versions of Hyper-V and who now want to convert them to VHDX files that are more flexible and equally as scalable.
- You would like to convert an existing virtual hard disk into a Windows Server 2012 virtual hard disk. This could be useful if you have used a VHD on an older (Windows Server 2008 or Windows Server 2008 R2) version of Hyper-V and want to convert it into one that is padded for better performance on 512e physical disks.
Using the PowerShell alternative can be a bit quicker than stepping through the New Virtual Hard Disk Wizard, especially if you need to create lots of virtual machines or virtual hard disks. The following example creates a 100 GB fixed VHDX:
New-VHD -Path "D:Virtual Machinesparent.vhdx" -Fixed -SizeBytes 100GBThe next example creates a differencing VHDX that uses the first VHDX as its parent:
New-VHD -Path "D:Virtual MachinesVM01differencing.vhdx" -ParentPath `
“D:Virtual Machinesparent.vhdx”
If you want to create VHDX files that are optimized for 512e or 4K disks, you must use the New-VHD PowerShell cmdlet. There are two ways to configure a VHDX to get the best performance and to get operating system compatibility:
Creating VHDX files with a sector size that doesn’t match the physical storage will greatly reduce your storage performance. Therefore, it is recommended that you match the physical sector size of VHDX files with the type of physical disks that you are using. For example, a 4K guest OS should use VHDXs with 4K logical and physical sector sizes if the disk is 4K. However, a non-4K-capable guest OS should use VHDXs with a 512-byte logical sector size and a 4K physical sector size to get RMW and the best compatibility possible when stored on a 4K disk. Table 3-1 shows how to match the physical sector size of the VHDX with the physical disk to get the best performance.
Table 3-1: Physical disk vs. VHDX physical sector size
| Physical Disk Type | VHDX Physical Sector Size |
| 512-byte | 512, 512e, 4K (no difference in performance) |
| 512e | 4K, 512e, 512 (decreasing order of performance) |
| 4K | 4K, 512e (decreasing order of performance) |
The following example creates a VHDX with 4K logical and physical sector sizes:
New-VHD -Path "D:Virtual MachinesVM02	est.vhdx" -Dynamic -SizeBytes 100GB `
-LogicalSectorSizeBytes 4096 -PhysicalSectorSizeBytes 4096
The guest OS and application(s) must support 4K sectors if you choose 4K logical and physical sector sizes for the VHDX. The next example creates a VHDX file that matches the 4K sector of the physical storage but uses 512-byte logical sectors:
New-VHD -Path "D:Virtual MachinesVM02	est.vhdx" -Dynamic -SizeBytes 100GB `
-LogicalSectorSizeBytes 512 -PhysicalSectorSizeBytes 4096
Attaching Virtual Hard Disks
In Hyper-V Manager, you can edit the settings of a virtual machine, browse to the controller of choice, select the Location (channel), click Add, and browse to or enter the path to the desired virtual hard disk.
Alternatively, you can use the Add-VMHardDiskDrive PowerShell cmdlet. This example adds an existing (fixed) VHDX file to the boot location of the IDE 0 controller of a virtual machine called VM01:
Add-VMHardDiskDrive VM01 -ControllerType IDE -ControllerNumber 0 `
-ControllerLocation 0 -Path `
“D:Virtual MachinesVM01Virtual Hard DisksVM01.vhdx”
You could instead attach a virtual hard disk to a SCSI controller in the virtual machine:
Add-VMHardDiskDrive VM01 -ControllerType SCSI -ControllerNumber 0 `
-ControllerLocation 0 -Path `
“D:Virtual MachinesVM01Virtual Hard DisksVM01.vhdx”
Modifying Virtual Hard Disks
You will probably want to view the settings of a virtual hard disk before you modify it. You can do this in a few ways, including these:
- Browse to an attached VHD in the setting of a virtual machine and click Inspect.
- Run the Inspect task in the Actions pane of Hyper-V Manager and browse to the virtual hard disk.
- Run Get-VHD with the path to the virtual hard disk.
The Edit Virtual Hard Disk Wizard will step you through the possible actions for modifying a virtual hard disk. Note that the virtual hard disk must be offline (usually requiring an attached virtual machine to be offline) to modify it. There are two ways to access it in Hyper-V Manager:
- Click Edit Disk in the Actions pane of Hyper-V Manager and browse to the virtual hard disk.
- Browse to the desired virtual hard disk in the settings of a virtual machine and click Edit.
The Choose Action screen will present the possible actions, depending on whether the virtual hard disk is of fixed, dynamic, or differencing type:
- Dynamic and differencing virtual hard disks can be compacted to reduce their storage utilization.
- You can convert from one type to another, such as dynamic to fixed.
- Virtual hard disks can be expanded.
- Differencing disks can be merged with their parent to create a single virtual hard disk with all of the data.
The wizard will vary depending on the action that is chosen:
Convert-VHD “D:Virtual MachinesVM01Disk.vhd” -Destinationpath “D:Virtual MachinesVM01Disk.vhdx”Set-VHD (http://technet.microsoft.com/library/hh848561.aspx) is also available in PowerShell to change the physical sector size of a virtual hard disk or to change the parent of a differencing disk.
Removing and Deleting Virtual Hard Disks
You can remove virtual hard disks from a virtual machine. Virtual hard disks that are attached to IDE controllers can be removed only when the virtual machine is not running. SCSI-attached virtual hard disks can be removed from a running virtual machine, but you should make sure that no services or users are accessing the data on them first.
You can remove a virtual hard disk from a virtual machine in Hyper-V Manager by editing the settings of the virtual machine, browsing to the controller, selecting the disk, and clicking Remove. You can use PowerShell to remove a virtual hard disk. This example will remove the first virtual hard disk from the first SCSI controller, even with a running virtual machine:
Remove-VMHardDiskDrive VM01 -ControllerType SCSI -ControllerNumber 0 `
-ControllerLocation 0
Removing a virtual hard disk from a virtual machine will not delete it. You can use Windows Explorer, the Del command, or the Remove-Item PowerShell cmdlet to delete the virtual hard disk file.
Network Adapters
Virtual machines can have one or more virtual network adapters that are connected to a virtual switch. You can learn much more about this topic, and the advanced configuration of virtual network adapters, in Chapter 4.
Adding Network Adapters
You can add, remove, and configure virtual network adapters in a virtual machine’s settings in Hyper-V Manager. To add a virtual network adapter, you can open Add Hardware, select either a (synthetic) Network Adapter or a Legacy Network Adapter, and click Add. You can use the Add-VMNetworkAdapter cmdlet to add network adapters by using PowerShell. The following example adds a (synthetic) network adapter without any customization:
Add-VMNetworkAdapter VM01You can also add a legacy network adapter. Add-VMNetworkAdapter does allow you to do some configuration of the new virtual network adapter. This example creates a legacy network adapter and connects it to a virtual switch:
Add-VMNetworkAdapter VM01 -IsLegacy $True -SwitchName ConvergedNetSwitchConfiguring Virtual Network Adapters
You can configure the settings of a virtual network adapter in Hyper-V Manager by browsing to it in the virtual machine’s settings, as shown in Figure 3-10. The basic settings of the virtual network adapter are as follows:
Figure 3-10 Network Adapter settings in a virtual machine
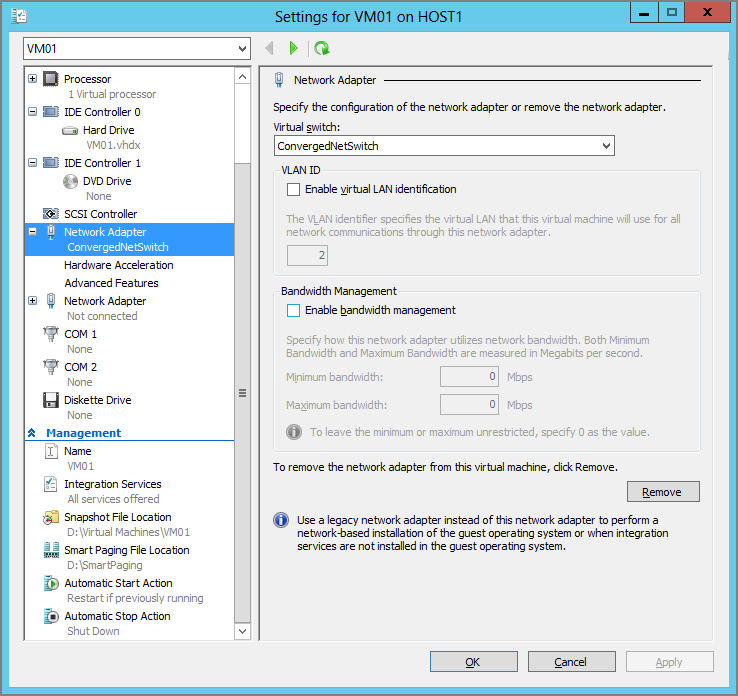
All of these settings are covered in great detail in Chapter 4. The Hardware Acceleration settings are also covered in that chapter.
The Advanced Features settings, shown in Figure 3-11, allow you to further configure a virtual network adapter.
Figure 3-11 Advanced Features settings of a virtual network adapter
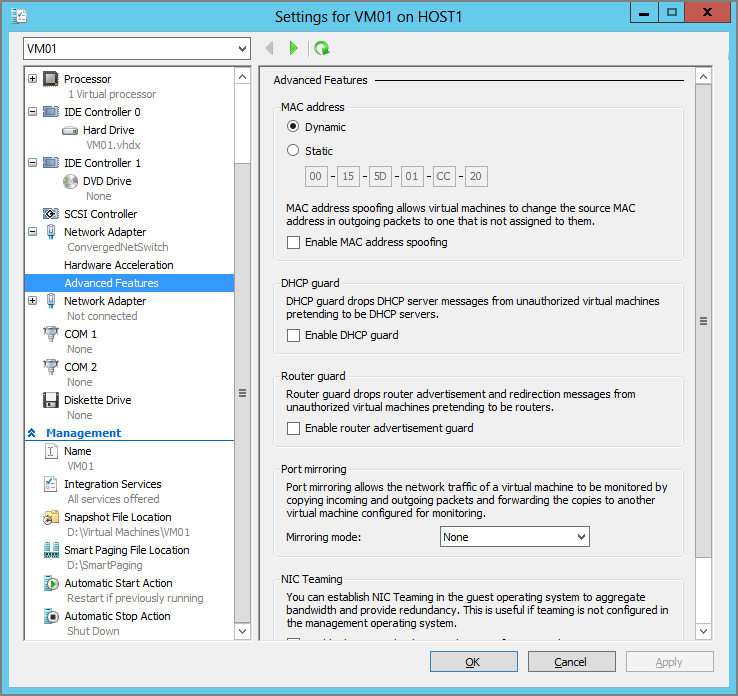
The main Advanced Features settings are as follows:
Set-VMNetworkAdapter VM01 -DynamicMacAddressSet-VMNetworkAdapter VM01 -StaticMacAddress "00165D01CC01" `
-MacAddressSpoofing OnSet-VMNetworkAdapter * -DhcpGuard OnSet-VMNetworkAdapter * -RouterGuard OnSet-VMNetworkAdapter VM01 -PortMirroring Source
Set-VMNetworkAdapter VM02 -PortMirroring DestinationHere’s the quickest way to disable Port Mirroring:
Set-VMNetworkAdapter * -PortMirroring NoneSet-VMNetworkAdapter VM01 -AllowTeaming OnUsing Integration Services
In Chapter 1, you learned about the role of integration components or services. A number of services allow the host and virtual machine to have a limited amount of interaction with each other. You can enable (they are on by default) or disable these features by opening a virtual machine’s settings and browsing to Integration Services. There you will find the following:
Typically, these features are left enabled because they are very useful. You should not disable them unless you have a valid reason. Remember that the integration components/services must be installed in the guest OS (and kept up-to-date) for this functionality to work correctly.