Advanced Networking
Windows Server 2012 is changing how we design networking for servers, and particularly, for Hyper-V. In this section, you are going to look at converged fabrics. You will also look at QoS, which makes converged fabrics possible.
Quality of Service
Although it doesn’t create many headlines, QoS is an important feature of Windows Server 2012. Without it, many of the new possibilities that enable flexibility, cost savings, and easier deployment of Hyper-V would just not be possible.
Remembering a World without QoS
Why did a clustered Windows Server 2008 R2 Hyper-V host require so many physical NICs? Let’s count them, leaving iSCSI aside for a moment:
That is four NICs so far; keep counting. NIC teaming wasn’t universal with Windows Server 2008 R2, but if you implemented it, you’d now have eight NICs (two for every function, to make four NIC teams). Many larger deployments would put in an additional backup network or isolate the impact of the backup traffic from the management OS and the services running on the virtual machines. With NIC teaming, you’re now adding two more NICs, and you have 10 NICs at this point. And now we can think about iSCSI with its two NICs (using MPIO for iSCSI NICs because NIC teaming is not supported with iSCSI), and you require 12 NICs per host. And we haven’t even considered the need to support multiple virtual networks.
An incredible amount of cabling, documentation, careful implementation (many mistakes were basic networking/cabling errors), and switch ports required yet more spending on hardware, support, and electricity. Did the host hardware even have enough slots for all these quad-port NIC cards? Consider blade servers; they take only so many network expansion cards, and this usually meant buying another pair (or more) of those incredibly expensive blade chassis switches or Virtual Connect type of devices.
Why did we need so many NICs? Couldn’t we run these services on fewer NICs? Couldn’t larger organizations deploy 10 GbE networking and run everything through just a NIC team?
Without expensive hardware solutions, the answer was no; we needed to physically isolate each of these functions in the host. Live Migration needed bandwidth. Services running in virtual machines needed to be available to users, no matter what administrators did to move workloads. Monitoring agents couldn’t fail to ping the hosts, or alarms would be set off. Cluster heartbeat needs to be dependable, or we end up with unwanted failover. We physically isolated these functions in the host to guarantee quality of service.
Introducing QoS
QoS has been in Windows Server for some time, offering basic functionality. But we never had a function that could guarantee a minimum level of service to a virtual NIC or a protocol (or an IP port). That is exactly what we are getting with QoS in Windows Server 2012. At its most basic level, we can configure the following rules in QoS:
The focus of Microsoft’s effort in Windows Server 2012 was minimum bandwidth. Most of the time, you will implement minimum-bandwidth QoS rules that are based on weight. This is the most flexible solution, because it makes no assumptions about hardware capacity, and it has an elastic nature, whereby virtual NICs or protocols can burst beyond the minimum guarantee.
Understanding the Three Ways to Apply QoS
There are three ways to apply QoS in Windows Server 2012. How we do it depends on how we design our Hyper-V hosts, and what kind of traffic we want to apply the rules to. Figure 4-18 illustrates how you will decide to apply QoS.
These are the three approaches to applying QoS:
Figure 4-18 Deciding on a QoS strategy
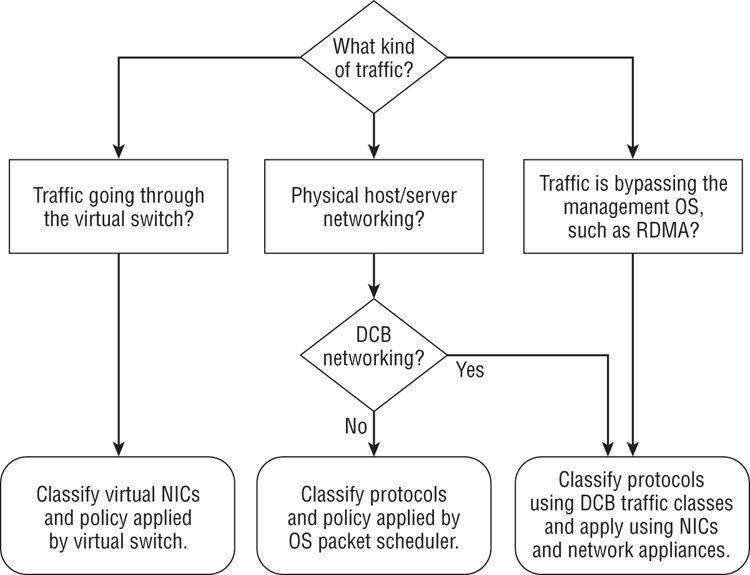
Now you understand how to decide which type of QoS approach to use based on your network requirements. We can summarize as follows:
- If the traffic comes from a virtual NIC, create rules for virtual NICs.
- You should create rules for protocols or IP ports when the traffic is not coming from a virtual NIC. We’d prefer to do it with DCB, but we can use the OS packet scheduler. That last approach works inside virtual machines too.
- Any protocol that the management OS cannot see must use DCB for applying QoS rules.
Implementing QoS
This section shows you how to implement each of the three approaches to QoS. There is no way to implement this functionality in the GUI in Windows Server 2012. Every step of the process will be done using PowerShell.
Applying QoS to Virtual NICs
When traffic is passing through a virtual switch, and therefore from a virtual NIC, we create QoS rules that are based on virtual NICs. This is the simplest of the three ways to configure QoS: you have a virtual NIC, and you give it a share of bandwidth.
The first thing we must deal with is the virtual switch, where the QoS rules will be applied. When you create a virtual switch by using PowerShell, you have the option to specify a bandwidth reservation mode (QoS rules guaranteeing a minimum amount of bandwidth) of either weight-based (a share of bandwidth) or absolute (bits per second). The virtual switch has to be one or the other. This does not affect your ability to specify maximum-bandwidth rules of either type. You also must do this at the time you create the virtual switch. If you do not specify an option, the virtual switch will be set to Absolute. The following snippet of PowerShell queries the bandwidth reservation mode of a virtual switch:
PS C:> (Get-VMSwitch "External1").BandwidthReservationMode
Absolute
The following example creates a new external virtual switch called ConvergedNetSwitch that is linked to a NIC team called ConvergedNetTeam. The bandwidth reservation mode is set to weight-based:
New-VMSwitch "ConvergedNetSwitch" -MinimumBandwidthMode weight `
-NetAdapterName “ConvergedNetTeam” -AllowManagementOS 0
You should perform this configuration on each host that you want to use virtual NIC QoS rules for. For example, maybe a virtual machine was to be assigned an SLA guaranteeing at least 10 percent of bandwidth. In this case, you need to be sure that the weight-based bandwidth reservation mode was configured on the appropriate virtual switch on each host that the virtual machine could be placed on.
We now can create QoS rules for each required virtual NIC. This is a simple operation. The following rule guarantees a virtual machine 10 percent of bandwidth of any virtual switch it is connected to:
Set-VMNetworkAdapter –VMName “Virtual Machine 1” -MinimumBandwidthWeight 10You can even specify one particular virtual NIC in a virtual machine. The next example retrieves the first virtual NIC of Virtual Machine 2. It then sets an SLA indicating that the virtual NIC will get 20 percent of bandwidth if required, but it will be capped at 1 Gbps. You can see in this example that we are not prevented from using absolute-bps rules to limit bandwidth, even if the switch is set to a weight-based bandwidth reservation mode:
Set-VMNetworkAdapter {Get-VMNetworkAdapter -VMName “Virtual `
Machine 2”}[0] -MinimumBandwidthWeight 20 -MaximumBandwidth 1073741824
You will see more of this type of rule when you look at the topic of converged fabrics later in the chapter. Here are some important notes on this way of using QoS:
- If you assign a virtual NIC a weight of 3 and another virtual NIC a weight of 1, then you have split the bandwidth to 75 percent and 25 percent.
- Never assign a total weight of more than 100.
- Be conservative when assigning weights to critical workloads such as cluster communications. Although a weight of 1 might be OK on a 10 GbE NIC for cluster communications, Microsoft is recommending that you use a weight of at least 5; the cluster heartbeat is critical in a Hyper-V cluster.
- If you are going to assign QoS rules to virtual machines, consider creating classes such as Gold, Silver, and Bronze, with each class having a defined weight. This will make operating and documenting the environment much easier.
- At the time of writing this book (just after the release of Windows Server 2012), running Get-VMNetworkAdapter -VMName *| FL Ba* will not show you the results of your QoS policies.
Applying QoS to Protocols with the OS Packet Scheduler
We will classify protocols and use the OS packet scheduler to apply QoS for traffic that does not go through a virtual switch in the operating system. This type of rule applies in two scenarios:
- Traffic for physical NICs in which we do not have end-to-end support for DCB.
- We want to apply QoS inside the guest operating system of a virtual machine, assuming that it is running Windows Server 2012.
The PowerShell cmdlet we will use is New-NetQosPolicy. New-NetQosPolicy is a very flexible cmdlet, allowing us to create QoS rules. The cmdlet supports built-in protocol classifications or filters shown in Table 4-2.
Table 4-2: Built-in protocol filters for QoS
| Label | Protocol | Matching Criteria |
| -LiveMigration | Live Migration | TCP 6600 |
| -iSCSI | iSCSI | TCP/UDP 3260 |
| -SMB | SMB or file services | TCP/UDP 445 |
| -NetDirect <Port Number> | SMB Direct (RDMA) | Match the identified RDMA port |
| -NFS | NFS | TCP/UDP 2049 |
The cmdlet will allow you to create rules based on source and destination IP details including the following:
- Ports or port ranges
- Network address
- Protocol, such as TCP or UDP
You can even specify the Windows network profile (Domain, Private, or Public), or the priority of QoS rules if there are multiple matches. We could write an entire chapter on this cmdlet alone, so here are a few useful examples:
This first example uses the built-in filter to create a QoS rule to guarantee 30 percent of bandwidth to SMB. The rule is given a priority of 3.
New-NetQosPolicy “SMB” –SMB –MinBandwidthWeight 30 –Priority 3Note that –MinBandwidthWeight is short for –MinBandwidthWeightAction, and -Priority is short for -PriorityValuc80e021Action. You do not need to type in the full names of the flags.
An important protocol to protect is cluster communications; you don’t want the cluster heartbeat to not be able to be starved of bandwidth! Notice how this example specifies the destination IP port for cluster communications (3343):
New-NetQosPolicy “Cluster” -IPDstPort 3343 –MinBandwidthWeightAction 15 `
–Priority 255
The priority of this cluster example is set to the maximum allowable value of 255 (the default is 127 if the priority of the rule is not defined). If we had a scenario in which another rule matched this rule (which is quite unlikely in this case), then this rule would win. The rule with the highest priority always wins. The lowest possible value is 0.
A handy option for New-NetQosPolicy is the -Default flag. This allows you to create a QoS rule for all protocols not matching a filter in any other rule. The following does this for us:
New-NetQosPolicy “EverythingElse” –Default –MinBandwidthWeightAction 15So far, every example applies QoS on a per-server basis using the OS packet scheduler. A handy option is to use a Differentiated Services Code Point (DSCP) value to tag traffic (from 0 to 63) so that the physical network can apply QoS for you. This means that you can stop a single type of traffic from flooding the LAN.
A common source of pain for network administrators is the nightly backup. The next example uses a DSCP flag of 30 to mark backup traffic going to 10.1.20.101. The network administrators can use this flag to identify traffic on the LAN and apply QoS in the network devices to control all backup traffic.
New-NetQosPolicy –Name "Backup" -IPDstPrefixMatchCondition `
10.1.20.101/24 -DSCPAction 30
Remember that each of these examples can be used on Hyper-V hosts, traditional physical servers, and in virtual machines where the operating system is Windows Server 2012.
Applying QoS to Protocols Using DCB
The final option for QoS rules is to let the hardware do the work. It is the preferred option if you have DCB-capable NICs and network appliances, and it is the required option if you plan on creating QoS rules for SMB Direct (RDMA) to ensure that it has enough bandwidth through a host’s NIC(s).
DCB uses priorities to apply QoS policies. You will use the following process to classify protocols and create traffic classes that prioritize the traffic:
Enabling the DCB feature can be done in Server Manager or by running the quicker PowerShell alternative:
Install-WindowsFeature Data-Center-BridgingNext you will want to create each of your QoS policies. The following example classifies SMB Direct by using –NetDirectPort 445. Note how this cmdlet does not specify any minimum or maximum bandwidth settings.
New-NetQosPolicy “SMB Direct” –NetDirectPort 445 –Priority 2We specify the bandwidth rule when we create the traffic class for DCB. We should match the name (for consistency) and priority (required) of the QoS classification when we create a DCB traffic class.
New-NetQosTrafficClass “SMB Direct” –Priority 2 –Algorithm ETS –Bandwidth 40DCB can work slightly differently as compared to the other examples. We are setting a bandwidth rule of 40 percent, but DCB can use an algorithm to ensure that lesser protocols are not starved. Enhanced Transmission Selection, or ETS (http://msdn.microsoft.com/library/windows/hardware/hh406697(v=vs.85).aspx), is an industry standard that ensures lower-priority protocols of a minimum level of bandwidth. The alternative is to specify Strict as the algorithm, and that will cause DCB to apply the traffic class with no exceptions.
If we are using RoCE, we should enable PFC for SMB Direct if the NIC(s) support it. This should be done on both ends of the connection, such as a Hyper-V host using SMB storage for virtual machine files, and the file server that is providing that storage. You can enable PFC by running the next example. Once again, the priority will match the SMB Direct QoS policy and DCB traffic class:
Enable-NetQosFlowControl –Priority 2The next step is to enable DCB settings to be pushed down to the NICs:
Set-NetQosDcbxSetting –Willing $falseYou then enable DCB on each required NIC:
Enable-NetAdapterQos “Ethernet 1”DCB does require a bit more work than the other two ways of implementing QoS. However, it is a hardware function, so it is going to be the most efficient option. And as you will learn in Chapter 7, using SMB Direct will be completely worth the effort.
Using NIC Teaming and QoS
NIC teaming and QoS are compatible features of Windows Server 2012. Classification, tagging, and PFC all work seamlessly. There are some things to watch out for.
Minimum-bandwidth policy for virtual NICs passing through a Hyper-V Port NIC team can be complicated. Remember that virtual NICs are hashed to specific team members (physical NICs) in the team, and they are limited to that team member until a failover is required. The weights of those virtual NICs are used to divide up the bandwidth of a team member. They are not used to divide up the bandwidth of the entire team.
You cannot assign more than the bandwidth of a single team member by using absolute or bps-based rules.
How you configure your NIC team can also affect how DCB behaves, because traffic may not be distributed evenly between the various team members. Review the two modes and two load-distribution methods of NIC teaming from earlier in this chapter to see how this might impact your design.
Understanding the Microsoft Best Practice Design
There is no published best practice on designing QoS from Microsoft. The reason is simple; there are just too many variables in the design process that engineers and consultants will have to work through. Our advice is as follows:
- Use the decision process illustrated in Figure 4-18 earlier to decide which type of QoS you need to implement.
- Determine how much bandwidth each virtual NIC or protocol requires. One way to do that is to imagine that you can install NICs of any speed and have to always choose the right one for budget reasons, but you could temporarily burst through the limits.
- Use the right NIC-team design for your network environment and workload. Ideally, you will be able to define the switch architecture to give you the best results.
- Do not enable DCB and the OS packet scheduler QoS rules on the same NICs or networking stack. They are not designed to work together.
Converged Fabrics
We have presented many networking technologies that are new in Windows Server 2012. At times, you might have wondered whether each technology is important. They are, because they led you to this part of the chapter, and possibly one of the most important parts of the book. This is where you learn how to design converged fabrics.
Understanding Converged Fabrics
Fabric is a term that refers to a network. Earlier in the chapter, when we talked about a world without QoS, we listed all the network connections required for building a clustered Hyper-V host. Each one of those connections is referred to as a fabric. We questioned why we needed so many networks. In past versions of Windows Server and Hyper-V, we used physical isolation of those fabrics to guarantee a minimum level of service. However, we now have QoS in Windows Server 2012, which enables us to set a minimum-bandwidth reservation for virtual NICs or for protocols. And this makes it possible for us to converge each fabric into fewer NICs, possibly even as few as one.
The benefits should be immediately obvious. You are going to have fewer NICs. That means less cabling, fewer switch ports, less hardware being purchased, smaller support contracts, and the electricity bill being further reduced. Converged fabrics give us design flexibility too. We can use a NIC or aggregation of NICs (NIC team) and divide it logically to suit the needs of the infrastructure or business.
There are some less obvious benefits too. At this point, you have seen how to script the creation and configuration of all the networking components of Hyper-V. The entire construction of a converged fabric can be scripted. Write it once and reuse it many times; this is going to have huge time-saving and consistency-making rewards, whether you are an operator deploying hundreds of Hyper-V hosts in a public cloud or a field engineer deploying one host at a time for small-business customers.
Another less obvious benefit is that you can make the most of your investments in high-speed networking. Many organizations have started to implement 10 GbE networking. Many others would like to, but there is no way that they could pay to install that many 10 GbE NICs or pay for underutilized switches. Converged fabrics is about making full, but well-controlled, use of bandwidth. An investment in 10 GbE (or faster) networking with converged fabrics will allow more than just the live migration to be faster. Other fabrics can make use of that high-capacity bandwidth while live migration doesn’t need it. This is balanced by administrator-defined QoS policies.
Having too many eggs in one basket is always bad. NIC teaming comes to the rescue because we can team two of those high-speed networks to not only achieve failover, but also to take advantage of link aggregation for better sharing of bandwidth.
How much convergence is too much? Or how much convergence is the right amount? Quite honestly, we have to give the classic consultant answer of “it depends” for those questions. You should then look at various factors such as actual bandwidth requirements for each fabric vs. what each NIC or NIC team can provide. We should also consider the hardware enhancements or offloads that we plan to use. For example, you learned earlier in this chapter that RSS and DVMQ can offer greatly improved network performance, but they cannot be enabled on the same NICs.
The days of the traditional physical isolation for every fabric are truly over. Microsoft has given us the tools in Windows Server 2012 to create more-elegant, more-economic, more-flexible, and more-powerful designs.
Designing Converged Fabrics
The beauty of converged fabrics is that there is no one right answer for everyone; the design process is a matter of balancing desired convergence with compatibility and with bandwidth requirements. This section presents designs that we can expect to be commonly deployed over the coming years.
There is no feature in Windows Server 2012 for converged fabrics. There is no control in Server Manager, no option in Network Connections, and no specific PowerShell module. If you have read this chapter from end to end, taking the time to understand each section, you already know what the components are and how to implement converged fabrics. All that remains is to know how to design them.
Using Management OS Virtual NICs
There is a reason that we made a point about virtual NICs in the management OS. You can create a design in which all of the host’s fabrics pass through the virtual switch, and on to the NIC or NIC team to reach the physical network, as you can see in Figure 4-19. Pairing this with QoS policies for the virtual NICs will guarantee each virtual NIC a certain amount of bandwidth.
Figure 4-19 Using virtual NICs to converge fabrics
Each management OS virtual NIC is connected to a port on the virtual switch. And each management OS virtual NIC will appear as a connection, with its own protocol configurations, such as IPv4 and/or IPv6 settings. You can even isolate these virtual NICs on the physical network by assigning VLAN IDs to them.
A QoS will be created to assign each management OS virtual NIC a minimum amount of bandwidth. We don’t need to use a protocol approach because we’re using each virtual NIC for a specific function.
Although you can assign QoS policies to the virtual machine virtual NICs, we’re going to try to avoid this unless absolutely necessary. It can become messy. Here’s an example why:
Who really wants to keep track of all those virtual NICs, especially when you might have up to 8,000 virtual machines in a single cloud? Experienced engineers like to manage by exception. We can take this approach with QoS:
Here is the PowerShell to create a virtual switch and the management OS virtual NICs, assign VLAN IDs to the new virtual NICs, and apply the required QoS policies:
write-host "Creating external virtual switch, with no Management OS virtual `
NIC, with weight-based QoS”
#You could substitute the name of a NIC team for the name of the physical `
(NIC Ethernet 2)
New-VMSwitch "ConvergedNetSwitch" -MinimumBandwidthMode weight `
-NetAdapterName “Ethernet 2” -AllowManagementOS 0
write-host "Setting default QoS policy"
Set-VMSwitch "ConvergedNetSwitch" -DefaultFlowMinimumBandwidthWeight 40
write-host "Creating virtual NICs for the Management OS"
Add-VMNetworkAdapter -ManagementOS -Name "ManagementOS" -SwitchName `
“ConvergedNetSwitch”
Set-VMNetworkAdapter -ManagementOS -Name "ManagementOS" `
-MinimumBandwidthWeight 20
Set-VMNetworkAdapterVlan –ManagementOS –VMNetworkAdapterName `
“ManagementOS” –Access -VlanId 101
Add-VMNetworkAdapter -ManagementOS -Name "Cluster" -SwitchName `
“ConvergedNetSwitch”
Set-VMNetworkAdapter -ManagementOS -Name "Cluster" -MinimumBandwidthWeight 10
Set-VMNetworkAdapterVlan –ManagementOS –VMNetworkAdapterName "ManagementOS" `
–Access -VlanId 102
Add-VMNetworkAdapter -ManagementOS -Name "LiveMigration" -SwitchName `
“ConvergedNetSwitch”
Set-VMNetworkAdapter -ManagementOS -Name "LiveMigration" `
-MinimumBandwidthWeight 30
Set-VMNetworkAdapterVlan –ManagementOS –VMNetworkAdapterName `
“LiveMigration” –Access -VlanId 103
In a matter of seconds, you have configured a simple converged fabric for a clustered Hyper-V host that uses a type of storage that is not based on iSCSI.
We should do some mathematics before moving forward. A total weight of 100 has been allocated. The percentage of bandwidth allocated to virtual NICs is calculated as follows:
Bandwidth percentage = (allocated weight / sum of weights)
Keep that in mind in case you allocate a total weight of 80 (such as 30, 10, 20, and 20) and you find percentages that look weird when you run the following cmdlet:
Get-VMNetworkAdapter -ManagementOS | FL Name, BandwidthPercentageWe could take the preceding script one step further by appending the following scripting that configures the IPv4 addresses of the host’s new virtual NICs:
write-host "Waiting 30 seconds for virtual devices to initialize"
Start-Sleep -s 30
write-host "Configuring IPv4 addresses for the Management OS virtual NICs"
New-NetIPAddress -InterfaceAlias "vEthernet (ManagementOS)" -IPAddress `
10.0.1.31 -PrefixLength 24
Set-DnsClientServerAddress -InterfaceAlias "vEthernet `
(ManagementOS)” -ServerAddresses “10.0.1.11”
New-NetIPAddress -InterfaceAlias "vEthernet (Cluster)" -IPAddress `
192.168.1.31 -PrefixLength “24”
New-NetIPAddress -InterfaceAlias "vEthernet (LiveMigration)" `
-IPAddress 192.168.2.31 -PrefixLength “24”
It doesn’t take too much imagination to see how quickly host networking could be configured with such a script. All you have to do is change the last octet of each IP address, and you can run it in the next host that you need to ready for production.
A Converged Fabrics Design Process
With so many possible options, you might want to know where to start and how to make decisions. Here is a suggested process:
A whiteboard, a touch-enabled PC with a stylus, or even just a pen and paper will be tools you need now. We’re going to present a few possible converged fabric designs and discuss each one:
Figure 4-20 Converged fabric using virtual NICs and NIC team
Figure 4-21 Dedicated NICs for SMB 3.0 storage
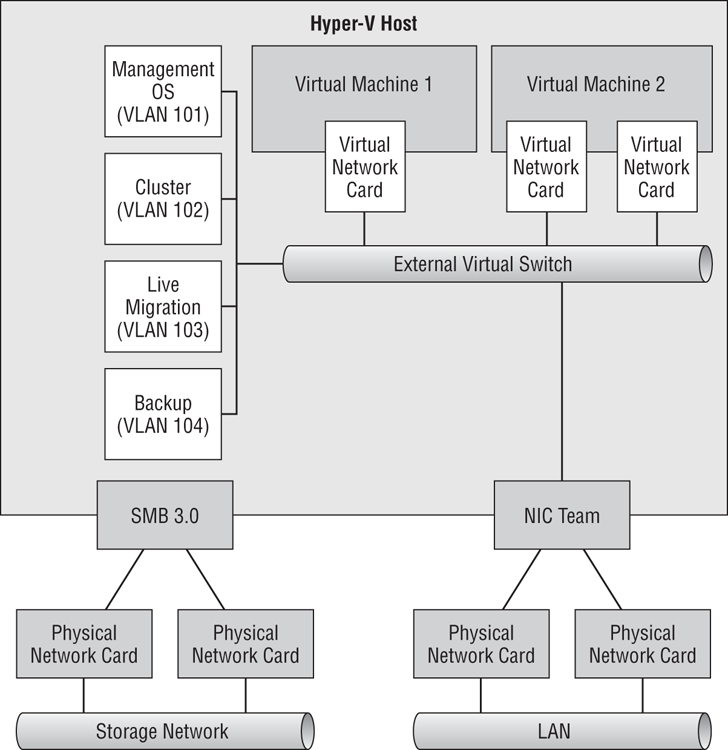
Figure 4-22 Converging the iSCSI connections
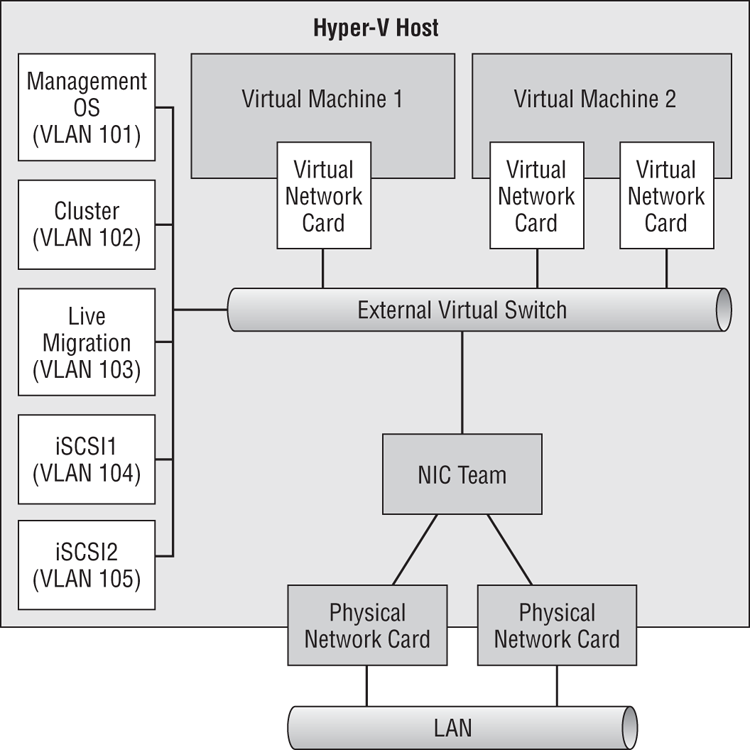
Figure 4-23 Using physically isolated iSCSI
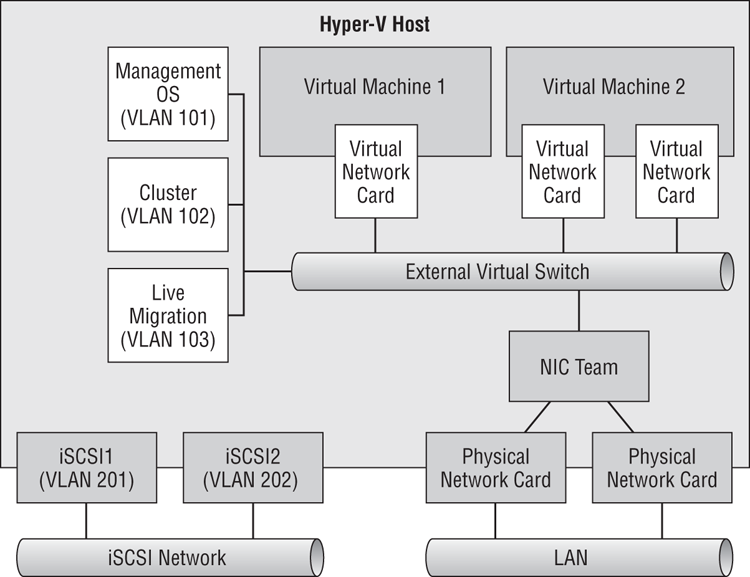
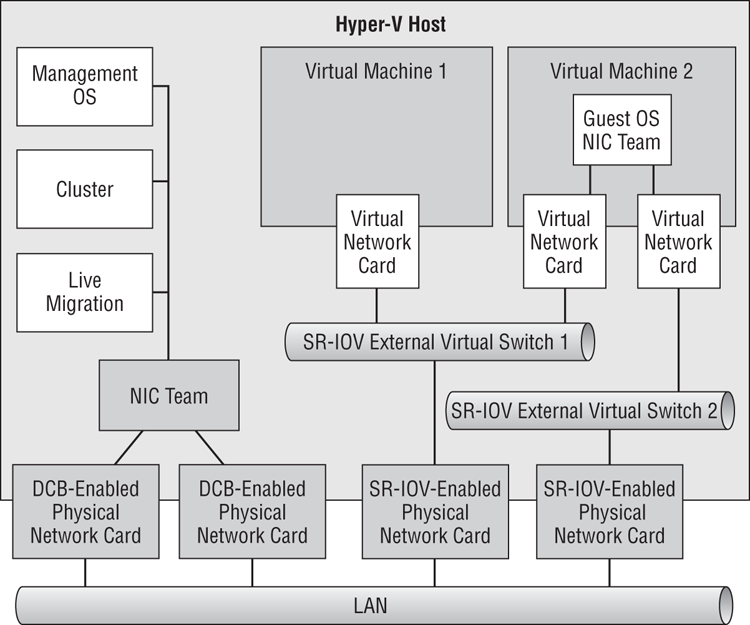
Figure 4-24 Nonconvergence of SR-IOV NICs
This is just a small sample of the possible converged fabric designs. Using the suggested process will help you find the right design for each project that you do.
With the converged fabric configured on your hosts, you can join them to a domain, install management agents, or start to build Hyper-V clusters.
Once you go converged fabrics, you’ll never go back. The flexibility that they provide, the abstraction from physical networks, and the ability to deploy a host configuration in seconds from a reusable script will bring you back every single time.