Real World Solutions
Here are a few examples of how you can use the information in this chapter in the real world.
Implementing RSS and DVMQ
Challenge
You are a consultant starting a cloud project for a customer. The hosts that will be deployed in this cloud have the following specifications:
- Two 10 core processors with Hyper-Threading enabled, providing you with a total of 40 logical processors.
- Four NICs that will be used to create two NIC teams, one for an external virtual switch (Hyper-V Port and Switch-Independent) and one for host communications (Address Hashing and Switch-Independent). All four NICs support RSS queues, but not SR-IOV.
The project requirements state that you must enable any available hardware acceleration to increase the performance of virtual-machine networking. The hosts will be using SMB storage, and you are also to use any available hardware features to maximize storage bandwidth utilization. How will you accomplish these requirements?
Solution
The presence of RSS queues in all four NICs in the hosts means that you can enable two features:
- RSS to provide SMB Multichannel
- DVMQ to improve virtual machine networking performance
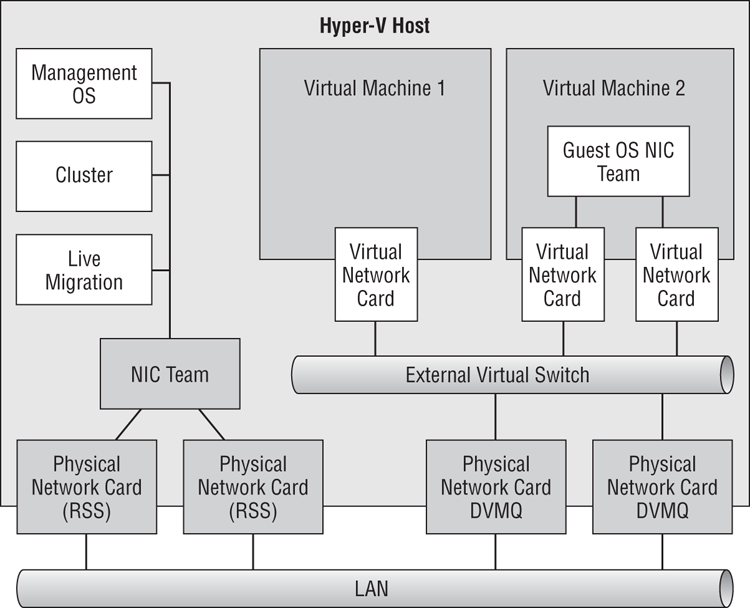
Figure 4-25 illustrates the design. You will need to enable RSS and DVMQ. The first step is to enable RSS in all four NICs. This feature is used by RSS and DVMQ in Windows. Although they are different features at the OS level, they are using the same queues on the NICs and are incompatible. This requires you to physically isolate NICs that will be used for RSS and for DVMQ, as in the design.
Figure 4-25 Converged host networking with RSS and DVMQ
Consult the NIC manufacturer’s documentation for specific guidance (if provided). Then enable RSS in the advanced configuration of each NIC’s connection in Network Connections.
You will need to calculate two settings, *RssBaseProcNumber and *MaxRssProcessors for RSS and for DVMQ. They will be used to specify the range of cores that
- NIC1 can use for RSS
- NIC2 can use for RSS
- NIC3 can use for DVMQ
- NIC4 can use for DVMQ
There are 40 logical processors:
- They are numbered 0 to 39.
- We can use only cores, not logical processors, for RSS and DVMQ. Therefore, we identify cores by using the number of the first logical processor in that core. They are numbered as 0, 2, 4, 6 and so on, up to 38.
- The first core, logical processor 0, is reserved for default (non-RSS and non-DVMQ) network processing.
- It is decided to use a roughly 50/50 split between RSS and DVMQ.
The eight remaining logical processors on CPU0 (2–18) will be used by RSS. The logical processors of CPU1 (20–38) will be used by DVMQ.
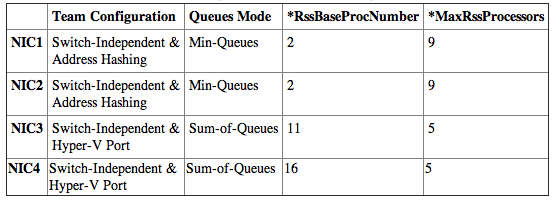
The settings for the four NICs will depend on whether NIC teaming is in Sum-of-Queues mode or in Min-Queues mode. NIC1 and NIC2 are using Address Hashing so they are in Min-Queues mode. That will mean that the two NICs in this team can share cores. NIC3 and NIC4 are in a Switch-Independent and Hyper-V Port team, so they are in Sum-of-Queues mode. This means that the remaining cores must be split between the two NICs in this team. The settings for the four NICs will therefore be those illustrated in Table 4-3.
Table 4-3: RSS and DVMQ settings for scenario host design
You can use PowerShell to deploy these settings to the NICs:
Set-NetAdatperVmq “NIC1” –BaseProcessorNumber 2 –MaxProcessors 9
Set-NetAdatperVmq “NIC2” –BaseProcessorNumber 2 –MaxProcessors 9
Set-NetAdatperVmq “NIC3” –BaseProcessorNumber 11 –MaxProcessors 5
Set-NetAdatperVmq “NIC4” –BaseProcessorNumber 16 –MaxProcessors 5
The implementation is now complete.
Creating Converged Fabrics with Isolated SMB Storage
Challenge
You have been asked to deploy a cluster of 64 Hyper-V hosts, each having the network configuration that was previously shown in Figure 4-21. The storage NIC team will be in Switch-Dependent LACP mode with Address Hashing for load distribution. The virtual switch NIC team will be in Switch-Independent mode with Hyper-V Port enabled.
The servers that are being used store the PCI names of the NICs. Windows Server 2012 will use these consistent device names and label the network adapters in Network Connections as follows:
- Port1
- Port2
- Port3
- Port4
You have been told to complete the following:
You will write a script that can be quickly modified for each host.
Solution
#Set variables for each NIC’s IP address
#Modify these values for each host you want to configure
$ManagementOSIPv4 = “10.0.10.1”
$ManagementOSRouter = “10.0.10.254”
$ManagementOSDNS = “10.0.1.51”
$ClusterIPv4 = “192.168.1.1”
$LiveMigrationIPv4 = “192.168.2.1”
$BackupIPv4 = “10.0.11.1”
$StorageTeamIPv4 = “172.16.1.1”
$StorageTeamRouter = “172.16.1.254”
Write-Host “Creating the NIC teams”
New-NetLBFOTeam -Name “ConvergedNetTeam” -TeamMembers “Port3”, “Port4” `
-TeamingMode SwitchIndependent -LoadBalancingAlgorithm HyperVPort -Confirm:$false
New-NetLBFOTeam -Name “StorageTeam” -TeamMembers “Port1”, “Port2” `
-TeamingMode LACP -Confirm:$false
write-host "Creating external virtual switch, with no Management OS virtual `
NIC, with weight-based QoS”
New-VMSwitch "ConvergedNetSwitch" -MinimumBandwidthMode weight `
-NetAdapterName “ConvergedNetTeam” -AllowManagementOS 0
write-host "Setting default QoS policy"
Set-VMSwitch "ConvergedNetSwitch" -DefaultFlowMinimumBandwidthWeight 30
write-host "Creating and configuring virtual NIC for the Management OS"
Add-VMNetworkAdapter -ManagementOS -Name "ManagementOS" -SwitchName `
“ConvergedNetSwitch”
Set-VMNetworkAdapter -ManagementOS -Name "ManagementOS" -MinimumBandwidthWeight 5
Set-VMNetworkAdapterVlan –ManagementOS –VMNetworkAdapterName "ManagementOS" `
–Access -VlanId 101
write-host "Creating and configuring virtual NIC for the cluster"
Add-VMNetworkAdapter -ManagementOS -Name "Cluster" -SwitchName `
“ConvergedNetSwitch”
Set-VMNetworkAdapter -ManagementOS -Name "Cluster" -MinimumBandwidthWeight 5
Set-VMNetworkAdapterVlan –ManagementOS –VMNetworkAdapterName "Cluster" `
–Access -VlanId 102
write-host "Creating and configuring virtual NIC for Live Migration"
Add-VMNetworkAdapter -ManagementOS -Name "LiveMigration" -SwitchName `
“ConvergedNetSwitch”
Set-VMNetworkAdapter -ManagementOS -Name "LiveMigration" `
-MinimumBandwidthWeight 40
Set-VMNetworkAdapterVlan –ManagementOS –VMNetworkAdapterName "LiveMigration" `
–Access -VlanId 103
write-host "Creating and configuring virtual NIC for the backup fabric"
Add-VMNetworkAdapter -ManagementOS -Name "Backup" -SwitchName `
“ConvergedNetSwitch”
Set-VMNetworkAdapter -ManagementOS -Name "Backup" -MinimumBandwidthWeight 20
Set-VMNetworkAdapterVlan –ManagementOS –VMNetworkAdapterName "Backup" `
–Access -VlanId 104
write-host "Waiting 30 seconds for virtual devices to initialize"
Start-Sleep -s 30
write-host "Configuring IPv4 addresses for the Management OS virtual NICs"
New-NetIPAddress -InterfaceAlias "vEthernet (ManagementOS)" -IPAddress `
$ManagementOSIPv4 -PrefixLength 24 –DefaultGateway $ManagementOSRouter `
Set-DnsClientServerAddress -InterfaceAlias "vEthernet (ManagementOS)" `
-ServerAddresses $ManagementOSDNS
New-NetIPAddress -InterfaceAlias "vEthernet (Cluster)" -IPAddress $ClusterIPv4 `
-PrefixLength “24”
New-NetIPAddress -InterfaceAlias "vEthernet (LiveMigration)" -IPAddress `
$LiveMigrationIPv4 -PrefixLength “24”
New-NetIPAddress -InterfaceAlias "vEthernet (Backup)" -IPAddress `
$BackupIPv4 -PrefixLength “24”
write-host "Configuring team interface IPv4 address of the storage steam"
New-NetIPAddress -InterfaceAlias "StorageTeam" -IPAddress `
$StorageTeamIPv4 -PrefixLength “24” –DefaultGateway $StorageTeamRouter
Creating Converged Fabrics with DCB and SR-IOV
Challenge
You have been asked to script the creation of a converged fabric design similar to the one previously shown in Figure 4-24. Servers with NIC names that are detectable by Windows Server 2012 are being used. SMB Direct (RDMA over Converged Ethernet with DCB NICs) will be used to minimize the processor impact of SMB Multichannel. Therefore, Port1 and Port2 will not be in a NIC team, as was shown in Figure 4-24.
You are to write a PowerShell script that can be used to configure the networking of hosts using this design. It will configure each NIC’s required IPv4 settings, configure QoS over DCB, enable PFC for RDMA, and set up SR-IOV for virtual machine connectivity. The minimum bandwidth reservations should be as follows:
- Remote Desktop (TCP 3389): 5 percent
- Monitoring (TCP 5723): 5 percent
- Cluster communications: 5 percent
- Live Migration: 30 percent
- Backup (TCP 3148): 20 percent
- SMB Direct: 30 percent
Ensure that any low-priority protocol will not be starved of bandwidth by QoS and DCB. You should also enable DSCP tagging (with IDs that will be provided to you) so that network administrators can throttle the total sum of traffic from all hosts in the network.
Solution
#Set variables for each NIC’s IP address
#Modify these values for each host you want to configure
$Port1IPv4 = “10.0.10.1”
$Port1Router = “10.0.10.254”
$Port1IPv4 = “10.0.11.1”
$Port1Router = “10.0.11.254”
Write-Host "Configuring IPv4 address of Port1"
New-NetIPAddress -InterfaceAlias "Port1" -IPAddress $Port1IPv4 -PrefixLength `
“24” –DefaultGateway $Port1Router
Write-Host "Configuring IPv4 address of Port2"
New-NetIPAddress -InterfaceAlias "Port2" -IPAddress $Port2IPv4 -PrefixLength `
“24” –DefaultGateway $Port2Router
Write-Host "Installing DCB feature"
Install-WindowsFeature Data-Center-Bridging
write-host "Waiting 10 seconds"
Start-Sleep -s 10
Write-Host “Creating QoS policies”
New-NetQosPolicy “Backup” -IPDstPort 3148 -IPProtocol TCP –Priority 1 `
-DSCPAction 10
New-NetQosPolicy “Remote Desktop” -IPDstPort 3389 -IPProtocol TCP `
–Priority 2 -DSCPAction 11
New-NetQosPolicy “Live Migration” -LiveMigration –Priority 3 -DSCPAction 12
New-NetQosPolicy “Cluster” -IPDstPort 3343 –Priority 4 -DSCPAction 13
New-NetQosPolicy “Monitoring” –IPDstPort 5723 -IPProtocol TCP –Priority `
5 -DSCPAction 14
#You cannot assing a DSCP tag to RDMA traffic
New-NetQosPolicy “SMB Direct” –NetDirectPort 445 –Priority 6
Write-Host “Creating traffic classes”
New-NetQosTrafficClass “Backup” –Priority 1 –Algorithm ETS –Bandwidth 20
New-NetQosTrafficClass “Remote Desktop” –Priority 2 –Algorithm ETS –Bandwidth 5
New-NetQosTrafficClass “Live Migration” –Priority 3 –Algorithm ETS –Bandwidth 30
New-NetQosTrafficClass “Cluster” –Priority 4 –Algorithm ETS –Bandwidth 5
New-NetQosTrafficClass “Monitoring” –Priority 5 –Algorithm ETS –Bandwidth 5
New-NetQosTrafficClass “SMB Direct” –Priority 6 –Algorithm ETS –Bandwidth 30
Write-Host “Enabling PFC for RDMA over Converged Ethernet”
Enable-NetQosFlowControl –Priority 6
Write-Host “Enabling push down of DCB settings”
Set-NetQosDcbxSetting –Willing $false -Confirm:$false
Write-Host “Enabling DCB on NICs”
Enable-NetAdapterQos “Port1”
Enable-NetAdapterQos “Port2”
Write-Host “Creating SR-IOV enabled virtual switches”
New-VMSwitch -Name “ExternalSRIOV1” -EnableIOV $True -NetAdapterName `
“Port3” -AllowManagementOS 0
New-VMSwitch -Name “ExternalSRIOV2” -EnableIOV $True -NetAdapterName `
“Port4” -AllowManagementOS 0