Managing Hyper-V
The main management tool for working with Hyper-V has been the MMC for Hyper-V, Failover Cluster Manager, or VMM. With Windows Server 2012, Hyper-V finally gets full PowerShell support, which provides access to not only all the functionality available in the GUI, but also the functionality not exposed through the GUI.
Table 2-7: Changes to the Hyper-V Management Console
| Hyper-V Host | Virtual Machines |
| New, Virtual Machine (existing) New, Virtual Hard Disk (existing) New, Floppy Disk (existing) Import Virtual Machine (improved) Hyper-V Settings (improved) Virtual Switch Manager (improved) Virtual SAN Manager (new) Edit Disk… (existing) Inspect Disk (existing) Stop Service (existing) Remove Server (existing) | Connect (existing) Settings (improved) Turn Off (existing) Shut Down… (existing) Save (existing) Pause (existing) Reset (existing) Snapshot (existing) Move… (new) Rename… (existing) Enable Replication… (new) |
Hyper-V Management Console
The Hyper-V Manager uses the classic MMC approach, with the Actions pane on the right-hand side displaying the available actions. The options available to configure Hyper-V hosts and virtual machines are outlined in Table 2-7.
To manage a Hyper-V host from a client machine, the Remote Server Administration Toolkit (RSAT) has to be installed. It was released shortly after Windows Server 2012 became generally available and can be downloaded directly from Microsoft:
www.microsoft.com/en-us/download/details.aspx?id=28972
Hyper-V PowerShell
PowerShell isn’t new to Windows, but in Windows Server 2012, the new version 3 of PowerShell can be used to manage all major roles and features, including Hyper-V. There are more than a whopping 2,500 new PowerShell cmdlets spread across the operating system to manage nearly all aspects of Windows.
To get a list of the new Hyper-V cmdlets, you can use the Get-Command -Module Hyper-V command in PowerShell. You can always get detailed help within PowerShell, including a list of parameters for a specific cmdlet, by using the Get-Help cmdlet. For instance, if you want help creating a new virtual machine, you can use the following PowerShell command: Get-Help New-VM.
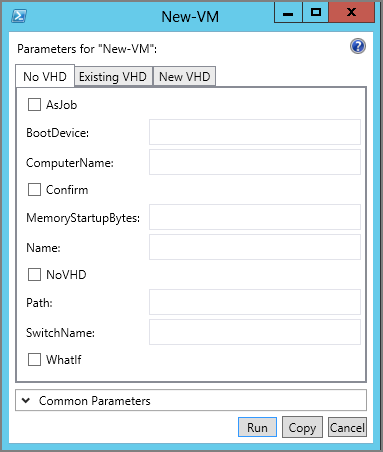
PowerShell 3 also introduces a new cmdlet called Show-Command that opens a GUI leveraging the PowerShell ISE. This capability makes it easy to understand the options and the syntax of a cmdlet. The syntax of New-VM, for example, can be displayed by typing Show-CommandNew-VM in a PowerShell console, which opens the dialog box shown in Figure 2-12.
Figure 2-12 Show-Command New-VM
The best way to learn PowerShell is to start with some easy, yet real-world scenarios, such as creating a new virtual machine. Which parameters are important when creating a new VM? Here are some examples:
- VM name (-Name)
- Location for VM config files (-Path)
- Amount for startup memory (-MemoryStartupBytes)
- Location for virtual hard disk (-NewVHDPath)
- Size for virtual hard disk (-NewVHDSizeBytes)
- Network connection (-SwitchName)
If you don’t know the parameters, check the New Virtual Machine Wizard. These parameters would look like the following:
New-VM -Name "MyFirstVM" -Path "E:VMData" -MemoryStartupBytes 512MB `
-NewVHDPath “E:VMDataMyFirstVMMyFirstVM_disk_1.vhdx” -NewVHDSizeBytes 40GB `
-SwitchName “External Public”
You can check the details of the newly created virtual machine by running the Get-VM command. Use the pipe option to display all details of this machine: Get-VM | fl *. By default, the virtual machine will be created with a single processor and static memory. As a next step, the virtual machine needs to be configured for Dynamic Memory and 2 processors. This can be done as follows:
Set-VM -Name "MyFirstVM" -ProcessorCount "2" -DynamicMemory `
-MemoryMaximumBytes “4294967296”
Because the virtual hard disk is empty, you might need to attach an ISO image to start the installation by configuring the VM’s DVD drive:
Set-VMDvdDrive -VMName "MyFirstVM" -Path "C:ISOsWINDOWSSERVER.ISO"Finally, let’s start the virtual machine:
Start-VM -Name "MyFirstVM"A mistake that often happens is that ISO images become mounted forever. With a simple query, these virtual machines can be identified. If needed, the problem could even be fixed in the same way. The following example makes a query for vmgues, which is needed to update Integration Services:
Get-VM | Get-VMDvdDrive | Where-Object {$_.DvdMediaType -ne 'None' `
-and ($_.Path -like ‘C:Windowssystem32vmguest.iso’)}
As you can see, the new Hyper-V PowerShell modules are straightforward. However, this is just the top of the iceberg. As you might imagine, there is much more PowerShell can do for you.
Server Core
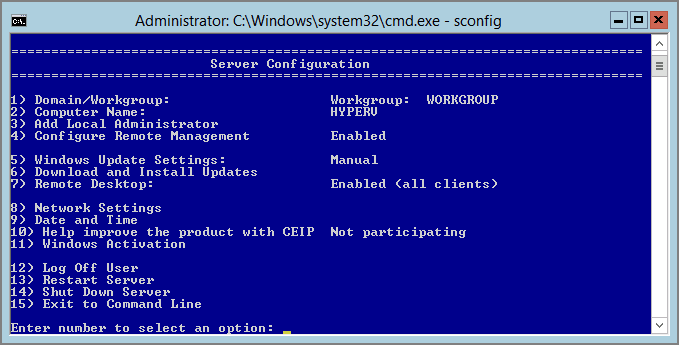
As in the previous version, Server Core comes with a limited configuration menu called Server Configuration (SCONFIG.cmd), shown in Figure 2-13. On Hyper-V Server, this menu is started automatically. In Server Core installation mode, however, this has to be launched explicitly. This tool helps with the most recent configuration tasks, such as changing the computer name, configuring the IP address, or joining the computer to the domain.
Figure 2-13 Server Core Server configuration menu (SCONFIG.cmd)
In Windows Server 2008 and Windows Server 2008 R2, you could not switch between Server Core and Full Installation modes. The only way to change the mode was to reinstall the entire operating system. Starting with Windows Server 2012, you have the flexibility to switch between Server Core and Server with a GUI modes. However, you still have to be aware of one small thing: when changing the installation mode after the server is set up, one reboot is required to complete the process. But, compared to what had to be done in the past, you should find this acceptable. After all, switching modes is not a day-to-day action. If it is, you should reconsider your architecture.
Converting from GUI to Server Core
The scenario where you deploy a server with a GUI and then remove the GUI management tools and desktop shell to convert the server to Server Core installation mode will probably also be the most common and probably also the scenario in which you can also benefit the most from the easy installation using the GUI and having a secure platform when transforming to Server Core.
You can easily do this via Server Manager by using the Remove Roles And Features wizard to help you:
As a part of the removal, the server reboots automatically. You can choose to manually reboot the system, but the process is not completed until you’ve rebooted the server. Some graphical management tools, such as the PowerShell ISE, will be removed as part of this process.
Another way is to use this PowerShell command:
Uninstall-WindowsFeature Server-Gui-Mgmt-Infra,Server-Gui-Shell –Restart Whereas in previous versions of Windows Server a role or feature was just disabled, the binary files can now be removed completely from the operating system to conserve disk space and reduce the attack surface even further. To completely remove a role or feature, use the -Remove option with the Uninstall-WindowsFeature cmdlet:
Uninstall-WindowsFeature Server-Gui-Mgmt-Infra,Server-Gui-Shell –Remove –RestartThe component would then have the status Removed in Server Manager and Disabled With Payload Removed in DISM.exe. The host needs access to an installation source to add the role or feature back to the operating system.
Although converting to Server Core mode is a very good choice for the Hyper-V hosts for performance, security, and patching reasons, consider maintaining a single “emergency” management host that still runs with the GUI (in case you need to make an emergency change). Otherwise, the preceding PowerShell makes a perfect last statement in any provisioning script that you have running to deploy your Hyper-V hosts.
Converting from Server Core to GUI
The second scenario is to install the GUI to a server configured as Server Core. As explained earlier, you also have the option of having a Minimal Server Interface instead of using the full Server with a GUI mode. The Minimal Server Interface mode can be installed by using the following PowerShell cmdlet:
Install-WindowsFeature Server-Gui-Mgmt-Infra –Restart If the Minimal Server Interface would be not enough, the full Server with a GUI mode can be installed using this PowerShell cmdlet:
Install-WindowsFeature Server-Gui-Shell –Restart Of course, the server GUI can also be installed directly in almost one step by using the following PowerShell cmdlet:
Install-WindowsFeature Server-Gui-Mgmt-Infra,Server-Gui-Shell –Restart If the host doesn’t have access to Windows Update, the process will fail. However, the installation can be done using the original INSTALL.wim image as the source to complete the process:
mkdir C:MountDirdism /Get-WimInfo /WimFile:<YourDrive>:sourcesinstall.wimdism /Mount-Wim /WimFile:<YourDrive>:sourcesinstall.wim `
/Index:<YourIndexNumber> /MountDir:C:MountDir /ReadOnlyInstall-WindowsFeature Server-Gui-Mgmt-Infra,Server-Gui-Shell –Restart `
–Source C:MountDirWindowsWinSxSDon’t forget to unmount the WIM image after the task has been completed:
dism /Unmount-Wim /MountDir:C:MountDir /DiscardWithout access to the original source file used to mount the WIM, the unmount process will fail with the error message “The device is not ready.”