
Running your application on the iPhone
Getting the app ready for distribution
Taking the app to market — that is, the App Store
Benjamin Franklin once said, "In this world nothing can be said to be certain, except death and taxes." Here's another certainty in this earthly vale of tears: Everybody has the same hoops to jump through to get an app onto an iPhone and then into the App Store — and nobody much likes jumping through hoops, but there they are.
So you're working on your app, running it in the Simulator, as happy as a virtual clam, and all of a sudden you get this urge to see what your creation will look like on the iPhone itself. Assuming that you've joined the requisite developer program (see Chapter 3 of this minibook), what do you have to do to get it to run on the iPhone?
For most developers, getting their apps to run on the iPhone during development can be one of the most frustrating things about developing software for the iPhone. The sticking point has to do with a technical concept called code signing, a rather complicated process designed to ensure the integrity of the code and positively identify the code's originator. Apple requires all iPhone apps to be digitally signed with a signing certificate — one issued by Apple to a registered iPhone developer — before the app can be run on a development system and before they're submitted to the App Store for distribution. This signature authenticates the identity of the developer of the app and ensures that there have been no changes to the app after it was signed.
As to why this is a big deal, here's the short and sweet (and, to our ears, convincing) answer: Code signing is your way of guaranteeing that no bad guys have done anything to your code that can harm the innocent user.
Okay, so nobody really likes the process, but it's doable, and it's certainly worth the trouble. In this chapter, I give you an overview of how it all works by jumping right to that point where you're getting your app ready to be uploaded to the App Store and then distributed. I'm starting at the end of the process, which for all practical purposes begins with getting your app to run on a device during development. I'm doing the overview in this order because the hoops you have to jump through to get an app to run on a single iPhone during development are a direct consequence of code signing, and of how Apple manages it through the App Store and on the device.
After the overview, which will give you some context for the whole process, I revert to the natural order of things and start with getting your app to run on your iPhone during development.
It's very important to keep clear that you have to go through two processes: One for development, and one for distribution. Both produce different (but similarly named) certificates and profiles, and you'll need to pay attention to keep them straight. This section starts with the distribution process — how you get your app to run on other people's iPhones. Next up is the development process — how to get your app running on your iPhone during development.
Before you can build a version of your app that will actually run on your users' iPhones, Apple insists that you have the following:
A Distribution Certificate: An electronic document that associates a digital identity (which it creates) with other information that you have provided that identifies you, including a name, e-mail address, or business. The Distribution Certificate is placed on your keychain — that place on your Mac that securely stores passwords, keys, certificates, and notes for users.
A Distribution Provisioning Profile: These profiles are code elements that Xcode builds into your application, creating a kind of "code fingerprint" that acts as a unique digital signature.
After you've built your app for distribution, you then send it to Apple for approval and distribution. Apple verifies the signature to be sure that the code came from a registered developer (you) and has not been corrupted. Apple then adds its own digital signature to your signed app. The iPhone OS runs only apps that have a digital signature. Doing it this way ensures iPhone owners that the apps they download from the App Store have been written by registered developers and have not been altered since they were created.
Tip
To install your distribution-ready app on a device, you can also create an Ad Hoc Provisioning Profile, which enables you to distribute your app on up to 100 devices.
Although the system for getting apps on other people's iPhones works pretty well, leaving aside the fact that Apple essentially has veto rights on every app that comes its way, there are some significant consequences for developers. In this system, there really is no mechanism for testing your app on the device it's going to run on:
You can't run your app on an actual device until it's been code-signed by Apple, but Apple is hardly going to code-sign something that may not be working correctly.
Even if Apple did sign an app that hadn't yet run on an iPhone, that would mean an additional hassle: Every time you recompiled, you'd have to upload the app to the App Store again — and have it code-signed again because you had changed it, and then download it to your device.
Bit of a Catch-22 here.
To deal with this problem, Apple has developed a process for creating a Development Certificate (as opposed to the Distribution Certificate that I explain at the start of this section) and a Development Provisioning Profile (as opposed to the Distribution Provisioning Profile that I also explain at the start of this section). It's easy to get these confused — the key words are Distribution and Development. With these items in hand, you can run your application on a specific device.
Note
This process is required only because of the code-signing requirements of the distribution process.
The Development Provisioning Profile is a collection of your App ID, Apple device UDID (a unique identifier for each iPhone), and iPhone Development Certificate (belonging to a specific developer). This Profile must be installed on each device on which you want to run your application code. (You see how that's done in "Creating your Development Provisioning Profile and Development Certificate" in this chapter.) Devices specified within the Development Provisioning Profile can be used for testing only by developers whose iPhone Development Certificates are included in the Provisioning Profile. A single device can contain multiple provisioning profiles.
It's important to realize that a development provisioning profile (as opposed to a distribution one) is tied to a device and a developer.
Even with your provisioning profile(s) in place, when you compile your program, Xcode will build and sign (create the required signature for) your app only if it finds one of those Development Certificates in your Keychain. Then, when you install a signed app on your provisioned device, the iPhone OS verifies the signature to make sure that (a) the app was signed and (b) the app has not been altered since it was signed. If the signature is not valid or if you didn't sign the code, the iPhone OS will not let the app run.
This means that each Development Provisioning Profile is also tied to a particular Development Certificate.
Note
And to make sure the message has really gotten across:
A Development Provisioning Profile is tied to a specific device and a specific Development Certificate.
Your app, during development, must be tied to a specific Development Provisioning Profile (which is easily changeable).
Tip
The process you're about to go through is akin to filling out taxes: You have to follow the rules, or there can be some dire consequences. But if you do follow the rules, everything works out, and you don't have to worry about it again. (Until it's time to develop the next app, of course.)
Although this process is definitely not our favorite part of iPhone software development, I've made peace with it, and so should you. Now I can go back to the natural order of things and start by explaining the process of getting your device ready for development. Although Apple documents the steps very well, do keep in mind that you really have to carry them out in exactly the way Apple tells you. There are no shortcuts! But if you do it the way it prescribes, you'll be up and running on a real device very quickly.
With your app up and running, it's time for the next step: getting your creation ready for distribution. (This process is somewhat easier.) Finally, you definitely want to find out how to get your application into the App Store. After that, all you have to do is sit back and wait for fame and fortune to come your way — or read Chapter 7 in this minibook to discover why it hasn't yet.
Warning
What I describe on these pages is the way things looked when I wrote this book. What you see when you go through this process yourself may be slightly different from what you see here. Don't panic. It's because Apple changes things from time to time.
Until just recently, getting your app to run on the iPhone during development was a really painful process. (In fact, co-author Neal had written a 30-page chapter on it, detailing step after painful step. Then, lo and behold, right when Neal had put the finishing touches on his magnum opus, Apple changed the process and actually made it much easier. Neal has mixed feelings about that, but they're mostly relief.)
In fact, the process is now so easy that there's no real need for us to linger over the details. Here's the drill:
Go to the iPhone Dev Center Web site at
http://developer.apple.com/iphone
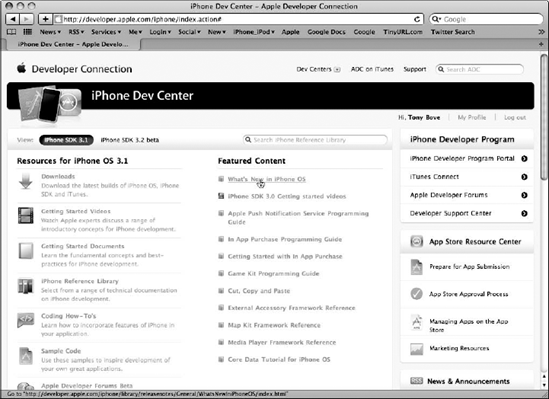
The iPhone Dev Center appears, as shown in Figure 6-1. You can see the iPhone Developer Program Portal link, along with the iTunes Connect and the Developer Support Center links, in the iPhone Developer Program section on the right side of the Web page. (You can if you're a registered developer. You did take care of that, right? If not, look at Chapter 3 in this minibook for more on how to register.)
Click the iPhone Develope Program Portal link.
The iPhone Developer Program Portal screen appears, as shown in Figure 6-2.
Tip
Assuming you're either a Team Admin or Team Agent or are enrolled in the Developer Program as an individual, use the Development Provisioning Assistant to create and install a Provisioning Profile and iPhone Development Certificate, as shown in the next section.
You need these to build and install applications on the iPhone. But you knew that.
If you're enrolled in the Developer Program as an individual, you're considered a Team Agent with all the rights and responsibilities.
If you're part of a company, you've set up a team already. If not, click the Setting Up a Team link on the right side of the iPhone Developer Program Portal page — right there under the Portal Resources heading — to get more info about setting up a team and who needs to do what when.
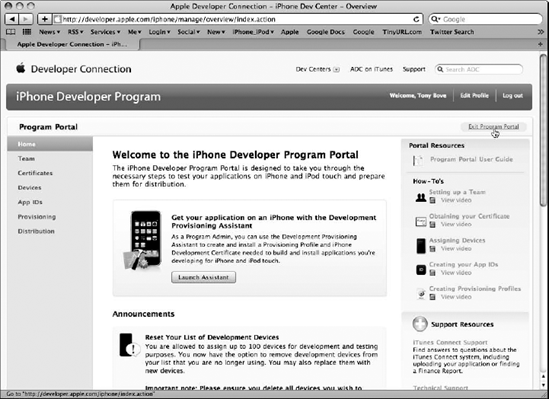
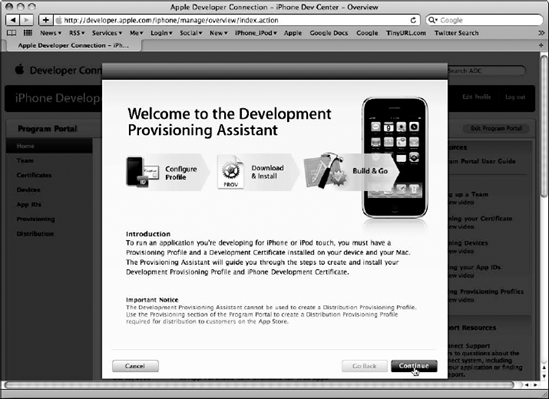
When you've settled the matter of which kind of developer you are (for Apple's purposes), click the Launch Assistant button, and then you see the dialog in Figure 6-3.
As I mention earlier in the chapter, to run the app on the iPhone you must have a Provisioning Profile installed on the iPhone, as well as a Development Certificate on your Mac. The whole point of the Development Provisioning Assistant is to guide you through the steps to create and install your Development Provisioning Profile and iPhone Development Certificate.
Note
Development and Distribution stay off each other's turf. The Development Provisioning Assistant creates a Development Provisioning Profile, not a Distribution Provisioning Profile. You have to use the Provisioning section of the Program Portal, described later in this chapter, to create the Distribution Provisioning Profile required to distribute the app to customers through the App Store.
Here's what the Development Provisioning Assistant has you do:
Choose an App ID.
An App ID is a unique identifier that is one part of your Development Provisioning Profile. iPhone OS uses it to allow your app to connect to the Apple Push Notification service (which I discuss momentarily), share keychain data between apps, and communicate with external hardware accessories that you want to pair your iPhone OS app with. But even if you don't want to do those things, you need to create an App ID anyway in order to install your app on an iPhone OS-based device.
Tip
If you're creating a suite of apps that will share the same Keychain access (for example, sharing passwords between apps) or have no Keychain Access requirements, you can create a single App ID for your entire app suite by typing an asterisk as a wild-card character.
Warning
The App ID that the Assistant creates can't be used with the Apple Push Notification service. (This service lets your app keep its users up-to-date, offering the capability of sending a message that lets the user launch your app, or triggering audible alerts with your own custom sounds, or adding a numbered badge to your app icon — for details, see the App IDs section of the iPhone Developer Program Portal at
http://developer.apple.com/iphone/manage/bundles/index.action). The App ID created by the Assistant also can't be used for In App Purchase. (See Chapter 7 for details on In App Purchase.) If you've previously created an App ID already that can be used with the Apple Push Notification service or for In App Purchase, you can't use the Assistant to create a Development Provisioning Profile. This isn't a big deal; you just have to follow the steps the Assistant follows on your own.Choose an Apple Device and connect your iPhone or iPod touch.
Development provisioning is also about the device, so you have to specify which particular device you're going to use, and connect it. You do that by providing the Assistant with the device's Unique Device Identifier (UDID), which the Assistant shows you how to locate using Xcode — with Xcode open, choose Window

Provide your Development Certificate.
Your existing Development Certificate appears in the Assistant, and all you need to do is click Continue. All apps must be signed with a valid certificate before they can run on an Apple device, so you have to create one at this point if you don't already have one. You can do so by visiting the Certificates section of the iPhone Developer Program Portal (click the Certificates link in the left column of the portal's home page), and following the instructions to request individual iPhone Development Certificates.
For a Company (that is, a Team), each developer has to first create a Certificate Signing Request, which then has to be approved by your Program Admin or Team Agent. Visit the Certificates section of the iPhone Developer Program Portal for instructions.
Name your Provisioning Profile.
You then give your Provisioning Profile a name and click Generate. The Provisioning Profile pulls together your App ID (Step 1), Apple device UDID (Step 2), and iPhone Development Certificate (Step 3). The Assistant then steps you through downloading the profile and handing it over to Xcode, which installs it on your device. You hand it over to Xcode by dragging it over the Xcode icon in the Mac OS X Dock or by dragging it directly to the Provisioning Profiles section of the Organizer window. (Choose Window
Verify that the Provisioning Profile is installed.
In Xcode, choose Window
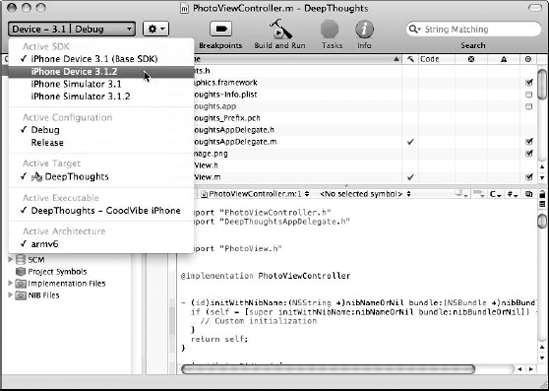
At this point, you can choose iPhone Device 3.1 as the active SDK in the Project window, as shown in Figure 6-5. You can then build your app and have it installed on the provisioned device.

Although there's no dedicated assistant to help you provision your application for the App Store, that process is actually a little easier — which may be why there's no assistant for it.
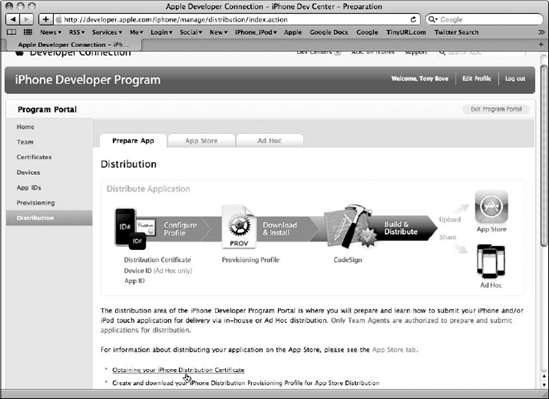
You start at the Developer Portal (refer to Figure 6-2), but this time you click the Distribution link on the menu on the left side of the page. Doing so takes you to the Prepare App page shown in Figure 6-6, where you can find an overview of the process, as well as links that take you where you need to go when you click them.
Note
You actually jump through some of the very same hoops you did when you provisioned your device for development — except that this time, you're going after a Distribution Certificate.
Here's the step-by-step account:
Obtain your iPhone Distribution Certificate.
To distribute your iPhone app, you (as an Individual developer) or your Team Agent (as a development team) creates an iPhone Distribution Certificate. This works much like the Development Certificate, except that only the Team Agent (or whoever is enrolled as an Individual developer) can get one. Clicking the Obtaining Your iPhone Distribution Certificate link on the Prepare App page (shown at the bottom of Figure 6-6) leads you through the process.
Create your iPhone Distribution Provisioning Profile for App Store Distribution.
To build your app successfully with Xcode for distribution via the App Store, first you have to create and download an App Store Distribution Provisioning Profile, which is (lest we forget) different from the Development Provisioning Profiles described in the previous section.
Note
Apple will accept an app only after it's built with an App Store Distribution Provisioning Profile.
Click the Create and Download Your iPhone Distribution Provisioning Profile for App Store Distribution link.
Scroll the Prepare App page (refer to Figure 6-6) to click the link, which leads you through this process.
When you're done creating the Distribution Provisioning Profile, download it and drag it over the Xcode icon in the Mac OS X Dock.
That loads your Distribution Profile into Xcode, and you're ready to build an app you can distribute for use on actual iPhones.
(Optional) You can also create and download a Distribution Provisioning Profile for Ad Hoc Distribution.
Going the Ad Hoc Distribution route enables you to distribute your application to up to 100 users without going through the App Store. Scroll the Prepare App page (refer to Figure 6-6) to click the Creating and Downloading a Distribution Provisioning Profile for Ad Hoc Distribution link, which leads you through the process. (Ad Hoc Distribution is beyond the scope of this book — the iPhone Developer Program Portal has more info about this option.)
Build your app with Xcode for distribution.
After you download the distribution profile, you can build your app for distribution — rather than just building it for testing purposes, which is what you've been doing so far. It's a well-documented process that you start by scrolling the Prepare App page (refer to Figure 6-6) and clicking the Building Your Application with Xcode for Distribution link.
Verify that it worked.
Scroll the Prepare App page (refer to Figure 6-6) and click the Verifying a Successful Distribution Build link to get the verification process started. In this case, there are some things missing in the heretofore well-explained step-by-step documentation — it tells you to open the Build Log detail view and confirm the presence of the
embedded.mobileprovisionfile. In Chapter 4 of this minibook, I show you how to keep the Build Results window open in Xcode, but if you haven't been doing that, choose BuildDepending on the way the way the Build Results window is configured, you may see a window only showing the end result of your build. To get the actual log of the process, you have to change Errors & Warnings Only in the drop-down menu in the scope bar to All Messages.
At this point, do a couple of prudent checks:
Verify that your app was signed by your iPhone Certificate. To do that, select the last line in the Build log — the one that starts with CodeSign. Then click the icon at the end of the line. You can see that it was signed by the iPhone Certificate. (Okay, you may need a magnifying glass, but trust me, it's there, and make sure yours is, too.)
Verify that the
embedded.mobileprovisionis there and is located in the Distribution build directory and is not located in a Debug or Release build directory. To do that, you can search forembedded.mobileprovisionin the search field in the upper-right corner of the Build Results window.
When you've done this elaborate (but necessary) song and dance, you're ready to rock 'n' roll. You can go to iTunes Connect, which is your entryway to the App store. This is where the real fun starts.
iTunes Connect is a group of Web-based tools that enables developers to submit apps to the App Store and manage their apps in the store. It's actually the very same set of tools that the other content providers — the music and video types — use to get their content into iTunes.
In iTunes Connect, you can check on your contracts, manage users, and submit your app with all its supporting documentation — the metadata, as Apple calls it — to the App Store. iTunes Connect is also where you get financial reports and daily/weekly sales trend data, as I describe in Chapter 7 of this minibook.
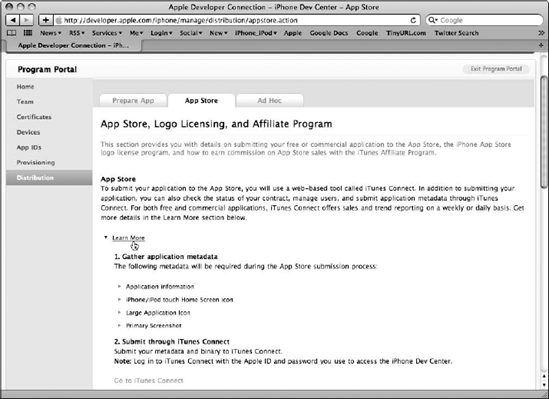
Your first stopping point is the App Store, Logo Licensing, and Affiliate Program page (shown in Figure 6-7). To get there, select the App Store tab in the Distribution section of the Developer Portal, and then click the Learn More link right under the App Store heading.
At this point, get your bearings and proceed:
Whether you are a Team Agent or an Individual developer, you see the Go to iTunes Connect link (after clicking the Learn More link). Click the Go to iTunes Connect link to call up the login page of iTunes Connect.
You need to use your Apple ID and password to log in.
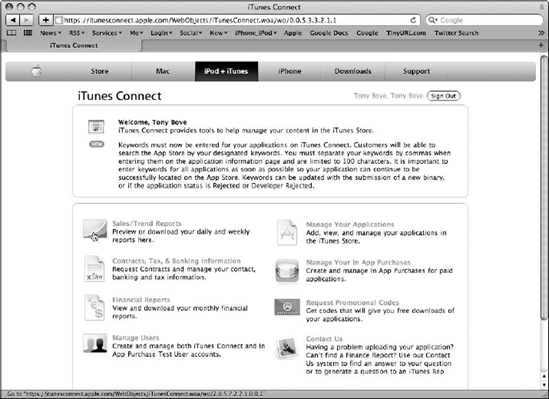
Before you can do anything, you're asked to review and accept the iTunes Distribution Terms & Conditions. After taking care of that chore, you land on the iTunes Connect page shown in Figure 6-8. You should bookmark this page so that you don't have to go hunting for that Go to iTunes Connect link.
Tip
At some point, you should also select To Become an Authorized Licensee, which is a little farther down the App Store, Logo Licensing, and Affiliate Program page you see back in Figure 6-7. This option allows you to use the iPhone App Store artwork and iPhone images in your advertising, Web sites, and other marketing materials.
When you want to add an application to the App Store or manage what you already have there, the iTunes Connect main page is your control panel for getting that done.
Apple is very strict about some things, and I speak from firsthand experiences.
The first time co-author Neal submitted the ReturnMeTo app from his other book, iPhone Application Development For Dummies, he received a polite, but firm, e-mail rejecting the application because the app's icon used an iPhone image. (You can see that icon and the rejection letters in the first edition of that book.) You may not think this is such a big deal, but it certainly is with Apple. The artwork you use for the app icon is just one of many pieces of information that must be submitted in advance and is subject to Apple's approval.
So how do you get your app into the App Store? To start with, there's a link on the iPhone Dev Center page, under News and Information, labeled Tips on Submitting Your App to the App Store. This page has information on keywords, assigning a rating for your app, and some other tips. Read it!
The Uploading Your Application to the App Store part is pretty easy. The hard part is collecting all the little bits of information you need to enter into all the text fields in the upload page.
Here's an overview of the kind of information you need (for more information, click the Prepare for App Submission link in the App Store Resource Center section of the iPhone Dev Center page shown earlier in Figure 6-1):
Metadata: The ever-present data about data. Here's what Apple wants from you:
Application Name: The name must conform to guidelines for using Apple trademarks and copyrights. Apple takes this very seriously, as evidenced by the company sending a cease-and-desist order to Neal's ISP when Neal tried (innocently) to use iPhoneDev411 as his domain name. (A word to the wise: Don't mess with Apple.)
Application Description: When you go through the process of uploading your data, the field you have to paste this into will say you're limited to 4,000 characters. Apple suggests no more than 700.
This description is what users will see when they click on your app in the App Store, so it's important that this description is well written and points out all your app's key features.
Tip
Don't include HTML tags; they will be stripped out when the data is uploaded. Only line breaks are respected.
Device: Basically, I'm talking iPhone and/or iPod touch as of this writing.
Primary Category: A drop-down menu offers the primary category choices for your app — choose one. The App Store offers about 20 categories ranging from Reference to Games to Social Networking to Travel to Utility.
Secondary Category: (Optional) You're offered the same categories that you see for the Primary Category.
Rating Information: You're asked to provide additional information describing the content. This allows you to set your rating for your app for the purpose of parental controls on the App Store. You may see content types such as Cartoon or Fantasy Violence, Simulated Gambling, Mature/Suggestive Themes, and so on. For each type of content, you need to describe the level of frequency for that content — None, Infrequent/Mild, Frequent/Intense. Apple has strict rules stating that an app must not contain any obscene, pornographic, or offensive content. Oh and by the way, it's entirely up to Apple what is to be considered offensive or inappropriate.
Copyright: Use a line such as:
© Copyright your name 2010. All rights reserved.
You can type the copyright symbol by pressing Option-G. If you have any questions about copyright registration, talk to your lawyer or check out
www.copyright.gov.Version Number: People usually start with 1.0. Then, as you update the app to respond to suggestions and constructive criticism, you can move on to 1.1, and someday even version 2.0.
SKU Number: The Stock Keeping Unit (SKU) number is any alphanumeric sequence of letters and numbers that uniquely identifies your app in the system. (Be warned — this is not editable after you submit it.)
Keywords: Keywords describe your app. These are matched to App Store searches. Spend some time on this one. Keywords can be changed only when you submit a new binary, or if the app status is Rejected.
Support URL and Company URL: You need a support URL, which appears on the app product page at the App store — this is the link users will click on if they need technical support from you or have a question about your app. You also need a company URL, which also appears on the app product page and enables potential customers to find out more about you. After you've assigned these URLs, you want to keep them the same as long as possible, even if you change the Web site's contents, because people bookmark them.
If you don't have a Web site yet and don't know how to build one, try using iWeb with MobileMe (if you already have the service) or with your friendly ISP. MobileMe offers automatic Web publishing to a reasonably unique domain name that can serve well enough for your URLs — to find out more, see co-author Tony's book iLife For Dummies. If you use an ISP, obtain a domain name for your URLs that reflects your company or product name. You can also find out more about building a professional-looking site from David Crowder's book Building a Web Site For Dummies, 3rd Edition.
Support E-mail Address: (For use by Apple only, not visible to end users of your app.) This address will likely be the one you used when you registered for the developer program.
Demo Account — Full Access: This is a test account that the App Store reviewers can use to test your app. Include usernames, passwords, access codes, demo data, and so on. You should include any messages to the Apple app reviewers, in case they might incorrectly reject something — for example, lack of permission to use a piece of music in the app that it is in the public domain. Make sure the demo account works correctly. You'd hate to have your app rejected because you didn't pay attention to setting up a demo account correctly.
End User License Agreement: (Optional) If you don't know what this is, don't worry. It's the legal document that spells out to your app's users what they're agreeing to do in order to use your app. Fortunately the iTunes Store has a standard agreement, which has been time-tested — but you should read it anyway before you use it.
Availability Date: When your app will be available for download (for free apps) or purchase-and-download.
Application Price: Free is easier, but later on I show you what you have to do if you want to get paid (what a concept) for all the work you did getting your app to the public.
Localization: Additional languages (besides English) for your metadata. You can have your text and images in Italian in all Italian-speaking stores, for example.
App Store Availability: The territories in which you would like to make your app available (the default is all countries iTunes supports).
Artwork: A picture is worth a thousand words, so the App store gives you the opportunity to dazzle your app's potential users with some nice imagery:
iPhone/iPod touch Home Screen Icon: Your built app must have a 57×57-pixel icon included for it, following the procedure I describe in Chapter 5 of Book III. This icon is what will be displayed on the iPod touch or iPhone home screen.
Large Application Icon: This icon will be used to display your app on your App Store page and other App Store pages. It needs to meet the following requirements, although the version you see in the App Store is resized by Apple:
512 × 512 pixels (flattened, square image)
72 dpi
JPEG or TIFF format
Primary Screenshot: This shot will be used on your application product page in the App Store.
Note
Apple doesn't want you to include the iPhone status bar in your screenshot. The shot itself needs to meet these requirements:
320 × 460 portrait (without status bar) minimum
480 × 300 landscape (without status bar) minimum
320 × 480 portrait (full screen)
Up to four additional optional screenshots can appear on the application product page. These may be resized to fit the space provided. Follow the same requirements from the preceding list.
Tip
To take a screenshot on an iPhone or iPod touch, quickly press and release the Sleep/Wake and Home buttons at the same time. The screen flashes (and if your volume is up, you can hear a shutter click). This indicates that the screen was saved in the Saved Images album (on an iPod touch) or the Camera Roll album — choose the album in the Photos app to see the image. You can take as many screen shots as you like. The next time you sync your iPhone or iPod touch, your photo application (such as iPhoto) launches to receive these new images.
Tip
You can also capture a screenshot using the Xcode Organizer window. Open Xcode and choose Window
Additional Artwork: (Optional) If you're really lucky — I mean really lucky (or that good) — you may be included on featured pages in the App Store. Apple will want "high-quality layered artwork with a title treatment for your application," which will then be used in small posters to feature your app in the App Store.
If you're going to charge for your app, you have to provide even more information. Most of it is pretty straightforward, except for some of the banking information, which you do need to have available. To change this information after you've entered it, you have to e-mail iTunes technical support. It behooves you to get it right the first time.
Here's what I'm talking about:
Bank name
Bank address
Account number
Branch/Branch ID
ABA/Routing Transit Number: Generally, this number is the first nine digits of that long number at the bottom of your checks that also contains the account number. If you aren't sure what the routing number is, contact your bank.
Your Bank SWIFT Code: You will have to get that from your bank.
Tip
Take it from us; it's far easier if you have all bits and pieces together before you start the actual upload process, rather than having to scramble at 3 a.m. to find some obscure piece of information it wants. (The Bank SWIFT Code was the one that got co-author Neal.)
At this point, you can start the app-upload process by clicking the Manage Your Applications link on the iTunes Connect main page. (Refer to Figure 6-8.) But hold it. Better to look before leaping: Check out the requisite Contracts, Tax & Banking Information.
Here's why: If you plan on selling your app, you need to have your paid commercial agreement in place and signed before your apps can be posted to the App Store.
Note
If your app is free, you've already entered into the freeware distribution agreement by being accepted into the iPhone Developer Program. You may not want to charge for your app now, but just like with anything else at Apple, contract approval can take a while, so you should probably fill out the contract information just to get it out of the way.
Start by clicking the Contracts, Tax & Banking Information link on the iTunes Connect main page. The Manage Your Contracts page appears. You use this page to create a contract for your paid app. You can also see that you already have, by default, a contract in effect for free apps. To create a new contract, select the box under Request Contract in the Request New Contracts section, and you're taken though a series of pages that ask you to provide the information Apple needs, including the bank information I call your attention to earlier.
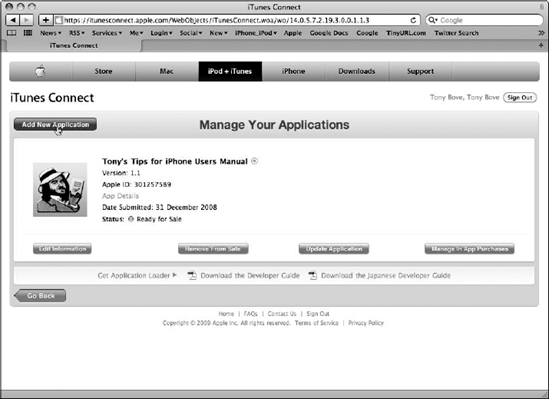
After you've set the wheels in motion, you can then go back to the iTunes Connect main page and upload your data. Click the Manage Your Applications link (refer to Figure 6-8) to call up the Manage Your Applications page, as shown in Figure 6-9. In that page, click the Add New Application button and go to town. Fill in all the blanks, using all that info I ask you to collect in the "Supplying the Information Required for the App Store" section earlier in the chapter. Along the way, you'll upload your metadata and the app itself to Apple.
Tip
Click the Download the Developer Guide link at the bottom of the Manage Your Applications page in iTunes Connect (refer to Figure 6-9) to obtain comprehensive information about submitting apps to the App Store.
Tip
Apple offers Application Loader, a Mac application that analyzes your iPhone app's zip file and verifies all the certificates and icons before uploading your app. Using the Application Loader minimizes your chances of app rejection. To download it, choose Manage Your Applications and scroll down to the bottom, and then click the Get Application Loader link. To use it, go ahead with the process of adding a new app to the App Store, but when iTunes Connect asks you to upload your app, select the Check Here to Upload Your Binary Later check box. Complete the rest of the information required for uploading an app. Then, to begin uploading, start Application Loader and choose File
As of November 2009 (as quoted in Business Week), about 90 percent of all submitted apps are accepted. Of the 10 percent rejected (mostly for bugs or for improper use of artwork or trademarks in the app), only a handful (less than 1 percent) fell into some gray area that Apple hadn't anticipated — for instance, apps intended to help people cheat at gambling in casinos. For guidelines on how to avoid rejection due to coding or user interface issues, see Chapter 2 in this minibook.
Before you upload your app and its data, make sure you haven't run afoul of any of Apple's rules about trademarks, copyrights, and artwork. Be sure to peruse Apple's posted Guidelines for Using Apple's Trademarks and Copyrights, which you can find here:
www.apple.com/legal/trademark/guidelinesfor3rdparties.html
Here are some tips:
Use the same icon for the app (the bundle icon) and the App Store page icon. Make sure the 57-pixel bundle icon for your app is the same image as the 512-pixel version for your App Store page.
Icons must be different for lite and pro versions (such as free and paid versions). Use a different icon image for app and page for a lite version than the one you use for the pro version. Using the same icon image for both sends your app straight to the rejection bin.
Don't use any part of an Apple image and certainly none of the company's trademark images or names. Your app can't include any photos or illustrations of the iPhone, including icons that resemble the iPhone, or any other Apple products (including the Apple logo itself). I've heard of projects being rejected for using the Bonjour logo, as well as Apple's network icon (the little picture of the globe with all the glowing lines). Your app can't include the word iPhone in its title (although the app title Tony's Tips for iPhone Users is okay because the app's content is about the iPhone), and its use in the title or description of any components or features is very strict and probably not worth the trouble.
If you use any of Apple's user interface graphics, you must use them in the way they were intended. For example, the blue + button should be used only to add an item to a list.
Don't infringe on other trademarks, either. Your app's title, description, and content must not potentially infringe upon other non-Apple trademarks or product likenesses. I've heard of an app rejected for using an icon resembling Polaroid photos.
Keywords can get you in trouble. Keyword terms must be related to your app's content. It should be obvious, but some developers do it: You can't use offensive terms. And it's a big no-no to refer to other apps, competitive or not.
Don't include pricing information in your app's description and release notes. Your app's marketing text — the application description and release notes — should not include pricing information, mostly because it would cause confusion in other countries due to pricing differences.
Don't mention Steve. Apple will reject any app that mentions Steve Jobs in any context, even as a clue in a puzzle — it does not matter how trivial the reference; just the name is enough.
Don't try to fool the ratings. Apps are rated accordingly for the highest (meaning most adult) level of content that the user is able to access. If you hide it, they will find it, and if Apple's review indicates that the app's content is in any way inconsistent with the information you provided, out you go!
You wait for your app's approval or rejection. The timeframe is, on average, about two weeks, though some developers have claimed much longer, and Tony can attest to it taking much shorter for his app.
So it varies, but if you follow our advice about submitting your app in the section "Avoiding the App Store Rejection Slip" in this chapter, and you take our advice in Chapter 2 of this minibook about development and user interface practices to avoid, it shouldn't take longer than a few weeks. Use the time wisely to set up your marketing campaigns, as I describe in the next chapter of this minibook — Chapter 7.