
Finding an address for a map coordinate and displaying on the map
Finding the map coordinate from an address and displaying it on the map
Geocoding allows you to take an address and turn it into a map coordinate. Reverse geocoding allows you to take a map coordinate (your current location, for example) and turn it into an address. In this chapter, you add both kinds of functionality to RoadTrip. You also (finally) get rid of those annoying compiler warnings.
Being able to see where I am on an iPhone map has some visual appeal — that dot is a real nice shade of blue — but I'm an exacting kind of guy who'd like to know exactly where I am in the scheme of things. I'd like to know the street address of where I'm standing, in other words. Geocoding makes that possible. (If I have the address, I can also write some code to turn the iPhone's current address into an Address Book contact — I show that to you in Book VII.)
Being able to go from a coordinate on a map to an address is called reverse geocoding, and thankfully the ability to do that is supplied by the MapKit. Forward geocoding, the kind of geocoding that converts an address to a coordinate, doesn't come with the MapKit, although many free and commercial services are available. I talk more about those options in the next section.
Tip
Keep in mind that the location may not be completely accurate — that whole horizontalAccuracy thing I talk about in Chapter 5 of this minibook does play a role here. For example, because my office is very close to my property line, my location sometimes shows up with my next-door neighbor's address.
Adding reverse geocoding to RoadTrip enables you to display the address of the current location. Just follow these steps:
Import the reverse geocoder framework (conveniently named
MKReverseGeocoder) intoMapController.hand haveMapControlleradopt theMKReverseGeocoderDelegateprotocol.That protocol should sound familiar because you should already have adopted it when you created the
MapControllerback in Chapter 5 of this minibook.#import <MapKit/MKReverseGeocoder.h>@interface MapController : UIViewController<MKReverseGeocoderDelegate>{Add an instance variable to hold a reference to the geocoder object.
MKReverseGeocoder *reverseGeocoder;
You use this later to release (I won't need it any more) the
MKReverseGeocoderafter you get the current address.Add the methods
reverseGeocoder:didFindPlacemark:andreverseGeocoder:didFailWithError:toMapController.m.- (void)reverseGeocoder:(MKReverseGeocoder *) geocoder didFindPlacemark:(MKPlacemark *) placemark { NSMutableString* addressString = [[NSMutableString alloc] initWithString: placemark.subThoroughfare]; [addressString appendString: @" "]; [addressString appendString:placemark.thoroughfare]; mapView.userLocation.subtitle = placemark.locality; mapView.userLocation.title = addressString; [addressString release]; } - (void)reverseGeocoder:(MKReverseGeocoder *) geocoder didFailWithError:(NSError *) error{ NSLog(@"Reverse Geocoder Errored"); }
The reverseGeocoder:didFindPlacemark: message is sent to the delegate when the MKReverseGeocoder object successfully obtains placemark information for its coordinate. An MKPlacemark object stores placemark data for a given latitude and longitude. Placemark data includes the properties that hold the country, state, city, street address, and other information associated with the specified coordinate. The following list shows the kind of data involved here:
In this implementation, you're setting the user location annotation (userLocation) title (supplied by MapKit) to a string you create that's made up of the subThoroughfare and thoroughfare (the street address). You assign the locality (city) property to the subtitle.
Note
A placemark is also an annotation and conforms to the MKAnnotation protocol, whose properties and methods include the placemark coordinate and other information. Because they are annotations, you can add them directly to the Map view. (For more on annotations, see Chapter 5 of this minibook.)
The reverseGeocoder:didFailWithError: message is sent to the delegate if the MKReverseGeocoder couldn't get the placemark information for the coordinate you supplied to it. The internet may not available for example. (This is a required MKReverseGeocoderDelegate method.)
Of course, to actually get the reverse geocoder information, you need to create an MKReverseGeocoder object. Make the MapController a delegate, send it a start message, and then release it when you're done with it, as follows:
Allocate and start the reverse geocoder and add the
MapControlleras its delegate in theMapContoller'sgoToLocation:method by adding the code in bold shown here:- (IBAction)goToLocation:(id) sender{ MKUserLocation *annotation = mapView.userLocation; CLLocation *location = annotation.location; if (nil == location) return; CLLocationDistance distance = MAX(4*location.horizontalAccuracy, 500); MKCoordinateRegion region = MKCoordinateRegionMakeWithDistance (location.coordinate, distance, distance); [mapView setRegion:region animated:NO]; self.navigationItem.rightBarButtonItem.action = @selector(goToTrip:); self.navigationItem.rightBarButtonItem.title = @"Map";reverseGeocoder = [[MKReverseGeocoder alloc]initWithCoordinate:location.coordinate];reverseGeocoder.delegate = self;[reverseGeocoder start];}Notice how you initialize the
MKReverseGeocoderwith the coordinate of the current location with the following bit at the end:.reverseGeocoder = [[MKReverseGeocoder alloc] initWithCoordinate:location.coordinate];Release the MKReverseGeocoder by adding the code in bold below to
goToTrip:.- (IBAction)goToTrip:(id) sender{[reverseGeocoder release];CLLocationCoordinate2D initialCoordinate = [destination initialCoordinate]; [self updateRegionLatitude: initialCoordinate.latitude longitude: initialCoordinate.longitude latitudeDelta:.2 longitudeDelta:.2]; self.navigationItem.rightBarButtonItem.title = @"Locate"; self.navigationItem.rightBarButtonItem.action = @selector(goToLocation:); }
Note
You release the MKReverseGeocoder here in this method rather than in the goToLocation: method for one simple reason: Even though you start the MKReverseGeocoder in the goToLocation: method, it actually doesn't return the information in that method. It operates asynchronously; and when it either constructs the placemark or gives up, it sends the message reverseGeocoder:didFindPlacemark: or reverseGeocoder:didFailWithError:, respectively. If you're returning to the original Map view, however, you no longer care whether it succeeds or fails because you no longer need the placemark, and you release the MKReverseGeocoder.
Figure 6-1 shows the result of your adventures in reverse geocoding.
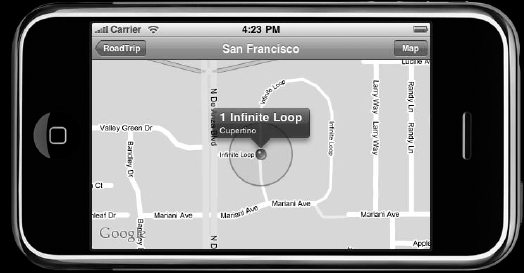
You may have noticed in the process of compiling your code to get to Figure 6-1, no pesky compiler warnings popped up onscreen. Yes, you have progressed so far that you've left the pesky things behind. Reason to celebrate.
As I mention earlier in this chapter, there is reverse geocoding and there is forward geocoding, often referred to simply as geocoding proper. One of the more useful things a map can do is help you find a particular place, and this is what you do when you engage in geocoding. You take the address of something and turn it into a longitude and latitude coordinate. After you've done that, you can, say, add an annotation and drop a pin on the map at that location.
I also mention earlier that geocoding (unfortunately) is not part of MapKit.framework. Not to worry, though, because Google, as well as other third-party types, does provide a free service that you can use. I show you how to add such free services in a moment, but you need to start by creating a way to enter the information the service needs: the address of what you want to find and have annotated on the map. You do that by adding a toolbar to your map. (You could, of course, have added a Search bar, but adding a toolbar gives you the opportunity to add additional functionality, such as directions from your current location to the new, or any other location, or even filtering the map to show just hotels, or just sights, or both. I leave this up to you to implement, but after you get the hang of maps and of using a geocoding provider, it isn't all that difficult.)
To add the toolbar itself, add the following code to the end of the MapController's viewDidLoad method.
NSMutableArray *items = [[NSMutableArray alloc]
                                  initWithCapacity:1];

UIBarButtonItem *barButton =
      [[UIBarButtonItem alloc] initWithTitle: @"Find:"
             style:UIBarButtonItemStyleBordered
             target:self
             action:@selector(find:)];
barButton.tag = 0;
barButton.width = 100;
[items addObject: barButton];
[barButton release];

UIToolbar *toolbar = [UIToolbar new];
toolbar.barStyle = UIBarStyleBlackOpaque;
[toolbar sizeToFit];
CGFloat toolbarHeight = toolbar.frame.size.height;
CGFloat navbarHeight = self.navigationController.
navigationBar.frame.
size.height;
CGRect mainViewBounds = self.view.bounds;
[toolbar setFrame:
CGRectMake(CGRectGetMinX(mainViewBounds),
CGRectGetMinY(mainViewBounds) +
CGRectGetHeight(mainViewBounds) -
(toolbarHeight + navbarHeight),
CGRectGetWidth(mainViewBounds),
toolbarHeight)];
[self.view addSubview:toolbar];
toolbar.items = items;
toolbar release];
[items release];This particular bunch of code adds a toolbar to your Map view. Walking through it all, you see that the first thing you do is create an array to hold the button, similar to what you did when you created your annotations back in Chapter 5 of this minibook:
NSMutableArray *items = [[NSMutableArray alloc]
                                  initWithCapacity:1];
From there, you move on to create a UIBarButtonItem. This is a simple bordered button with a target of find:. (This is the message that is sent to the MapController when the button is touched.)
UIBarButtonItem *barButton = [[UIBarButtonItem alloc]
    initWithTitle: @"Find:"
   style:UIBarButtonItemStyleBordered
   target:self action:@selector(find:)];
Then you give it a tag number, so you can identify it if you need to (you won't in this example) and set the width to 100 pixels.
barButton.tag = 0;
barButton.width = 100;
Next you create the toolbar itself
UIToolbar *toolbar = [UIToolbar new];

toolbar.barStyle = UIBarStyleBlackOpaque;
 [toolbar sizeToFit];
CGFloat toolbarHeight = toolbar.frame.size.height;
CGFloat navbarHeight =  self.navigationController.
   navigationBar.frame.
                                          size.height;

CGRect mainViewBounds = self.view.bounds;
[toolbar setFrame: CGRectMake(CGRectGetMinX(mainViewBounds),
CGRectGetMinY(mainViewBounds) +
CGRectGetHeight(mainViewBounds) − (toolbarHeight +
navbarHeight),
CGRectGetWidth(mainViewBounds),
toolbarHeight)];You start by getting both the toolbar and navigation bar heights, as spelled out in this section of the code:
CGFloat toolbarHeight = toolbar.frame.size.height;
CGFloat navbarHeight =  self.navigationController.
   navigationBar.frame.
                                          size.height;
You then create a View Bounds rectangle, which gives you the size of the screen.
CGRect mainViewBounds = self.view.bounds;
Okay, time to set the toolbar frame with its x coordinate equal to the left side of the screen, as follows:
CGRectMake(CGRectGetMinX(mainViewBounds),
With the x out of the way, go ahead and set its y coordinate equal to the size of the screen minus the height of the toolbar and the height of the navigation bar,
CGRectGetMinY(mainViewBounds) +
   CGRectGetHeight(mainViewBounds) - (toolbarHeight +
                                        navbarHeight),
and its width equal to the width of the screen, and its height equal to the toolbar height.
CGRectGetWidth(mainViewBounds),
toolbarHeight)];
Okay, that finishes that particular walkthrough. To put the final bow on the package, add the following bit of code: This adds the toolbar to the view, adds the items to the toolbar.items, and releases the toolbar and items.
[self.view addSubview:toolbar];
toolbar.items = items;
[toolbar release];
[items release];
Now that you have the toolbar and the find: method as the target, you have to implement the find: method.
In this case, you create a modal view controller that allows the user to enter an address. Add the method in Listing 6-1 to MapController.m and the corresponding declaration to MapController.h.
Example 6-1. Implementing the find: Method
- (void) find:(id) sender {

 FindLocationController *findLocationController =
    [[FindLocationController alloc] initWithMapController:
    self];
  UINavigationController *navigationController =
      [[UINavigationController alloc]
      initWithRootViewController: findLocationController];
  navigationController.modalTransitionStyle =
    UIModalTransitionStyleFlipHorizontal;

  [self presentModalViewController:navigationController
    animated:YES];

  [navigationController release];
  [findLocationController release];
}
As you can see, this code creates a new view controller and presents it as a modal view.
Of course, now you're going to have to create this new FindLocationController class. No rest for the weary.
Putting a piece in place often requires putting yet another piece in place, and your quest to add geocoding to RoadTrip is no exception. Here's the next piece of the puzzle:
The FindLocationController will be responsible for creating the view that allows the user to enter the location they are looking for and then will take care of creating and initializing the Geocoder object that actually finds it.
In the RoadTrip Project window, select the Classes folder, and then choose File

In the left column of the dialog, select Cocoa Touch Classes under the iPhone OS heading, select the UIViewController subclass template in the top-right pane, and then click Next.
Be sure the With XIB for User Interface check box is also selected.
You see a new dialog asking for some more information.
Enter FindLocationController.m in the File Name field and then click Finish.
All you're really going to do in the FindLocationController view is present a Search bar and a keyboard. I'll show you how to do a plain vanilla one, but feel free to gussy it up as you'd like. You need an outlet (just as you do with all those controllers in Chapter 4 of this minibook) as well as a reference to the view from the FindLocationController. You also need to make the FindLocationController a UISearchViewDelegate so it can manage the text being entered.
The MapController will be managing the location, so the FindLocationController needs a reference to the MapController so it can pass it the text. (There are other ways that you can do this, including making the MapController a delegate of the FindLocationController, but I leave that as an exercise for you to do on your own.) You pass that reference in the initWithMapController method.
Notice you have to import the MapKit and class MapController.
Start by going into
FindLocationController.mand adding the necessary methods and outlets (that is, the code in bold) in Listing 6-2 (shown after the steps).Do the File
Note
Only after it's saved can Interface Builder find the new outlet.
Use the Groups & Files list on the left in the Project window to drill down to the
FindLocationController.xibfile; then double-click the file to launch it in Interface Builder.Tip
If the Attributes Inspector window isn't open, choose Tools
If you can't find the
FindLocationController.xibwindow (you may have minimized it — accidentally, on purpose, whatever) you can get it back by choosing WindowSelect File's Owner in the
FindLocationController.xibwindow.It should already be set to
FindLocationController. If not, retrace your steps to see where you may have made a mistake.You need to be sure that the File's Owner is
FindLocationController. You can set the File's owner from the Class drop-down menu in the Identity Inspector.Next drag a
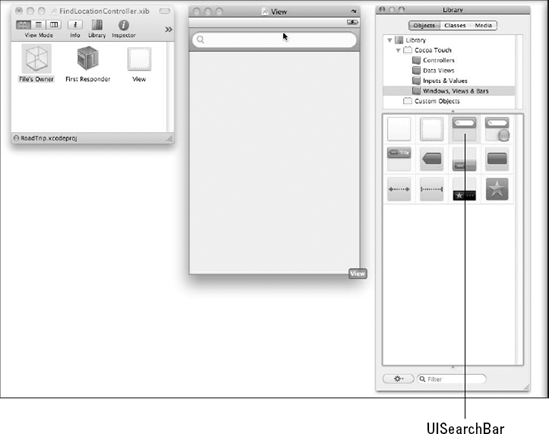
UISearchBarfrom the Library window to the top of the View window, as I have in Figure 6-2.You can find
UISearchBarin Cocoa Touch's Windows, Views & Bars folder.Back in the
FindLocationController.xibwindow, right-click File's Owner to call up a contextual menu with a list of connections.You can get the same list using the Connections tab in the Attributes Inspector.
Drag from the little circle next to the
searchBaroutlet in the list onto the Search bar in the View window.Doing so connects the
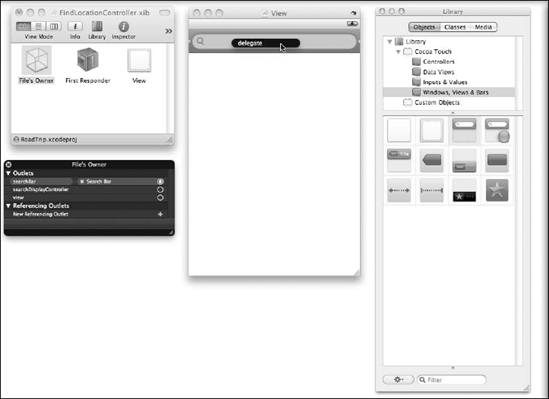
FindLocationController'ssearchBaroutlet to the Search bar itself.Go back to that list of connections and click the triangle next to Referencing Outlets. This time drag from the little circle next to the New Referencing Outlet list onto
SearchBarin the View window.With the cursor still in the View window, let go of the mouse button.
A pop-up menu appears, looking like the one in Figure 6-3.
Choose delegate from the pop-up menu (OK, your choices are pretty limited; there is only the one item — delegate).
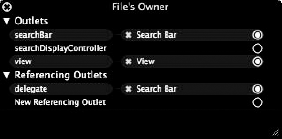
When you're done, the File's Owner contextual menu should look like Figure 6-4.
Example 6-2. The FindLocationController Interface
#import <UIKit/UIKit.h>#import <MapKit/MapKit.h>@class MapController;@interface FindLocationController : UIViewController<UISearchBarDelegate>{MapController* mapController;IBOutlet UISearchBar *searchBar;}
- (id) initWithMapController:(MapController*) mapController;@end
Next stop — FindLocationController. Add the code in Listing 6-3 to FindLocationController.m.
Example 6-3. The FindLocationController implementation
#import "FindLocationController.h"#import "MapController.h"@implementation FindLocationController- (id) initWithMapController:(MapController*) theMapController {if (self = [super initWithNibName:@"FindLocationController" bundle:nil]) {self.title = NSLocalizedString(@"Find", @"Find");mapController = theMapController;}return self;}- (void) viewDidLoad {searchBar.showsCancelButton = YES;searchBar.autocorrectionType =UITextAutocorrectionTypeNo;[searchBar becomeFirstResponder];}- (void) searchBarSearchButtonClicked:(UISearchBar *) theSearchBar {[theSearchBar resignFirstResponder];[mapController doFind:searchBar.text];[self dismissModalViewControllerAnimated:YES];}- (void) searchBarCancelButtonClicked:(UISearchBar *)theSearchBar {[theSearchBar resignFirstResponder];[self dismissModalViewControllerAnimated:YES];}
The initWithMapController: you see near the beginning of Listing 6-3 is nothing special. With viewDidLoad, you end up doing three things of interest. First, you tell the Search bar to show the Cancel button:
searchBar.showsCancelButton = YES;
Secondly, you turn off autocorrection on the keyboard (which is my own preference because autocorrection gets very annoying when the user starts searching for landmarks like Coit Tower).
searchBar.autocorrectionType = UITextAutocorrectionTypeNo;
Finally, you make the searchBar the first responder. What that will do is cause the keyboard to be raised when the view is displayed.
[searchBar becomeFirstResponder];
The method searchBarSearchButtonClicked: is a UISearchBarDelegate method and is called when the user taps Search on the keyboard. You'll resign as first responder, which lowers the keyboard (not really necessary since you are going to dismiss the dialog, but good form) and send a message to the MapController with whatever text that the user typed, and then you dismiss the FindLocationController and its view.
[mapController doFind:searchBar.text];
self dismissModalViewControllerAnimated:YES];
Finally if the user taps the Cancel button, the delegate method searchBarCancelButtonClicked: is invoked and you resign as first responder and dismiss the dialog.
After the user has entered the text, it's time for the doFind: method of the MapController to go to work. For that to happen, you need to enter the code in Listing 6-4 into MapController.m as well as a declaration in MapController.h.
Example 6-4. doFind:
- (void) doFind:(NSString*) newLocation {

  [mapView removeAnnotations: annotations];
  Geocoder* geocoder = [[Geocoder alloc] init];
  CLLocationCoordinate2D locationCoordinate =
                   [geocoder geocodeLocation:newLocation];
  MKCoordinateRegion initialRegion;
initialRegion.center.latitude =
locationCoordinate.latitude;
initialRegion.center.longitude =
locationCoordinate.longitude;
initialRegion.span.latitudeDelta = .06;
initialRegion.span.longitudeDelta = .06;
[mapView setRegion:initialRegion animated:NO];
MapAnnotation* findAnnotation = [[MapAnnotation alloc]
initWithTitle: @"Found Location"
subTitle: @"pretty easy"
coordinate: locationCoordinate];
[annotations addObject:findAnnotation];
[mapView addAnnotations: annotations];
[findAnnotation release];
}The first thing that happens with this code is that the MapController object sends a message to mapView to remove its annotations. You want your code to do that because you'll be entering a new annotation to the array for the found location. It isn't necessary, but good form nonetheless.
[mapView removeAnnotations: annotations];
Next, you allocated and initialized the Geocoder object and sent it a message to find the coordinate for the address or landmark the user entered.
Geocoder* geocoder = [[Geocoder alloc] init];
CLLocationCoordinate2D locationCoordinate = [geocoder
                             geocodeLocation:newLocation];
Based on the coordinate that's returned, you set up a new region for the map to move to. (You may remember this is what you did when you first displayed the map and centered it on San Francisco back in Chapter 5 of this minibook.) Here's how that worked:
MKCoordinateRegion initialRegion;
initialRegion.center.latitude =
                              locationCoordinate.latitude;
initialRegion.center.longitude =
                             locationCoordinate.longitude;
initialRegion.span.latitudeDelta = .06;
initialRegion.span.longitudeDelta = .06;
[mapView setRegion:initialRegion animated:NO];
Finally, you created a new MapAnnotation that marks the location you have found, added it to the annotations array, and then added the array to mapView.
MapAnnotation* findAnnotation = [[MapAnnotation alloc]
           initWithTitle: @"Found Location"
           subTitle: @"pretty easy"
           coordinate: locationCoordinate];
[annotations addObject:findAnnotation];
[mapView addAnnotations: annotations];
Don't forget to add the following to MapController.m:
#import "FindLocationController.h"
#import "MapAnnotation.h"
#import "Geocoder.h"
You can add the new location as a hotel or landmark later as you wish. You also need to add a control and some code to delete the found location when the user no longer wants it on the map.
The last step on this journey is looking at the Geocoder class that you need to create. To start things off,
Choose File
In the leftmost column of the dialog, select Cocoa Touch Classes under the iPhone OS heading, but this time select the Objective-C Class template in the topmost pane — making sure the Subclass drop-down menu has
NSObjectselected — and then click Next.You see a new dialog asking for some more information.
Enter Geocoder.m in the File Name field and then click Finish.
Now you need to add the code to the Geocoder.m and Geocoder.h files. You can find the interface in Listing 6-5.
Example 6-5. Geocoder Interface File
#import <Foundation/Foundation.h>
#import <CoreLocation/CoreLocation.h>

@interface Geocoder : NSObject {

  CLLocationCoordinate2D geocodedLocation;
  BOOL             accumulatingParsedCharacterData;
  BOOL             didAbortParsing;
  BOOL             parseThis;
  NSMutableArray  *currentParseBatch;
  NSMutableString *currentParsedCharacterData;
}
@property (nonatomic) CLLocationCoordinate2D
geocodedLocation;
@property (nonatomic, retain) NSMutableString
*currentParsedCharacterData;
@property (nonatomic, retain) NSMutableArray
*currentParseBatch;
- (CLLocationCoordinate2D) geocodeLocation:
                                  (NSString*) theLocation;
- (void)parseLocationData:(NSData *)data;
@endIn this interface, you can see the geocodeLocation: message you send from the MapController.
- (CLLocationCoordinate2D) geocodeLocation:
(NSString*) theLocation;The rest of the code consists of a bunch of instance variables and methods used internally.
CLLocationCoordinate2D geocodedLocation;
BOOL             accumulatingParsedCharacterData;
BOOL             didAbortParsing;
BOOL             parseThis;
NSMutableArray  *currentParseBatch;
NSMutableString *currentParsedCharacterData;
Not much to linger over.
Now take a look at the code in Listing 6-6:
Example 6-6. Geocoder Implementation
#import "Geocoder.h"


@implementation Geocoder
@synthesize  geocodedLocation, currentParsedCharacterData,cur
    rentParseBatch;


- (CLLocationCoordinate2D) geocodeLocation:(NSString*)
                                            theLocation {

  NSArray *listItems =
           [theLocation componentsSeparatedByString:@" "];
  NSMutableString* geoLocate =
                           [[NSMutableString alloc] init];
[geoLocate appendString:
@"http://maps.google.com/maps/geo?q="];
int n=1;
for (NSString* element in listItems) {
[geoLocate appendString:element];
if (n < [listItems count]){
[geoLocate appendString:@"+"];
}
++n;
}
[geoLocate appendString:@"&output=xml&oe=utf8&sensor=false
&key=ABQIAAAA7ENMKygUyCp2QLbEjPqmUhRZPACFXRtD3hcaI-
7zUtqGDiOY-BS5WmoOs_BFfg1gdn88IfCtEikY-A"]; please blur this "];
NSData* theData =[[NSData alloc] initWithContentsOfURL:
[NSURL URLWithString:geoLocate]];
[self parseLocationData:theData];
[theData release];
[geoLocate release];
return self.geocodedLocation;
}
- (void)parseLocationData:(NSData *)data {
self.currentParseBatch = [NSMutableArray array];
self.currentParsedCharacterData =
[NSMutableString string];
NSXMLParser *parser =
[[NSXMLParser alloc] initWithData:data];
[parser setDelegate:self];
parseThis = NO;
[parser parse];
self.currentParseBatch = nil;
self.currentParsedCharacterData = nil;
[parser release];
}
#pragma mark NSXMLParser delegate methods
- (void)parser:(NSXMLParser *)parser didStartElement:(NSString
*)elementName namespaceURI:(NSString *)namespaceURI
qualifiedName:(NSString *)qName attributes:(NSDictionary
*)attributeDict {
if ([elementName isEqualToString:@"coordinates"]) {
accumulatingParsedCharacterData = YES;
parseThis = YES;
}
}
- (void)parser:(NSXMLParser *)parser didEndElement:(NSString
*)elementName namespaceURI:(NSString *)namespaceURI
qualifiedName:(NSString *)qName {if ([elementName isEqualToString:@"coordinates"]) {
if (parseThis) {
NSArray *listItems = [currentParsedCharacterData
componentsSeparatedByString:@","];
geocodedLocation.longitude =[[listItems
objectAtIndex:0] doubleValue];
geocodedLocation.latitude = [[listItems
objectAtIndex:1] doubleValue];
parseThis = NO;
accumulatingParsedCharacterData = NO; }
}
}
- (void)parser:(NSXMLParser *)parser
foundCharacters:(NSString *)string {
if (accumulatingParsedCharacterData) {
[self.currentParsedCharacterData appendString:string];
}
}
- (void)parser:(NSXMLParser *)parser
parseErrorOccurred:(NSError *)parseError {
NSString *errorMessage = [parseError localizedDescription];
UIAlertView *alertView = [[UIAlertView alloc]
initWithTitle:NSLocalizedString(@"Geocode error",
@"Alert displayed when parse error occurs")
message:errorMessage delegate:nil
cancelButtonTitle:@"OK" otherButtonTitles:nil];
[alertView show];
[alertView release];
}
- (void) dealloc {
currentParsedCharacterData = nil;
currentParseBatch = nil;
[super dealloc];
}
@endThis class does two things. First, it goes out onto the Web and gets the coordinates for the address or landmark the user entered. This is accomplished by two methods
- (CLLocationCoordinate2D) geocodeLocation: (NSString*)
   theLocation;
- (void)parseLocationData:(NSData *)data;
The rest of the methods accomplish the task of parsing the XML data retrieved in order to extract the necessary coordinates.
geocodeLocation: first takes the string and reformats it into something a third-party geocoder like Google's can use. It takes all the words in the text, removes the spaces, and replaces them with a single + character.
NSArray *listItems = [theLocation
    componentsSeparatedByString:@" "];
  NSMutableString* geoLocate = [[NSMutableString alloc]
    init];
  [geoLocate appendString:@"http://maps.google.com/maps/
   geo?q="];
  int n=1;
  for (NSString* element in listItems) {
    [geoLocate appendString:element];
    if (n < [listItems count]){
      [geoLocate appendString:@"+"];
    }
    ++n;
  }
Next, geocodeLocation: appends a string that tells the geocoder (say, Google's) about the format you want the geocoded information in — as well as some control information — and includes your API key. This key starts at &key and is blurred out in the text because you just have to get your own — no, you can't use mine. Google doesn't charge for it, but you do have to register; I explain how in a second:
[geoLocate appendString:@"&output=xml&oe=utf8&sensor=false&key=ABQIAAAA7ENMKygUyCp2QLbEjPqmUhRZPACFXRtD3hcaI-7zUtqGDiOY-BS5WmoOs_BFfg1gdn88IfCtEikY-A"];
Then it simply does a "get" to the URL for the geocoded information, passing in the formatted text string as well as the control information and API key, and then stores what's returned in theData. (I requested the data in XML format, but you have several alternatives, which you can specify in the control information I mention earlier.)
NSData* theData =[[NSData alloc]
    initWithContentsOfURL:[NSURL URLWithString:geoLocate]];
Finally, geocodeLocation: sends the parseLocationData: message to itself, which parses the returned XML and extracts the coordinate. There's actually a lot more there, but you can explore that on your own. Here's a road map:
parseLocationData:allocates and initializes anNSXMLParserobject. This class parses XML documents (including DTD declarations) in an event-driven manner. It uses several delegate methods.The first of such methods is
parser:didStartElement:namespaceURI:qualifiedName:attributes:. You override this method to see whether the current tag it's processing iscoordinates. That's the only one you are interested in. If it's not that tag, you returnNO. If it is that tag, you returnYES.The parser then sends the delegate the
parser:foundCharacters:message. This message is sent by the parser when it finds parsed character data in an element. The parser is not guaranteed to deliver all the parsed character data for an element all at once, so it's necessary to accumulate character data until the end of the element is reached.You can also find this same strategy in Book VI, where I explain the URL Loading System and how to asynchronously download information from a server on the internet. I go into more detail about these kinds of mechanism there.
After it finishes that tag, it sends the
didStartElement:namespaceURI:qualifiedName:attributes:message again for the next tag until it runs out of tags.For an error condition,
geocodeLocation:sendsparseErrorOccurred:parseError::.
Tip
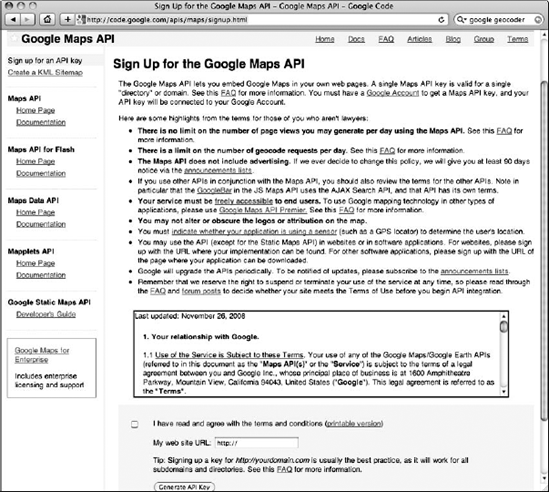
The Goggle error codes aren't that easy to find. They're located at http://code.google.com/apis/maps/documentation/geocoding/index.html, along with lots of explanation of the service and process. As I mention earlier, you have to get your own API key, which you can do at http://code.google.com/apis/maps/signup.html.
Figure 6-5 shows you what the Google Maps Sign Up page looks like. This is obviously just a brief introduction to the Google Maps APIs. If you're going to be doing a lot with geocoding and maps, you'll have to go through the documentation yourself.
You can see the results of typing Coit Tower San Francisco into the ever-more complete RoadTrip app in Figure 6-6.
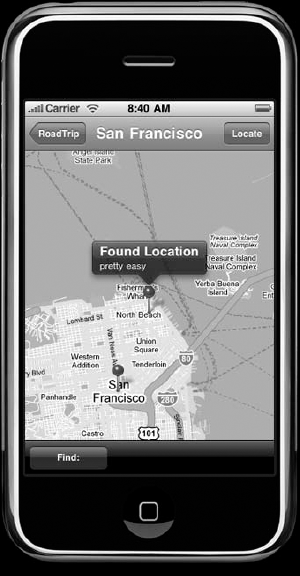
You've just created a real application with quite a bit of functionality, so give yourself a pat on the back. But there's more to come.
In Book VI, I go through what you need to know about saving data. I cover plists, the URL Loading System, and core data, with a few tips and warnings thrown in for good measure.