
Getting back to where you once belonged
Working with user preferences
Getting things done with selections
Once you have set up the basics for using table views, you need to allow the user to be able to select one of the entries and navigate to it. But as you will see, there's more involved in the selection process that may meet the eye.
In the first part of this chapter I'll show you how the selection mechanism works in table views.
Next, I'll show you how that mechanism can also be used to restore the state the application was in when the user last left the application.
Finally, I show you how user preferences may come into play during selection. I'll start by showing you how preferences work, and then I'll explain how you can use those preferences when the user does make a selection.
When the user taps on a table view entry, what happens next depends on what you want your table view to do for you.
If you're using the table view to display data (as the Albums view in the iPod application does, for example), you'd want a user's tap to show the next level in the hierarchy, such as a list of songs or a detail view of an item (such as information about a song).
In your case, you're going to want your user's taps to do more for you. When the user taps the Sights entry, he gets a list of sights from which he can choose to get more information. As such, you're essentially using the table view as a table of contents, so tapping a table view entry transfers the user to the view that presents the desired information — the Car Servicing information, for example.
Tip
For the RoadTrip application, I show you how you can get table views to display data hierarchies as well as tables of content, although you have to wait for Book VI to see how to work with data hierarchies.
To move from a table view to a new Content view, first you need to create a new view controller for that view. Then you need to launch your new view controller so it creates and installs the view on the screen. But you also have to give the user a way to get back to the Main view!
Brass-tacks time: What kind of code-writing gymnastics do you have to do to get all this stuff to happen?
Actually, not that much. Table views are usually paired with navigation bars, which enable users to get back to preceding views. And to get a navigation bar, all you have to do is include a navigation controller in your application. What's more, if you wisely chose the Navigation-Based Application template at the outset of your RoadTrip project, a navigation controller was already put in place for you in the appDelegate created by the template. Here's the code that the template quite generously provided you with (the navigation controller is in boldface type so you can find it easier):
@interface RoadTripAppDelegate : NSObject
<UIApplicationDelegate> {
UIWindow *window;
UINavigationController *navigationController;
}
@property (nonatomic, retain) IBOutlet UIWindow *window;
@property (nonatomic, retain) IBOutlet UINavigationController
*navigationController;
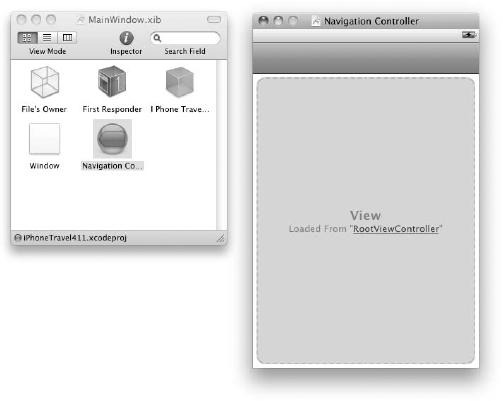
@endThis navigation controller is created for you in the MainWindow.xib file (see Figure 3-1), which you can access by double-clicking the MainWindow.xib file in the Groups & Files list in your Xcode project window. If you take a closer look at Figure 3-1, you can see that, when the navigation controller is selected, it points to the RootViewController.nib in the View window — which is to say, it's pointing to the RootViewController and its table view. This links together the navigation controller, the root view controller, and the view.
Not only did the Navigation-Based Application template deliver the goods in the RoadTripAppDelegate.h file and nib file, but it also created the code you need in the RoadTripAppDelegate.m file.
To get the navigation controller view to load in the window, you don't have to do anything. When you chose the Navigation-Based Application template, the following code was automatically generated for you:
-void)applicationDidFinishLaunching:
                          (UIApplication *)application {
  [window addSubview:[navigationController view]];
  [window makeKeyAndVisible];
}
When all is said and done, you have a table view with a navigation bar ready to go to work.
As the previous section explains, to give users the option of returning to a view higher up in the hierarchy (in our case, the Main view), table views are paired with navigation bars that enable a user to navigate the hierarchy. Here's what you need to know to make that work:
The view below the navigation bar presents the current level of data.
A navigation bar includes a title for the current view.
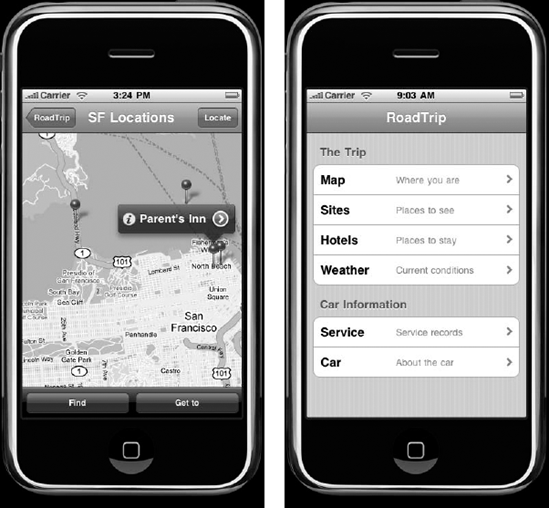
If the current view is lower in the hierarchy than the top level, a Back button appears on the left side of the bar; the user can tap it to return to the previous level, as shown in Figure 3-2. The text in the Back button tells the user what the previous level was. In this case, it's the application's Main view, so you see the application's name — RoadTrip.
A navigation bar may also have an Edit button on the right side — used to enter editing mode for the current view — or even custom buttons.
In the case of the RoadTrip application, you create a custom button that will act as an additional back button. I explain why that is needed shortly.
The navigation bar for each level is managed by a navigation controller, as mentioned in the previous section. The navigation controller maintains a stack of view controllers, one for each of the views displayed, starting with the root view controller (hence the name RootViewController given to the table view controller by the template). The root view controller is the very first view controller that the navigation controller pushes onto its stack when a user launches the application; it remains active until the user selects the next view to look at.
Time for a concrete example. When the user taps a row of the table view to get the map, the root view controller pushes the next view controller onto the stack. The new controller's view (the map) slides into place, and the navigation bar items are updated appropriately. When the user taps the back button in the navigation bar, the current view controller pops off the stack, the map slides off the screen, and the user finds himself back in the main (table) view.
A stack is a commonly used data structure that works on the principle of "last in, first out." Imagine an ideal boarding scenario for an airplane: Passengers would start being seated in the last seat in the last row, and they'd board the plane in back-to-front order until they got to the first seat in the first row, which would contain the seat for the last person to board. When the plane reached its destination, everyone would deplane (is that really a word?) in the reverse order. That last person on — the person in row one seat one — would be the first person off.
A computer stack is pretty much the same. Adding an object is called a push — in this case, when you tap Map row, the view controller for the Map view is pushed onto the stack. Removing an object is called a pop — touching the back button pops the view controller for the Heathrow view. When you pop an object off the stack, it's always the last one you pushed onto it. The controller that was there before the push is still there, and now becomes the active one. In this case, it's the root view controller.
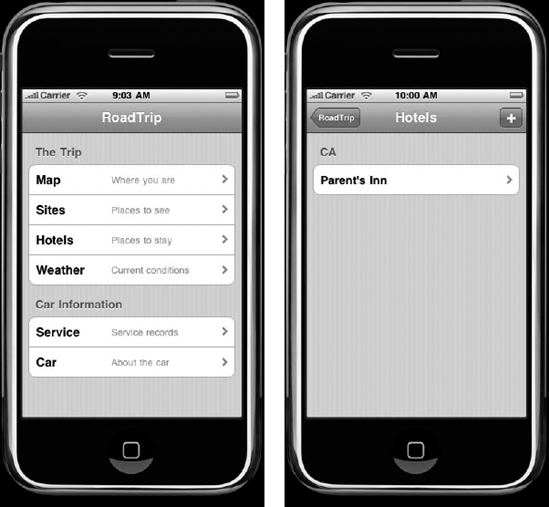
As you know from using the built-in applications, however, when you tap a row you might find yourself not viewing some content, as you just did when you tapped the Map row, but rather at another table view. Figure 3-3 shows you what happens when you tap the Hotels row. You get another table view (which has just one entry at the moment), and tapping that entry gets you more information about the Parent's Inn. That process (for the next row tap) works the same way, and I show you how to do that in Book VI Chapter 1.
At some point, you have to make sure that something actually happens when a user makes a selection. To do that, all you really need to do is implement the tableview:didSelectRowAtIndexPath: method to set up a response to a user tap in the Main view. This method, too, is already in the RootViewController.m file, courtesy of the template. You can see it all in Listing 3-1.
Tip
A lot of code in Listing 3-1 may not make sense to you. That's okay; I explain it all in detail in this chapter and the next. I include it here because it shows you the entirety of the application functionality and maintains a reference as you implement it step-by-step.
In this section, I'll be explaining the non-bolded code. This is the basic recipe you would use for handling user selection on a table view. As for the bolded code, the first set (see immediately below) has to do with saving the selection the user made in the table view. I'll explain this bit later when I show you how to save where the user is in the application in the "Saving state information step" section later in this chapter.
[RoadTripAppDelegate *appDelegate =(RoadTripAppDelegate *) [[UIApplicationsharedApplication] delegate];[appDelegate.lastView replaceObjectAtIndex:0 withObject:[NSNumber numberWithInteger:indexPath.section]];[appDelegate.lastView replaceObjectAtIndex:1 withObject:[NSNumber numberWithInteger:indexPath.row]];
The rest of the code in bold implements user preferences. I'll explain that bit of business in the "Using Preferences in Your Application" section later in this chapter.
Example 3-1. tableview:didSelectRowAtIndexPath:
- (void)tableView:(UITableView *)tableView
didSelectRowAtIndexPath:(NSIndexPath *)indexPath {
[RoadTripAppDelegate *appDelegate =
           (RoadTripAppDelegate *) [[UIApplication
                              sharedApplication] delegate];
  [appDelegate.lastView replaceObjectAtIndex:0 withObject:
          [NSNumber numberWithInteger:indexPath.section]];
  [appDelegate.lastView replaceObjectAtIndex:1 withObject:
              [NSNumber numberWithInteger:indexPath.row]];
[tableView deselectRowAtIndexPath:indexPath
animated:YES];int menuOffset =
[self menuOffsetForRowAtIndexPath:indexPath];
UIViewController *targetController =
[[menuList objectAtIndex:menuOffset]
objectForKey:kControllerKey];
if (targetController == nil) {
BOOL realtime = !appDelegate.useStoredData;
switch (menuOffset) {
case 0:
if (realtime) targetController =
[[MapController alloc] initWithTrip:trip];
else [self displayOfflineAlert:
[[menuList objectAtIndex:menuOffset]
objectForKey:kSelectKey]];
break;
case 1:
targetController =
[[SightListController alloc] initWithTrip:trip];
break;
case 2:
targetController =
[[HotelController alloc] initWithTrip:trip];
break;
case 3:
if (realtime) targetController =
[[WebViewController alloc] initWithTrip:trip
tripSelector:@selector(returnWeather:)
webControl:YES title:
NSLocalizedString(@"Weather", @"Weather")];
else [self displayOfflineAlert:[
[menuList objectAtIndex:menuOffset]
objectForKey:kSelectKey]];
break;
case 4:
targetController =
[[WebViewController alloc] initWithTrip:trip
tripSelector:
@selector(returnCarServicingInformation:)
webControl:NO title:NSLocalizedString
(@"Car Servicing", @"Car Servicing")];
break;
case 5:
targetController = [[WebViewController alloc]
initWithTrip:trip tripSelector:
@selector(returnCarInformation:)
webControl:NO title:NSLocalizedString
(@"The Car", @"Car Information")];
break;
}if (targetController) {
[[menuList objectAtIndex:menuOffset]
setObject:targetController forKey:kControllerKey];
[targetController release];
}
}
if (targetController) [[self navigationController]
pushViewController:targetController animated:YES];
}Here's what all this code ends up doing for you when a user makes a selection in the Main view:
Deselects the row the user selected.
[tableView deselectRowAtIndexPath:indexPath animated:YES];It stands to reason that if you want your app to move on to a new view, you have to deselect the row where you currently are.
Computes the offset (based on section and row) into the menu array.
int menuOffset = [self menuOffsetForRowAtIndexPath: indexPath];You need to figure out where you want your app to land, right? I explain the
menuOffsetForRowAtIndexPath:indexPathin Book V, Chapter 2.Checks to see whether the controller for that particular view hasalready been created.
UIViewController *targetController = [menuList objectAtIndex:menuOffset] objectForKey:kControllerKey]; if (targetController == nil) {If no controller exists, the code creates and initializes a new controller.
I explain the mechanics of creating and initializing a new controller in Book V, Chapter 4. As you can see, you're going to use another
switchstatement to get to the right controller:switch (menuOffset) {For many of the selections, you'll always create a new controller. For example:
targetController = [[SightListController alloc] initWithTrip:trip];
For others you don't:
if (realtime) targetController = [MapController alloc] initWithTrip:trip];else [self displayOfflineAlert: [[menuList objectAtIndex:menuOffset] objectForKey:kSelectKey]];As I said, I explain this in the "Using Preferences in Your Application" section.
If you created a new view controller, the code saves a reference to thenewly created controller in the dictionary for that row.
if (targetController) { [[menuList objectAtIndex:menuOffset] setObject:targetController forKey:kControllerKey]; [targetController release]; }Pushes the new or existing controller onto the stack and lets thenavigation controller do the rest.
if (targetController) [[self navigationController] pushViewController:targetController animated:YES];
Okay, I admit it. There's a lot of stuff in Listing 3-1 you probably haven't seen yet, but I clear it all up in Chapter 4 of this minibook. Rather than get caught up in the minutia, take some time now to look at some other issues here affecting navigation.
What other issues? Funny you should ask. "Keep the customer satisfied" is my mantra. If that means constantly refining an application design, so be it. In thinking about the RoadTrip design, two things struck me as essential if I really wanted to make this an application that focuses on the user. The first is part of Apple's Human Interface Guidelines — when it makes sense, you want the user, when he or she returns to an application, to find it in the same state as when he or she left — so it's not really something I can claim credit for. The second is something that flowed straight out of the nature of my design being able to access data even when you can't connect to the Internet.
When the user taps the Home button, the iPhone OS terminates your application and returns to the Home screen. The applicationWill Terminate: method is called, and your application is terminated — no ifs, ands, or buts. That means you have to save any unsaved data as well as the current state of your application if you want to restore the application to its previous state the next time the user launches it. Now, in situations like this one, you have to use common sense to decide what state really means. Generally, you wouldn't need to restore the application to where the user last stopped in a scrollable list, for example. For purposes of explanation, my RoadTrip app example saves the last category view that the user selected in the main table view, which corresponds to a row in a section in the table view. You might also consider saving that last view that was selected in that category.
Here's the sequence of events that go into saving the state:
Add the new instance variable
lastViewand declare the@propertyin theRoadTripAppDelegate.hfile.This is shown in Listing 3-2. As usual, the new stuff is bold.
As you can see,
lastViewis a mutable array. (TheNSMutableArraybusiness kind of gives it away.). You'll save the section as the first element in the array and the row as the second element. Because it's mutable, it'll be easier to update when the user selects a new row in a section.Add the
@synthesizestatement to theRoadTripAppDelegate.mfileto tell the compiler to create the accessors for you.The
@synthesizestatement is shown in Listing 3-3. (You guessed it — new stuff is bold.)Define the filename you'll use when saving the state information in the
Constants.hfile.#define kState @"LastState"
Save the section and row that the user last tapped in the
RoadAppDelegateobject'slastViewinstance variable. This is accomplished by the first set of bolded code in the beginning of thetableview:didSelectRowAtIndexPath:method in theRootViewController.mfile in Listing 3-1, and is also shown separately in Listing 3-4. You have to importRoadTripAppDelegate.h, as well.#import "RoadTripAppDelegate.h"
The
tableview:didSelectRowAtIndexPath:method is called when the user taps a row in a section. As you may recall, the section and row information are in theindexPathargument of thetableview:didSel ectRowAtIndexPath:method. All you have to do to save that information is to save theindexPath.sectionas the first array entry, and theindexPath.rowas the second. (The reason I do it this way will become obvious when I show you how to write this to a file.)When the user goes back to the Main view, save that Main view location in the
viewWillAppear:method. You need to add this methodto theRootViewController.mfile, as shown in Listing 3-5. (It'salready there; all you have to do is uncomment it out.)The last step is to deal with the case when the user moves back to the Main view and then quits the application. To indicate that the user is at the Main view, you use
−1to represent the section and−1to represent the row. You use minus ones in this case because, as you recall, the first section and row in a table are both 0, which requires me to represent the table (main) view itself in this clever way.Save the section and row in the
applicationWillTerminate:method.The method stub is already in the
RoadTripAppDelegate.mfile; you just have to add the code in Listing 3-6.
In applicationWillTerminate:, you're saving the lastView instance variable (which contains the last section and row the user tapped) to the file kState (which is the constant you defined in Step 3 to represent the filename LastState).
As you can see, reading or writing to the file system on the iPhone is pretty simple: You tell the system which directory to put the file in, specify the file's name, and then pass that information to the writeTo File method. Let me take you through what I just did in Step 6:
Got the path to the
Documentsdirectory.NSArray *paths = NSSearchPathForDirectoriesInDomains (NSDocumentDirectory, NSUserDomainMask, YES); NSString *documentsDirectory =[paths objectAtIndex:0];On the iPhone, you really don't have much choice about where the file goes. Although there's a
/tmpdirectory, I'm going to place this file in the Documents directory because (as I explain in Book V, Chapter 2) this is part of my application's sandbox, so it's the natural home for all the app's files.NSSearchPathForDirectoriesInDomains:returns an array of directories. Because I'm interested only in the Documents directory, I use the constantNSDocumentDirectory, and because I'm restricted to my home directory,/sandbox, the constantNSUserDomainMasklimits the search to that domain. There will be only one directory in the domain, so the one I want will be the first one returned.Created the complete path by appending the path filename to the directory.
NSString *filePath = [documentsDirectory stringByAppendingPathComponent:fileName];stringByAppendingPathComponent;precedes the filename with a path separator (/) if necessary.Tip
Unfortunately, this doesn't work if you're just trying to create a string representation of a URL.
[lastView writeToFile:filePath atomically:YES];
writeToFile:is anNSDatamethod and does what it implies. I am actually telling the array here to write itself to a file, which is why I decided to save the location in this way in the first place. A number of other classes implement that method, includingNSData, NSDate, NSNumber, NSString, andNSDictionary. You can also add this behavior to your own objects, and they could save themselves, but I don't get into that here. Theatomicallyparameter first writes the data to an auxiliary file, and after that's successful, it's renamed to the path you've specified. This guarantees that the file won't be corrupted even if the system crashes during the write operation.
I explain a lot more about saving data in Book VI.
Example 3-2. Adding the Instance Variable to the Interface
@interface RoadTripAppDelegate : NSObject
<UIApplicationDelegate> {
UIWindow *window;
UINavigationController *navigationController;
NSMutableArray *lastView;
}
@property (nonatomic, retain) IBOutlet UIWindow *window;
@property (nonatomic, retain) IBOutlet UINavigationController
*navigationController;
@property (nonatomic, retain) NSMutableArray *lastView;
@endExample 3-3. Adding the @synthesize Statement to the Implementation
#import "RoadTripAppDelegate.h" #import "RootViewController.h"#import "Constants.h"@implementation RoadTripAppDelegate @synthesize window; @synthesize navigationController;@synthesize lastView;
Example 3-4. Saving indexPath in didSelectRowAtIndexPath:
RoadTripAppDelegate *appDelegate = (RoadTripAppDelegate *)
[[UIApplication sharedApplication] delegate];
[appDelegate.lastView replaceObjectAtIndex:0 withObject:
[NSNumber numberWithInteger:indexPath.section]];
[appDelegate.lastView replaceObjectAtIndex:1 withObject:
[NSNumber numberWithInteger:indexPath.row]];Example 3-5. Adding viewWillAppear:
- (void)viewWillAppear:(BOOL)animated {
RoadTripAppDelegate *appDelegate = (RoadTripAppDelegate *)
[[UIApplication sharedApplication] delegate];
[appDelegate.lastView replaceObjectAtIndex:0
withObject:[NSNumber numberWithInteger:−1]];
[appDelegate.lastView replaceObjectAtIndex:1
withObject:[NSNumber numberWithInteger:−1]];
}Example 3-6. Adding applicationWillTerminate:
- (void)applicationWillTerminate:(UIApplication *)
application {
NSArray *paths = NSSearchPathForDirectoriesInDomains
(NSDocumentDirectory, NSUserDomainMask, YES);
NSString *documentsDirectory = [paths objectAtIndex:0];
NSString *filePath = [documentsDirectory
stringByAppendingPathComponent:kState];
[lastView writeToFile:filePath atomically:YES];
}After you've saved the state, you need to restore it the next time the application is launched. You can use my old friend applicationDid FinishLaunching: to carry out that task (as shown in Listing 3-7). You can find the applicationDidFinishLaunching: method in the RoadTripAppDelegate.m file. The code you need to add is in bold.
Example 3-7. Adding to applicationDidFinishLaunching:
- (void)applicationDidFinishLaunching:(UIApplication *)
application {
NSArray *paths = NSSearchPathForDirectoriesInDomains
(NSDocumentDirectory, NSUserDomainMask, YES);
NSString *documentsDirectory = [paths objectAtIndex:0];
NSString *filePath = [documentsDirectory
stringByAppendingPathComponent:kState];
lastView =[[NSMutableArray alloc]
initWithContentsOfFile:filePath];
if (lastView == nil) {
lastView = [[NSMutableArray arrayWithObjects:
[NSNumber numberWithInteger:−1],
[NSNumber numberWithInteger:−1],
nil] retain];
}
[window addSubview:[navigationController view]];
[window makeKeyAndVisible];
}Reading is the mirror image of writing. You create the complete path, including the filename, just as you did when you saved the file. This time, you send the initWithContentsOfFile: message instead of writeToFile:, which allocates the lastView array and initializes it with the file. If the result is nil, there's no file, meaning that this is the first time the application is being used. In that case, you create the array with the value of section and row set to −1 and −1. (As I said in the previous section, when talking about saving state information, you use −1 −1 to indicate the Main view because 0 0 is actually the first row in the first section.)
Tip
initWithContentsOfFile: is an NSData method similar to write ToFile:. The classes that implement writeToFile: and those that implement initWithContentsOfFile: are the same.
Fortunately, restoring the current state is actually pretty straightforward, given the program architecture. The RootViewController object's view DidLoad method is called at application launch — after the first view is in place but not yet visible. At that point, you're getting ready to display the (table) view. But instead of just doing that, you see if the saved view was something other than the table view, and if it was, you take advantage of the same mechanisms that are used when the user taps a row in the table view. You invoke the didSelectRowAtIndexPath: method, which already knows how to display a particular view represented by the indexPath, that is, section and row. (Listing 3-8 shows the particulars.) You'll then save the current selection in the array.
Example 3-8. Specifying the View to Be Displayed at Launch
- (void)viewDidLoad {
...
RoadTripAppDelegate *appDelegate =
(RoadTripAppDelegate *)[[UIApplication sharedApplication]
delegate];
if ([((NSNumber*) [appDelegate.lastView objectAtIndex:0])
intValue] != −1) {
NSIndexPath* indexPath = [NSIndexPath indexPathForRow:
[[appDelegate.lastView objectAtIndex:1] intValue]
inSection:
[[appDelegate.lastView objectAtIndex:0] intValue]];
[self tableView:((UITableView*) self.tableView)
didSelectRowAtIndexPath:indexPath];
}Here's what you're up to in Listing 3-8:
You get the app delegate to where it's able to access the
lastView.RoadTripAppDelegate *appDelegate = (RoadTripAppDelegate *)[[UIApplication sharedApplication] delegate];Check to see whether the last view was the Main view.
if ([((NSNumber*) [appDelegate.lastView objectAtIndex:0]) intValue] != −1) {If the last view wasn't the Main view, create the index path using thelast section and row information that was loaded into the
lastViewinstance variable byapplicationDidFinishLaunching:.NSIndexPath* indexPath = [NSIndexPath indexPathForRow: [[appDelegate.lastView objectAtIndex:1] intValue] inSection: [[appDelegate.lastView objectAtIndex:0] intValue]];
Send the
tableview:didSelectRowAtIndexPath:message to display the right view.[self tableView:((UITableView*) self.tableView) didSelectRowAtIndexPath:indexPath];
Tip
The reason you created an index path was to be able to take advantage of the didSelectRowAtIndexPath: method to replay the last user tap in the Main view.
All this being done, the user will thank you for it. Now he or she can use the application, take a phone call, play a game, look up something on a map, and then find themselves right back where they left off when they restart the application.
Being able to have the user tailor an application to do things in the way they would like is an important part of creating a great user experience. The user, for example, may want to see measurements in kilometers rather than miles, or vice versa.
In this section I'll show you how to implement a user preference for whether or not to always download the latest information from the Internet when the application starts up. While this preference itself is more important in situations where data roaming is an additional charge, it does serve to illustrate how to implement any kind of preference you might want to have the user set. More importantly, it will also provide a vehicle for showing you how to cache (or save) data so you don't always have to always download it every time the user starts up the application.
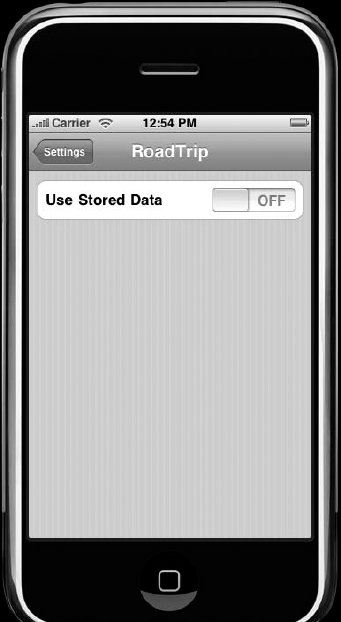
Figure 3-4 shows you what I came up with for the Settings screen for the RoadTrip application.
Use Stored Data tells the application to use the last version of the data that it accessed, rather than going out on the Internet for the latest information. Although this does violate my I Want the Most Up-to-Date Information rule, it can be useful if you're on an airplane and can't access the Internet. (You can accomplish the same thing in airplane mode and by adding error checking for Internet availability, but I want to show you how to use preferences, and this is a great example. This works especially well if you're creating applications to be used globally and you don't want to subject the user to roaming changes.)
Tip
No doubt it's way cool to put user preferences in Settings. Some programmers abuse this trick, though; they make you go into Settings when it's just as easy to give the user a preference-setting capability within the application itself. You should put something in Settings only if the user changes it infrequently. In this case, stored data doesn't change often; Use Stored Data mode definitely belongs in Settings.
In the following sections, I show you how to put a toggle switch in Settings that lets you specify whether to use only stored data, and then I show you how to retrieve the setting. After that, I show you how to actually use the toggle switch setting in your code.
The Settings application uses a property list, called Root.plist, found in the Settings bundle inside your application. The Settings application takes what you put in the property list and builds a Settings section for your application in its list of application settings as well as the views that display and enable the user to change those settings. The next sections spell out how to put that Settings section to work for you.
For openers, you have to add a Settings bundle to your application. Here are the moves:
In the Groups & Files list (at left in the Xcode project window), selectthe RoadTrip folder and then choose File

The New File dialog appears.
Choose Resource under the iPhone OS heading in the left pane andthen select the Settings Bundle icon, as shown in Figure 3-5.
Click the Next button.
Choose the default name of
Settings.bundleand then press Return (Enter) or click Finish.You now see a new item called
Settings.bundlein theRoadTripfolder, in the Groups & Files list.Click the triangle to expand the
Settings.bundlesubfolder.You see the
Root.plistfile as well as anen.lprojfolder. (The latter is used for localization issues.)

Property lists are widely used in iPhone applications because they provide an easy way to create structured data using named values for a number of object types.
Property lists all have a single root node, a dictionary, which means it stores items using a key-value pair, just as an NSDictionary does: All dictionary entries must have both a key and a value. In this dictionary, there are two keys:
StringsTablePreferenceSpecifiers
The value for the first entries is a string — the name of a strings table used for localization, which I don't get into here. The second entry is an array of dictionaries — one dictionary for each preference. You probably need some time to wrap your head around that one. It'll become clearer as I take you through it.
PreferenceSpecifiers is where you put a toggle switch so the user can choose to use (or not use, since it's a toggle) only stored data; I refer to that choice later as stored data mode. Here's how it's done:
In the Groups & Files list of the project window, select the triangle next to the
Settings.bundlefile to reveal theRoot.plistfile.Double-click the
Root.plistfile to open it in a separate window.Okay, you don't really have to do this, but I find it easier to work with this file when it's sitting in its own window.
In the
Root.plistwindow you just opened, click to expand all thetriangles next to all the nodes, as shown in Figure 3-6.Under the
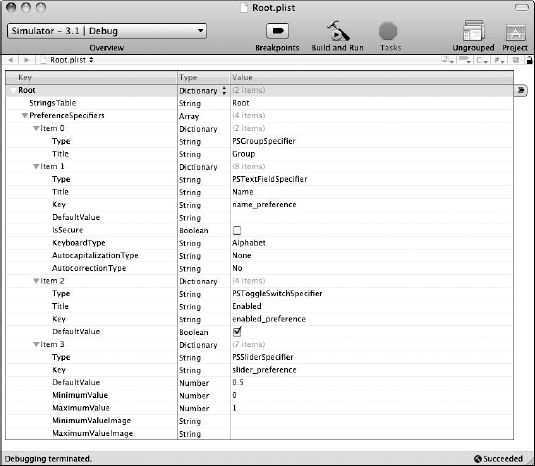
PreferenceSpecifiersheading in theRoot.plistwindow, move to Item 1.PreferenceSpecifiersis an array designed to hold a set of dictionary nodes, each of which represents a single preference. For each item listed in the array, the first row under it has a key ofType; every property list node in thePreferenceSpecifiersarray must have an entry with this key, which identifies what kind of entry this is. TheTypevalue for the current Item 0 —PSGroupSpecifier— is used to indicate that a new group should be started. The value for this key actually acts like a section heading for a table view (like what you create in Book V, Chapter 2). Double-click the value next toTitleand delete the defaultGroup, as I have in Figure 3-7 (or you can put inRoadTrip Preferences, or be creative if you like).Seeing that Item 2 is already defined as a toggle switch, you can just modify it by changing the
Titlevalue fromEnabledtoUse stored dataand the key fromenabled_preferencetouseStoredData-Preference. This is the key you will use in your application to access the preference.Continue your modifications by deselecting the Boolean check box next to
DefaultValue.You want the Use Stored Data preference initially to be set to Off because I expect most people will still want to go out on the Internet for the latest information, despite the high roaming charges involved.
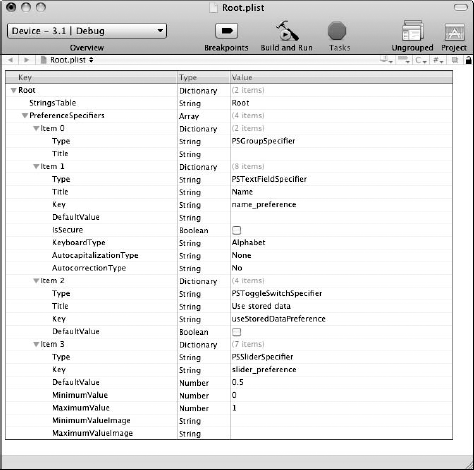
When you're done, the
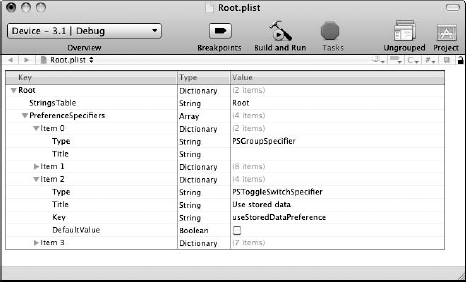
Root.plistwindow should look like Figure 3-7.Collapse the little triangles next to Items 1 and 3 (as shown in Figure 3-8) and then select those items one by one and delete them.
Warning
The item numbers do change as you delete them, so be careful (starting with Item 3 does make it easier). That's why you need to leave the preference item you care about open, so you can see not to delete it. Fortunately, Undo is supported here; if you make a mistake, press

Save the property file by pressing
After you've set it up so your users can let their preferences be known in Settings, you need to read those preferences back into the application. You do that in the RoadTripAppDelegate object's applicationDidFinish-Launching: method. But first, a little housekeeping — taking care of things like new instance variables and properties and the like.
Add the new instance variable
useStoredDataand declare the@propertyin theRoadTripAppDelegate.hfile.This is shown in Listing 3-9. (Again, the new stuff is bold.)
Notice that the
@propertydeclaration is a little different than what you have been using so far. Up to now, all your properties have been declared (nonatomic, retain). What's thisreadonlystuff? BecauseuseStoredData:is not an object (it's a Boolean value),retainis not applicable. In addition, you'll enable it to be read only. If you wanted it to be updatable, you could make itreadwrite.Add the
@synthesizestatement to theRoadTripAppDelegate.mfile to tell the compiler to create the accessors for you.This is shown in Listing 3-10. (You guessed it — new is bold.)
You'll also have to add kUseStoredDataPreference to the Constants.h file;
#define kUseStoredDataPreference
@"useStoredDataPreference"Example 3-9. Adding the Instance Variable to the Interface
@interface RoadTripAppDelegate : NSObject
<UIApplicationDelegate> {
UIWindow *window;
UINavigationController *navigationController;
NSMutableArray *lastView;
BOOL useStoredData;
}
@property (nonatomic, retain) IBOutlet UIWindow *window;
@property (nonatomic, retain) IBOutlet UINavigationController
*navigationController;
@property (nonatomic, retain) NSMutableArray *lastView;
@property (nonatomic, readonly) BOOL useStoredData;
@endExample 3-10. Adding the @synthesize Statement to the Implementation
#import "RoadTripAppDelegate.h"
#import "RootViewController.h"
#import "Constants.h"
@implementation RoadTripAppDelegate
@synthesize window;
@synthesize navigationController;
@synthesize lastView;
@synthesize useStoredData;With your housekeeping done, it's time to add the necessary code to the applicationDidFinishLaunching: method. Listing 3-11 shows the code you need:
Example 3-11. Adding to applicationDidFinishLaunching
- (void)applicationDidFinishLaunching:
(UIApplication *)application {
if (![[NSUserDefaults standardUserDefaults]
objectForKey:kUseStoredDataPreference]) {
[[NSUserDefaults standardUserDefaults]setBool:NO
forKey:kUseStoredDataPreference];
useStoredData = NO;
}
elseuseStoredData = [[NSUserDefaults standardUserDefaults]boolForKey:kUseStoredDataPreference];NSArray *paths = NSSearchPathForDirectoriesInDomains (NSDocumentDirectory, NSUserDomainMask, YES); NSString *documentsDirectory = [paths objectAtIndex:0]; NSString *filePath = [documentsDirectory stringByAppendingPathComponent:kSt ate]; lastView =[[NSMutableArray alloc] initWithContentsOfFile:f ilePath]; if (lastView == nil) { lastView = [[NSMutableArray arrayWithObjects: [NSNumber numberWithInteger:−1], [NSNumber numberWithInteger:−1], nil] retain]; } [window addSubview:[navigationController view]]; [window makeKeyAndVisible]; }
Here's what you want all that code to do for you:
Check to see whether the settings have been moved into
NSUserDefaults.if (![[NSUserDefaults standardUserDefaults] objectForKey:kUseStoredDataPreference]){The Settings application moves the user's preferences from Settings into
NSUserDefaultsonly after the application runs for the first time. Settings will, however, update the preferences inNSUserDefaultsif the user makes any changes.If the settings haven't been moved into
NSUserDefaultsyet, use thedefault ofNO(which corresponds to the default you used for the initial preference value).[[NSUserDefaults standardUserDefaults]setBool:NO forKey:kUseStoredDataPreference]; useStoredData = NO;If the settings have been moved into
NSUserDefaults, read them inand then set theuseStoredDatainstance variable to whatever theuser's preference is.else useStoredData = [[NSUserDefaults standardUserDefaults] boolForKey:kUseStoredDataPreference];
Way back when, I showed you how to implement the tableview:didSelectRowAtIndexPath: method that makes something happen when a user selects a row in the table view. (Okay, it was the "Implementing the selection" section earlier in this chapter.) And although there are other places to use stored data in your application, the tableview:didSelectRowAtIndexPath: method is one method that really needs to use it.
In Listing 3-12, the code in bold shows you what you will need to do to implement the user preference.
Example 3-12. tableview:didSelectRowAtIndexPath:
- (void)tableView:(UITableView *)tableView
        didSelectRowAtIndexPath:(NSIndexPath *)indexPath {

  [RoadTripAppDelegate *appDelegate =
           (RoadTripAppDelegate *) [[UIApplication
                             sharedApplication] delegate];
  [appDelegate.lastView replaceObjectAtIndex:0 withObject:
          [NSNumber numberWithInteger:indexPath.section]];
  [appDelegate.lastView replaceObjectAtIndex:1 withObject:
              [NSNumber numberWithInteger:indexPath.row]];

  [tableView deselectRowAtIndexPath:indexPath
                                            animated:YES];
int menuOffset =
[self menuOffsetForRowAtIndexPath:indexPath];
UIViewController *targetController =
[[menuList objectAtIndex:menuOffset]
objectForKey:kControllerKey];
if (targetController == nil) {
BOOL realtime = !appDelegate.useStoredData;
switch (menuOffset) {
case 0:
if (realtime) targetController =
[[MapController alloc] initWithTrip:trip];
else [self displayOfflineAlert:
[[menuList objectAtIndex:menuOffset]
objectForKey:kSelectKey]];
break;
case 1:
targetController =
[[SightListController alloc] initWithTrip:trip];
break;
case 2:targetController =
[[HotelController alloc] initWithTrip:trip];
break;
case 3:
if (realtime) targetController =
[[WebViewController alloc] initWithTrip:trip
tripSelector:@selector(returnWeather:)
webControl:YES title:
NSLocalizedString(@"Weather", @"Weather")];
else [self displayOfflineAlert:[
[menuList objectAtIndex:menuOffset]
objectForKey:kSelectKey]];
break;
case 4:
targetController =
[[WebViewController alloc] initWithTrip:trip
tripSelector:
@selector(returnCarServicingInformation:)
webControl:NO title:NSLocalizedString
(@"Car Servicing", @"Car Servicing")];
break;
case 5:
targetController = [[WebViewController alloc]
initWithTrip:trip tripSelector:
@selector(returnCarInformation:)
webControl:NO title:NSLocalizedString
(@"The Car", @"Car Information")];
break;
}
if (targetController) {
      [[menuList  objectAtIndex:menuOffset]
        setObject:targetController forKey:kControllerKey];
      [targetController release];
    }
  }
  if (targetController) [[self navigationController]
        pushViewController:targetController animated:YES];
}For some selections, having Internet access makes no difference. But for other selections — Map and Weather come to mind — you've (hopefully) decided that if you're not online, you can't deliver the quality of the information a user needs. (Face it; saved current weather conditions is an oxymoron.) For other selections, Map for example, a network connection is required. (Right now, no caching is available.) In that case, you send an alert to the user (see Listing 3-13) informing him or her that the selection is unavailable. Add the code in Listing 3-13 to RootViewController.m and add the corresponding method declaration (see the following code) to RootViewController.h.
else [self displayOfflineAlert:
              [[menuList objectAtIndex:menuOffset]
objectForKey:kSelectKey]];Example 3-13. Displaying an Alert
- (void) displayOfflineAlert: (NSString*) selection {

  UIAlertView *alert = [[UIAlertView alloc]
           initWithTitle:selection
           message:@"is not available offline"
           delegate:self cancelButtonTitle: @"Thanks"
           otherButtonTitles:nil];
  [alert show];
  [alert release];
}
Warning
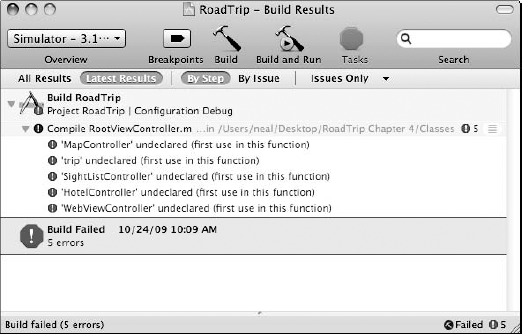
If you try to compile RoadTrip at this point, you will get errors. You haven't yet defined a number of classes that are used in tableView:didSelectR owAtIndexPath:. If you feel the need to compile the application to check syntax errors (as I do), you should only have five compiler errors, all in tab leView:didSelectRowAtIndexPath: as you can see in Figure 3-9.
To be able to compile the application, comment out the code shown here in bold in tableView:didSelectRowAtIndexPath:.
// BOOL realtime = !appDelegate.useStoredData;switch (menuOffset) { case 0:// if (realtime) targetController = [[MapControlleralloc] initWithTrip:trip];// else [self displayOfflineAlert: [[menuListobjectAtIndex:menuOffset] objectForKey:kSelectKey]];break; case 1:
// targetController = [[SightListController alloc]initWithTrip:trip];break; case 2:// targetController = [[HotelController alloc]initWithTrip:trip];break; case 3:// if (realtime) targetController = [[WebViewControlleralloc] initWithTrip:trip tripSelector:@selector(returnWeather:)// webControl:YES title:NSLocalizedString(@"Weather", @"Weather")];// else [self displayOfflineAlert:[[menuListobjectAtIndex:menuOffset] objectForKey:kSelectKey]];break; case 4:// targetController = [[WebViewController alloc]initWithTrip:trip tripSelector: @selector(returnCarServicingInformation:)// webControl:NO title:NSLocalizedString(@"Car Servicing", @"Car Servicing")];break; case 5:// targetController = [[WebViewController alloc]initWithTrip:trip tripSelector: @selector(returnCarInformation:)// webControl:NO title:NSLocalizedString(@"The Car", @"Car Information")];break; }