
In This Chapter
Taking another look at model objects
Taking advantage of reusable view controllers and models
Accessing data on the Internet
Saving and reading files
Getting the framework (no pun intended) in place for a new iPhone application is certainly a crucial part of the development process, but in the grand scheme of things, it's only the spadework that prepares the way for the really cool stuff. After all is said and done, you still need to add the content that the users will see or interact with. Content is, after all, the reason they bought this application.
The last couple of chapters have been about creating an application structure, but this chapter moves on to Content views and how to implement them. Content views display the information that the user is after when he or she is using the app.
This whole implementation thing is actually less difficult than it sounds. The real key to creating an extensible application — one where you can easily add new views — is the program architecture. When you have a table view in place, you have the structure necessary for navigation in your application. With that navigation architecture — along with the Model-View-Controller pattern I've been touting all along in this and other minibooks — the actual business of creating the views, view controllers, and the model necessary for your app turns out to be somewhat pedestrian. You do more or less the same thing over again for each new Content view. (Oh well, boring is sometimes good.)
One of the things I pay significant attention to in this chapter is the relationships that are defined in the Model-View-Controller model (MVC model, to in-the-know types like you). I want to remind you that the data and application logic about what to do with that data must be encapsulated in the model class(es). The views (and the view controllers) are really only conduits for displaying what the model supplies. The relationships I speak of here have to do with how a view controller for example, accesses the model to get the data needed to be displayed in a view.
To kick off the process, you first need to decide what you want the user to see whenever the user selects a particular row in the Main view of your app. He or she may see some information they are interested in — the Golden Gate Bridge for example. In this case you also need to decide where that information is going to be (physically) located. You have a number of options here. It can be 1) a program resource (kind of like a local file, which I get to later); 2) a Web page; or 3) data located on a server on the Internet.
But when the user selects a particular row what you may want to display is not (just) information, but some controls or another table view that gives you even more choices, like when you select an album in the iPod application and it gives you a list of songs you can select. The list of albums in this case is both information (what albums are available) as well as "controls" that allow you to get even more information. To ease your mind, I show you how to work with two of your three options (information and another table view) right here in this chapter. (Controls are covered in Book III.) And, oh yes, as is the case in Chapter 3 of this minibook, you also have to make some decisions about what you want to do if the user fires up your app while offline.
This RoadTrip app you're building piece by piece is going to be an application with a lot of functionality, so it's probably best to get some of the simpler functions out of the way first. Getting the RoadTrip app to display car model information as well as car-servicing information simply involves displaying some data in a Web view. It may be true that the Car Model Information feature gets its data from a resource, and the Car Servicing Information feature gets its data from a server on the Internet, but in all other respects, they work exactly the same. You can throw the Weather feature in here as well; it simply goes out to a Web site, but instead of launching a browser, it displays the information in your application.
Speaking of the weather, it makes a lot of sense to present that functionality first. Implementing a view that accesses a Web page — which is what the Weather feature does — is actually a superset of what you need to do to display a local resource or data from a Web server. So, if you get Weather under your belt, you'll be all set to tackle Car Model Information and Car Servicing Information.
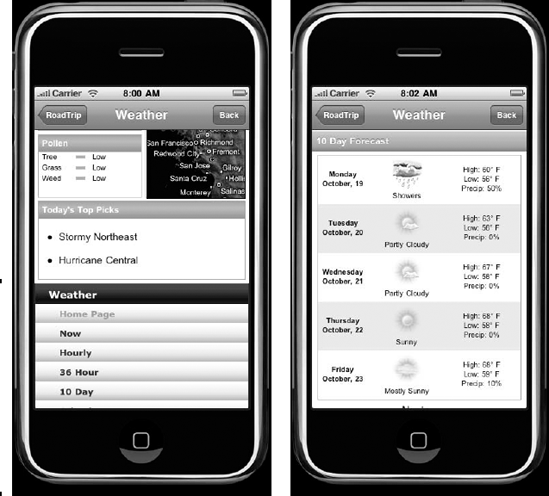
If the user selects Weather from the Main view in the RoadTrip application, he or she comes face-to-face with an Internet site displaying weather information. (I use www.weather.com in my example, but you can use any site that you like.)
In this chapter, I show you how to code the view controller and model class it will use to get the information it needs to pass on to the view to display for each of the examples shown in Figures 4-1, and 4-2. The view controllers are the key elements here. They're the ones that get the content from the Trip model object — the model object you're going to in the viewDidLoad method of the RootViewController — and send it to the view to display.
Note
When the user selects Weather from the Main view, what the user sees does depend on whether the device is online or in stored data mode. If the device is online, the user sees a Web page from a Web site with the weather information, as illustrated in Figure 4-2 (left). When in stored data mode, the user gets a message stating that weather data is unavailable when offline, as you can see in Figure 4-2 (right).
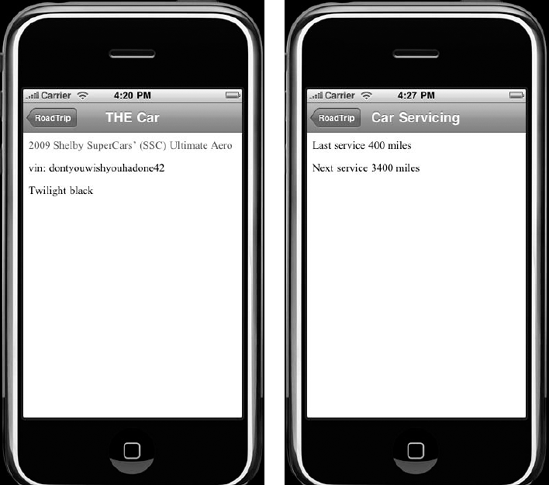
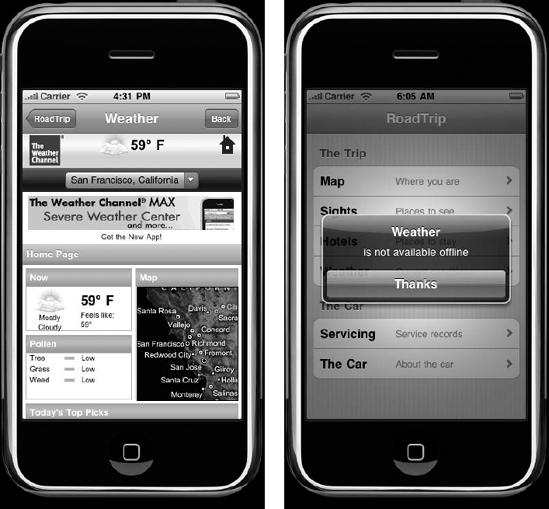
Figure 4-2. If you're online, you can connect to Weather (left). If you're offline, it's a different story (right).
If you're not blessed with quite a bit of object-oriented programming experience, your first inclination here would probably be to create three view controllers, one for each of the entries in the table: Weather, Car Servicing, and The Car. Although this would work, you would soon realize that all three of those controllers would be doing more or less the same thing, and all use a UIWebView to display the information.
In the interest of reducing the total number of classes you have to deal with, not to mention reducing typos and copy-and-paste errors, I show you how a single view controller can handle the display requirements for all three entries.
Standard operating procedure for iPhone applications is to have a user tap an entry in a Main view to get to a subsequent view. For this to work, you first need to create a new view controller and then push it onto the stack. (For more on controllers and stacks as they apply to the RoadTrip application, see Chapter 3 in this minibook.) To make all that happen, you need to code all of the following: your view controller interface and implementation files, your nib files, and finally your model interface and implementation files.
Going from abstract to concrete, read on as I spell out what you need to have in place before your users can jump from one view to another in RoadTrip — say, when a user selects the The Car row in the Main view of the app and fully expects to find a new view full of information about (yep) his car. This will be the general pattern you can follow for any application that uses a table view. (For more on table views, check out Chapter 2 of this minibook.)
Okay, check out how easy it is to come up with the view controller and nib files:
Fire up Xcode and load your RoadTrip project.
You'll be building on what you've done in Chapter 1–3 of this minibook.
In the RoadTrip project window, select the Classes folder, and then choose File

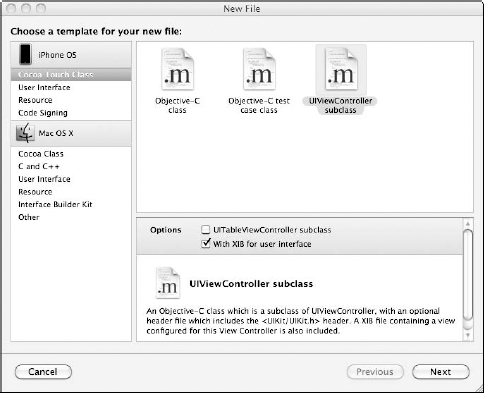
In the left column of the dialog, select Cocoa Touch Class under the iPhone OS heading, select the UIViewController Subclass template in the top-right pane and then click Next.
Be sure the With XIB for User Interface option is also selected.
You see a new dialog asking for some more information.
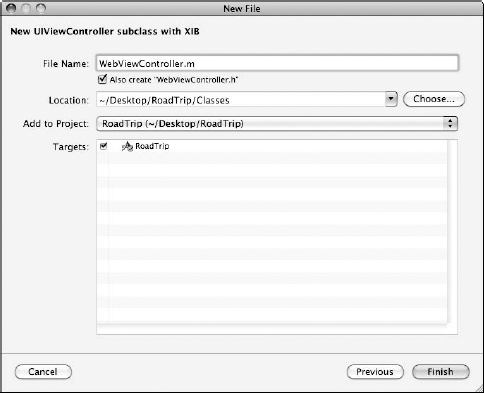
Enter WebViewController.m in the File Name field, as I did in Figure 4-4, and then click Finish.
Tip
To make things easier to find, I keep my WebViewController.m and WebViewController.h classes in the Classes folder. And I move the WebViewController.xib to the Resources folder.
Now do it all over again (and get it out of the way) for the model classes your controllers will use. After you finish that, you're all set up to start adding code.
Tip
It would be a good idea to add a new folder in the Groups & Files list to hold all your new model classes. To do so, select the RoadTrip project icon and then choose Project
Choose File
Refer to Figure 4-3 if you need to see what the dialog looks like.
In the leftmost column of the dialog, first select Cocoa Touch Class under the iPhone OS heading, but this time be sure to select the Objective-C Class template in the topmost pane. Make sure as well that the drop-down menu Subclass Of has NSObject selected and then click Next.
You see a new dialog asking for some more information.
Enter Trip in the File Name field and then click Finish.
This is the main model class you'll be using.
Go through steps 1-3 to create
.mand.hfiles forWeather,CarServicing, andCarInformation.
The Weather, CarServicing, and CarInformation classes are pretty straight-forward — but what about this Trip thing? As you'll see, it will be the class in charge and serve to hide the other model classes — making the architecture much more flexible.
For the RoadTrip application, you want to use a nice UIWebView to display the information for the three table view entries you are implementing in this chapter. You need to set the UIWebView up using Interface Builder, but you also need a reference to it from the WebViewController so it can pass the content from the model to the view. To do that, you need to create an outlet (a special kind of instance that can refer to objects in the nib) in the view controller, just as you do in Chapter 2 of Book III for the DeepThoughts application. The outlet reference will be "filled in" automatically when your application is initialized.
Here's how you should deal with this outlet business:
Within Xcode, add a
webView (UIWebView)outlet to theWebViewController.hinterface file.You declare an outlet by using the keyword
IBOutletin theWebViewControllerinterface file, like soIBOutlet UIWebView *webView;
Do the File
Note
After it's saved — and only then — can Interface Builder find the new outlet.
Use the Groups & Files list on the left in the project window to drill down to the
WebViewController.xibfile; then double-click the file to launch it in Interface Builder.Tip
If the Attributes Inspector window is not open, choose Tools
If you can't find the
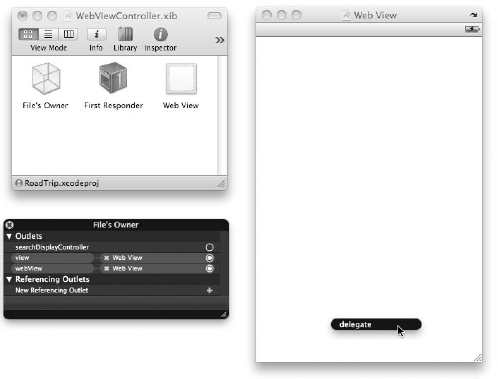
WebViewController.xibwindow (you may have minimized it whether by accident, on purpose, whatever), you can get it back by choosing WindowClick the File's Owner icon in the
WebViewController.xibwindow.It should already be set to WebViewController. If not, retrace your steps to see where you may have made a mistake.
You need to be sure that the file's owner is
WebViewController. You can set the file's owner from the Class drop-down menu in the Identity Inspector. (If it's not visible, choose ToolsClick in the View window and then choose UIWebView from the Class drop-down menu in the Identity Inspector.
Note
The name in the
WebViewController.xibwindow changes to Web View, and the title of the View window changes to Web View the next time you reopen the window after it has been closed.Back in the
WebViewController.xibwindow, right-click the File's Owner icon to call up a contextual menu with a list of connections.You can get the same list using the Connections tab in the Attributes Inspector. (Same drill — if it's not visible, choose Tools
Drag from the little circle next to the
webViewoutlet in the list onto the Web View window.Doing so connects the
webViewoutlet forWebViewControllerto the Web view.Go back to that list of connections and click the triangle next to Referencing Outlets. This time drag from the little circle next to the New Referencing Outlet list onto the Web View window.
With the cursor still in the Web View window, let go of the mouse button.
A pop-up menu appears (with only one term in it — delegate), looking like what you see in Figure 4-5.
Choose delegate from the pop-up menu.
You need this later when I show you how to allow a user to go back when he or she selects a Web site link being displayed in a Web view.
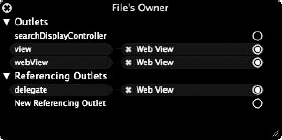
When you're done, the contextual menu should look like Figure 4-6.
Note
If you think about it though, why do you need the webView? There's already a pointer to the view object safely nestled in the view controller. There're two reasons.
I'm lazy. If I create a second outlet of type
UIWebView, then every time I access it, I don't have to cast theUIViewinto aUIWebView, as you can see in the following line:(UIWebView*) [self view] or (UIWebView*) self.view
I'm doing it for you. It makes the code easier to follow.
At this point, you have the view controller class set up and you've arranged for the nib loader to create a UIWebView object and set all the outlets for you when the user selects Weather for the view he or she wants to see.
Yea! You're done with all the tedium! Now you can get on to the more interesting stuff.
At this point, you have the classes defined for all of the view controller and model objects. All that's left for you to do is to enter the code to make it do something — well, maybe not just something. How about exactly what you want it to do?
As I point out earlier in this chapter — and numerous other times, but who's counting? — the models own and encapsulate the data and application logic. In the case of Weather, as well as The Car and Car Servicing, that means the model is the place where the knowledge of where that data is — and how to access that data — resides. It may be a Web page, a file or resource on the iPhone itself, or data that will be provided by a server on the Internet. Encapsulating that knowledge in the model allows you to change how and where the data is represented without impacting the controllers themselves. As an added bonus, you can add new controllers and views and have them access their data without having to do a lot of copy and pasting.
The model object that you'll use — at least the one that the view controllers will be aware of — is the Trip. It provides the interface to the View controllers that enables them to both get the data required by their views as well as inform the model object of any new information passed in by the views. (You can see how that's actually done in the next minibook). You can find that interface in Listing 4-1. Add the code in bold to Trip.h.
Example 4-1. The Trip Interface
@class Weather;@class CarServicing;@class CarInformation;@interface Trip : NSObject {NSString *tripName;CarServicing *carServicing;CarInformation *carInformation;Weather *weather;}- (id) initWithName:(NSString*) theTripName;- (void) returnWeather:(id) theViewController;- (void) returnCarServicingInformation:(id)theViewController;- (void) returnCarInformation:(id) theViewController;@end
The beauty of the setup here is that the view controller that's controlling the display of the Weather view only has to send the returnWeather: message to the Trip object to get the information it needs.
What may puzzle you is that the method returns a void, but I explain that shortly.
Before moving on, you also want to get the creation and initialization of the Trip object out of the way. Add the code in bold in Listing 4-2 to Trip.m.
Example 4-2. Initializing the Trip Object
#import "Trip.h"#import "CarInformation.h"#import "CarServicing.h"#import "Weather.h"#import "WebViewController.h"@implementation Trip- (id) initWithName:(NSString*) theTrip {if ((self = [super init])) {tripName = theTrip;[theTrip retain];carInformation =[[CarInformation alloc] initWithTrip:self];carServicing =[[CarServicing alloc] initWithTrip:self];weather = [[Weather alloc] init];}return self;}@end
All this method does is save the name of the trip (My trip to Graceland for example — which is specified in the RootViewController, as you see later on) and allocate and initialize the objects it will use — the classes you created earlier. The class you're concentrating on now is Weather, but you get to the others later in this chapter.
While Listings 4-1 and 4-2 show you what you'll do once the Trip object has been created, you'll probably notice that you haven't created it yet.
To do that, add this line of code to viewDidLoad in RootViewController.m.
trip = [[Trip alloc] initWithName:@"Road Trip"];
After creating your model object, you of course also have to import its header to be able to send it messages. Add these two lines of code to RootViewController.m. You also might as well add the #import for WebViewController (you'll be creating the WebViewController shortly) at the same time:
#import "Trip.h" #import "WebViewController.h"
Add the new instance variable trip to RootViewController.h.
Trip *trip;
You also have to make the compiler aware of the class, so add the following as well to RootViewController.h:
@class Trip;
This is shown in bold:
@class Trip;@interface RootViewController : UITableViewController { NSArray *sectionsArray; NSMutableArray *menuList;Trip *trip;} - (int) menuOffsetForRowAtIndexPath:(NSIndexPath *)indexPath; - (void) displayOfflineAlert:(NSString*) selection; @end
Note
The compiler needs to know certain things about the classes that you're using, such as what methods you've defined and so on, and the #import statement in the implementation (.m) file generally solves that problem. But when you get into objects that point at other objects, you also need to provide that information in the interface file, which can cause a problem if there are so-called circular dependencies. (Sounds cool, I know, but I'm not going to get into that here; it's beyond the scope of this book.) To solve that problem, Objective-C introduces the @class keyword. This informs the compiler that Trip is a class name. At this point, in the interface file, that is enough for the compiler, but when you actually do use the class — by creating an instance of that class or sending it a message for example — you still have to do the #import.
You now have the Trip model object ready to work with. Notice that it creates and uses three other objects: Weather, CarService, and CarInformation (whose files you created earlier). I explain why I had you do it this way in the next section.
Now back to the real work.
Okay, I spoke too fast. Before you can get back to the real work, you have to deal with one nagging question. If you're going to be relying on generic view controllers, how do they know what message to send the Trip to get the information they need? That feat is accomplished by the RootViewController, The RootViewController knows what the user wants to see displayed based on what entry the user selected in the tableView:didSelectRowAtIndexPath: method.
if (realtime) targetController =
[[WebViewController alloc] initWithTrip:trip
tripSelector:@selector(returnWeather:)
webControl:YES
title:NSLocalizedString(@"Weather", @"Weather")];
else [self displayOfflineAlert:
[[menuList objectAtIndex:menuOffset]
objectForKey:kSelectKey]];
break;When the user selects Weather in the Main view, the RootViewController allocates and then initializes the view controller with the data it needs — including the message it needs to send to the Trip object to get its data. In this case, it is its model (the Trip), its title (@"Weather"); whether or not it's a Web site (in this case YES). (It needs to know that in order to manage user link selections — I explain that shortly.) The last bit of data concerns what message to send the Trip object (in this case, returnWeather:). I explain the if (realtime) bits in Chapter 3 of this minibook, so if it isn't clear, you should review it there.
The :@selector(returnWeather:) part corresponds to the method you've declared in Trip.h.
Looking at the method declaration for initWithTrip:::::
- (id) initWithTrip:(Trip*)aTrip
tripSelector:(SEL)aTripSelector
webControl:(BOOL) ifWebControl
title:(NSString*) aTitle;You can see that tripSelector is of type SEL. SEL is a selector that is used for a number of things in Objective-C that are beyond the scope of this book. But it also can be used for something that you need to do, and that is act like a dynamic function pointer that, for a given name, automatically points to the implementation of the method in the class it's used with. In this case, it's returnWeather:, and it will be sent to the Trip object.
That means that the WebViewController needs to know only about the Trip object, and it can ask the Trip object to perform whatever method the selector specifies — loadWeather: when the user selects Weather or LoadCarInformation: when the user selects The Car and so on.
The @selector is a compiler directive you may not be familiar with. It tells the compiler that this is a selector.
Note
You can also specify the selector using the NSSelectorFromString function, where the string is the name of the method. You would use this when you want to send a message whose name you may not know until runtime.
Now that you understand that the WebViewController will be initialized with the message it needs to send, based on the user selection, you can look and see how to implement that in the WebViewController.
Add the code in bold in Listing 4-3 to WebViewController.h. I also have you add the fact that the WebViewController adopts the UIWebViewDelegate protocol, which you will use when you add the ability for the user to navigate links on a Web site later in this section. You already connected the WebViewController as a Web view delegate when you worked with the nib file.
Example 4-3. The WebViewController Interface
#import <UIKit/UIKit.h>@class Trip;@interface WebViewController : UIViewController<UIWebViewDelegate>{SEL tripSelector;Trip *trip;IBOutlet UIWebView *webView;BOOL webControl;}- (id) initWithTrip:(Trip*)aTrip tripSelector:(SEL)aTripSelector webControl:(BOOL) ifWebControltitle:(NSString*) aTitle;- (void)loadWebView:(NSURLRequest*) theNSURLRequest;@end
Listing 4-4 shows you how the implementation of the WebViewController's initWithTrip:::: initializer works. Add its code to WebViewController.m and its declaration to WebViewController.h.
Example 4-4. The WebViewController Initializer
- (id) initWithTrip:(Trip*)aTrip tripSelector:(SEL)
aTripSelector webControl:(BOOL) ifWebControl
title:(NSString*) aTitle{
if (self = [super initWithNibName:@"WebViewController"
bundle:nil]) {
self.title = aTitle;
tripSelector = aTripSelector;
trip = aTrip;
webControl = ifWebControl;
[trip retain];
}
return self;
}Listing 4-4 is nothing special — just your usual run-of-the-mill initialization method — but it's still fun to see how it gets the job done.
First, it invokes the superclass's initWithNibName:bundle: method:
if (self = [super initWithNibName:
@" WebViewController" bundle:nil]) {The first thing this method does is invoke its superclass's initialization method. I pass it the nib filename (the one I just created in a previous section) and nil as the bundle, telling it to look in the main bundle.
Note that the message to super precedes the initialization code added in the method. This sequencing ensures that initialization proceeds in the order of inheritance. Calling the superclass's initWithNibName:bundle: method initializes the controller, loads and initializes the objects in the nib file (views and controls, for example), and then sets all its outlet instance variables and Target-Action connections for good measure. (I'll get to those soon.)
Note
The init...: methods all return a pointer to the object created — self, in other words. Although that's not the case here, the reason you assign whatever comes back from an init...: method to self is that some classes actually return back a different class than what you created. The assignment to self becomes important if your class is derived from one of those kinds of classes. Keep in mind as well that an init...: method can also return nil if there's a problem initializing an object. If you're creating an object where that's a possibility, you have to take that into account. (Both of those situations are beyond the scope of this book.)
After the superclass initialization is completed, the WebViewController is ready to do its own initialization, including saving the aTrip argument to the trip instance variable. The only thing worth noting is that it stores the selector argument in tripSelector, an instance variable of type SEL. This is a type you may not have used before.
The place where the selector is used is in the viewDidLoad method. Add the code in Listing 4-5 to WebViewController.m.
Example 4-5. Adding the viewDidLoad Method
- (void)viewDidLoad {
[super viewDidLoad];
if (webControl) {
UIBarButtonItem *backButton = [[UIBarButtonItem alloc]
initWithTitle:@"Back" style:UIBarButtonItemStylePlain
target:self action:@selector(goBack:)];
self.navigationItem.rightBarButtonItem = backButton;
[backButton release];
}
[trip performSelectorOnMainThread:tripSelector
withObject:self waitUntilDone:NO];
}This is a key part of your application framework, so take a look what is going on here in the code.
It checks to see whether the view is going to be displaying a Web site in the Web view. If it is, it adds a Back button to enable the user to navigate links on that site. (I explain such messy navigation details in the "Managing links in Web view Web sites" section, later in this chapter.)
It sends the
performSelectorOnMainThread:tripSelector withObject:self waitUntilDone:NOmessage to theTripobject to get the data for the Web view to display.This message tells the
Tripobject that it is receiving thetripSelectormessage with one argument (in this case, a pointer back to itself,self).
performSelectorOnMainThread:withObject:waitUntilDone is an NSObject method that allows you to invoke a method in an object (in this case, trip). I'm not going to get into multi-threading here, but the main thread is appropriate to what you need to do. The first argument is the method you want invoked — in this case tripSelector, which is an instance variable that holds the selector returnWeather:. The argument (withObject:) is the pointer to the WebViewController — you see how that is being used shortly. The waitUntilDone: argument is a Boolean argument that specifies whether or not everything grinds to a halt until after the specified selector is performed on the receiver. For your purposes, NO is the right choice here.
Next look at what happens when Trip object gets the message returnWeather. Add the method in Listing 4-6 to Trip.m.
Example 4-6. The Trip Object's returnWeather
- (void) returnWeather:(id) theViewController {
[theViewController
loadWebView:[weather weatherRealtime]];
}All this does is send a message to the Weather model object.
Now you need to add that method to Weather.m. To do that, add Listing 4-7 to Weather.m to add the weatherRealtime method. I'll show you what this method does next.
You also need to add the method declaration to Weather.h.
@interface Weather : NSObject {
}
- (NSURLRequest*) weatherRealtime;
@endAlthough it may seem pointless to have the Trip simply turn around and send a message to the Weather object, it really isn't. I explain why I am having you implement it this way in the section "What's with the Trip Model and All That Indirection?"
Example 4-7. The Weather Object's weatherRealtime method
- (NSURLRequest*) weatherRealtime {
NSURL *url = [NSURL URLWithString:@"http://www.
weather.com/outlook/travel/businesstraveler/local/
UKXX0085?lswe=CarServicing,%20UNITED%20KINGDOM&lwsa=Weathe
rLocalUndeclared&from=searchbox_typeahead"];
if (url == NULL) NSLog( @"Data not found %@", url);
NSURLRequest* theNSURLRequest = [NSURLRequest
requestWithURL:url];
return theNSURLRequest;
}This method creates an NSURLRequest that the Web view needs to load the data. First, it creates an NSURL — an object that includes the utilities necessary for downloading files or other resources from Web and FTP servers. Then it takes this NSURL and creates an NSURLRequest from it. The NSURLRequest is what the WebViewController needs to send to the Web view in the loadRequest: message, which tells it to load the data associated with that particular NSURL.
The NSURLRequest class encapsulates a URL and any protocol-specific properties, all the time keeping things nicely protocol-independent. It also provides a number of other things I get around to explaining in detail in Book VI when I discuss the URL loading system — the set of classes and protocols that provide the underlying capability for an application to access the data specified by a URL. Seeing that this is the preferred way to access files both locally and on the internet, I explain the URL loading system in great detail in Book VI.
The second thing the weatherRealtime method does is send the WebViewController a loadWebView: message. Add Listing 4-8 to WebController.m.
Example 4-8. Loading the Web View Data
- (void)loadWebView:(NSURLRequest*) theNSURLRequest {
[webView loadRequest:theNSURLRequest];
}The loadRequest message is sent to the Web view, and the Weather Web site is displayed in the window. This causes the Web view to load the data and display it in the window.
Note
Having the Trip object send the loadWebView: message might seem a little cumbersome. It's actually a side effect of the limitations of selectors — no return type and only one argument. I examine more elegant solutions in Book VI.
When you implemented the WebViewController class's viewDidLoad method back in Listing 4-5, I mentioned that it adds a Back button to enable the user to navigate links on that site. Why did I want you to do that?
To refresh your memory, here's another look at Listing 4-5, where you implement the Back button:
- (void)viewDidLoad {
[super viewDidLoad];if (webControl) {UIBarButtonItem *backButton = [[UIBarButtonItem alloc]initWithTitle:@"Back"style:UIBarButtonItemStylePlaintarget:selfaction:@selector(goBack:)];self.navigationItem.rightBarButtonItem = backButton;[backButton release];}[trip performSelectorOnMainThread:tripSelector withObject:self waitUntilDone:NO]; }
There's one interesting thing about the Weather view — or any other view that loads real Web content into your application instead of using a browser. The links are live, and from that view the user can follow those links if you want to let them.
I get to the if-you-want-to-let-them issue shortly, but first I need to talk about a second Back button.
Once the user is at the weather Web site, as you can see in Figure 4-7, the user might want to look at the ten-day forecast. (You can see such a link on the left in Figure 4-7, and the page display for that link on the right.)
When the user makes use of the 10 Day link, the Web view replaces the content of the view, rather than creating a new view controller. Tapping the link doesn't change the controller in any way, so the left button won't change; you won't be able to use it to get back to a previous view — you only go back to the Main view, as the control text tells you. To solve this quandary, I created another button and labeled it Back, so the user knows he or she can use it to get back to the previous view. It's actually pretty easy to do as the following steps make clear:
Create and add a Back button.
Okay, you already did that in Listing 4-5. The
viewDidLoadmethod allocates the button and then assigns it to an instance variable that theUINavigationControllerwill later use to set up the navigation bar. Theaction:@selector(goBack:)argument is the standard way to specify Target-Action — and is similar to the selector strategy you implemented in theWebViewController. It says that when the button is tapped, you need to send thegoBack:message to thetarget:self, which is theWebViewController.Warning
That being said, the Apple Human Interface Guidelines say, "In addition to displaying Web content, a Web view provides elements that support navigation through open Web pages. Although you can choose to provide Web page navigation functionality, it's best to avoid creating an application that looks and behaves like a mini Web browser." In case you want to follow Apple's suggestion here, I show you how to disable links next.
Add the
goBack:method in Listing 4-9 to theWebViewController.mfile
Example 4-9. goBack: to Where You Once Belonged
- (IBAction)goBack:(id) sender {
if ([webView canGoBack] == NO )
[[self navigationController]
popViewControllerAnimated:YES];
else
[webView goBack];
}The UIWebView actually implements much of the behavior you need here. When the user touches the Back button and goBack: message is sent, you first check with the Web view to see whether there's someplace to go back to. (It keeps a backward and forward list.) If there's an appropriate retreat, you send the UIWebView message (goBack:) that will reload the previous page. If not, it means that you're at the Weather content page, and you simply pop (remove from the stack) the WebViewController to return to the main window — the same thing the button on the left side of the navigation bar would do.
The goBack: method is part of the UIWebViewDelegate protocol.
Everybody knows the Internet is a tempting place. If you see a link, more often than not something goes off in your brain that says "click it." This quirk of human nature also applies to any links that might show up in the Web views of your app. If you'd prefer that your app users stick around for a bit and don't go off gallivanting around the Internet at the first opportunity, you need to disable the links. That turns out to be a two-step process:
Change the
webControl:(BOOL)argument toNOininitWithTrip::::.Implement the
UIWebViewDelegatemethodshouldStartLoadWithRequest:.The
shouldStartLoadWithRequest:method is called before a Web view begins loading content to see whether you want the load to proceed. You're only interested in doing something if the user mistakenly touched a link when he or she is in stored data mode or you really want to make Apple happy and heed its advice to disable all links. In the case ofWeather, you really don't care about stored data mode, because you plan on sending an alert to the user if he or she tries to select that entry in the Main view while in stored data mode. Under other circumstances, if the Web view is stored but also has links, you want to display that view but disable the links. For example, you might want to have a link to an online manual for your car in the CarServicing view. And, because this is a genericWebViewController, you want to support that functionality, even if you know there will be some times when the user is going to resort to stored data mode.
Listing 4-10 shows the code you'd need to add in order to disable links in such a situation. Add this to WebViewController.m. You also need to import Constants.h (#import "Constants.h") because you're using the kUseStoredDataPreference. constant.
Example 4-10. Disabling Links
- (BOOL)webView:(UIWebView *)webView
shouldStartLoadWithRequest:(NSURLRequest *) request
navigationType:(UIWebViewNavigationType) navigationType {
if ((navigationType == UIWebViewNavigationTypeLinkClicked)
&& ([[NSUserDefaults standardUserDefaults] boolForKey:kUs
eStoredDataPreference])) {
UIAlertView *alert = [[UIAlertView alloc]
initWithTitle:@"" message:NSLocalizedString(@"Link
not available", @" Link not available")
delegate:self cancelButtonTitle:NSLocalizedString(
@"Thanks", @"Thanks") otherButtonTitles:nil];
[alert show];
[alert release];
return NO;
}
else return YES;
}Here's the process the code uses to get the job done for you:
It checks to see whether the user has touched an embedded link (while in stored data mode).
if ((navigationType == UIWebViewNavigationTypeLinkClicked) && ([[NSUserDefaults standardUserDefaults] boolForKey:kUseStoredDataPreference])) {If the user is in stored data mode, it alerts him or her to the fact that the link is unavailable, and returns
NOfrom the method.This informs the Web view not to load the link.
UIAlertView *alert = [[UIAlertView alloc] initWithTitle:@"" message:NSLocalizedString(@"Link not available", @" Link not available") delegate:self cancelButtonTitle:NSLocalizedString(@" Thanks", @"Thanks") otherButtonTitles:nil]; [alert show]; [alert release]; return NO;
You create an alert here with a message telling the user that the link is not available. The Cancel button's text will be
@"Thanks".If the user is not in stored data mode, it returns
YESto tell the Web view to load from the Internet.
If you've decided to follow Apple's suggestion and the Web view is not acting as a mini browser, you have to disable the links that are available in the content. You can do that in the shouldStartLoadWithRequest: method by coding it in the following way:
- (BOOL)webView:(UIWebView *) webView
shouldStartLoadWithRequest:(NSURLRequest *) request
navigationType:(UIWebViewNavigationType)navigationType {
if (navigationType ==
UIWebViewNavigationTypeLinkClicked)
return NO;
else return YES;
}You should add an alert to inform the user of the fact that there's no Internet gallivanting to be had here as well.
At this point, you uncomment the following lines you see in bold in tableView:didSelectRowAtIndexPath: in RootViewController.h, and your application will compile. You can select Weather from the Main view and find yourself at the www.weather.com site. After you choose a city, you can also follow the links to get more information — if you haven't disabled the links, I should add.
BOOL realtime = !appDelegate.useStoredData;switch (menuOffset) { case 0: // if (realtime) targetController = [[MapController alloc] initWithTrip:trip]; // else [self displayOfflineAlert: [[menuList objectAtIndex:menuOffset] objectForKey:kSelectKey]]; break; case 1: // targetController = [[SightListController alloc] initWithTrip:trip]; break; case 2: // targetController = [[HotelController alloc] initWithTrip:trip]; break; case 3:if (realtime) targetController = [[WebViewControlleralloc] initWithTrip:triptripSelector:@selector(returnWeather:)webControl:YES title:NSLocalizedString(@"Weather", @"Weather")];else [self displayOfflineAlert:[[menuListobjectAtIndex:menuOffset]objectForKey:kSelectKey]];break;case 4: // targetController = [[WebViewController alloc] initWithTrip:trip tripSelector: @selector(returnCarServici ngInformation:)
// webControl:NO title:NSLocalizedString
(@"Car Servicing", @"Car Servicing")];
break;
case 5:
// targetController = [[WebViewController alloc]
initWithTrip:trip tripSelector: @selector(returnCarServici
ngInformation:)
// webControl:NO title:NSLocalizedString
(@"The Car", @"Car Information")];
break;
}You also have to comment out the statements that allocate and initialize the CarInformation and CarServicing objects in the Trip.m's initWithName: method. Since you haven't implemented them yet the compiler whines if it sees them. The code to do that is shown in bold.
- (id) initWithName:(NSString*) theTrip {
if ((self = [super init])) {
tripName = theTrip;
// carInformation =
[[CarInformation alloc] initWithTrip:self];
// carServicing =
[[CarServicing alloc] initWithTrip:self];
weather = [[Weather alloc] init];
}
return self;
}You'll get a couple of compiler warnings because you haven't implemented returnCarServicingInformation: and returnCarInformation: in Trip.m, but you get a chance to do that in the next two sections.
Now that you have implemented the WebViewController for Weather, it's time to turn your attention to the other two views it will need to display.
In the RootViewController's didSelectRowAtIndexPath: method you already have the code to allocate and initialize a WebViewController for CarInformation and CarServicing.
case 4:
targetController = [[WebViewController alloc]
initWithTrip:trip tripSelector:
@selector(returnCarServicingInformation:)
webControl:NO
title:NSLocalizedString (@"Car Servicing", @"Car
Servicing")];break;
case 5:
targetController = [[WebViewController alloc]
initWithTrip:trip tripSelector:
@selector(returnCarInformation:)
webControl:NO
title:NSLocalizedString (@"The Car", @"Car
Information")];
break;All that is left to do is implement the necessary methods in Trip and in CarServicingInformation and CarInformation. As you'll see, adding new functionality here is really easy. It makes things way more fun when you don't have to go out and implement two more view controllers.
You can get started by adding the selector methods in Listing 4-11 to Trip.m.
Example 4-11. The CarServicingInformation and CarInformation (Selector) Methods
- (void) returnCarServicingInformation:
(id) theViewController {
[theViewController
performSelectorOnMainThread:@selector(loadWebView:)
withObject:[carServicing
returnCarServicingInformation]
waitUntilDone:NO];
}
- (void) returnCarInformation:(id) theViewController {
[theViewController
performSelectorOnMainThread:@selector(loadWebView:)
withObject:[carInformation returnCarInformation]
waitUntilDone:NO];
}This should look familiar — it's the same thing you did in the returnWeather: method earlier. (See Listing 4-6.)
From the view controller's perspective, that's all you need to do to support the Car Servicing and Car Information views. Of course you now have to add the functionality that actually returns the data
Start with CarInformation.
In Chapter 1 of this minibook, I mention that CarInformation is always offline, which means it's a great way to show you how to implement static data. It hardly ever changes, so it makes sense to include it in the application itself as a resource.
The content for the CarInformation view is in a file I created called CarSpecs.html. To make it available to the application, I need to include it in the application bundle itself, although I could have downloaded it the first time the application ran. (But there's method to my madness. Including it in the bundle does give me the opportunity to show you how to handle this kind of data.)
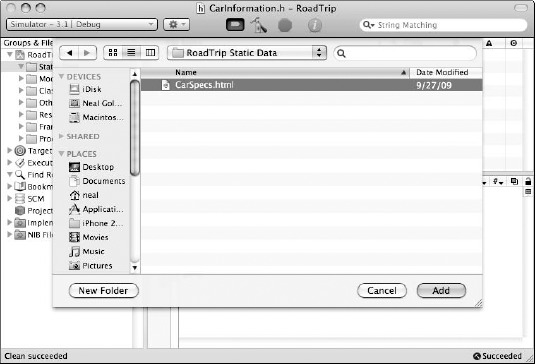
Now, you can add it to your bundle one of two ways:
Open the Project window and drag the
.htmlfile into the Project folder.It's a good idea to create a new folder within your main Project folder as a snug little home for the file. (I use the Car Information folder, but you should also consider a folder called Static data where you can place all the resource-based data you'll be using.)
Or
Choose Project
The only thing at all interesting here is the fact that you're going to use some data that you've included with your application as a resource (which you can think about as an included file, although it doesn't live in the file system but rather is embedded in the application itself).
To start things off, you're going to have to create the CarInformation object. You already entered the code to do that in Listing 4-2 when you added the initWithName: method to Trip. Here's what that code looked like, in case you need a reminder:
- (id) initWithName:(NSString*) theTrip {
if ((self = [super init])) {
tripName = theTrip;
carInformation =
[[CarInformation alloc] initWithTrip:self];
carServicing =
[[CarServicing alloc] initWithTrip:self];
weather = [[Weather alloc] init];
}
return self;
}You have to enter the code in Listing 4-12 to implement the initWithTrip: method in CarInformation.m. (You also have to add the requisite #import statement to CarInformation.m.)
#import "Trip.h"
and method declaration in CarInformation.h — you know, that snippet of code that looks like the following:
- (id) initWithName:(NSString*) theTrip;
Example 4-12. initWithTrip:
- (id) initWithTrip:(Trip*) aTrip {
if ((self = [super init])) {
trip = aTrip;
[trip retain];
}
return self;
}You also have to add the new instance variable to in CarInformation.m:
Trip* trip;
As well as the @class statement:
@class Trip;
You may notice that the trip instance variable is not used. I include it because in a more complex model object, there would be some communication back to the Trip object and I put that in simply to show you how it's done. For example, when I introduce the URL loading system in Book VI, the Sights object will use it to gain access to the URL manager you'll implement.
Finally, you can add the raison d'être for the object's existence: accessing the CarSpecs resources you added earlier. This is the returnCarInformation method in Listing 4-13 you need to add to CarInformation.m, and also declare in CarInformation.h.
Example 4-13. The returnCarInformation Method
- (NSURLRequest*) returnCarInformation {
NSString *filePath = [[NSBundle mainBundle]
pathForResource:@"CarSpecs" ofType:@"html"];
NSURL* carInformationData=
[NSURL fileURLWithPath:filePath];
NSURLRequest* theNSURLRequest =
[NSURLRequest requestWithURL:carInformationData];
return theNSURLRequest;
}This is the same approach you took in weatherRealtime back in Listing 4-7 — creating an NSURLRequest. This time, though, the request is pointing to a resource you've included in your application bundle.
You're using pathForResource::, which is an NSBundle method to construct the NSURL. (You use an NSBundle method when you get the application name in the RootViewController to set the title on the main window in Chapter 3 of this minibook.) Just give pathForResource:: the name and the file type. That gets packed in to the NSURLRequest and sent back to the WebViewController (via the Trip object) to load.
Pretty easy huh?
Tip
Be sure you provide the right file type; otherwise, this technique won't work.
To see what you've managed to do so far, you have to uncomment out the code in the RootViewController's tableView:didSelectRowAtIndexPath:
targetController = [[WebViewController alloc]
initWithTrip:trip tripSelector:
@selector(returnCarServicingInformation:)
webControl:NO title:NSLocalizedString
(@"Car Servicing", @"Car Servicing")];and the Trip's initWithTripName:
carInformation =
[[CarInformation alloc] initWithTrip:self];With the exception of how the data is accessed, CarServicingInformation works the same way as CarInformation.
In Chapter 1 of this minibook, I mention that the CarServicingInformation data is found on a Web server, and now's the time to show you how to access that server. Additionally, I want to explain how to save that data for later use — those times when the user is in stored data mode or has no Internet access.
To start things off, you have to create the CarServicing object. Lucky for you, you already entered the code to do that in Listing 4-2 when you added the initWithName: method to Trip. Does the following ring a bell?
- (id) initWithName:(NSString*) theTrip {
if ((self = [super init])) {
tripName = theTrip;
carInformation =
[[CarInformation alloc] initWithTrip:self];
carServicing =
[[CarServicing alloc] initWithTrip:self];
weather = [[Weather alloc] init];
}
return self;
}You have to enter the code in Listing 4-14 to implement the initWithTrip: method in CarServicing.m. You also have to add the requisite #import statement and the method declaration in CarServicing.h.
Here's that tremendously complicated #import statement:
#import "Trip.h"
Example 4-14. initWithTrip:
- (id) initWithTrip:(Trip*) aTrip {
if ((self = [super init])) {
trip = aTrip;
[trip retain];
}
return self;
}You also have to add the new instance variable to CarServicing.h.
Trip* trip;
As well as the @class statement:
@class Trip;
You may notice that the trip instance variable is not used. I've included it because in a more complex model object, there would be some communication back to the Trip object, and I put that in simply to show you how it's done. For example, when I introduce the URL loading system in Book VI, the Sights object will use it to gain access to the URL manager you'll implement.
Finally, you can add the raison d'être for the object's existence. Add the method you see in Listing 4-15 to CarServicing.m and its declaration to CarServicing.h. Because this method also checks to see whether the user wants to use stored data, you also have to add
#import "RoadTripAppDelegate.h"
to CarServicing.m.
Example 4-15. The returnCarServicingInformation Method
- (NSURLRequest*) returnCarServicingInformation {
NSURL *carServicingData = nil;
RoadTripAppDelegate *appDelegate = (RoadTripAppDelegate *)
[[UIApplication sharedApplication] delegate];
BOOL realtime = !appDelegate.useStoredData;
if (realtime) {
carServicingData = [NSURL URLWithString:@"http://
nealgoldstein.com/CarServicing.html"];[self saveCarServicingData:@"CarServicing"
withDataURL:carServicingData];
if (!carServicingData) NSLog(@"data not there for
CarServicing");
}
else {
carServicingData =
[self getCarServicingData:@"CarServicing"];
}
NSURLRequest* theNSURLRequest =
[NSURLRequest requestWithURL:carServicingData];
return theNSURLRequest;
}This is the same approach you took in weatherRealtime and returnCarInformation — creating an NSURLRequest. This time, though, the request is for information on a Web server.
But that's not the big part. The big difference here is the following: Because you can't always count on being online — say you're driving through the mountains of Big Sur, for example — you want to be able to save the latest version of the data you have downloaded from the Internet and use that if necessary.
So how do you do that? It's all there back in Listing 4-15, which shows you the implementation of the returnCarServicingInformation method.
If the user is online, the method constructs the NSURL object that it will need to have in order to construct the NSURLRequest.
if (realtime) {
carServicingData = [NSURL URLWithString:@"http://
nealgoldstein.com/CarServicing.html"];Then the saveCarServicingData: message is sent:
[self saveCarServicingData:@"CarServicing"
withDataURL:carServicingData];The saveCarServicingData: method in Listing 4-16 downloads and saves the file containing the latest data for the car servicing. It's what will be displayed in the current view, and it'll be used later if the user specifies stored data mode. Add this method to CarServicing.m and its declaration to CarServicing.h.
Example 4-16. Saving Car-Servicing Data
- (void) saveCarServicingData:(NSString*) fileName
withDataURL:(NSURL*) url {
NSData *dataLoaded = [NSData dataWithContentsOfURL:url];
if (dataLoaded == NULL)
NSLog( @"Data not found %@", url);
NSArray *paths = NSSearchPathForDirectoriesInDomains
(NSDocumentDirectory, NSUserDomainMask, YES);
NSString *documentsDirectory = [paths objectAtIndex:0];
NSString *filePath = [documentsDirectory
stringByAppendingPathComponent:fileName];
[dataLoaded writeToFile:filePath atomically:YES];
}You did the exact same thing in Chapter 3 of this minibook when you saved the current state of the application. If you need a refresher here, go back and work through that part of Chapter 3 again.
You might have noticed that I've added an NSLog message for those cases when the data can't be found. This is a placeholder for error-handling that I've left as an exercise for you.
Note
This is definitely not the most efficient way to implement saving files for later use, but given the relatively small amount of data involved, the impact is not noticeable. In Book VI, I show you a better way to mange data.
Note
If the user wants stored data to be used, the method returns the stored data as opposed to loading the data for its URL on the Internet. It gets the data by calling the getCarServicingData: method, which reads the data that was stored in saveCarServicingData:
url = [self getCarServicingData:@"CarServicing"];
getCarServicingData: also constructs a NSURL object that the Web view uses to load the data. So you find the path and construct the NSURL object using that path. This is shown in Listing 4-17. Add the getCarServicingData: method (also shown in Listing 4-17) to CarServicing.m and its declaration to CarServicing.h.
Example 4-17. Getting the Saved car servicing data
-(NSURL*) getCarServicingData:(NSString*) fileName{
NSArray *paths = NSSearchPathForDirectoriesInDomains
(NSDocumentDirectory, NSUserDomainMask, YES);
NSString *documentsDirectory = [paths objectAtIndex:0];
NSString *filePath = [documentsDirectorystringByAppendingPathComponent:fileName]; NSURL* theNSURL= [NSURL fileURLWithPath:filePath]; if (theNSURL == NULL) NSLog (@"Data not there"); return theNSURL; }
Note
If you're coming to this project from C++, you probably want these last two methods to be private, but there's no private construct in Objective-C. To hide them, you could have moved their declarations to the implementation file and created an Objective-C category. Here's what that would look like:
@interface CarServicing ()
- (NSURL*) getCarServicingData:(NSString*) fileName;
- (void) saveCarServicingData:(NSString*) fileName
withDataURL:(NSURL*) url;
@endYou would then remove the declarations from CarServicing.h.
After that, the returnCarServicingInformation method constructs the NSURLRequest and returns to the Trip method that sent it the message.
NSURLRequest* theNSURLRequest = [NSURLRequest
requestWithURL:carServicingData];
return theNSURLRequest;At this point, you need to uncomment out the following code in the RootViewController's tableView:didSelectRowAtIndexPath:
targetController = [[WebViewController alloc]
targetController = [[WebViewController alloc]
initWithTrip:trip tripSelector:
@selector(returnCarServicingInformation:)
webControl:NO title:NSLocalizedString
(@"The Car", @"Car Information")];as well as the following code in the Trip's initWithTripName;
carServicing =
[[CarServicing alloc] initWithTrip:self];Remember to keep the unimplemented functionality commented out in the RootViewController's tableView:didSelectRowAtIndexPath:.
When you compile the code thus far, you can see what's shown in the first figure in Chapter 1 of this minibook. If you click or touch one of the rows, you get the kinds of content I specified (courtesy of some files I have on my Web site).
In Listing 4-6, you see what happens when the Trip object gets the returnWeather: message — it just passes it on to the Weather object, gets the NSURLRequest back, and then turns around and more or less sends it back. So why all these hoops?
You have a couple of options when it comes to creating the model objects needed by the view controllers. One way is to have the view controllers create the ones they'll use. For example, the RootViewController would create the CarInformation object, and so on. That would eliminate the indirection you saw in the previous section — you know, having to go through the Trip object to the CarInformation object that does the real work.
Although that technique does work, and I've actually taken that route in past versions, I'd like you to consider a different approach that results in a more extensible program. (I explain my logic here in detail in Objective-C For Dummies, so if you're curious, you might want to pick up a copy of that book.)
One of the advantages of the Model-View-Controller design pattern I explain in Chapter 2 of this minibook is that it allows you to separate these three groups in your application and work on them separately. If each group has a well-defined interface, it encapsulates many of the kinds of changes that are often made so that they don't affect the other groups. This little fact is especially true of the model and view controller relationship.
If the view controllers have minimal knowledge about the model, you can change the model objects with minor impact on the view controllers.
As I mention in Chapter 2 of this minibook, what makes this possible is a well-defined interface, which you develop in the section "The Trip Model," earlier in this chapter. You create an interface between the model and the controllers by using a technique called composition, which is a useful way to create interfaces.
I'm a big fan of composition, because it's another way to hide what's really going on behind the curtain. It keeps the objects that use the composite object (in this case, Trip is the composite object) ignorant of the objects the composite object uses and actually makes the components ignorant of each other, allowing you to switch components in and out at will.
The Trip class provides the basis for such an architecture, and although I don't fully implement it here (some is done in Chapter 5 of this minibook, and the rest in Book VI), you can understand the structure and will have no trouble extending it on your own.
The class in question looks like this:
#import <Foundation/Foundation.h>
@class Weather;
@class CarServicing;
@class CarInformation;

@interface Trip : NSObject  {

  NSString       *tripName;
  CarServicing   *carServicing;
  CarInformation *carInformation;
  Weather        *weather;
}

- (id) initWithName:(NSString*) theTripName;
- (void) returnWeather:(id) theViewController;
- (void) returnCarServicingInformation:(id)
                                        theViewController;
- (void) returnCarInformation:(id) theViewController;
@endStart with what happens when the Trip object is created. (You did that earlier in section "Getting Trippy with the Trip Model.")
- (id) initWithName:(NSString*) theTrip {

  if ((self = [super init])) {
    tripName = theTrip;
    carInformation =
               [[CarInformation alloc] initWithTrip:self];
    carServicing =
                 [[CarServicing alloc] initWithTrip:self];
    weather = [[Weather alloc] init];
  }
  return self;
}Trip creates the model objects, encapsulating the knowledge of what objects make up the model from the object that creates it. (In this case, Trip is created by the RootViewController.) In order to do that, you added the following line of code to the viewDidLoad method in RootViewController.m.
trip = [[Trip alloc] initWithName:@"Road Trip"];
This would hide all implementation knowledge from the view controller — it would only know about the Trip object and the selectors it creates.
In addition, because the WebViewController is generic, it is oblivious to the messages it is sending to the Trip object.
While trivial here, and may even appear a bit gratuitous — Trip just turns around and essentially resends the message — this architecture becomes important in the more complex applications you'll develop. It'll save you much grief and (make it easier) when you refactor your code to enhance and extend your app.
In Chapter 5 and 6 of this minibook, I cover what I consider to be a premier iPhone feature — the ability to generate customized maps in your application. I explain the map framework and show you some of the things you can do with it. As I mention, this is one of the key features of the iPhone and enables applications to provide not only context-based information (information about what is going on in the context) and functionality, but also information about the context itself.
I promise it will be fun.