
Using delegation to implement a new transaction
Defining formal and informal protocols
Using categories to extend a class
In Chapter 2 of this minibook, you find out how to use inheritance to create subclasses such as CashTransaction and CreditCardTransaction to implement more specific functionality that was defined generically as a superclass — such as the spend functionality in the Transaction class. I also show back in Chapter 2 how you can use inheritance to add new functionality, new methods, and new instance variables to a subclass.
If you were to add ATM transactions (which require a transaction fee) to the mix, it would make sense to use inheritance to create a new subclass for an ATM transaction. If you did that it would also mean (thanks to the wonders of polymorphism, as described in Chapter 2 of this minibook) that the only changes you would have to make besides defining the new class would be to add a new method to Destination (in addition to the existing spend- Cash: and chargeCreditCard: methods): useATM: to create the new ATM transaction.
Frameworks provide a good model for how to create extensible and enhance-able applications. As you start to work with the UIKit and AppKit frameworks, you'll often use inheritance to extend the behavior of framework classes and to add your own unique application behavior. There are times, however, when inheritance is not an option due to technical or architectural reasons (which are beyond the scope of this book).
And yet, all is not lost. Objective-C allows you to accomplish virtually the same thing using delegation (which enables you to implement methods defined by other classes) and categories (which enable you to extend a behavior of a class without subclassing). In other words, rather than using inheritance and modifying the code in Destination (or creating a Destination subclass) to implement useATM:, you can accomplish the same thing by using delegation and categories.
I'm not necessarily suggesting you implement a new Transaction type this way. On the contrary, creating a new Transaction subclass is usually the best way to do that. But delegation and categories are used a lot in the frameworks. So, to make using the frameworks as transparent as possible, I explain delegation and categories in this chapter before you stumble across them on your own.
Delegation is a design pattern used extensively in the UIKit and AppKit frameworks to customize the behavior of an object without subclassing. (I talk a lot about patterns in Chapter 5 of Book I.) Instead of having to bother with subclassing, one object (a framework object) delegates the task of implementing one of its methods to another object. You can use delegation to create a class that implements the spend method of the Transaction (the delegator) class, for example, one that will behave in the same way as subclass.
To implement a delegated method, you put the code for your applicationspecific behavior in a separate (delegate) object. When a request is made of the delegator, the delegate's method that implements the applicationspecific behavior is invoked by the delegator.
The methods that a class delegates are defined in a protocol — similar to the spend: protocol you define in the Transaction class in Chapter 2 of this minibook.
The Objective-C language provides a way to formally declare a list of methods (including declared properties) as a protocol. When a framework object has been designed to use delegates to implement certain behaviors, the behaviors it requires (or gives you the option to implement) are defined in a protocol. Protocols declare methods that can be implemented by any class. They are useful for declaring methods that other delegate objects are expected to implement.
Objective-C lets you create informal protocols, which is a list of methods which a class can opt to implement (or not), and compiler-enforced formal protocols. With formal protocols, the compiler can check for types based on protocols, and objects can report whether they conform to a protocol. I start with formal protocols and cover informal ones later in this chapter.
You declare formal protocols with the @protocol directive. If you want to create a Transaction Delegate protocol that requires that all its delegates implement a spend message (like its subclasses), you would code the following:
@protocol TransactionDelegate
@required

- (void) spend: (Transaction *) aTransaction;

@optional

- (void) transaction: (Transaction *) transaction spend:
   (double) amount;

@end
Methods can be optional or required. If you don't mark a method as optional, it is assumed to be required. For example, the preceding code declares the TransactionDelegate protocol with a required method (spend:) and an optional method (transaction: spend:).
The more formal representation is
@protocolProtocolNamemethod declarations@end
Tip
The method transaction: (Transaction*) transaction spend: (double) amount may look a little weird. The method name is transaction:spend:, and in some of the framework protocols you can see examples of using a pointer to the delegating object as the first argument in the method.
As I describe in Chapter 3 of Book III, you can use Interface Builder to connect objects to their delegates; or you can set the connection programmatically through the delegating object's setDelegate: method or delegate property. In this chapter, I show you how to set the connection programmatically.
Generally, protocol declarations are in the file of the class that defines it. In this case, you would add the TransactionDelegate protocol declaration to the Transaction.h file.
Adopting a protocol is similar in some ways to declaring a superclass. In both cases, you're adding methods to your class. When you use a superclass, you're adding inherited methods; when you use a protocol, you're adding methods declared in the protocol list. A class adopts a formal protocol by listing the protocol within angle brackets after the superclass name.
@interfaceClassName : ItsSuperclass<protocol list>
A class can adopt more than one protocol, and if so, names in the protocol list are separated by commas.
@interface Translator : NSObject < English, Italian >
Just as with any other class, you can add instance variables, properties, and even nonprotocol methods to a class that adopts a protocol.
In this case, you're creating a new class, ATMTransactionDelegate that will adopt the TransactionDelegate protocol. To get this done, fire up Xcode and follow these steps:
Select the Classes folder in the Groups & Files list and then choose File

Selecting the Classes folder first tells Xcode to place the new file in the Classes folder.
In the leftmost column of the dialog, first select Cocoa under Mac OS X; then select the Objective-C class template in the top-right pane. Make sure
NSObjectis selected in the Subclass of the drop-down menu.You see a new screen asking for some more information.
Enter ATMTransactionDelegate.m in the File Name field and make sure the check box to have Xcode create ATMTransactionDelegate.h is selected; then click Finish.
This is the new class that will process all ATM transactions.
Add the code in bold to the
ATMTransactionDelegate.hfile.#import <Cocoa/Cocoa.h>
#import "Transaction.h"@interface ATMTransactionDelegate : NSObject<TransactionDelegate>{ } @endYou add this code because you need to import the header file where the protocol is declared because the methods declared in the protocol you adopted are not declared anywhere else. In this case, you're declaring the protocol in the
Transaction.hfile.Add the
spend:anddeallocmethods to theATMTransactionDelegate.mfile.#import "ATMTransactionDelegate.h"
#import "Budget.h"@implementation ATMTransactionDelegate- (void) spend: (Transaction *) aTransaction {[aTransaction.budget spendDollars:aTransaction.amount + 2.00];}- (void) dealloc {[super dealloc];}@endWhen you adopt a protocol, you must implement all the required methods the protocol declares; otherwise, the compiler issues a warning. As you can see, the
ATMTransactionDelegateclass does define all the required methods declared in theTransactionDelegateprotocol. (Remember, you can add instance variables, properties, and even nonprotocol methods to a class that adopts a protocol, although yourATMTransactionDelegateis a class that simply implements the required protocol methods.)As you can see, this new transaction is at heart a dollar transaction that adds the $2.00 "convenience" fee charged by the ATM. (How convenient.)
Note
Even though
ATMTransactionDelegateimplements a protocol that is used by theTransactionobject, it doesn't automatically have access to the instance variables of theTransactionobject. This means that you will have to makeamountandbudget Transactionclass properties and pass them with a pointer to theTransactionobject soATMTransactionDelegatecan access those instance variables.
So far, you've defined a protocol based on the Transaction class that requires Transaction class delegates to implement the spend: method. It now becomes the responsibility of the delegator, Transaction, to invoke the spend: method in its delegate. Here's how you do that in Transaction.
Add the code in bold to the
Transaction.hfile.#import <Cocoa/Cocoa.h> @class Budget; @interface Transaction : NSObject { Budget *budget; double amount; NSString* name;id delegate;} - (id) initWithAmount: (double) theAmount forBudget: (Budget*) aBudget; - (void) spend;@property (nonatomic, retain) Budget *budget;@property (nonatomic, retain) id delegate;@property (readwrite) double amount;@end@protocol TransactionDelegate@required- (void) spend: (Transaction *) aTransaction;@optional- (void) transaction: (Transaction*) transaction spend:(double) amount;@endYou added the
delegateinstance variable, which is the object that implements the behavior you specified in the protocol. An instance variable for an object that implements the behavior is generally declared to be a generic object (id) because the point here is that you won't necessarily know what class is implementing the delegate behavior (although you do here). You also added three properties: one to be able to set the delegate, and two others to allow the delegate access to theamountandbudgetinstance variable. You also declared theTransactionDelegateprotocol.Add the code in bold to the
Transaction.mfile.#import "Transaction.h" #import "Budget.h" @implementation Transaction
@synthesize budget, delegate , amount;- (void) spend {if ([delegate respondsToSelector:@selector(spend:)])[delegate spend:self];} - (id) initWithAmount: (double) theAmount forBudget: (Budget*) aBudget { if (self = [super init]) { self. budget = aBudget; amount = theAmount; } return self; } - (void) dealloc { [budget release]; [super dealloc]; } @end
You added the @synthesize statement for delegate, amount, and budget to have the compiler generate the getters and setters (accessor methods) for you. When you need to have an instance variable accessible by other objects, you need to have the compiler create the getters and setter accessor methods, as I describe in Chapter 1 of this minibook).
Thus far, Destination has never created a Transaction object, and its spend: method has never been invoked. Using delegation, however, requires creating Transaction objects that invoke the delegate's spend: method in a Transaction object's spend: method.
Because this is a formal protocol, you can assume that since spend: is @required, the delegate object will have implemented it. If this were an informal protocol (which I show later in this chapter), you would need to determine whether spend is implemented. You can determine that by sending the delegate the following message, for example:
if ([delegate respondsToSelector:
                     @selector(spend:)])
respondsToSelector: is an NSObject method that tells you whether a method has been implemented. If the method has been implemented, you then send it the spend: message.
To complete the implementation of the ATM transaction you've been working on in this chapter, you need to add a method to the Destination class to process an ATM transaction just as it does cash and credit cards (as I show in Chapter 2 of this minibook). The preferred approach is to add the new method to the Destination class or add a new method to a subclass — in fact, you'd have to add a subclass if you did have the source code, as is the case with a framework — but instead of going with the preferred approach, I want to show another Objective-C feature.
One of the features of the dynamic runtime dispatch mechanism employed by Objective-C is that you can add methods to existing classes without subclassing. Objective-C calls such new methods created in this fashion categories. A category allows you to add methods to an existing class — even to one to which you don't have the source code. This is a powerful feature that allows you to extend the functionality of existing classes.
How would you use categories to add the useATM: method to your Destination class? You would start by creating a new category — ATM.
@interface Destination (ATM)
This line looks a lot like a class interface declaration — except the category name is listed within parentheses after the class name, and there is no superclass (or colon for that matter). Unlike protocols, categories do have access to all the instance variables and methods of a class. And I do mean all, even ones declared @private, but you'll need to import the interface file for the class it extends. You can also add as many categories as you want.
You can add methods to a class by declaring them in an interface file under a category name and defining them in an implementation file under the same name. What you can't do is add more instance variables.
The methods the category adds become honestly and truly part of the class type; they aren't treated as "step methods." The methods you add to Destination using the ATM category become part of the Destination class and are inherited by all the class's subclasses, just like other methods. The category methods can do anything that methods defined in the class proper can do. At runtime, there's no difference.
So, to add this new method, useATM:, to Destination, you create a category, as follows:
Select the Classes folder in the Groups & Files list and then choose File
Selecting the Classes folder first tells Xcode to place the new file in the Classes folder.
In the leftmost column of the dialog, first select Cocoa under Mac OS X; then select the Objective-C class template in the top-right pane. Make sure
NSObjectis selected in the Subclass of the drop-down menu.You see a new screen asking for some more information.
Enter
DestinationCategory.min the File Name field and make sure the check box to have Xcode createDestinationCategory.h.is selected; then click Finish.Be sure to change the
appDataPathand balanceDataPath in main inVacation.m(refer to Chapter 4 of this book forVacation.m) to whatever your folder name is for this project.I use the name Example 16, but use your own project name here.
NSString* appDataPath = @"/Users/neal/Desktop/Example
   16/AppData.plist";
NSString* balancePath = @"/Users/neal/Desktop/Example
   16/BalanceData.txt";
Put this code in the
DestinationCategory.hfile.#import <Cocoa/Cocoa.h> #import "Destination.h" @interface Destination (ATM) -(void) useATM: (double)amount; @end
Put this code in the
DestinationCategory.mfile.#import "DestinationCategory.h" #import "Transaction.h" #import "ATMTransactionDelegate.h" @implementation Destination (ATM) -(void) useATM: (double)amount { ATMTransactionDelegate *aTransactionDelegate = [[ATMTransactionDelegate alloc] init]; Transaction *aTransaction = [[Transaction alloc] initWithAmount: amount forBudget: theBudget]; aTransaction.delegate = aTransactionDelegate; [transactions addObject:aTransaction]; [aTransaction spend]; [aTransaction release]; } @endThe new
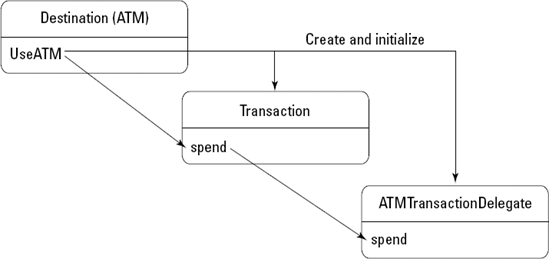
useATM:method is almost the same as the previousDestinationmethods; you even added the transaction to thetransactionsarray. The differences here are that you're creating both aTransactionobject and a delegate that will implement thespend:message and updating the transaction object with its delegate in theuseATM: method.Figure 5-1 shows the relationship between the
DestinationCategory'suseATM:method, theTransaction'sspend:method, and theATMTransactionDelegate'sspend:method.Somewhere in the group of
#importsinmaininVacation.m,add#import "DestinationCategory.h"
Scroll down and, after the
whileloop inmaininVacation.m,add the following line of code — this will be your only ATM transaction.NSLog (@"Sending a $50.00 ATM transaction"); [europe useATM: 50]; NSLog(@"Remaining budget $%.2f", [europe leftToSpend]);Delete the previous
balanceData.txtfile — which makes it easier to see that your updated application works correctly.Select the Build and Run button in the Project Window toolbar to build and run the application.
You now see the new ATM transaction among the other transactions.
You can use categories the following ways:
To extend classes defined by other implementers (instead of subclassing — this is what you just did for
Destination).To declare informal protocols, described next.
In addition to formal protocols, you can also define an informal protocol by grouping the methods in a category declaration:
@interface Transaction (TransactionDelegate)

- (void) spend;

@end
In this case, you have only one method — spend — but if you need more methods for the informal protocol, you can declare them in the same way as spend in a list before the @end.
In fact, if you added the preceding code to the Transaction.h file and changed the ATMTransactionDelegate.h as follows:
@interface ATMTransactionDelegate : NSObject/*
   <TransactionDelegate> */
your program would work the same way.
Being informal, protocols declared in categories are not type-checked by the compiler, nor are they checked at runtime to see whether an object conforms to the protocol.
An informal protocol may be useful when all the methods are optional, such as for a delegate, but it's typically better to use a formal protocol that offers optional methods (if you need to provide optional methods). That way you get the benefit of the compiler's check on your code and the runtime system's check to make sure objects conform to the protocol.
Now that you understand the basics of getting other objects to do your work, you also understand the most popular and effective programming style for developing an iPhone app. As you'll see in the next minibook, frameworks help you create extensible and enhance-able applications — you'll be using inheritance to extend the behavior of framework classes and to add your own unique application behavior, delegation to implement methods defined by other classes, and categories to extend a behavior of a class without subclassing.