
One reason why it's easy to extend and enhance your iPhone app is the fact that the template sets you up to take advantage of delegation — you're using a behavior-rich object supplied by the framework as is, and you're putting the code for program-specific behavior in a separate (delegate) object. You're basically using delegation to get the framework objects to do the work for you.
Government and military leaders know all about delegation. Ronald Reagan could have been talking about extending the functionality of apps object-oriented programming when he said "Surround yourself with the best people you can find, delegate authority, and don't interfere." And General George S. Patton seemed to know all about combining delegation with encapsulation to enhance applications when he said, "Never tell people how to do things. Tell them what to do and they will surprise you with their ingenuity."
When you combine delegation, encapsulation, and inheritance, changing or enhancing objects or their functionality becomes much easier because it reduces the impact of those changes on the rest of your application. As I point out in Chapter 1 of Book II, inheritance allows you to do a number of things that make your programs more extensible — in a subclass, you can add new methods and instance variables to what is inherited from a superclass, refine or extend the behavior of an inherited method, and change the behavior of an inherited method. With encapsulation, you're hiding how things are being done from what is being done. Combining inheritance and encapsulation gives you polymorphism — using objects that do the same thing in different ways. (See Chapter 2 of Book II for background info on these programming patterns.)
In this chapter, you enhance your app to show photos or images from the Photo library on the user's iPhone. You use instances of the same object (the Main view controller) along with inherited methods of a superclass to implement a second view (a flowing image) next to the first view (flowing words) so that the user can horizontally scroll between them. Because you've encapsulated the details of how to set the falling words and falling image, how to save preferences, and how to show info from the main screen to select new preferences, it's a piece of cake to add the ability to select and display photos.
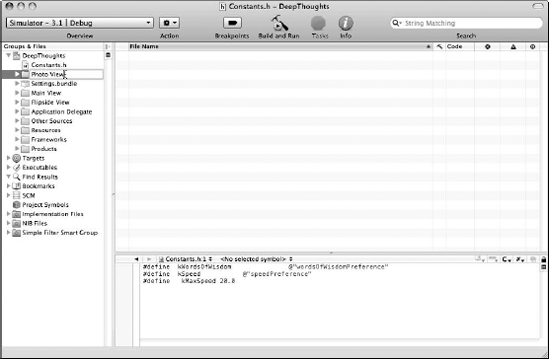
To use instances of the same controller to control other views, you need to first define the number of views, or "pages," as a key in the Constants.h file. Add the following to Constants.h (refer to Chapter 4 of this minibook for details on editing Constants.h):
#define kNumberOfPages 2
The game plan is to initialize two instances of MainViewController (mainViewController1 and mainViewController2), and to set up the ability to scroll horizontally — swipe to the left or right — in order to switch views.
In Chapter 1 of this minibook, I show how the Utility Application template provides the code you need for loading the parts of the MainWindow.xib to create both DeepThoughtsAppDelegate and the window and for sending DeepThoughtsAppDelegate the applicationDidFinishLaunching: message. The applicationDidFinishLaunching: method in DeepThoughtsAppDelegate initializes MainView.
The applicationDidFinishLaunching: message is sent at the very beginning, before the user can even see anything on the screen. Here's where you'd insert your code to initialize two instances of MainViewController: the declarations go in the DeepThoughtsAppDelegate.h header file, as shown in Listing 5-1, and the implementation goes in the DeepThoughtsAppDelegate.m file, as shown in Listing 5-2. I've commented-out the old code (which begins with //) and added the new code (shown in bold) in both listings.
Example 5-1. DeepThoughtsAppDelegate.h
@class MainViewController;

@interface DeepThoughtsAppDelegate : NSObject
   <UIApplicationDelegate, UIScrollViewDelegate > {
UIWindow *window;//MainViewController *mainViewController;MainViewController *mainViewController1;MainViewController *mainViewController2;IBOutlet UIScrollView *scrollView;} @property (nonatomic, retain) IBOutlet UIWindow *window;//@property (nonatomic, retain) MainViewController *mainViewController;@property (nonatomic, retain) MainViewController*mainViewController1;@property (nonatomic, retain) MainViewController*mainViewController2;@property (nonatomic, retain) UIScrollView *scrollView;@end
Example 5-2. DeepThoughtsAppDelegate.m
#import "DeepThoughtsAppDelegate.h" #import "MainViewController.h"#import "PhotoViewController.h"#import "Constants.h"@implementation DeepThoughtsAppDelegate @synthesize window; //@synthesize mainViewController;@synthesize mainViewController1;@synthesize mainViewController2;@synthesize scrollView;- (void)applicationDidFinishLaunching:(UIApplication *) application {//MainViewController *aController = [[MainViewController alloc] initWithNibName:@"MainView" bundle:nil];//self.mainViewController = aController;//[aController release];//mainViewController.view.frame = [UIScreen mainScreen]. applicationFrame;//[window addSubview:[mainViewController view]];scrollView.pagingEnabled = YES;scrollView.contentSize = CGSizeMake(scrollView.frame.size.width * kNumberOfPages, scrollView.frame.size.height);scrollView.showsHorizontalScrollIndicator = NO;scrollView.showsVerticalScrollIndicator = NO;scrollView.scrollsToTop = NO;scrollView.delegate = self;
MainViewController *aController = [[MainViewControlleralloc] initWithNibName:@"MainView" bundle:nil];MainViewController *bController = [[PhotoViewControlleralloc] initWithNibName:@"PhotoView" bundle:nil];self.mainViewController1 = aController;self.mainViewController2 = bController;[aController release];[bController release];//mainViewController1.view.frame = [UIScreen mainScreen] applicationFrame ;CGRect frame1 = scrollView.frame;frame1.origin.x = frame1.size.width * 0;frame1.origin.y = 0;mainViewController1.view.frame = frame1;CGRect frame2 = scrollView.frame;frame2.origin.x = frame2.size.width * 1;frame2.origin.y = 0;mainViewController2.view.frame = frame2;[scrollView addSubview:[mainViewController1 view]];[scrollView addSubview:[mainViewController2 view]];[window makeKeyAndVisible]; } - (void)dealloc {//[mainViewController release];[mainViewController1 release];[mainViewController2 release];[window release]; [super dealloc]; } @end
In Listing 5-1, you modify the template declarations in DeepThoughtsAppDelegate.h so you can add the UIScrollViewDelegate protocol as well as declare mainViewController1 and mainViewController2, while commenting out the declaration of mainViewController. You also add an IBOutlet so that Interface Builder can discover UIScrollView, then go on to add property declarations for mainViewController1, mainViewController2, and scrollView.
In Listing 5-2, you modify the template implementation code in DeepThoughtsAppDelegate.m to import the Constants.h file and the new PhotoViewController.h file to control the second view (the Photo view), which you create later in this chapter. You then synthesize mainViewController1, mainViewController2, and scrollView so that the compiler can synthesize these accessor methods according to the way you told it to in the property declaration. (See Chapter 1 of Book II for background info about accessor methods.) Further down in the code, you initialize with aController the MainView to be controlled by mainViewController1, and with bController the PhotoView to be controlled by mainViewController2 (as instances of MainViewController). Finally, you implement the two views with horizontal scrolling.
The UIScrollView class adds scrolling without you having to do any work, and in this case you use it for horizontal scrolling. The methods declared by the UIScrollViewDelegate protocol allow the adopting delegate to respond to messages from the UIScrollView class. The UIScrollView class provides support for displaying content that's larger than the size of the app's window — users can swipe to scroll within that content and zoom in and out from portions of the content by pinching and un-pinching.
A UIScrollView object (a Scroll view) is a view with an origin point that is adjustable over the Content view — it clips the content to its frame, which usually coincides with that of the app's main window. The Scroll view tracks the movements of fingers and adjusts the origin accordingly. The view that is showing its content "through" the Scroll view draws that portion of itself based on the new origin, which is pinned to an offset in the Content view. The Scroll view itself does no drawing — unless you include the displaying of vertical and horizontal Scroll indicators.
The Scroll view must know the size of the Content view so it knows when to stop scrolling; by default, it bounces back when scrolling exceeds the bounds of the content. Your code sets the pagingEnabled property for scrollView to YES so that paging is enabled — the Scroll view stops on multiples of the view bounds (pages) when the user scrolls. (The default value is NO.) You set the contentSize property (the size of the Content view) by using the scrolling frame size and kNumberOfPages (which is a constant now set to 2). The code then shuts off the horizontal and vertical scroll indicators and scrolling to the top. Finally, you add CGRect (rectangle) structures to draw the Scroll view frames for the two views, and you add each view as a subview of the Scroll view.
In Chapter 1 of this minibook, I spend some time nagging you about memory management. Back in Listing 5-2 — right there, at the bottom — you add mainViewController1 and mainViewController2 to the dealloc method supplied by the template. Here's why: You created those objects by sending a retain message in the @property declarations. (See Listing 5-1.) Now you have to release them. You're responsible for telling the memory-management system you're done with them.
Tip
Don't forget to save your Xcode project before going any further! Choose File
Now comes the easy part: creating the Photo view that will display a flowing image in the same way that the Main view displays flowing words. You need not just a version of the MainViewController code, but also the Light Info button, which you may have encountered in Chapter 2 of this minibook.
Start by creating a new group for your project in the Groups & Files list in Xcode. Click DeepThoughts at the top of the pane so that the new group you create is placed outside any other group in the pane, and choose Project
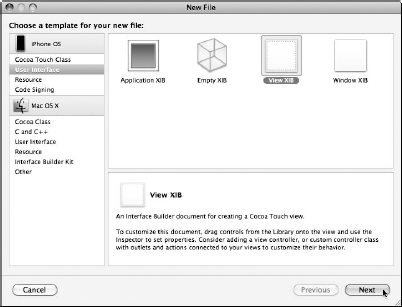
Next, create a new UIView subclass in your new group. Select the Photo View group and then choose File
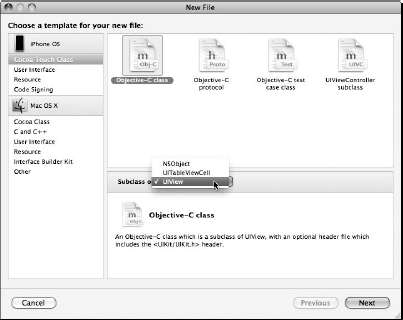
In the next New File screen, enter the filename for the implementation file (PhotoView.m), as shown in Figure 5-3. Be sure to also select the Also Create PhotoView.h option. (The filename in the option depends on the name you provide for the .m file.) Finally, click Finish.

Xcode creates PhotoView.h and PhotoView.m and stashes them in the Photo View group (since that is the group you selected at first). You modify these files later in this chapter.
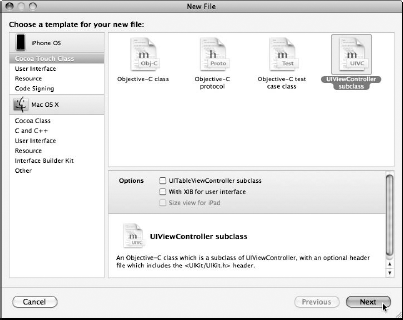
The Photo view, just like the Main view, will be accessed by a subclass of UIViewController. Select the Photo View group (if it's not already selected) and then choose File
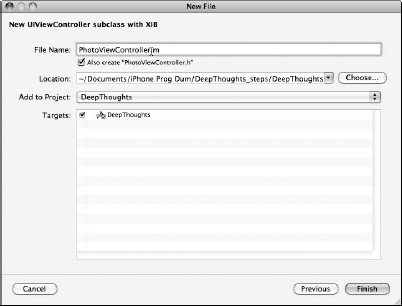
In the next New File screen, enter the filename for the implementation file (PhotoViewController.m), as shown in Figure 5-5. Be sure to also select the Also Create "PhotoViewController.h" option. Finally, click Finish.
Xcode creates PhotoViewController.h and PhotoViewController.m in the Photo View group.
A nib file, as you may recall from Chapter 1 of this minibook, is a resource file that contains the specifications for one or more objects. The main nib file usually contains a window object of some kind, the application delegate object, and any other key objects. When the file is loaded, the objects are reconstituted (think "instant application") in memory. The single window you see displayed on the iPhone is an instance of the UIWindow class. This window is created at launch time automatically by UIKit, which loads it from the nib file. You can add views and controls to the window. The UIView class defines the basic properties of a view, and you can use it as is by simply adding some controls.
First, create a nib file for the view, being sure to specify that it be included in the Resources group in your Xcode project. Select the Resources group, and then choose File
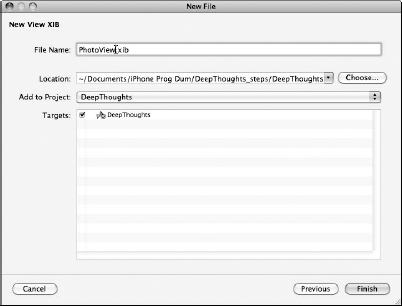
In the next New File screen, enter the filename for the nib file (PhotoView.xib), as shown in Figure 5-7, and then click Finish.
Xcode creates PhotoView.xib in the Resources group in your project. Double-click PhotoView.xib to open it in Interface Builder.
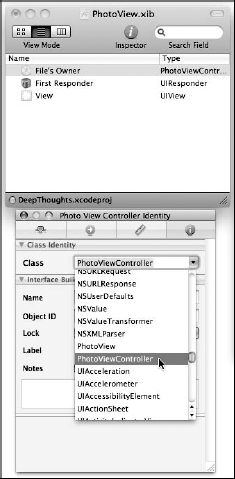
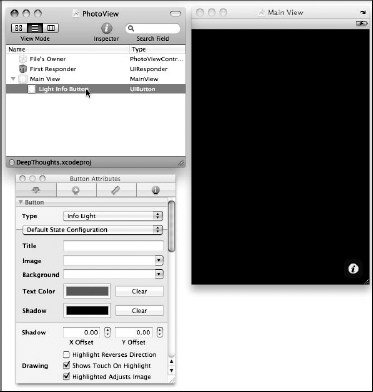
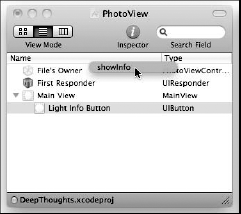
To control the Photo view from the PhotoViewController subclass of UIViewController, select File's Owner in the PhotoView.xib window, click the Identity tab in the Inspector window (or choose Tools
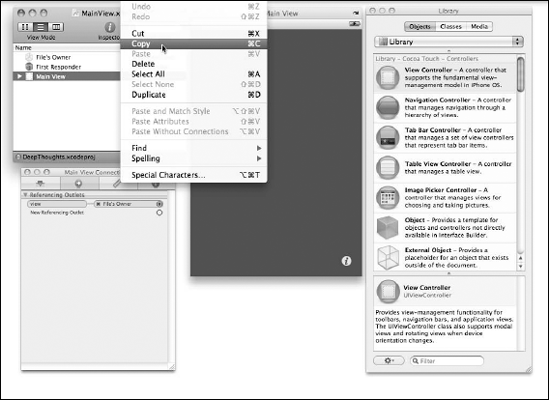
Now you need some of the objects from the main view — the MainView object and its Light Info Button. It just so happens that you can simply copy them from one nib file to the other. Double-click MainView.xib in the Resources group to open it in Interface Builder, select Main View in the MainView.xib window, as shown in Figure 5-9, and then choose Edit
Quit Interface Builder and then double-click PhotoView.xib in the Resources group to open it in Interface Builder. Select View in the PhotoView.xib window, choose Edit
Now all you need to do is connect the view and Info button to the appropriate methods.
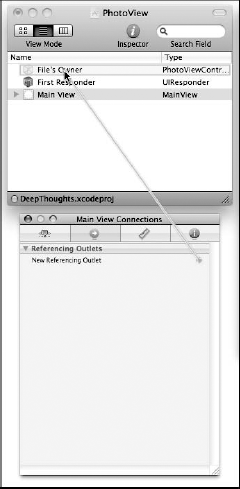
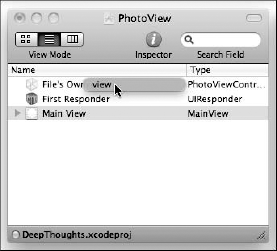
To connect the view, select Main View in the PhotoView.xib window, click the Connections tab in the Inspector window (or choose Tools
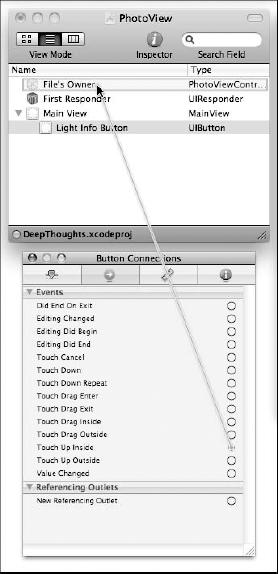
To connect the Info button to the appropriate method, click the triangle next to Main View in the PhotoView.xib window to open it, select Light Info Button underneath Main View, click the Connections tab in the Inspector window (or choose Tools
Remember, you are (in a sense) combining two views into one for the purpose of horizontal scrolling — controlling the falling words (Main) view and the falling images (Photo) view through instances of MainViewController. What you need to do now is add a scrolling view (UIScrollView) to the window and connect that to the DeepThoughts application delegate and its scrollView method.
Double-click MainWindow.xib in the Resources group in your project to open it in Interface Builder. You can then click Window in the MainWindow.xib window of Interface Builder, so that you can add a Scroll View object to it, as shown in Figure 5-15. If the Library window is not already open, choose Tools
Drag the UIScrollView, as shown in Figure 5-15, to the window. Horizontal and vertical guides appear to help you place it where you want, but for this app's purposes, you want it to fill the entire black portion of the window. As you drag, the UIScrollView snaps into position to cover the black portion of the window (unless you drag a side of it to resize it). Interface Builder creates the Scroll View object underneath the Window object in the MainWindow.xib window.
To connect the Scroll view to the appropriate method, first click the triangle next to Window in the MainWindow.xib window to open it and reveal Scroll View underneath Window. Select Deep Thoughts App Delegate, click the Connections tab in the Inspector window (or choose Tools
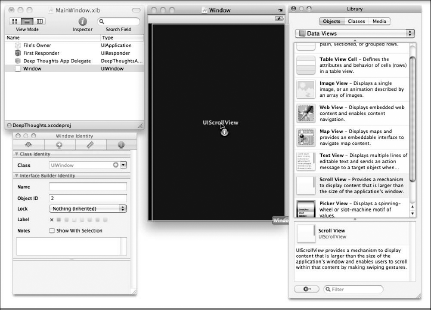
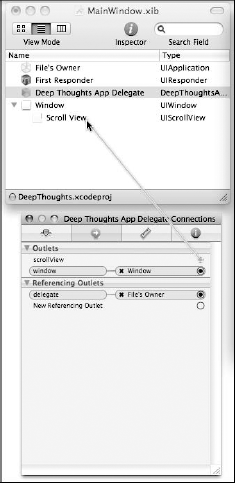
Figure 5-16. Connect the scrollView method in the Deep Thoughts App Delegate to Scroll View in Main Window. xib.
You have now successfully implemented the Photo view and modified the window for horizontal scrolling between the Main and Photo views.
In Chapter 3 of this minibook, you created the animated view for the falling words (the Main view) in MainViewController.h and MainViewController.m. You can now reuse most of that code to animate the Photo view.
As you enter the PhotoViewController code in Listing 5-3 and Listing 5-4 (the code to add is in bold), compare it with the MainViewController code in Chapter 4 of this minibook. (The full MainViewController code is in Chapter 3, with changes made in Chapter 4 to include user preferences.) Much of it is identical; the difference is that you are animating fallingImage without having to convert a string of words first.
Example 5-3. PhotoViewController.h
@interface PhotoViewController : UIViewController  {
  UIImage                *fallingImage;
}

 - (IBAction)showInfo;
@end
Example 5-4. PhotoViewController.m
#import "PhotoViewController.h"#import "PhotoView.h"@implementation PhotoViewController // The designated initializer... un-comment to use:- (id)initWithNibName:(NSString *)nibNameOrNilbundle:(NSBundle *)nibBundleOrNil {if (self = [super initWithNibName:nibNameOrNilbundle:nibBundleOrNil]) {// Custom initialization}return self;}- (void)viewDidLoad {
[super viewDidLoad];self.view.backgroundColor = [UIColor colorWithRed:.9green:.3 blue:.9 alpha:1];fallingImage = [UIImage imageNamed:@"fallingImage.png"];[NSTimer scheduledTimerWithTimeInterval:.2 target:selfselector:@selector(onTimer) userInfo:nil repeats:YES];}- (void)onTimer{UIImageView *fallingImageView = [[UIImageView alloc]initWithImage:fallingImage];int startX = round(random() % 420);int endX = round(random() % 420);//speed of fallingdouble speed = (1/round(random() % 100) +1) *10;// size of the imagedouble scale = (1/round(random() % 100) +1)* 100;[self.view addSubview:fallingImageView];fallingImageView.frame = CGRectMake(startX, −100, scale,scale);fallingImageView.alpha = .75;[UIView beginAnimations:nil context:fallingImageView];[UIView setAnimationDuration:speed];[UIView setAnimationDelegate:self];[UIView setAnimationDidStopSelector:@selector(animationDone:finished:context:)];fallingImageView.frame = CGRectMake(endX, 500, scale,scale);[UIView commitAnimations];}-(void)animationDone:(NSString *)animationIDfinished:(NSNumber *)finished context:(id)context {UIImageView *fallingImageView = context;[fallingImageView removeFromSuperview];[fallingImageView release];}/* // Implement viewDidLoad to do additional setup after loading the view, typically from a nib. - (void)viewDidLoad { [super viewDidLoad]; } */ /* // Override to allow orientations other than the default portrait orientation. - (BOOL)shouldAutorotateToInterfaceOrientation:(UIInterfaceO rientation)interfaceOrientation {
// Return YES for supported orientations
   return (interfaceOrientation ==
     UIInterfaceOrientationPortrait);
 }
 */
- (IBAction)showInfo {
}

- (void)didReceiveMemoryWarning {
// Releases the view if it doesn't have a superview.
  [super didReceiveMemoryWarning];
// Release any cached data, images, etc that aren't in use.
}
- (void)viewDidUnload {
   // Release any retained subviews of the main view.
   // e.g. self.myOutlet = nil;
}
- (void)dealloc {
  [super dealloc];
}

@endBesides changing the background color with the self.view.backgroundColor statement, and the time interval from .5 to .2, the PhotoViewController code (in Listing 5-4) differs from the MainViewController code (in Chapter 4 of this minibook) by assigning a default image to fallingImage rather than converting words to the falling image:
fallingImage = [UIImage imageNamed:@"fallingImage.png"];
You can copy any photo or graphic image file, convert it to the .png format using an image editing program, rename it to fallingImage.png and then add the file.
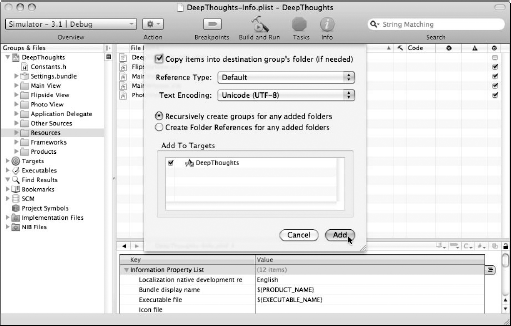
To add the file to your project in Xcode, select the Resources group in the Groups & Files list to add the file to, and choose Project
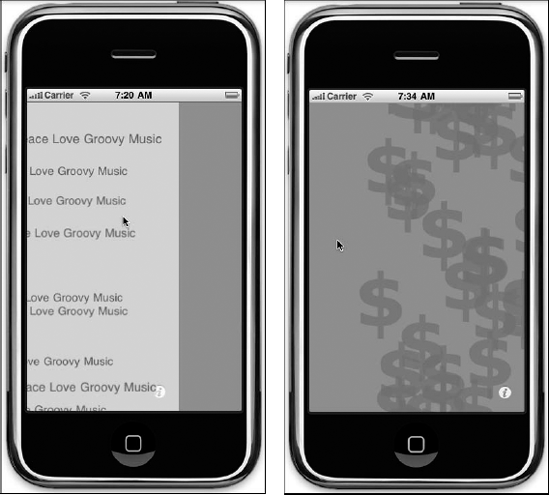
If you build and run your project now, you can drag the Main view horizontally to simulate the swipe gesture and see the Photo view with the flowing default image, as shown in Figure 5-18. (The default image is a dollar sign.)
At this point, the Photo view's Info button, which connects to the showInfo method, leads to a blank screen (unlike the Main view's Info button, which leads to the Flipside view). To enable the user to pick a photo from the iPhone photo library (accessible from the Photos app), you can create an object of the UIImagePickerController class.
The UIImagePickerController class manages the system-supplied interfaces for choosing pictures (iPhone and iPod touch), taking pictures (iPhone), and capturing movies (iPhone 3GS). By default, the UIImagePickerController class handles all user interactions — all you have to do is tell it which user interface to display, present it, and then dismiss it from your associated delegate object when the user picks an image or movie or cancels the operation.
Note
Because you're using this class to access saved or synced photos, which all iPhone and iPod touch models support, you don't need to verify that the device is capable of picking this content. However, if you're using this class to capture photos or videos, you need to verify that the device is capable of picking the content you want by calling the isSourceTypeAvailable: class method before presenting the interface. Also check which media types are available for the source type by calling the availableMediaTypesForSourceType: class method. This latter method allows you to distinguish between a camera that can be used for video recording and one that can be used only for still pictures.
To use this class, you provide a delegate that conforms to the UIImagePickerControllerDelegate protocol and the UINavigationControllerDelegate protocol by putting the code in Listing 5-5 (in bold) in the PhotoViewController.h file.
Note
The UIImagePickerControllerDelegate protocol defines methods that your delegate object must implement to interact with the image picker interface. The methods of this protocol notify your delegate when the user either picks an image or movie, or cancels the picker operation. The UINavigationControllerDelegate protocol defines methods a navigation controller delegate can implement to manage the currently displayed view using the navigation stack. For example, a navigation controller delegate implements the pushViewController:animated: method to push a new view controller object onto the stack, which causes the view of that view controller to be displayed and the navigation controls to be updated to reflect the change. You can also pop a view controller (remove it from the stack) using the popViewControllerAnimated: method.
Example 5-5. PhotoViewController.h
@interface PhotoViewController : UIViewController<UIImagePickerControllerDelegate,UINavigationControllerDelegate>{UIImagePickerController *imagePickerController;UIImageView *imageView;UIImage *fallingImage; } - (IBAction)showInfo; @end
After the interface starts, this class notifies your delegate of the user's actions. Your delegate is then responsible for dismissing the picker and returning to your application's views. Enter the code in Listing 5-6 (in bold) in the PhotoViewController.m file.
Example 5-6. PhotoViewController.m
#import "PhotoViewController.h"
#import "DeepThoughtsAppDelegate.h"

#import "PhotoView.h"

@implementation PhotoViewController

// The designated initializer... un-comment to use:
- (id)initWithNibName:(NSString *)nibNameOrNil
   bundle:(NSBundle *)nibBundleOrNil {
  if (self = [super initWithNibName:nibNameOrNil
   bundle:nibBundleOrNil]) {
    // Custom initialization
  }
  return self;
}

- (void)viewDidLoad {
  [super viewDidLoad];
  self.view.backgroundColor = [UIColor  colorWithRed:.9
   green:.3 blue:.9 alpha:1];
  fallingImage = [UIImage imageNamed:@"fallingImage.png"];
  [NSTimer scheduledTimerWithTimeInterval:.2 target:self
   selector:@selector(onTimer) userInfo:nil repeats:YES];
}
- (void)onTimer{
  UIImageView *fallingImageView = [[UIImageView alloc]
   initWithImage:fallingImage];
  int startX = round(random() % 420);
int endX = round(random() % 420);
//speed of falling
double speed = (1/round(random() % 100) +1) *10;
// size of the image
double scale = (1/round(random() % 100) +1)* 100;
[self.view addSubview:fallingImageView];
fallingImageView.frame = CGRectMake(startX, −100, scale,
scale);
fallingImageView.alpha = .75;
[UIView beginAnimations:nil context:fallingImageView];
[UIView setAnimationDuration:speed];
[UIView setAnimationDelegate:self];
[UIView setAnimationDidStopSelector:@selector(animationDone:
finished:context:)];
fallingImageView.frame = CGRectMake(endX, 500, scale,
scale);
[UIView commitAnimations];
}
-(void)animationDone:(NSString *)animationID
finished:(NSNumber *)finished context:(id)context {
UIImageView *fallingImageView = context;
[fallingImageView removeFromSuperview];
[fallingImageView release];
}
- (void)imagePickerController:(UIImagePickerController *)
   picker
        didFinishPickingImage:(UIImage *)image
                  editingInfo:(NSDictionary *)editingInfo
{
  // Dismiss the image selection, hide the picker and
  //show the image view with the picked image
  [picker dismissModalViewControllerAnimated:YES];
  fallingImage = image;
  [fallingImage retain];
}
// from PickImageAppDelegate.m
- (void)imagePickerControllerDidCancel:(UIImagePickerControl
   ler *)picker
{
  // Dismiss the image selection and close the program
  [picker dismissModalViewControllerAnimated:YES];
  //  exit(0);
}/*
// Implement viewDidLoad to do additional setup after
loading the view, typically from a nib.
- (void)viewDidLoad {
[super viewDidLoad];
}
*/
/*
// Override to allow orientations other than the default
portrait orientation.
- (BOOL)shouldAutorotateToInterfaceOrientation:(UIInterfaceO
rientation)interfaceOrientation {
// Return YES for supported orientations
return (interfaceOrientation ==
UIInterfaceOrientationPortrait);
}
*/
- (IBAction)showInfo {
imagePickerController = [[UIImagePickerController alloc]
init];
imagePickerController.delegate = self;
imagePickerController.sourceType =
   UIImagePickerControllerSourceTypePhotoLibrary;
imagePickerController.delegate = self;
// imagePickerController.view.frame = self.view.frame;
// imageView = [[UIImageView alloc] initWithFrame:[window
bounds]];
imagePickerController.modalTransitionStyle =
   UIModalTransitionStyleCoverVertical;
DeepThoughtsAppDelegate* appDelegate = (
DeepThoughtsAppDelegate*)[[UIApplication
sharedApplication] delegate];
CGRect frame1 = appDelegate.scrollView.frame;
frame1.origin.x = frame1.size.width * 0;
frame1.origin.y = 0;
[ self presentModalViewController:imagePickerController
animated:YES];
// [appDelegate.scrollView scrollRectToVisible:frame1
animated:YES];
[imagePickerController release];
}
- (void)didReceiveMemoryWarning {
// Releases the view if it doesn't have a superview.
[super didReceiveMemoryWarning];
// Release any cached data, images, etc that aren't in use.
}- (void)viewDidUnload {
// Release any retained subviews of the main view.
// e.g. self.myOutlet = nil;
}
- (void)dealloc {
[super dealloc];
}
@endThe following code from Listing 5-6 tells the delegate that the user picked an image. It then dismisses the image selection, hides the image picker, and shows the photo view with the picked image:
- (void)imagePickerController:(UIImagePickerController *)
picker
didFinishPickingImage:(UIImage *)image
editingInfo:(NSDictionary *)editingInfo
{
// Dismiss the image selection, hide the picker and
//show the image view with the picked image
[picker dismissModalViewControllerAnimated:YES];
fallingImage = image;
[fallingImage retain];
}The image used with this instance method is the image that the user picked. (editingInfo is a dictionary containing any relevant editing information, but if editing is disabled, as it is in this app, this parameter is nil.)
The imagePickerControllerDidCancel: instance method tells the delegate that the user cancelled the pick operation. Your code then dismisses the image selection:
- (void)imagePickerControllerDidCancel:(UIImagePickerControl
ler *)picker
{
// Dismiss the image selection and close the program
[picker dismissModalViewControllerAnimated:YES];
// exit(0);
}The new code in Listing 5-6 between the angle brackets for the (IBAction)showInfo method uses the image picker interface for the view accessed by the Info button. The following statement sets the type of picker interface displayed by the controller to the Photo library:
imagePickerController.sourceType = UIImagePickerControllerSourceTypePhotoLibrary;
The next statement (after the commented-out code available for experimentation) sets the transition style to use when presenting the current view controller (it's set to the default, which is vertical):
imagePickerController.modalTransitionStyle = UIModalTransitionStyleCoverVertical;
At the end of the (IBAction)showInfo method, the code presents a modal view managed by the view controller and then releases imagePickerController:
[ self presentModalViewController:imagePickerController
  animated:YES];
[imagePickerController release];
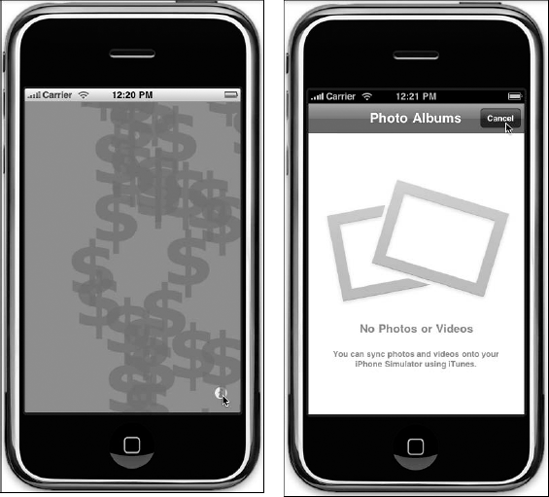
That's it. If you build and run your project now, you can drag the Main view horizontally to see the Photo view with the flowing default image (the dollar sign), as shown in Figure 5-19 (left side). Click the Info button, and the image picker interface appears (right side). (You won't be able to actually browse for images from within the Simulator, but at least you get a chance to see how the process would work with a real device.)
With an app nearly ready for release, you shouldn't procrastinate about the selection and installation of a graphic image as the app's icon.
An application icon is simply a 57-x-57-pixel .png graphics file. Add the file in the same way you added the default image in the "Adding a default image" section, earlier in this chapter. Select the Resources group in the Groups & Files list and then choose Project
After you add the icon's graphics file, you also need to specify that this file is what you want used as the application's icon. You do that using one of those other mysterious files you see in the Resources folder. Here's how:
In the Resources folder, click the
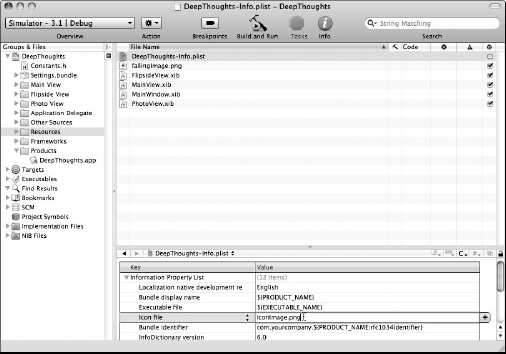
DeepThoughts-Info.plistfile, as shown in Figure 5-20.The contents of the
info.plistfile are displayed in the Editor pane. You're treated to some information about the application, including an item in the Key column labeled Icon file.Double-click in the empty space in the Value column next to Icon file.
Type in the name of your
.pnggraphics file and then build the project as you normally would.You know, clicking the Build and Run button in the Project Window toolbar, choosing Build

Click the Home button in the iPhone Simulator after building and running the project, and you should be able to see your application icon.
So it looks like you have all the pieces in place for the DeepThoughts application. The user can now enter any phrase for the flowing words and any photo in the iPhone photo library for the flowing images. The user can switch back and forth by swiping the view.
Appearances can be deceiving, though.
Reality check: Some how-to books on software development should really be housed in the Fiction section of your local bookstore because all their examples work flawlessly. In the real world, everything does not always go as planned; occasionally your software program blows up on you. That's why an essential part of software development is the debugging phase — teasing as many flaws out of your app as possible so you can squash 'em. Book IV shows you how to work through the debugging phase of your project and introduces you to the SDK's very own debugging tool, something that's sure to make your software-development life a lot easier.