
Checking out the versatile table view
Making the table look good
Ensuring that your application is usable worldwide
Making sure something happens after a user makes a selection
Views are the user's window into your application; they present the user experience on a silver platter, as it were. Their associated view controllers manage the user experience by providing the data displayed in the view, as well as by enabling user interaction.
In this chapter, you get a closer look at the RoadTrip Main view — the view you see when you launch the application — as well as the view controller that enables it. As part of your tour of the Main view, I show you how to use one of the most powerful features of the framework: table views. In the chapters that follow, I show you how to create the views that you set up to deliver the content of your application — how to add a hotel or campground, display places to visit, get directions from San Francisco to Big Sur, or even check on the weather in both places to see whether you really want to go.
In this and the following minibooks books, I get a chance to dive into how you would actually implement the application. I cover topics like the user interface, mapping, core location, e-mail, core data, and everything in between. But the best place to start — in my humble opinion — is right here with table views, which is why I'm giving the subject its own chapter right up front.
Table views are front and center in several applications that come with the iPhone out of the box; they play a major role in many of the more complex applications you can download from the App Store. (Obvious examples: Almost all the views in the Mail, iPod, and Contacts applications are table views.) Table views take on such a significant role because, in addition to displaying data, they can also serve as a way to navigate a hierarchy.
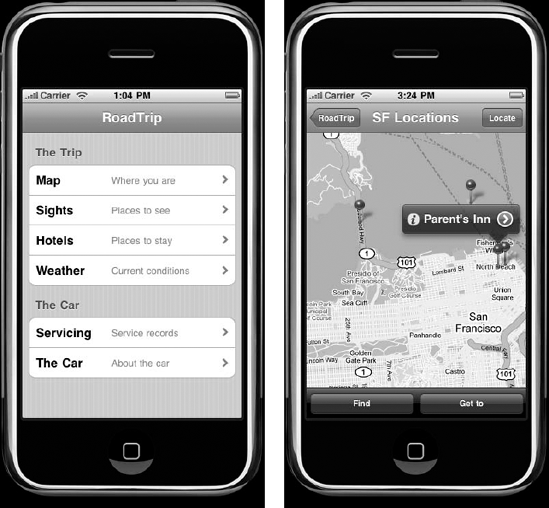
If you take a look at an application such as Mail or iPod, you find that table views present a scrollable list of items (or rows or entries — I use all three terms interchangeably) that may be divided into sections. A row can display text or images. So, when you select a row, you may be presented with another table view or with some other view that may display a Web page or even some controls such as buttons and text fields. You can see an illustration of this diversity in Figure 2-1. Selecting Map on the left leads to a Content view displaying a map of San Francisco, which is very handy when you roll into town.
Note
A table view is an instance of the class UITableView, whereas each visible row of the table uses a UITableViewCell to draw its contents. Think of a table view as the object that creates and manages the table structure, and the table view cell as being responsible for displaying the content of a single row of the table.
Although powerful, table views are surprisingly easy to work with. To create a table, you need only to do four — count 'em, four — things, in the following order:
Create and format the view itself.
This includes specifying the table style and a few other parameters, most of which is done in Interface Builder.
Specify the table view configuration.
Not too complicated, actually. You let
UITableViewknow how many sections you want, how many rows you want in each section, and what you want to call your section headers. You do that with the help of thenumberOfSectionsInTableView:method, thetableView:numberOfRowsInSection:method, and thetableView:titleForHeaderInSection:method, respectively.Supply the text (or graphic) for each row.
You return that from the implementation of the
tableView:cellForRowAtIndexPath:method. This message is sent for each visible row in the table view, and you return a table view cell to display the text or graphic.Respond to a user selection of the row.
You use the
tableView:didSelectRowAtIndexPath:method to take care of this task. In this method, you create a view controller and a new view. For example, when the user selects Map in Figure 2-1, this method is called, and then a Map controller and a Map view are created and displayed.
Note
A UITableView object must have a data source and a delegate. The data source supplies the content for the table view, and the delegate manages the appearance and behavior of the table view. The data source adopts the UITableViewDataSource protocol, and the delegate adopts the UITableViewDelegate protocol — no surprises there. Of the preceding methods, only tableView:didSelectRowAtIndexPath: is included in the UITableViewDelegate protocol. All the other methods I list earlier are included in the UITableViewDataSource protocol.
The data source and the delegate are often (but not necessarily) implemented in the same object — which is often a subclass of UITableViewController. (You'll be using the RootViewController for my RoadTrip app, by the way.)
Implementing these five (count 'em, five) methods is all you need to do to implement a table view. If you then take Interface Builder for a spin or two, along with the same kind of initialization methods and the standard memory-management methods you used in the DeepThoughts application back in Book III, you find yourself with a table view that can respond to a selection made in the table.
Not bad.
Table views come in two basic styles:
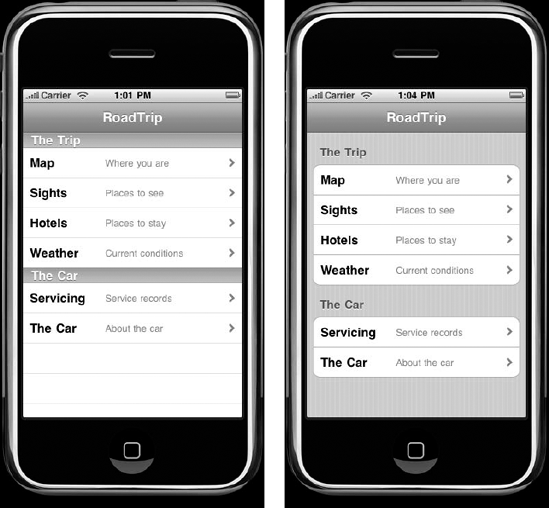
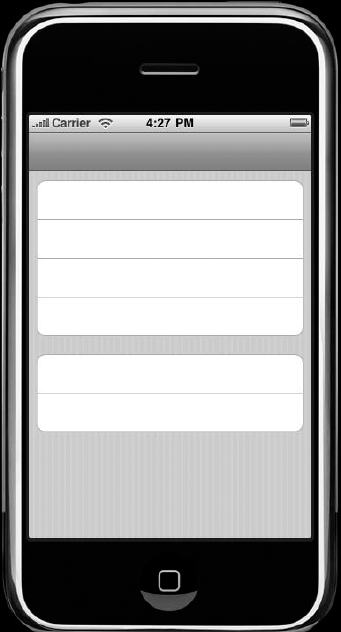
Plain: The default style is called plain and looks really unadorned — plain vanilla. It's a list: just one darn thing after another. You can index it, though, just as the table view in the Contacts application is indexed, so it can be a pretty powerful tool. Figure 2-2 shows a plain table view on the left.
A plain view can also have section titles (as I describe shortly) and footers.
Grouped: The other style is the grouped table view; unsurprisingly, it allows you to clump entries into various categories. In Figure 2-2, you can see a grouped table view on the right.
Tip
Grouped tables cannot have an index.
When you configure a grouped table view, you can also have header, footer, and section titles. I show you how to do section titles shortly.
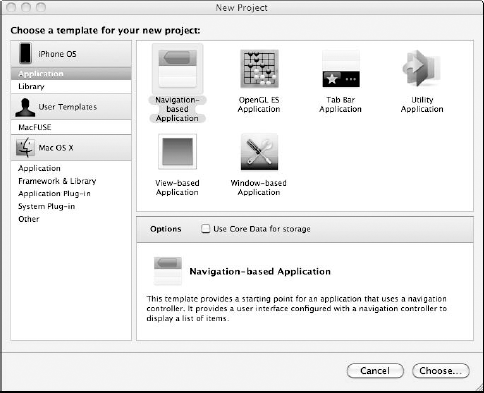
To see how table views work, you of course need a project you can use to show them off. With that in mind, fire up Xcode and officially launch the RoadTrip project. (If you need a refresher on how to set up a project in Xcode, take another look at Book I, Chapter 4.) For this project, you need to go with the Navigation-Based Application template, which I've selected in Figure 2-3.
You are not going to use core data yet, so leave the Use Core Data for Storage check box deselected.
Click Choose and then use the Save As dialog to save the project as RoadTrip in a folder on the desktop, as shown in Figure 2-4.

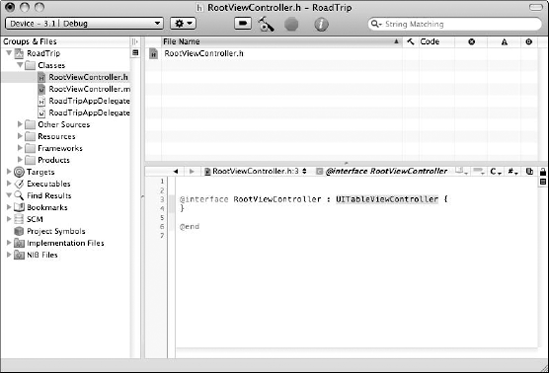
To no one's surprise, your new project gets added to the Groups & Files list on the left side of the Xcode Project window. Next, take a look at what happens when you drill down in your project folder in the Groups & Files list until you end up selecting RootViewController (as shown in Figure 2-5). The main pane of the Xcode Project window reveals that RootViewController is derived from a UITableViewController.
Inquisitive type that you are, you look up UITableViewController in the Documentation reference by right-clicking its entry in the Project window and choosing Find Selected Text in Documentation from the pop-up menu that appears. The Class reference tells you that UITableViewController conforms to the UITableViewDelegate and UITableViewDataSource protocols (and a few others), which are the two protocols I said were necessary to implement table views. What luck. (Kidding. It's all intentional.)
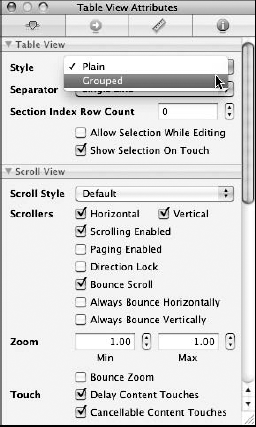
Always on the lookout for more information, you continue down the Groups & Files list to open your project's Resources folder, where you double-click the RootViewController.xib file to launch Interface Builder. You are reassured to see a table view set up in front of you. Admittedly, it's a plain table view rather than the grouped table view you want, but it's a table view nonetheless. To get the final duck in a row, choose Grouped from the Style drop-down menu in Interface Builder's Attributes Inspector, as shown in Figure 2-6, to make the switch from plain to grouped. Be sure to save the file after you do this.
At this point, you can build and run this project; go for it. What you see in the Simulator is a table view. If you try to scroll it, you get a bounce scroll, where the view just bounces back up when you scroll it, but not much else. In fact, you don't even see it as a grouped view. What you do have is the basic framework, however, and now you can format it the way you'd like.
The data source and the delegate for table views are often (but not necessarily) the same object — and that object is frequently a custom subclass of UITableViewController. For the RoadTrip project, the RootViewController created by the Navigation-Based Application template is a subclass of UITableViewController, and the UITableViewController has adopted the UITableViewDelegate and UITableViewDataSource protocols. So you're free to implement those handy methods I mention in the "Creating the table view" section, earlier in the chapter. (Just remember that you need to implement them in RootViewController to make your table usable.) Start with the methods that format the table the way you'd like.
In a grouped table view, each group is referred to as a section.
Note
In an indexed table, each indexed grouping of data is also called a section. For example, in the iPod application, all the albums beginning with A would be one section, those beginning with B another section, and so on. Although the indexed grouping has the same name, this is not the same thing as sections in a grouped table (which doesn't have an index).
The two methods you need on hand to start things off are as follows:
numberOfSectionsInTableView:(UITableView *)tableView
tableView:(UITableView *)tableView
             numberOfRowsInSection:(NSInteger)section
Each of these methods returns an integer, and that integer tells the table view something — the number of sections and the number of rows in a given section, respectively.
In Listing 2-1, you can see the code you need in order to create a table view that has two sections with three rows in each section. These methods are already implemented for you by the Navigation-Based Application template in the RootViewController.m file. You just need to remove the existing code and replace it with what you see in Listing 2-1.
Example 2-1. Modify numberOfSectionsInTableView: and tableView:numberOfRowsInSection:
- (NSInteger)numberOfSectionsInTableView:
                                (UITableView *)tableView {

  return 2;
}
- (NSInteger)tableView:(UITableView *)tableView
numberOfRowsInSection:(NSInteger)section {
NSInteger rows;
switch (section) {
case 0:
rows = 4;
break;
case 1:
rows = 2;
break;
default:
break;
}
return rows;
}You implement tableView:numberOfRowsInSection: by using a simple switch statement:
switch (section) {Note
Keep in mind that the first section is zero, as is the first row. This means, of course, that whenever you want to use an index to get to the first row or section, you'll need to use 0, not 1 — and an index of 1 for the second row and so on.
Although that's as easy as it gets, it's not really the best way to do it. Read on.
In the interests of showing you how to implement a robust application, I'm going to use constants to represent the number of sections and the number of rows in each section. I'll put those constants in a file, Constants.h, which will eventually contain other constants. I do this for purely defensive reasons: Both of these values — the number of sections and the number of rows in each section — will be used often in this application (I know that because hindsight is 20-20), and declaring them as constants makes changing the number of rows and sections easy, and it also helps avoid hard-to-detect typing mistakes.
Tip
Later I show you some techniques here that make life much, much easier. It means paying attention to some of the less-glamorous application nuts and bolts functionality — can you say "memory management"? — that may be annoying to implement along the way but that are really difficult to retrofit later. I want to head you away from the boulder-strewn paths that so many developers have gone down (me included), much to their later sorrow.
To implement the Constants.h file, do the following:
Choose File

I recommend having the
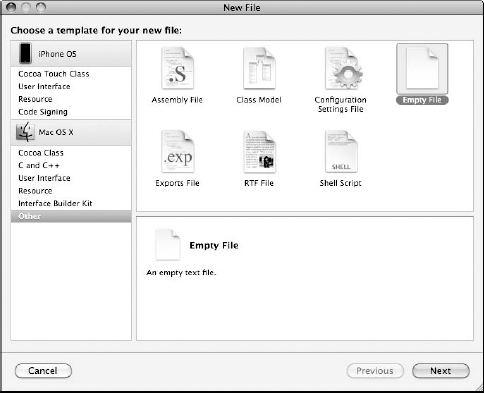
Classesfolder selected in the Groups & Files list so the file will be placed in there.In the New File dialog that appears, select Other from the listing on the left (under the Mac OS X heading) and then select Empty File in the main pane, as shown in Figure 2-7.
In the new dialog that appears, name the file
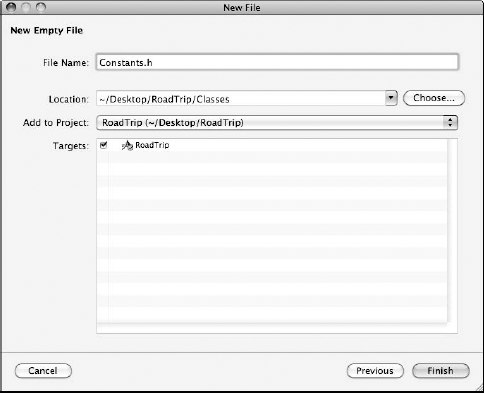
Constants.h(as shown in Figure 2-8) and then click Finish.The new empty file is saved in the Classes folder, as you can see in Figure 2-9.
With a new home for your constants all set up and waiting, all you have to do is add the constants you need so far. (Listing 2-2 shows you the constants you need to add to the Constants.h file.)
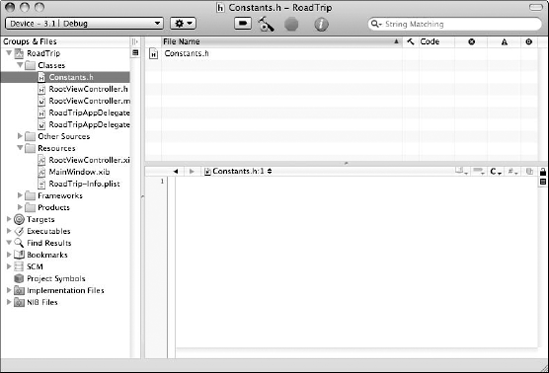
Now, using the Xcode Project window conveniently opened to the newly created Constants.h file (refer to Figure 2-9) — type in what you see in Listing 2-2.
Example 2-2. Adding to the Constants.h File
#define kSections      2
#define kSection1Rows  4
#define kSection2Rows  2
Having a Constants.h file in hand is great, but you have to let RootViewController.m know that you plan to use it. To include Constants.h in RootViewController.m, open RootViewController.m in Xcode and add the following statement:
#import "Constants.h"
You can then use these constants in all the various methods used to create your table view, as shown in Listing 2-3.
Example 2-3. Sections and Rows Done Better
- (NSInteger)numberOfSectionsInTableView:(UITableView *)
                                               tableView {

  return kSections;
}
- (NSInteger)tableView:(UITableView *)tableView
numberOfRowsInSection:(NSInteger)section {
NSInteger rows;
switch (section) {
case 0:
rows = kSection1Rows;
break;
case 1:
rows = kSection2Rows;
break;
default:
break;
}
return rows;
}When you build and run this (provisional) app, you get what you see in Figure 2-10: two sections, the first with four rows and the second with two.
Although using constants and a switch statement does make your program more extensible, it does require you to change the switch statement if you want to add or change the layout. An even better solution is to create an array in viewDidLoad that looks like this.
- (void)viewDidLoad {
  [super viewDidLoad];
  sectionsArray = [[NSArray alloc] initWithObjects:
                   [[NSNumber alloc]initWithInt:4],
                   [[NSNumber alloc]initWithInt:2], nil];
}
Add the code in bold to the viewDidLoad method in the RootViewController.m file. The method is already there; all you have to do is uncomment it out.
Then you can use the array count [sectionsArray count] to return the number of sections, and then use the index path section as an index into the array for the number of rows in a section [sectionsArray objectAtIndex:section]. And in fact, that's what I'm doing. You can see that in Listing 2-4, where I replaced the numberOfSectionsInTableView: and tableView:numberOfRowsInSection: yet again (and for the last time).
Example 2-4. Final Versions of numberOfSectionsInTableView: and tableView:numberOfRowsInSection:
- (NSInteger)numberOfSectionsInTableView:
                               (UITableView *) tableView {

  return [sectionsArray count];
}

- (NSInteger)tableView:(UITableView *)tableView
                numberOfRowsInSection:(NSInteger)section {

  return [[sectionsArray objectAtIndex:section] intValue];
}
You also have to add the following to RootViewContoller.h
NSArray *sectionsArray;
With sections in place, you now need to title them so users know what the sections are for. Luckily for you, the UITableViewDataSource protocol has a handy method — titled, appropriately enough, the tableView:titleForHeaderInSection: method — that enables you to add a title for each section. Listing 2-5 shows how to implement the method.
Example 2-5. Add Section Titles
- (NSString *)tableView:(UITableView *)tableView
              titleForHeaderInSection:(NSInteger)section {

  NSString *title = nil;
  switch (section) {
    case 0:
      title = @"The Trip";
      break;
    case 1:
      title =  @"The Car";
      break;
    default:
      break;
  }
  return title;
}
This (again) is a simple switch statement. For case 0, or the first section, you want the title to be @"The Trip", and for case 1, or the second section, you want the title to be @"The Car".
Warning
Okay, this, too, was really easy, so you probably won't be surprised to find out that it's not the best way to tackle the whole titling business. It's another path not to take — in fact, a really important one not to take. Really Serious Application Developers insist on catering to the needs of an increasingly global audience, which means — paradoxically — that they have to localize their applications. In other words, an app must be created in such a way that it presents a different view to different, local audiences. The next section explains how to do that.
Localizing an application isn't difficult, just tedious. To localize your application, you create a folder in your application bundle (I get to that in a bit) for each language you want to support. Each folder has the application's translated resources.
In the Settings application for the RoadTrip app, you're going to set things up so the user can set the language — Spanish or Italian, for example — and the region format.
For example, if the user's language is Spanish, available regions range from Spain to Argentina to the United States and lots of places in between. When a localized application needs to load a resource (such as an image, a property list, or a nib file), the application checks the user's language and region and looks for a localization folder that corresponds to the selected language and region. If it finds one, it loads the localized version of the resource instead of the base version — the one you're working in.
Showing you all the ins and outs of localizing your application is a bit too Byzantine for this book. But I do show you what you must do to make your app localizable when you're ready to tackle the chore on your own.
Note
What you have to get right — right from the start — are the strings you use in your application that get presented to the user. (If the user has chosen Spanish as his or her language of choice, what's expected in the Main view is now Plano, not Map.) You ensure that the users see what they're expecting by storing the strings you use in your application in a strings text file, which contains a list of string pairs, each identified by a comment. You would create one of these files for each language you support.
Here's an example of what an entry in a strings file might look like for this application:
/*Hotel choices */
"Hotels"  = "Hotels";
The values between the /* and the */ characters are just comments for the (human) translator you task with creating the right translation for the phrase — assuming, of course, that you're not fluent in the ten-or-so languages you'll probably want to include in your app, and therefore will need some translating help. You write such comments to provide some context and explain how that string is being used in the application.
Okay, this example has two strings: The one to the left of the equals sign is used as a key, and the one to the right of the equals sign is the one displayed. In the example, both strings are the same, but in the strings file used for a Spanish speaker, here's what you'd see:
/*Hotel choices */
 "Hotels"  = "Hoteles";
Looking up such values in the table is handled by the NSLocalizedString macro in your code.
To show you how to use the macro, I take one of the section headings as an example. Instead of
title = @"The Trip";
I code it as follows:
title = NSLocalizedString(@"The Trip",
                                      @"The trip by car");
As you can see, the macro has two inputs. The first is the string in your language, and the second is the general comment for the translator. At runtime, NSLocalizedString looks for a strings file named localizable.strings in the language that has been set, such as Spanish. (A user would have done that by going to Settings and choosing General
To create the localizable.strings file, you run a command-line program named genstrings, which searches your code files for the macro and places them all in a localizable.strings file (which it creates), making them ready for the (human) translator. The genstrings program is beyond the scope of this book, but it's well documented. When you're ready, I leave you to explore it on your own.
Okay, sure, it's really annoying to have to do this sort of thing as you write your code. (Yes, I know, really, really annoying.) But that's not nearly as annoying as having to go back and find and replace all the strings you want to localize after the application is almost done. Take my word for it!
Listing 2-6 shows how to use the NSLocalizedString macros to create localizable section titles. Add this method to the RootViewController.m file.
Example 2-6. Add Localizable Section Titles
- (NSString *)tableView:(UITableView *)tableView
              titleForHeaderInSection:(NSInteger)section {

  NSString *title = nil;
  switch (section) {
    case 0:
      title = NSLocalizedString(@"The Trip",
                                      @"The trip by car");
      break;
    case 1:
      title = NSLocalizedString(@"The Car", @"Car detail,
                 insurance, and servicing information ");
break;
default:
break;
}
return title;
}As all good iPhone app developers know, the Model-View-Controller (MVC) design pattern is the basis for the design of the framework you use to develop your applications. In this design pattern, each element (model, view, or controller) concentrates on the task at hand; it doesn't much care what the other elements are doing. For table views, that means the method that draws the content doesn't know what the content is, and the method that decides what to do when a selection is made in a particular row is equally ignorant of what the selection is. The important thing is to have a model object — one for each row — to hold and provide that information.
In this kind of situation, you usually want to deal with the model-object business by creating an array of models, one for each row. In this case, the model object will be a dictionary that holds the following three items:
The selection text: Map, for example
The description text: Where you are, for example
The view controller to be created when the user selects that row:
MapController, for example
You can see all three items illustrated in Figure 2-11.
Note
In more complex applications, you could provide a dictionary within the dictionary and use it to provide the same kind of information for the next level in the hierarchy. The iPod application is an example: It presents you with a list of albums, and then when you select an album, it shows you a list of songs on that album.
The following code shows you how to create a single dictionary for a row. Later on, I show you how to create all the dictionaries and tell you where all this code needs to go.
menuList = [[NSMutableArray alloc] init];

[menuList addObject:[NSMutableDictionary
     dictionaryWithObjectsAndKeys:
     NSLocalizedString(@"Map", @"Map Section"),kSelectKey,
     NSLocalizedString(@"Where you are", @"Map Explain"),
                                             kDescriptKey,
     nil, kControllerKey, nil]];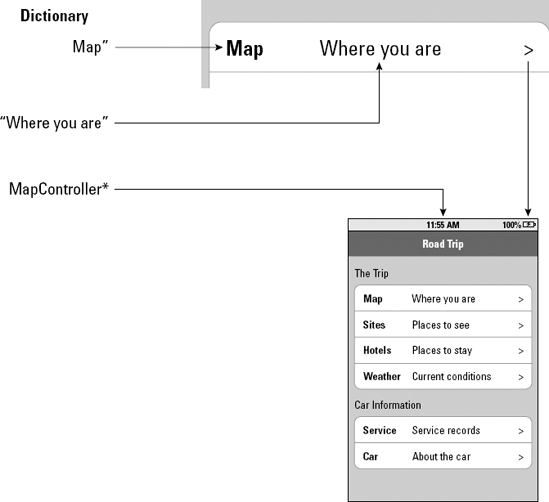
Here's the blow-by-blow account:
Create an array to hold the model for each row.
An
NSMutableArrayis a good choice here because it allows you to easily insert and delete objects. You need to add this toRootViewController.h.Create an
NSMutableDictionarywith three entries and the following keys:kSelectKey: The entry that corresponds to the main entry in the table view ("Map", for example).kDescriptKey: The entry that corresponds to the description in the table view ("Where you are", for example).kControllerKey: This entry contains a pointer to a view controller that will display the Map. You create an entry for the controller, but not just yet; you just usenilfor now. The first time the user selects a row, you create the view controller and save that value in here. That way, if the user selects that row again, the controller will simply be reused.
Add the keys to the
Constants.hfile.#define kSelectKey @"selection" #define kDescriptKey @"description" #define kControllerKey @"viewController"
The
@before each of the preceding strings tells the compiler that this is anNSString.
Note
With all of this information, you are now in a position to get rid of these controllers if you were to ever get a low-memory warning. You'd simply go through each dictionary in the array and release every controller except the one that's currently active.
You'll want to create this array and all the dictionaries in an initialization method viewDidLoad, which you need to add to the RootViewController.m file. (You can see viewDidLoad in all its glory in Listing 2-7.) The viewDidLoad message is sent to the RootViewController after all the objects in the nib file have been loaded and the RootViewController's outlet instance variables have been set.
Note
You could argue that you really should create a model class that creates this data-model array and get its data from a file or property list. For simplicity's sake, I add it in the viewDidLoad method for the RoadTrip app.
Example 2-7. viewDidLoad
- (void)viewDidLoad {
  [super viewDidLoad];
  sectionsArray = [[NSArray alloc] initWithObjects:
                   [[NSNumber alloc]initWithInt:4],
                   [[NSNumber alloc]initWithInt:2], nil];

  self.title = [[[NSBundle mainBundle] infoDictionary]
   objectForKey:@"CFBundleName"];
  menuList = [[NSMutableArray alloc] init];
  [menuList addObject:[NSMutableDictionary
     dictionaryWithObjectsAndKeys:
     NSLocalizedString(@"Map", @"Map Section"), kSelectKey,
     NSLocalizedString(@"Where you are", @"Map Explain"),
                                             kDescriptKey,
     nil, kControllerKey, nil]];
  [menuList addObject:[NSMutableDictionary
     dictionaryWithObjectsAndKeys:
NSLocalizedString(@"Sights", @"Sights Section"),kSelectKey,NSLocalizedString(@"Places to see",@"Places to see Explain"), kDescriptKey,nil, kControllerKey, nil]];[menuList addObject:[NSMutableDictionarydictionaryWithObjectsAndKeys:NSLocalizedString(@"Hotels", @"Hotels Section"),kSelectKey,NSLocalizedString(@"Places to stay",@"Places to stay Explain"), kDescriptKey,nil, kControllerKey, nil]];[menuList addObject:[NSMutableDictionarydictionaryWithObjectsAndKeys:NSLocalizedString(@"Weather", @"Weather Section"),kSelectKey,NSLocalizedString(@"Current conditions",@"Weather Explain"), kDescriptKey,nil, kControllerKey, nil]];[menuList addObject:[NSMutableDictionarydictionaryWithObjectsAndKeys:NSLocalizedString(@"Servicing", @"Service Section"),kSelectKey,NSLocalizedString(@"Service records",@"Service records Explain"), kDescriptKey,nil, kControllerKey, nil]];[menuList addObject:[NSMutableDictionarydictionaryWithObjectsAndKeys:NSLocalizedString(@"The Car",@"Car Information Section"), kSelectKey,NSLocalizedString(@"About the car",@"About the car"), kDescriptKey,nil, kControllerKey, nil]];}
You also have to add the following to RootViewContoller.h
NSMutableArray *menuList;
Going through the code in Listing 2-7, you can see that the first thing you do is get the application name from the bundle so you can use it as the Main view title.
self.title = [[[NSBundle mainBundle] infoDictionary]
                            objectForKey:@"CFBundleName"];
"What bundle?" you ask. Well, when you build your iPhone application, Xcode packages it as a bundle containing the following:
The application's executable code
Any resources that the app has to use (for instance, the application icon, other images, and localized content)
The
info.plist, also known as the information property list, which defines key values for the application, such as bundle ID, version number, and display name
infoDictionary returns a dictionary that's constructed from the bundle's info.plist. CFBundleName is the key to the entry that contains the (localizable) application name on the home page. The title is what will be displayed in the Navigation bar at the top of the screen.
As I mention earlier, I also create sectionsArray, which I can use to compute the offset in the menu. I save reference to that array in the instance variable.
Going through the rest of the code, you can see that for each entry in the Main view, you have to create a dictionary and put it in the menuList array. You put the dictionary in the menuList array so you can use it later when you need to provide the row's content or create a view controller when the user selects the row.
I've been going steadily from macro to micro, so it makes sense that after setting up a model for each row, I get to talk about cells, the individual constituents of each row.
Cell objects are what draw the contents of a row in a table view. The method tableView:cellForRowAtIndexPath: is called for each visible row in the table view. It's expected that the method will configure and return a UITableViewCell object for each row. The UITableView object uses this cell to draw the row.
When providing cells for the table view, you have three general approaches you can take:
Use vanilla (not subclassed)
UITableViewCellcell objects.Add subviews to a
UITableViewCellcell object's Content view.Use cell objects created from a custom subclass of
UITableViewCell.
The next few sections take a look at these options, one by one.
Using the UITableViewCell class directly, you can create cell objects with text and an optional image. (If a cell has no image, the text starts near the left edge of the cell.) You also have an area on the right of the cell for accessory views, such as disclosure indicators (the one shaped like a regular chevron), detail disclosure controls (the one that looks like a white chevron in a blue button), and even control objects such as sliders, switches, or custom views. The layout of a cell is shown in Figure 2-12. If you like, you can format the font, alignment, and color of the text, and you can even have a different format when the row is selected.
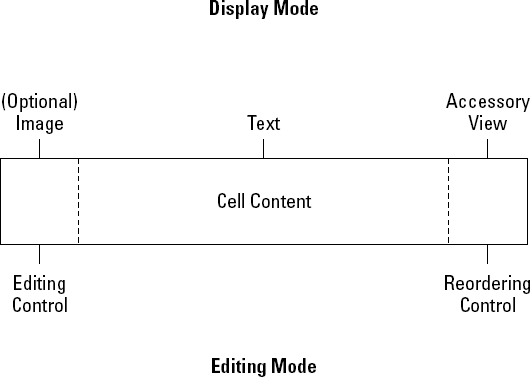
Although you can specify the font, color, size, alignment, and other characteristics of the text in a cell using the UITableViewCell class directly, the formatting is applied to all of the text in the cell. To get the variation that I suspect you want between the selection and description text (and, it turns out, the alignment as well), you have to create subviews within the cell.
A cell that a table view uses for displaying a row is, in reality, a view in its own right. UITableViewCell inherits from UIView, and it has a Content view. With Content views, you can add one subview (containing, say, the selection text "Weather") formatted the way you want and a second subview (holding, say, the description text "Current conditions") formatted an entirely different way.
As I mention in the previous section, you're going to use the UITableViewCell class to create the cells for your table views and then add the subviews you need in order to get the formatting you want. The place to create the cell is tableView:cellForRowAtIndexPath:. This method is called for each visible row in the table view, as shown in Listing 2-8. A code stub (a method with no — or only example — instructions) is already included in the RootViewController.m file, courtesy of the template. Replace the whole thing with Listing 2-8.
Example 2-8. Drawing the Text
- (UITableViewCell *)tableView:(UITableView *)tableView
          cellForRowAtIndexPath:(NSIndexPath *)indexPath {

  UITableViewCell *cell = [tableView
       dequeueReusableCellWithIdentifier:kCellIdentifier];
  if (cell == nil) {
    cell = [[[UITableViewCell alloc] initWithStyle:UITableVie
   wCellStyleDefault
            reuseIdentifier:kCellIdentifier] autorelease];

    cell.accessoryType =
   UITableViewCellAccessoryDisclosureIndicator;

    CGRect subViewFrame = cell.contentView.frame;
    subViewFrame.origin.x += kInset;
    subViewFrame.size.width = kInset+kSelectLabelWidth;

    UILabel *selectLabel = [[UILabel alloc]
                             initWithFrame:subViewFrame];
    selectLabel.textColor = [UIColor blackColor];
    selectLabel.highlightedTextColor =
                                    [UIColor whiteColor];
    selectLabel.font = [UIFont boldSystemFontOfSize:18];
    selectLabel.backgroundColor = [UIColor clearColor];
    [cell.contentView addSubview:selectLabel];

    subViewFrame.origin.x += kInset+kSelectLabelWidth;
    subViewFrame.size.width = kDescriptLabelWidth;
UILabel *descriptLabel = [[UILabel alloc]
initWithFrame:subViewFrame];
descriptLabel.textColor = [UIColor grayColor];
descriptLabel.highlightedTextColor =
[UIColor whiteColor];
descriptLabel.font = [UIFont systemFontOfSize:14];
descriptLabel.backgroundColor = [UIColor clearColor];
[cell.contentView addSubview:descriptLabel];
int menuOffset =
[self menuOffsetForRowAtIndexPath:indexPath];
NSDictionary *cellText =
[menuList objectAtIndex:menuOffset];
selectLabel.text = [cellText objectForKey:kSelectKey];
descriptLabel.text =
[cellText objectForKey:kDescriptKey];
[selectLabel release];
[descriptLabel release];
}
return cell;
}Here's the logic behind all that code:
Determine whether there are any cells lying around that you can use.
Although a table view can display only a few rows at a time on iPhone's small screen, the table itself can conceivably hold a lot more. A large table would chew up a lot of memory if you were to create cells for every row. Fortunately, table views are designed to reuse cells. As a table view's cells scroll off the screen, they're placed in a queue of cells available to be reused.
Create a cell identifier that indicates what cell type you're using. Add this to the
Constants.hfile:#define kCellIdentifier @"Cell"
Table views support multiple cell types, which makes the identifier necessary. In this case, you need only one cell type, but sometimes you may want more than one.
Note
If the system runs low on memory, the table view gets rid of the cells in the queue, but as long as it has some available memory for them, it will hold on to them in case you want to use them again.
You can ask the table view for a specific reusable cell object by sending it a
dequeueReusableCellWithIdentifier:message:UITableViewCell *cell = [tableView dequeueReusableCellWithIdentifier:kCellIdentifier];
This asks whether any cells of the type you want are available.
If there aren't any cells lying around, you have to create a cell by using the cell identifier you just created.
if (cell == nil) {
  cell = [[[UITableViewCell alloc]
      initWithStyle:UITableViewCellStyleDefault
      reuseIdentifier:kCellIdentifier] autorelease];
You now have a table view cell that you can return to the table view.
UITableViewCellStyleDefaultgives you a simple cell with a text label (black and left-aligned) and an optional image view. There are also several other styles:UITableViewCellStyleValue1gives you a cell with a left-aligned black text label on the left side of the cell and smaller blue text and right-aligned label on the right side. (The Settings application uses this style of cell.)UITableViewCellStyleValue2gives you a cell with a right-aligned blue text label on the left side of the cell and a left-aligned black label on the right side of the cell.UITableViewCellStyleSubtitlegives you a cell with a left-aligned label across the top and a left-aligned label below it in smaller gray text. (The iPod application uses cells in this style.)
Define the accessory type for the cell.
cell.accessoryType =
       UITableViewCellAccessoryDisclosureIndicator;
As I mention earlier in the brief tour of a cell, its layout includes a place for an accessory — usually something like a disclosure indicator.
Tip
In this case, use
UITableViewCellAccessoryDisclosureIndicator(the one shaped like a regular chevron). It lets the user know that tapping this entry will result in something (hopefully wonderful) happening, such as the display of the current weather conditions.If you're using a table view, and you want to display more detailed information about the entry itself, you might use a Detail Disclosure button. This allows you to then use a tap on the row for something else. In the Favorites view in the iPhone application, for example, selecting the Detail Disclosure button gives you a view of the contact information; if you just tap the row, it places the call for you.
You're not limited to these kinds of indicators; you also have the option of creating your own view — you can put in any kind of control. (That's what you see in the Settings application, for example.)
Here I show you just one example (the other is the same except for the font size and text color). You get the
contentViewframe and base the subview on it. The inset from the left (kInset) and the width of the subview (kLabelWidth) are defined in theConstants.hfile — you'll need to add them. They look like this:#define kInset 10 #define kSelectLabelWidth 100 #define kDescriptLabelWidth 160
To hold the text, the subview you are creating is a UILabelView, which meets my needs exactly:
CGRect subViewFrame = cell.contentView.frame;
subViewFrame.origin.x += kInset;
subViewFrame.size.width = kInset+kSelectLabelWidth;
UILabel *selectLabel = [[UILabel alloc]
                         initWithFrame:subViewFrame];
You then set the label properties that you're interested in; you do it by manually writing code rather than using Interface Builder. Just set the font color and size, the highlighted font color when an item is selected; and the background color of the label (as indicated in the code that follows). Setting the background color to transparent allows me to see the bottom line of the last cell in the group.
selectLabel.textColor = [UIColor blackColor];
selectLabel.highlightedTextColor = [UIColor
                                          whiteColor];
selectLabel.font = [UIFont boldSystemFontOfSize:18];
selectLabel.backgroundColor = [UIColor clearColor];
[cell.contentView addSubview:selectLabel];
Note
I could have inset the view one pixel up from the bottom, made the label opaque, and given it a white (not clear) background, which would be more efficient to draw. But with such a small number of rows, making that effort really has no appreciable performance impact, and the way I've set it up here requires less code for you to go through. Feel free to do it the "right way" on your own.
After you have your label, you just set its text to one of the values you get from the dictionary created in viewDidLoad representing this row.
The trouble is, you won't get the absolute row passed to you. You get only the row within a particular section — and you need the absolute row to get the right dictionary from the array. Fortunately, one of the arguments used when this method is called is the indexPath, which contains the section and row information in a single object. To get the row or the section out of an NSIndexPath, you just have to invoke its section method (indexPath.section) or its row method (indexPath.row), either of which returns an int. This neat trick enables you to compute the offset for the row in the array you created in viewDidLoad.
So the first thing you do in the following code is compute that. If you aren't going to use the sectionsArray as I did, you can compute it this way (which is commented out in the code). This is also why it's so handy to have the number of rows in a section as a constant.
int menuOffset = (indexPath.section*kSection1Rows)+
                                      indexPath.row;
But if you think about it, the menuOffset algorithm works only if you have two sections. That's why earlier I suggest you create sectionsArray. I did, and what's more, I added a method — menuOffsetForRowAtIndexPath: — so that I can use it again later to get the menu offset, as you'll see.
int menuOffset = [self menuOffsetForRowAtIndexPath:
                                         indexPath];
The method and its algorithm are shown in Listing 2-9:
Example 2-9. Computing the Menu Offset
- (int) menuOffsetForRowAtIndexPath:
                            (NSIndexPath *)indexPath {

  int menuOffset = indexPath.row;
  for (int sectionRow=0; sectionRow <
                    indexPath.section; ++sectionRow) {
    menuOffset += [[sectionsArray
                  objectAtIndex:sectionRow] intValue];
  }
  return menuOffset;
}
You start by passing the row to menuOffset. You then increment the offset by the number of rows in each of the previous sections, which is stored in the array as an NSNumber (and since NSNumber is an object, you have to use the intValue method to get the number as an integer).
And then you can use that dictionary you created to assign the text to the label.
NSDictionary *cellText = [menuList
                            objectAtIndex:menuOffset];
selectLabel.text = [cellText objectForKey:kSelectKey];
descriptLabel.text = [cellText
                           objectForKey:kDescriptKey];
Finally, because you no longer need the labels you created, you release them
[selectLabel release];
[descriptLabel release];
and return the cell formatted and with the text it needs to display in that row.
return cell;
You're off to a good start — and you had to use only five methods to create the table and handle user selections. You still have to create the Content views and models, but before you do that, I show you how navigation works and how to improve the user experience by saving state and allowing the user to set preferences.