
Getting a handle on the Xcode project
Compiling an iPhone app
Peeking inside the iPhone Simulator
Checking out the Interface Builder
Demystifying nib files
Arthur C. Clarke's Third Law is that any sufficiently advanced technology is indistinguishable from magic. The collection of tools known as the iPhone Software Development Kit (SDK) is the crucible for the alchemy of creating an iPhone app. You pick a template for the type of app; stir in the content, behavior, and user interface; and grind it all up with magical code. The SDK builds your final product. Sounds easy, and to be truthful, it's relatively easy.
In this chapter, I introduce you to the SDK. It's going to be a low-key, get-acquainted kind of affair. You get into the real nuts-and-bolts stuff in Book III and Book V, when you actually develop the two sample applications.
The Software Development Kit (SDK) gives you the opportunity to develop your apps without tying your brain up in knots. You can rapidly get a user interface up and running to see what it looks like. The idea here is to add your code incrementally — step by step — so that you can always step back and see how what you just did affects the Big Picture.
Your general steps in development should look something like this:
In this chapter, you start at the very beginning, with the very first step, which is Xcode. (Starting with Step 1? What a concept!) And the first step of the first step is to create your first project.
To develop an iPhone app, you work in what's called an Xcode project. So, time to fire one up. Here's how it's done:
Launch Xcode.
After you've downloaded the SDK (as described in Chapter 3 of this minibook), it's a snap to launch Xcode. By default, it's downloaded to /Developer/Applications, where you can track it down to launch it.
Tip
Here are a couple of hints to make Xcode handier and more efficient:
Drag the icon for the Xcode application all the way down to the Dock, so you can launch it from there. You'll be using it a lot, so it wouldn't hurt to be able to launch it from the Dock.
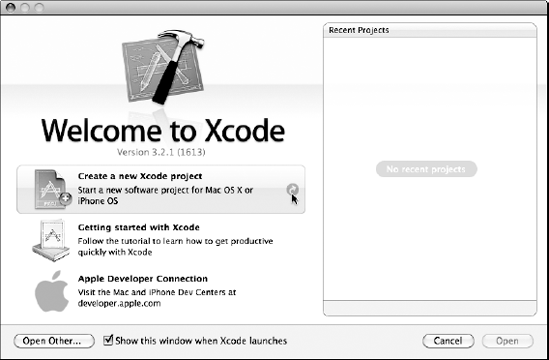
When you first launch Xcode, you see the Welcome screen shown in Figure 4-1. It's chock-full of links to the Apple Developer Connection and Xcode documentation. You may want to leave this screen up to make it easier to get to those links, but I usually close it. If you don't want to be bothered with the Welcome screen in the future, deselect the Show This Window When Xcode Launches check box.
Close the Welcome screen for now; you won't be using it.
Choose File

You can also just press Shift+

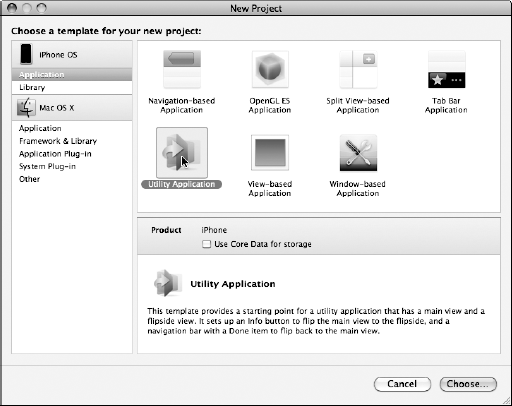
No matter what you do to start a new project, you're greeted by the New Project window, as shown in Figure 4-2.
The New Project window is where you get to choose the template you want for your new project. Note that the leftmost pane has two sections: one for the iPhone OS and the other for Mac OS X.
In the upper-left corner of the New Project window, click Application under the iPhone OS heading.
After clicking Application, the main pane of the New Project window refreshes, revealing several choices. (Refer to Figure 4-2.) Each of these choices is actually a template that, when chosen, generates some code to get you started.
Select Utility Application from the template choices displayed and then click Choose.
I'm selecting Utility Application to start the DeepThoughts app, the first sample app, which you develop in Book III. After selecting a template, the Save As dialog appears.
Note that when you select a template, a brief description of the template is displayed underneath the main pane. (Again, refer to Figure 4-2 to see a description of the Utility Application template. In fact, click some of the other template choices just to see how they're described as well. Just be sure to click the Utility Application template again to follow along with developing the DeepThoughts app.)
Enter a name for your new project in the Save As field, choose a Save location (the Desktop or any folder works just fine) and then click Save.
I named the first sample app project DeepThoughts. (You should do the same if you're following along with developing DeepThoughts.)
After you click Save, Xcode creates the project and opens the Project window — which should look like what you see in Figure 4-3.
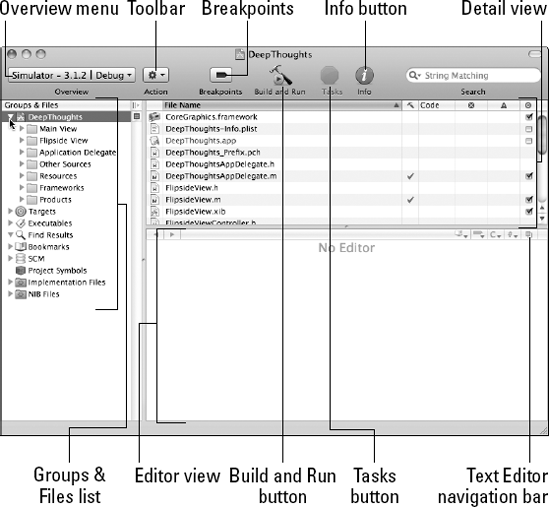
To develop an iPhone app, you have to work within the context of an Xcode project. It turns out that you do most of your work on projects using a Project window very much like the one in Figure 4-3. If you have a nice, large monitor, expand the Project window so you can see everything in it as big as life. This is, in effect, Command Central for developing your iPhone app; it displays and organizes your source files and the other resources needed to build your app.
If you take another peek at Figure 4-3, you see the following:
The Groups & Files list: An outline view of everything in your project, the Groups & Files list contains all of your project's files — source code, frameworks, and graphics, as well as some settings files. You can move files and folders around and add new folders. If you select an item in the Groups & Files list, the contents of the item are displayed in the topmost-pane to the right — otherwise known as the Detail view.
Tip
You may notice that some of the items in the Groups & Files list are folders, whereas others are just icons. Most have a little triangle (the disclosure triangle) next to them. Clicking the little triangle to the left of a folder expands the folder to show what's in it. Click the triangle again to hide what it contains.
The Detail view: Here you get detailed information about the item you selected in the Groups & Files list.
The Toolbar: Here you can find quick access to the most common Xcode commands. You can customize the toolbar to your heart's content by right-clicking it and selecting Customize Toolbar from the contextual menu that appears. You can also choose View
Pressing the Build and Run button compiles, links, and launches your app.
The Breakpoints button turns breakpoints on and off and toggles the Build and Run button to Build and Debug. (I explain breakpoints in Book IV.)
The Tasks button allows you to stop the execution of the app that you've built.
The Info button opens a window that displays information and settings for your project.
The status bar: Look here for messages about your project. (There are none yet in Figure 4-3; for a peek at a status message, see Figure 4-6.) For example, when you're building your project, Xcode updates the status bar to show where you are in the process — and whether or not the process completed successfully.
The favorites bar: Works like other favorites bars you're certainly familiar with; so you can bookmark places in your project. This bar isn't displayed by default (nor is it shown in Figure 4-3); to put it onscreen, choose View
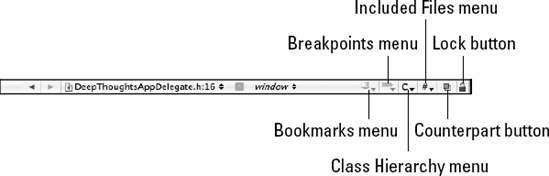
The Text Editor navigation bar: This navigation bar contains a number of shortcuts. These are shown in Figure 4-4. I explain more about them as you use them.
Bookmarks menu: You create a bookmark by choosing Edit
Breakpoints menu: Lists the breakpoints in the current file — I cover breakpoints in Book IV.
Class Hierarchy menu: The superclass of this class, the superclass of that superclass (if any), and so on.
Included Files menu: Lists both the files included by the current file, as well as the files that include the current file.
Counterpart button: This allows you to switch between header (or interface) file, such as
FlipsideView.h, and the implementation file, such asFlipsideView.m. The header files define the class's interface by specifying the class declaration (and what it inherits from); instance variables (a variable defined in a class — at runtime all objects have their own copy); and methods. The implementation file, on the other hand, contains the code for each method.Lock button: Indicates whether the selected file is unlocked for editing or locked (preventing changes). If it's locked, you can click the button to unlock the file (if you have permission).
The Editor view: Displays a file you've selected, in either the Groups & Files list or Detail view. You can also edit your files here — after all, that's what you'd expect from the Editor view — although some folks prefer to double-click a file in Groups & Files list or Detail view to open the file in a separate window.
To see how the Editor view works, check out Figure 4-5, where I've clicked the Main View folder in the Groups & Files list, and the MainView.h class in the Detail view. You can see the code for the class in the Editor view.
Right under the Lock button (refer to Figure 4-5) is a tiny windowshade icon that lets you split the Editor view. Click it to look at the interface and implementation files at the same time, or even the code for two different methods in the same or different classes.
Tip
If you have any questions about what something does, just position the mouse pointer above the icon, and a tooltip explains it.
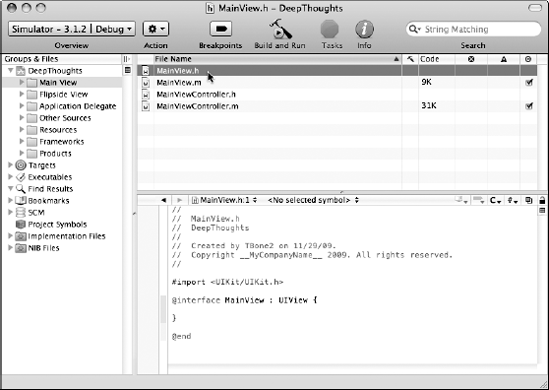
The first item in the Groups & Files view, as you can see in Figure 4-5, is labeled DeepThoughts. This is the container that contains all the source elements for the project, including source code, resource files, graphics, and a number of other pieces that will remain unmentioned for now (but I get into those in due course). You can see that this project container has seven distinct groups — Main view, Flipside view, Application Delegate, Other Sources, Resources, Frameworks, and Products. Here's what gets tossed into each group:
Main view is the group in which you place all of your code for the Main view of your utility app, although you are not obliged to. The Main View group has four distinct source-code files (which you can see in Figure 4-5):
MainView.hMainView.mMainViewController.hMainViewController.m
Flipside view is the group in which you place all of your code for the flipside view of your utility app — the view that appears when the user taps the i (information) button in the Main view (although again, you are not obliged to).
Application Delegate is the group in which you place the code for app-specific behavior to customize the behavior of a framework object without having to subclass it (as I describe in Chapter 5 of this minibook). A behavior-rich framework object (used as is) would delegate the task of implementing one of its responsibilities to an object in this group for a very specific behavior. The delegation pattern of adding behaviors to objects is described in more detail in Chapter 5 as well.
Other Sources is the group in which you typically would find the precompiled headers of the frameworks you will be using — stuff like
DeepThoughts_Prefix.pchas well asmain.m, your application's main function.The Resources group contains, well, resources, such as
.xibfiles, property lists (which you will encounter in Book V), images, other media files, and even some data files.Whenever you choose the Utility Application template (refer to Figure 4-2), Xcode creates the following files for you:
YourProject-Info.plistFlipsideView.xibMainView.xibMainWindow.xib
I explain
.xibfiles in excruciating detail in this chapter and in Book III and Book V. Soon you'll love the.xibfiles as much as I do.Frameworks are code libraries that act a lot like prefab building blocks for your code edifice. (I talk lots about frameworks in Chapter 5 of this minibook.) By choosing the Utility Application template, you let Xcode know that it should add the
UIKit framework, Foundation.framework, andCoreGraphics.frameworkto your project, because it expects that you'll need them in a Utility Application.The Products group is a bit different from the previous three items in this list: It's not a source for your app, but rather the compiled app itself. In it, you find
DeepThoughts.app. At the moment, this file is listed in red because the file can't be found (which makes sense because you haven't built the app yet).Note
A file's name appearing in red lets you know that Xcode can't find the underlying physical file.
Note
If you happen to open the DeepThoughts folder on your Mac, you won't see the "folders" that appear in the Xcode window. That's because those folders are simply groupings that help organize and find what you're looking for; this list of files can grow to be pretty large, even in a moderate-size project.
When you have a lot files, you'll have better luck finding things if you create subgroups within the Main View, Flipside View, and/or Resources groups, or even whole new groups. You create subgroups (or even new groups) in the Groups & Files list by choosing New Project
It's really a blast to see what you get when you build and run a project that you yourself created using a template from the Project window. Doing that is relatively simple:
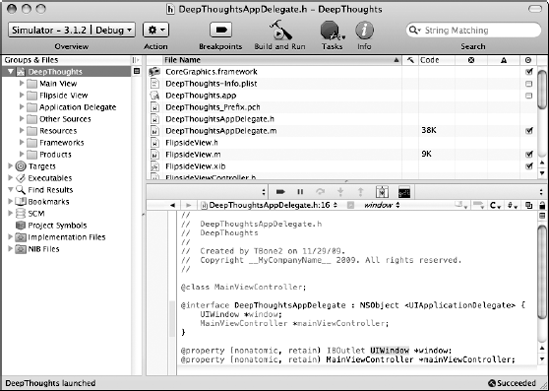
Choose Simulator – 3.1 | Debug from the Overview drop-down menu in the top-left corner of the project window to set the active SDK and Active Build Configuration.
It may be already chosen, as you can see in Figure 4-6. Here's what that means:
When you download an SDK, you actually download multiple SDKs — a Simulator SDK and a device SDK for each of the current iPhone OS releases.
Fortunately, for this book, I use the Simulator SDK and iPhone OS 3.1. Even more fortunately, in Chapter 6 of this minibook, I show you how to switch to the device SDK and download your app to a real-world iPhone. But before you do that, there's just one catch. . . .
Note
You have to be in the iPhone Developer Program to run your app on a device, even on your very own iPhone.
A build configuration tells Xcode the purpose of the built product. You can choose between Debug, which has features to help with debugging (there's a no-brainer for you); and Release, which results in smaller and faster binaries. I use Debug for most of this book, so I recommend you go with Debug for now.
Choose Build
You can also press
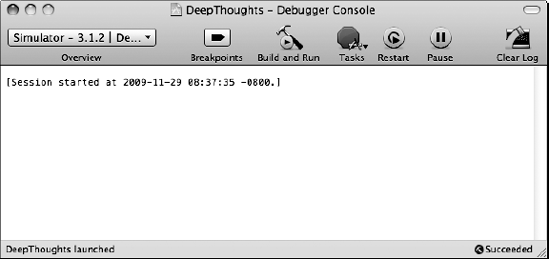
Because you selected Debug for the active build configuration, the Debugger Console may launch for you, as shown in Figure 4-7, depending on your Xcode preferences (more about them in a second). If you don't see the console, choose Run
After it's launched in the Simulator, your first app looks a lot like what you see in Figure 4-8. You should see the status bar and a gray window with the i information button (the hallmark of an app built from the Utility template), but that's it. You can also see the Hardware menu in Figure 4-8, which I explain next.
Now click on the i information button to see the flipside view, as shown in Figure 4-9. Whoa! You now have a standard iPhone app flipside view, complete with a Done button. Click the Done button to go back to the Main view. (I know, big deal . . . but about half the work of designing the DeepThoughts app is already done, thanks to the Utility template, and you continue adding functionality in Book III.)
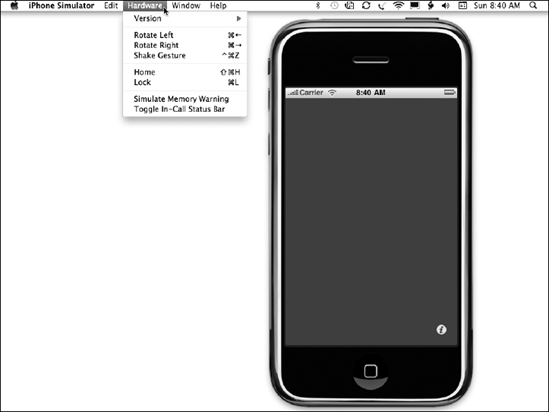

When you run your app, Xcode installs it on the iPhone Simulator (or a real iPhone device if you specified the device as the active SDK) and launches it. Using the Hardware menu and your keyboard and mouse, the Simulator mimics most of what a user can do on a real iPhone, albeit with some limitations that I point out shortly.
You use the iPhone Simulator Hardware menu (refer to Figure 4-8) when you want your device to do the following:
Rotate left: Choosing Hardware
Rotate right: Choosing Hardware
Use a shake gesture: Choosing Hardware
Go to the Home screen: Choosing Hardware
Lock the Simulator (device): Choosing Hardware
Send the running app low-memory warnings: Choosing Hardware
Toggle the status bar between its Normal state and its In Call state: Choose Hardware
Note
The status bar becomes taller when you're on a call than when you're not. Choosing In Call state here shows you how things look when your application is launched while the user is on the phone.
On the real device, a gesture is something you do with your fingers to make something happen in the device, like a tap, or a drag, and so on. Table 4-1 shows you how to simulate gestures using your mouse and keyboard.
Table 4-1. Gestures in the Simulator
iPhone Action | |
|---|---|
Tap | Click the mouse. |
Touch and hold | Hold down the mouse button. |
Double tap | Double-click the mouse. |
Swipe |
|
Flick |
|
Drag |
|
Pinch |
|
You uninstall applications on the Simulator the same way you'd do it on the iPhone, except you use your mouse instead of your finger.
On the Home screen, place the pointer over the icon of the app you want to uninstall and hold down the mouse button until all of the app icons start to wiggle.
Click the app icon's Close button — the little x that appears in the upper-left corner of the icon — to make the app disappear.
Click the Home button — the one with a little square in it, centered below the screen — to stop the other app icon's wiggling and finish the uninstallation.
You can also move an app's icon around by clicking and dragging with the mouse.
To reset the Simulator to the original factory settings — which also removes all the apps you've installed — choose iPhone Simulator
Keep in mind that running apps in the iPhone Simulator is not the same thing as running them in the iPhone. Here's why:
Different frameworks: The Simulator uses Mac OS X versions of the low-level system frameworks, instead of the actual frameworks that run on the device.
Different hardware and memory: The Simulator uses the Mac hardware and memory. To really determine how your app is going to perform on an honest-to-goodness iPhone device, you're going to have to run it on a real iPhone device. (Lucky for you, I show you how to do that in Chapter 6 of this minibook.)
Different installation procedure: Xcode installs your app in the iPhone Simulator automatically when you build the app using the iPhone Simulator SDK. (You can see that in Figure 4-8, earlier in this chapter, for example.) All fine and dandy, but there's no way to get Xcode to install apps from the App Store in the iPhone Simulator.
Lack of GPS: You can't fake the iPhone Simulator into thinking it's lying on the beach at Waikiki. The location reported by the
CoreLocationframework in the Simulator is fixed atLatitude: 37.3317 North
Longitude: 122.0307 West
Which just so happens to be 1 Infinite Loop, Cupertino, CA 95014, and guess who "lives" there?
Two-finger limit: You can simulate a maximum of two fingers. If your application's user interface can respond to touch events involving more than two fingers, you will need to test that on an actual device. The motion of the two fingers is limited in the Simulator — you can't do two-figure swipes or drags.
Accelerometer differences: You can access your computer's accelerometer (if it has one) through the
UIKitframework. Its reading, however, will differ from the accelerometer readings on an iPhone (for some technical reasons I don't get into).Differences in rendering: OpenGL ES (OpenGL for Embedded Systems), one of the 3D graphics libraries that works with the iPhone SDK, uses renderers on devices that are slightly different from those it uses in iPhone Simulator. As a result, a scene on the simulator and the same scene on a device may not be identical at the pixel level.
Xcode gives you options galore; I'm guessing you won't change any of them until you have a bit more programming experience under your belt, but a few options are actually worth thinking about now.
With Xcode open, choose Xcode
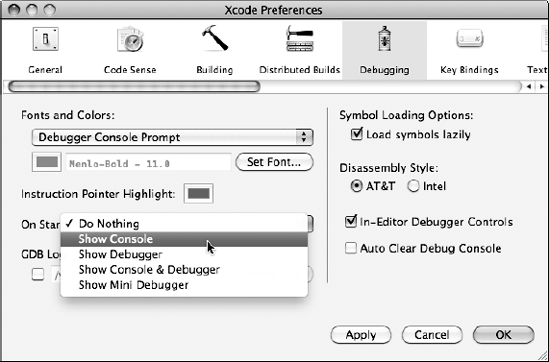
Click Debugging in the toolbar to show the Debugging pane, as shown in Figure 4-10.
The Xcode Preferences window refreshes to show the Debugging pane.
Open the On Start drop-down menu and choose Show Console (as shown in Figure 4-10). Then click Apply.
This step automatically opens the Console after you build your app, so you won't have to take the extra step of opening the Console to see your app's output.
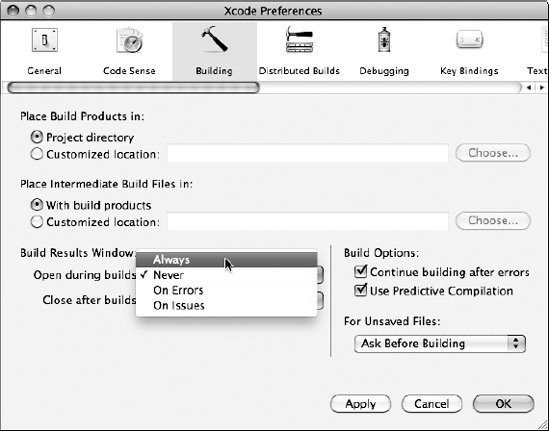
Click the Building button in the toolbar to show the Building pane, as shown in Figure 4-11.
In the Build Results Window section of the Building pane, select the Open During Builds drop-down menu, and choose Always, as shown in Figure 4-11. Then click Apply.
The Always choice opens the Build Results window and keeps it open. You might not like this, but some people find having the Build Results window onscreen all the time makes it easier to find and fix errors.
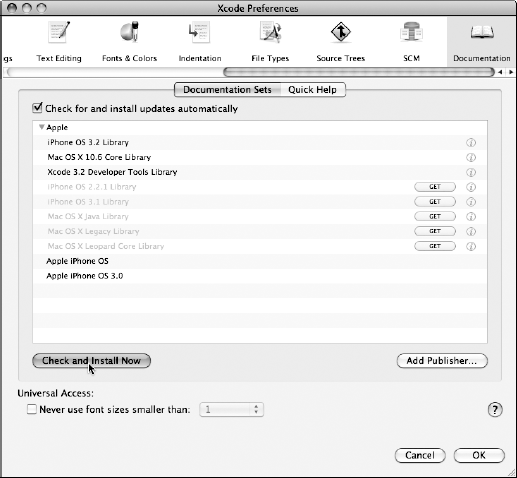
Click the Documentation button in the toolbar, as shown in Figure 4-12. (You may have to scroll the toolbar horizontally to access it.)
Select the Check for and Install Updates Automatically check box (shown in Figure 4-12) and then click the Check and Install Now button.
This step ensures that the documentation remains up-to-date and also allows you to load and access other documentation.
Click OK to close the Xcode Preferences window.
Tip
Set the tab width and other formatting options in the Indentation pane of the Preferences window.
You can also have the Editor show line numbers. If you click Text Editing in the Xcode Preferences toolbar to show the Text Editing pane, you can select the Show Line Numbers check box under Display Options. I don't take this step now, but having line numbers visible becomes very useful in Chapter 1 of Book IV.
Interface Builder is a great tool for graphically laying out your user interface. You can use it to design your app's user interface and then save what you've done as a resource file, which is then loaded into your app at runtime. This resource file is then used to automatically create the single window, as well as all your views and controls, and some of your app's other objects — view controllers, for example. (For more on view controllers and other application objects, check out Chapter 5 in this minibook.)
Tip
If you don't want to use Interface Builder, you can also create your objects programmatically — creating views and view controllers and even things like buttons and labels using your very own application code. I show you how to do that as well. Often Interface Builder makes things easier, but sometimes just coding it is the best way.
Here's how Interface Builder works:
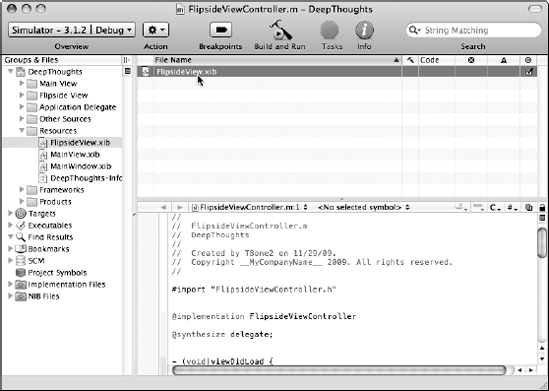
In your Project window's Groups & Files list, expand the Resources group and select the
FlipsideView.xibfile.Double-click the
FlipsideView.xibfile, which is shown in Figure 4-13.You could have just double-clicked the file in the Groups & Files list as well.
Note
Note that
FlipsideViewController.mis still in the Editor window; that's okay because I'm set to edit theFlipsideView.xibfile in the Interface Builder, not in the Editor window. That's because double-clicking always opens a file in a new window — this time, the Interface Builder window.
What you see after double-clicking are the windows as they were the last time you left them. If this is the first time you've opened Interface Builder, you see windows that look something like those in Figure 4-14.
Not surprisingly, the Flipside view window in Figure 4-14 shows the flipside view, which looks exactly as it did in the iPhone Simulator. (Refer to Figure 4-9.)

Interface Builder supports two file types: an older format that uses the extension .nib and a newer format that utilizes the extension .xib. The iPhone project templates all use .xib files. Although the file extension is .xib, everyone still calls them nib files. The term nib and the corresponding file extension .xib are acronyms for NeXT Interface Builder. The Interface Builder application was originally developed at NeXT Computer, whose OPENSTEP operating system was used as the basis for creating Mac OS X.
The window labeled FlipsideView.xib (the top center window in Figure 4-14) is the nib's main window. It acts as a table of contents for the nib file. With the exception of the first two icons (File's Owner and First Responder), every icon in this window (in this case, there's only one, but you'll find more as you get into nib files) represents a single instance of an Objective-C class that will be created automatically for you when this nib file is loaded.
Note
Interface Builder doesn't generate any code that you have to modify or even look at. Instead, it creates the ingredients for "instant" Objective-C objects that the nib loading code combines and turns into real objects at runtime.
If you were to take a closer look at the three objects in the FlipsideView.xib file window — and if you had a pal who knew the iPhone backwards and forwards — you'd find out the following about each object:
The File's Owner proxy object: This is the controller object that's responsible for the contents of the nib file. In this case, the File's Owner object is actually the
FlipsideViewControllerthat was created by Xcode. The File's Owner object is not created from the nib file. It's created in one of two ways: either from another (previous) nib file or by a programmer who codes it manually.First Responder proxy object: This object is the first entry in an app's dynamically constructed responder chain (a term I explain in Chapter 1 of Book III) and is the object with which the user is currently interacting. If, for example, the user taps a text field to enter some data, the First Responder would then become the Text Field object.
Note
Although you might use the First Responder mechanism quite a bit in your apps, there's actually nothing you have to do to manage it. It's automatically set and maintained by the
UIKitframework.View object: The View icon represents an instance of the
UIViewclass. AUIViewobject is an area (in this case, the Flipside view) that a user can see and interact with.
If you take another look at Figure 4-14, you notice two other windows open besides the main window. Look at the Flipside view window that has the word Title in the title bar. That window is the graphical representation of the View icon. If you close the Flipside view window and then double-click the View icon, this window opens again. This window is your canvas for creating your user interface: It's where you drag user-interface elements such as buttons and text fields. These objects come from the Library window (the leftmost window in Figure 4-14).
The Library window contains your palette — the stock Cocoa Touch objects that Interface Builder supports. Dragging an item from the Library to the Flipside view window adds an object of that type to the View (and remember, as subview).
Tip
If you happen to close the Library window, whether by accident or by design, you can get it to reappear by choosing Tools