
Loading and saving user preferences
Adding a Constants.h file
Connecting user preferences to the Settings app
Adding a Settings bundle for user preferences
Adding outlets to the view controller
Connecting interface objects to your code in Interface Builder
As you recall from Chapter 1 of Book I, Apple considers applications that perform simple, highly defined tasks as utility apps. The Weather app, for example, deals only with the weather data. One of the characteristics of utility apps is that the user can change aspects of it — in Weather, for example, the user can add and change the cities that Weather shows the weather data for.
The DeepThoughts app is considered a utility, as it performs a simple, highly defined task. With DeepThoughts, the idea is to enable the user to enter his or her own words for the falling words animation (which I show you in Chapter 3 of this minibook), as well as change the speed of the animation. For these functions to work, you need to enable the app to save data entered by a user for the next time he or she fires up the app. In this chapter, I tackle how to get your app to save data entered by the user, and then you set up the Flipside View controls for users to enter the data.
Most people these days have spent enough time around computers that they know what I mean when I throw the term preferences around. On your desktop, for example, you can set preferences at the system level for things like security, screen savers, printing, and file sharing — just to name a few. You can also set preferences for applications. For example, you can set all sorts of preferences in Xcode — not to mention all those preferences in your browser and word-processing programs.
The latter are application-specific settings used to configure the behavior or appearance of an application. On the iPhone, application preferences are supported as well, but the iPhone displays all application-level preferences through the Settings app. (Its icon looks like a bunch of gears.) Whatever separate settings feature you come up with has to function within the framework of iPhone's Settings app; in effect, the Settings app makes you color within the lines.
What guidelines does the iPhone impose for preferences? Here's a short summary:
If you have preference values that are typically configured once and then rarely changed: Leave the task of setting preferences to the Settings app. On an iPhone, this would apply to things like enabling/disabling Wi-Fi access, setting wallpaper displays, setting up mail accounts, and any other preference you would set and then leave in place for a while.
If you have preference values that the user might want to change regularly: In this situation, you should consider having users set the options themselves in your app.
Tip
The iPhone's Weather app is a good example: Suppose you have this thing for Dubrovnik — where it happens to be 48° F as I'm writing this — and you'd like to add it to your list of preferred cities that you want the Weather app to keep tabs on. To load Dubrovnik into the Weather app, all you would have to do is tap the Info button at the bottom of the screen; the view will flip around, and you can add it to your list of cities. That's a lot easier than going back to the Home screen, launching Settings, adding the new city, and then launching the Weather app again.
With DeepThoughts, I could go either way — set up preferences using the Settings app (assuming they are rarely changed by users) or set up preferences from inside the app (assuming they are changed frequently by users). To make DeepThoughts a better example, I show you how to do it both ways.
To save and read preferences, you use a built-in, easy-to-use class that lets you read and set user preferences from your app — NSUserDefaults. The class is also used by the Settings app (which has graciously consented to let us peons use it).
You use NSUserDefaults to read and store preference data to a default database, using a key value — just as you would access keyed data from an NSDictionary. (For more on key-value pairs in general and NSDictionary in particular, see Chapter 4 in Book II.) The difference here is that NSUserDefaults data is stored in the file system rather than in an object in memory — objects, after all, go away when the application terminates.
Tip
By the way, don't ask why the language experts put Defaults in the name rather than something to do with preferences — fewer letters, maybe — but that's the way it is. Just don't let their naming idiosyncrasies confuse you.
Storing the data in the file system rather than in memory gives you an easy way to store application-specific information. With the help of NSUserDefaults, you can easily store the state the user was in when he or she quit the application — or store something simple like a text string — which just so happens to be precisely what you need for DeepThoughts.
The first thing you need to decide is where you plan on gathering and then using the user's preferences. In this example, the preferences are a) the text for the falling words, and b) the speed of the animation. The obvious place to use the preferences data is MainViewController.m, where it sets fallingWords and speed (refer to the listing for MainViewController.m in Chapter 3 of this minibook):
fallingWords = [[NSString alloc] initWithString:@"Peace Love
   Groovy Music"];
speed = 10.0;
And the obvious place to gather the preferences data is in the Flipside view, where the user enters the replacement text for fallingWords and changes the speed — and this would be in FlipsideViewController.m, as you see in this chapter. (Don't forget: I also show you how to offer these preference settings through the Settings app.)
It's really easy to both access and update a preference — as long as you have NSUserDefaults by your side. The trick here is to use the NSUserDefaults class to read and update the replacement text and speed. NSUserDefaults is implemented as a singleton, meaning there's only one instance of NSUserDefaults running in your application. To get access to that one instance, you invoke the class method standardUserDefaults:
[NSUserDefaults standardUserDefaults]
standardUserDefaults returns the NSUserDefaults object. As soon as you have access to the standard user defaults, you can store data there and then get it back when you need it. To store data, you simply give it a key and tell it to save the data using that key.
The way you tell it to save something is by using the setObject;forKey: method. In case your knowledge of Objective-C is a little rusty (or not there at all), that's the way any message that has two arguments is referred to.
The first argument, setObject:, is the object you want NSUserDefaults to save. This object must be NSData, NSString, NSNumber, NSDate, NSArray, or NSDictionary. In this case, savedData is an NSString, so you're in good shape.
The second argument is forKey:. In order to get the data back, and in order for NSUserDefaults to know where to save it, you have to be able to identify it to NSUserDefaults. You can, after all, have a number of preferences stored in the NSUserDefaults database, and the key tells NSUserDefaults which one you are interested in.
The particular keys you will use are kWordsOfWisdom for the falling words replacement text, kSpeed for the animation speed, and kMaxSpeed for the maximum speed possible. (Assuming you use a slider on the Flipside view to set the speed, the maximum speed is the far right point on the slider.)
To use keys like kWordsOfWisdom, kSpeed, or kMaxSpeed, you need to define them in a Constants.h file. To implement the Constants.h file in your project, do the following:
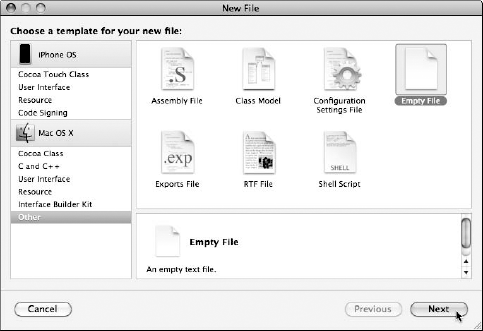
Select the project name (DeepThoughts) in the Groups & Files list and then choose File

In the New File dialog that appears, choose Other from the listing on the left (under the Mac OS X heading) and then choose Empty File in the main pane, as shown in Figure 4-1.
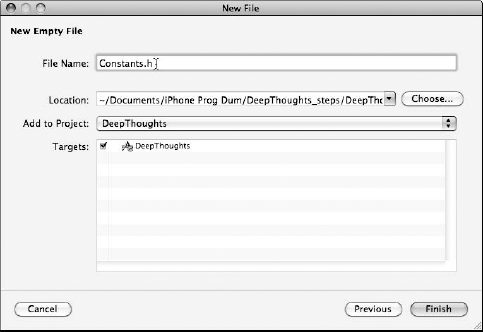
In the new dialog that appears, name the file
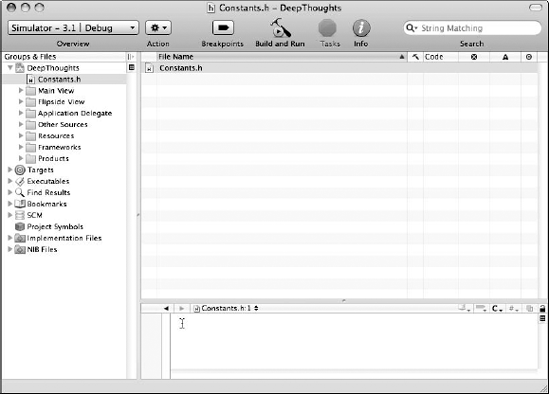
Constants.h(as shown in Figure 4-2) and then click Finish.The new empty file is saved in your project, as shown in Figure 4-3.
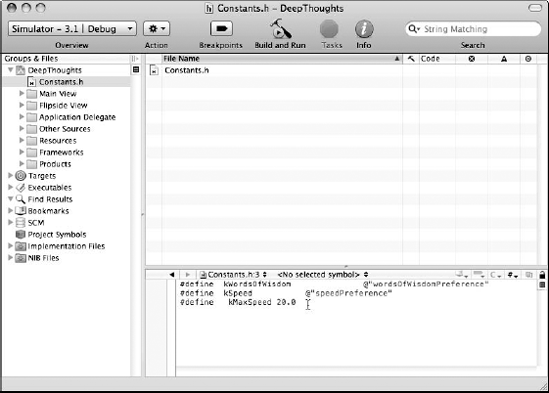
With a new home for your constants all set up and waiting, all you have to do is add the constants you need, as shown in Figure 4-4:
#define kWordsOfWisdom  @"wordsOfWisdomPreference"
#define  kSpeed         @"speedPreference"
#define  kMaxSpeed      20.0
Having a Constants.h file in hand is great, but you have to let MainViewController.m know that you plan to use it, as I show in the next section.
It may seem like starting at the end and working backwards, but it makes sense to show the code in DeepThoughts that uses these preferences first, and then show how you can enable the user to change and save these preferences in the Settings app, as well as from the Flipside view of the DeepThoughts app.
To put the preferences data to use in the app's view, you have to link it up with the view's controller — in this case, MainViewController. The best place to do that is viewDidLoad, which is invoked right after the view has been loaded from the nib file. viewDidLoad is found in the MainViewController.m file, so that's where you'd go to insert your code to use the preferences.
Edit the MainViewController.m file code where it sets fallingWords and speed. (Look in the first half of the code — refer to the listing for MainViewController.m in Chapter 3 of this minibook.) I've commented out the old code (which begins with //) and added the new code (shown in bold) in Listing 4-1.
Example 4-1. Reading the Settings into the App in MainViewController.m
#import "MainViewController.h"
#import "MainView.h"
#import "Constants.h"

@implementation MainViewController
- (id)initWithNibName:(NSString *)nibNameOrNil
bundle:(NSBundle *)nibBundleOrNil {
if (self = [super initWithNibName:nibNameOrNil
bundle:nibBundleOrNil]) {
// Custom initialization
}
return self;
}
- (void)viewDidLoad {
[super viewDidLoad];
self.view.backgroundColor = [UIColor colorWithRed:.5
green:3 blue:.7 alpha:1];
[NSTimer scheduledTimerWithTimeInterval:.5 target:self
selector:@selector(onTimer) userInfo:nil repeats:YES];
// fallingWords = [[NSString alloc] initWithString:@"Peace
Love Groovy Music"];
// speed = 10.0;
if (![[NSUserDefaults standardUserDefaults]
   objectForKey:kWordsOfWisdom]) {
[[NSUserDefaults standardUserDefaults]setObject:@"Peace
   Love Groovy Music"
            forKey:kWordsOfWisdom];
        fallingWords = @"Peace Love Groovy Music";
}
else {
    fallingWords = [[NSUserDefaults
   standardUserDefaults]
                    stringForKey:kWordsOfWisdom];
  }
if (![[NSUserDefaults standardUserDefaults]
objectForKey:kSpeed] ){
[[NSUserDefaults standardUserDefaults]setDouble:10.0
forKey:kSpeed];
speed = kMaxSpeed-10.0;}
else {
speed = kMaxSpeed-[[NSUserDefaults
standardUserDefaults] doubleForKey:kSpeed] ;
}
}
- (void)onTimer{(The rest of the code in MainViewController.m stays the same; see Chapter 3 of this minibook for the full listing.)
Here's what this code does for you:
Imports
Constants.hintoMainViewController.m.#import "Constants.h"
You can now use these keys with
NSUserDefaultsto save and retrieve the user preferences.Checks to see whether the
kWordsOfWisdomsetting has been moved intoNSUserDefaults.if (![[NSUserDefaults standardUserDefaults] objectForKey:kWordsOfWisdom]) {The Settings app or the Flipside view code moves the user's preferences into
NSUserDefaultsonly after the application runs for the first time; Settings will, however, update preferences inNSUserDefaultsif the user makes any changes.If the settings have not been moved into
NSUserDefaultsyet, the code uses the initial preference value ("Peace Love Groovy Music") forfallingWords.[[NSUserDefaults standardUserDefaults]setObject:@"Peace Love Groovy Music" forKey:kWordsOfWisdom]; fallingWords = @"Peace Love Groovy Music";If the settings have been moved into
NSUserDefaults, the code reads them in and then setsfallingWordsto whatever the user's preference is.else { fallingWords = [[NSUserDefaults standardUserDefaults] stringForKey:kWordsOfWisdom]; }Repeats the procedures in Steps 2–4 with the
speedsetting.if (![[NSUserDefaults standardUserDefaults] objectForKey:kSpeed] ){ [[NSUserDefaults standardUserDefaults] setDouble:10.0 forKey:kSpeed]; speed = kMaxSpeed-10.0;} else { speed = kMaxSpeed-[[NSUserDefaults standardUserDefaults] doubleForKey:kSpeed] ; }
Your code is now ready to use the preference settings. Now, as I mentioned at the beginning of this chapter, one way to enable the user to change and save preferences is inside the Settings app — you set up the preferences in a Settings bundle that you add to your project. Another way to enable the user to change and save preferences is from inside your app (in this case, in the Flipside view). I'm going to tackle the Settings app first and deal with the Flipside view scenario later in this chapter.
The Settings app uses a property list, called Root.plist, found in the Settings bundle inside your application. The Settings app takes what you put in the property list and builds a Settings section for your application in its list of application settings as well as the views that display and enable the user to change those settings. The next sections spell out how to put that Settings section to work for your app.
For openers, you have to add a Settings bundle to your application. Here are the moves:
In the Groups & Files list (at the left in the Xcode Project window), select DeepThoughts at the top and then choose File
The New File dialog appears.
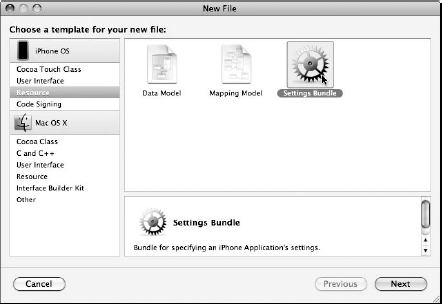
Choose Resource under the iPhone OS heading in the left pane and then select the Settings Bundle icon, as shown in Figure 4-5.
Click the Next button.
A new dialog appears, allowing you to change the name of the file.
You don't have to change the default name of
Settings.bundle, so just click Finish.You should now see a new item called
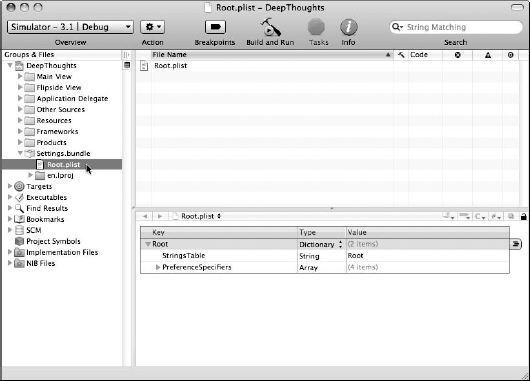
Settings.bundlein the DeepThoughts project in the Groups & Files list.Click the triangle to expand the
Settings.bundlesubfolder in Groups & Files, as shown in Figure 4-6.You should see the
Root.plistfile as well as anen.lprojfolder — the latter is used for dealing with localization issues, as discussed in Chapter 2 of Book V.
Property lists are widely used in iPhone apps because they provide an easy way to create structured data using named values for a number of object types.
Property lists all have a single root node — a dictionary, which means it stores items using a key-value pair, just as an NSDictionary does: All dictionary entries must have both a key and a value, as I describe in Chapter 4 of Book II. In this dictionary, there are two keys (refer to Figure 4-6):
StringsTablePreferenceSpecifiers
The value for the first entry is a string — the name of a strings table used for localization, which I don't get into here. The second entry is an array of dictionaries — one dictionary for each preference. PreferenceSpecifiers is where you put the user preferences, which in this case are the text entered by the user for fallingWords and the animation speed selected on a slider by the user for speed. Here's how you'd get PreferenceSpecifiers to do that for you:
In the Groups & Files list of the Project window, select the triangle next to the
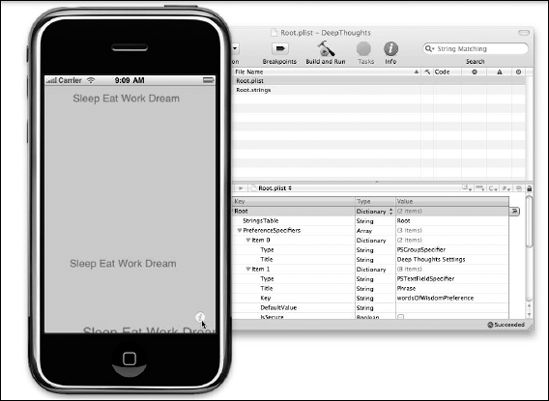
Settings.bundlefile to reveal theRoot.plistfile, and then double-click theRoot.plistfile to open it in a separate window, as shown in Figure 4-7.Okay, you don't really have to do this, but you might find it easier to work with this file in its own window.
In the
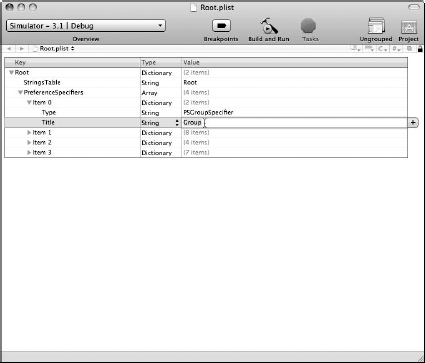
Root.plistwindow you just opened (refer to Figure 4-7), click the triangle next toPreferenceSpecifiers,and click the triangle next to Item 0.PreferenceSpecifiersis an array designed to hold a set of dictionary nodes, each of which represents a single preference. For each item listed in the array, the first row under it has a key ofType; every property list node in thePreferenceSpecifiersarray must have an entry with this key, which identifies what kind of entry this is. TheTypevalue for Item 0 —PSGroupSpecifier— is used to indicate that a new group should be started. The value for this key actually acts like a section heading for a Table view.Double-click the value next to
Titleand delete the defaultGroup(see Figure 4-7), and then type the title you want to appear in the Settings app.You will want to either delete the title's value of
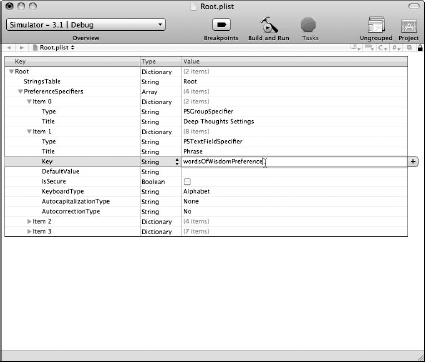
Groupentirely or replace it with something likeYour App'sSettings. (I useDeep Thoughts Settings.)Click the triangle next to Item 1 to open it, as shown in Figure 4-8.
The
Typevalue for Item 1 isPSTextFieldSpecifier, which enables a text field that a user can type into. Its title is set toPhrasewhich is okay for your purposes.Double-click the value for Key in Item 1, and replace the default preference text with
wordsOfWisdomPreference. (See Figure 4-8.)This is the user preference for the text for
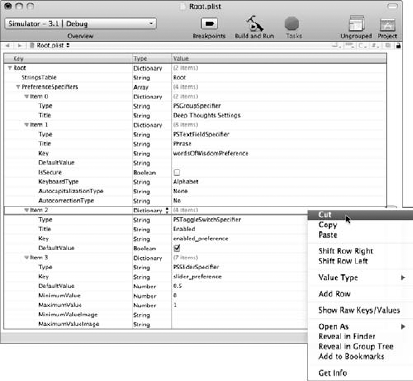
fallingwords, which the user can enter into a text field.Select Item 2 and choose Edit
I opened Item 2 in Figure 4-9 to show its contents. Item 2 is defined as a toggle switch, which you can modify by changing the
Titlevalue and so on. However, because you're not using it, you need to remove it from the file.Warning
The item numbers change as you delete them, so you need to be careful. Fortunately, Undo is supported here; if you make a mistake, press

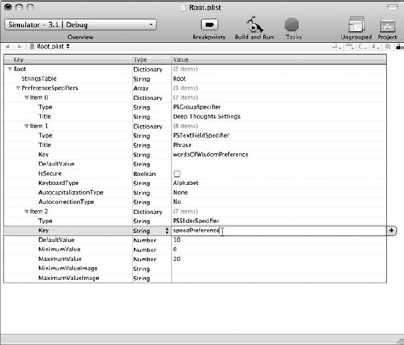
Item 3 is now Item 2, as shown in Figure 4-10.
Select Item 2 and change the
KeytospeedPreference,theDefaultValueto10,and theMaximumValueto20(and keep theMinimumValueset to0).The
Typevalue isPSSliderSpecifier, which enables a slider that a user can slide to set the value. TheDefaultValueis the middle of the slider (10), with theMinimumValueat the far left and theMaximumValueat the far right.When you're done, the
Root.plistwindow should look like Figure 4-10.Save the property file by pressing
To see how your DeepThoughts app makes do with user preferences set within the Settings app, build and run your project as I describe in the last part of Chapter 3 of this minibook. When the iPhone Simulator appears and the app starts running, quit the app by clicking the Home button on the iPhone Simulator. Then drag to the right across the screen of the Simulator to go to the first Home screen, which contains the Settings app, as shown in Figure 4-11.

Click the Settings icon to launch the Settings app, and you can then click DeepThoughts in the menu of app settings, as shown in Figure 4-12.
The settings now appear in the DeepThoughts settings screen. Click the Phrase entry field (to simulate a user touching the field), and the onscreen keyboard appears for typing the replacement text for fallingWords, as shown in Figure 4-13. You can also click and drag the slider (to simulate a user touching and sliding the slider) to set the value for speed.
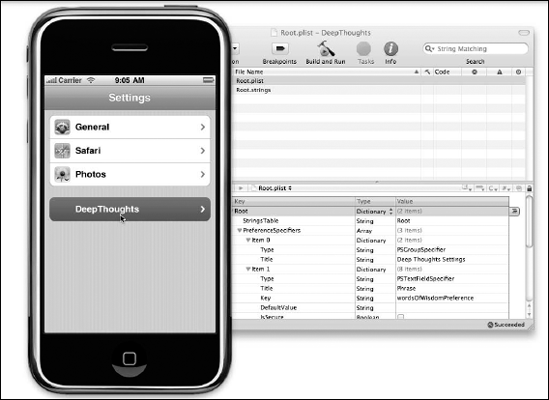
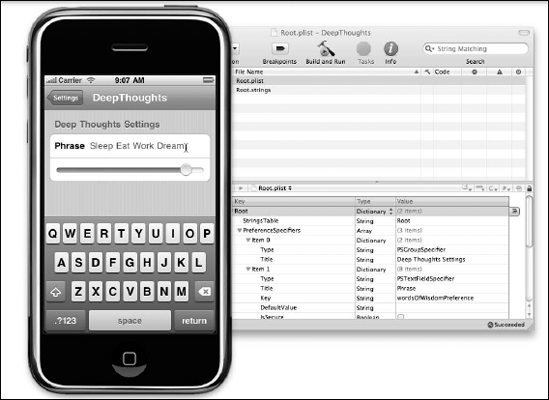
Figure 4-13. Change the entry in the Phrase field with the keyboard and slide the slider for the speed.
Click Settings in the top-left corner to return to the Settings menu, and then click the Home button to quit Settings. Drag across the Home screen to the left to switch to the next screen, which contains the DeepThoughts app. Click DeepThoughts to run it again, and the changes made in Settings should change the text and speed, as shown in Figure 4-14.
Warning
As you experiment with code and build and run your project, you need to delete the application and its data from the iPhone Simulator if you change anything of significance — before building and running again. The consequences of not doing so will become obvious when things don't work like you would expect them to. See Chapter 4 of Book I for details on deleting specific apps from the iPhone Simulator. For a fast reset of all apps and all data in the simulator, choose iPhone Simulator
As you may recall from Chapter 2 of this minibook, FlipsideView-Controller owns the Flipside view's FlipsideView.xib (which you can open in the Interface Builder). You can add the interface objects you need for DeepThoughts — the text entry field for the replacement text for fallingWords, and the speed slider for speed — using Interface Builder, but first you have to put outlets in the code that connect your methods to the Interface Builder interface objects.
Note
The fact that a connection between an object and its outlets exists is actually stored in a nib file. When the nib file is loaded, each connection is reconstituted and reestablished, thus enabling you to send messages to the object. IBOutlet is the keyword that tags an instance-variable declaration so the Interface Builder application knows that a particular instance variable is an outlet — and can then enable the connection to it with Xcode.
In your code, it turns out that you need to create two outlets: one to point to the text entry field and one to point to the speed slider. To get this outlet business started, you need to declare each outlet, which you do with the help of the aforementioned IBOutlet keyword.
Add the bold lines of code in Listing 4-2 — the <UITextFieldDelegate> between UIViewController and the first curly brace, the code (including IBOutlet statements) after delegate; and before the last curly brace as well as all the @property statements before the @end.
Example 4-2. FlipsideViewController.h
@protocol FlipsideViewControllerDelegate; @interface FlipsideViewController : UIViewController<UITextFieldDelegate>{ id <FlipsideViewControllerDelegate> delegate;NSString* wordsOfWisdom;IBOutlet UITextField *theTextField;float sliderValue;IBOutlet UISlider *slider;}//@property (nonatomic, assign) id <FlipsideViewControllerDelegate> delegate; - (IBAction)done;@property (nonatomic, assign) id<FlipsideViewControllerDelegate> delegate;@property (nonatomic, assign) NSString* wordsOfWisdom;@property (nonatomic, assign) UISlider* slider;@end @protocol FlipsideViewControllerDelegate - (void)flipsideViewControllerDidFinish:(FlipsideView- Controller *)controller; @end
The IBOutlet statements declare the outlets, which will automatically be initialized with a pointer to the UITextField (theTextField) and the UISlider (slider) when the application is launched. But while this will happen automatically, it won't automatically happen automatically. You have to help it out a bit.
In procedural programming — you know, all that Linux Kernel stuff — variables are generally fair game for all. But in object-oriented programming, a class's instance variables are tucked away inside an object and shouldn't be accessed directly. The only way for them to be initialized is for you to create what are called accessor methods, which allow the specific instance variable of an object to be read and (if you want) updated. Creating accessor methods is a two-step process that begins with a @property declaration, which tells the compiler that there are accessor methods. And that is what you did in the preceding section; you coded corresponding @property declarations for each IBOutlet declaration.
The methods that provide access to the instance variables of an object are called accessor methods, and they effectively get (using a getter method) and set (using a setter method) the values for an instance variable. Although you can code those methods yourself, it can be rather tedious. This is where properties come in. The Objective-C Declared Properties feature provides a simple way to declare and implement an object's accessor methods. The compiler can synthesize accessor methods according to the way you told it to in the property declaration. Objective-C creates the getter and setter methods for you by using an @property declaration in the interface file, combined with the @synthesize declaration in the implementation file.
All that being said, at the end of the day, you need to do three things in your code to have the compiler create accessors for you:
Declare an instance variable in the interface file.
Add an
@propertydeclaration of that instance variable in the same interface file (usually with thenonatomicattribute).The declaration specifies the name and type of the property as well as some attributes that provide the compiler with information about how exactly you want the accessor methods to be implemented.
For example, the declaration
@property (nonatomic, assign) NSString* wordsOfWisdom;
declares a property named
wordsOfWisdom, which is a pointer to anNSStringobject. As for the two attributes —nonatomicandassign—nonatomictells the compiler to create an accessor to return the value directly, which is another way of saying that the accessors can be interrupted while in use. (This works fine for applications like this one.)The second value,
assign, tells the compiler to create an accessor method that sends anassignmessage to any object that is assigned to this property.Use
@synthesizein the implementation file so that Objective-C generates the accessors for you.The
@propertydeclaration only declares that there are accessors. It is the@synthesizestatement that tells the compiler to create them for you. You add this statement in the next section, along with more code, to theFlipsideViewController.mimplementation file. (Cue the next section!)
Okay, time to add the bold lines of code in Listing 4-3 to the FlipsideViewController.m implementation file.
Example 4-3. FlipsideViewController.m
#import "FlipsideViewController.h"#import "MainViewController.h"#import "Constants.h"@implementation FlipsideViewController@synthesize delegate , wordsOfWisdom, slider;# pragma mark textField methods- (BOOL)textFieldShouldBeginEditing:(UITextField *)textField{[textField setReturnKeyType:UIReturnKeyNext];return YES;}- (BOOL)textFieldShouldReturn:(UITextField *)textField {[textField resignFirstResponder];return YES;}- (void)textFieldDidEndEditing:(UITextField *)textField {wordsOfWisdom = textField.text;}# pragma mark view methods- (void)viewDidLoad { [super viewDidLoad]; self.view.backgroundColor = [UIColor viewFlipsideBackgroundColor];
NSLog(@"Slider value %f parent value %f" ,slider.value ,((MainViewController*)(self.parentViewController)).speed);slider.value = + kMaxSpeed - ((MainViewController*)(self.parentViewController)).speed; //addedNSLog(@"Slider value %f parent value %f" ,slider.value ,((MainViewController*)(self.parentViewController)).speed);} - (IBAction)done {if(! [theTextField.text isEqualToString: @"" ])wordsOfWisdom = theTextField.text; // added[self.delegate flipsideViewControllerDidFinish:self]; } /* // Override to allow orientations other than the default portrait orientation. - (BOOL)shouldAutorotateToInterfaceOrientation:(UIInterfaceO rientation)interfaceOrientation { // Return YES for supported orientations return (interfaceOrientation == UIInterfaceOrientationPortrait); } */ - (void)didReceiveMemoryWarning { // Releases the view if it doesn't have a superview. [super didReceiveMemoryWarning]; // Release any cached data, images, etc that aren't in use. } - (void)viewDidUnload { // Release any retained subviews of the main view. // e.g. self.myOutlet = nil; } - (void)dealloc { [super dealloc]; } @end
Although the @property declaration in the previous section tells the compiler that there are accessor methods, they still have to be created. Fortunately, Objective-C will create these accessor methods for you whenever you include an @synthesize statement for a property:
@synthesize delegate , wordsOfWisdom, slider;
The @synthesize statement tells the compiler to create accessor methods for you — one for each @property declaration.
Next, you add the text field methods to obtain the wordsOfWisdom:
# pragma mark textField methods
- (BOOL)textFieldShouldBeginEditing:(UITextField *)textField
    {
  [textField setReturnKeyType:UIReturnKeyNext];
  return YES;
}
- (BOOL)textFieldShouldReturn:(UITextField *)textField {
  [textField resignFirstResponder];
   return YES;
}
- (void)textFieldDidEndEditing:(UITextField *)textField {
  wordsOfWisdom = textField.text;
}
The UITextFieldDelegate protocol defines the messages sent to a text field delegate as part of the sequence of editing its text. When the user performs an action that would normally start an editing session, the text field calls the textFieldShouldBeginEditing: method first to see whether editing should actually proceed. In most circumstances, you would simply return YES from this method to allow editing to proceed.
The text field calls the textFieldShouldReturn: method whenever the user taps the Return button on the keyboard to find out whether it should process the Return — you can use this method to implement any custom behavior when the Return button is tapped, but for your purposes, you simply return YES (which is the default), although you could return NO to ignore the Return button.
After saying "yes" to this and that, the real action happens with the textFieldDidEndEditing: method, which is called after the text field resigns its first responder status to tell the delegate that editing stopped for the specified text field, so that you now have the edited wordsOfWisdom.
Tip
The # pragma mark statement is simply a way to organize your methods in the Method list pop-up in the Xcode Text Editor Navigation bar (to the left of the Bookmarks menu). You use it with a label (such as textField methods or view methods) to add the label in bold to the Method list so that you can identify and keep separate the methods logically in the list.
Next, you modify the viewDidLoad method to obtain the speed from the slider (new code is in bold):
# pragma mark view methods
- (void)viewDidLoad {
[super viewDidLoad]; self.view.backgroundColor = [UIColor viewFlipsideBackgroundColor];NSLog(@"Slider value %f parent value %f" ,slider.value ,((MainViewController*)(self.parentViewController)).speed);slider.value = + kMaxSpeed - ((MainViewController*)(self.parentViewController)).speed; //addedNSLog(@"Slider value %f parent value %f" ,slider.value ,((MainViewController*)(self.parentViewController)).speed);} - (IBAction)done {if(! [theTextField.text isEqualToString: @"" ])wordsOfWisdom = theTextField.text; // added[self.delegate flipsideViewControllerDidFinish:self]; }
You wrap the code in NSLog statements to report back a message to the system log facility, but mostly this code assigns the slider.value to speed in MainViewController (which, as you recall from Chapter 3 of this minibook, uses speed to control the animated flowing text). Next, you deal with the possibility of a blank text field in the IBAction method. The code assigns the text field's text to wordsOfWisdom only if the field is not theTextField.text isEqualToString: @"".
Fine, but there are still a few problems: How will MainViewController know about the new speed assignment? How will the app save the preferences? You have to modify the MainViewController.h and MainViewController.m files by adding the code in bold, as I show in Listing 4-4 and Listing 4-5, to cover your bases here.
Example 4-4. MainViewController.h
#import "FlipsideViewController.h"

@interface MainViewController : UIViewController
   <FlipsideViewControllerDelegate> {

  UIImage    *fallingImage;
  NSString   *fallingWords;
  double      speed;
}

- (IBAction)showInfo;
@property (readwrite)  double speed;
@end
Example 4-5. MainViewController.m
#import "MainViewController.h"
#import "MainView.h"
#import "Constants.h"

@implementation MainViewController
@synthesize speed;

- (id)initWithNibName:(NSString *)nibNameOrNil
   bundle:(NSBundle *)nibBundleOrNil {
    if (self = [super initWithNibName:nibNameOrNil
    bundle:nibBundleOrNil]) {
        // Custom initialization
    }
    return self;
}

- (void)viewDidLoad {

  [super viewDidLoad];
  self.view.backgroundColor = [UIColor  colorWithRed:.5
   green:3 blue:.7 alpha:1];
  [NSTimer scheduledTimerWithTimeInterval:.5 target:self
   selector:@selector(onTimer) userInfo:nil repeats:YES];

//  fallingWords = [[NSString alloc] initWithString:@"Peace
   Love Groovy Music"];
//  speed = 10.0;
  if (![[NSUserDefaults standardUserDefaults]
   objectForKey:kWordsOfWisdom]) {
    [[NSUserDefaults standardUserDefaults]setObject:@"Peace
   Love Groovy Music"

   forKey:kWordsOfWisdom];
    fallingWords = @"Peace Love Groovy Music";
  }
  else {
    fallingWords = [[NSUserDefaults standardUserDefaults]
                    stringForKey:kWordsOfWisdom];
  }

  if (![[NSUserDefaults standardUserDefaults]
   objectForKey:kSpeed] ){
    [[NSUserDefaults standardUserDefaults]setDouble:10.0
   forKey:kSpeed];
    speed = kMaxSpeed-10.0;}
  else {
        speed = kMaxSpeed-[[NSUserDefaults
   standardUserDefaults] doubleForKey:kSpeed] ;
  }
}
- (void)onTimer{
UILabel *fallingImageView = [[UILabel alloc]
initWithFrame:CGRectMake(0, 0, 100, 30)];
fallingImageView.text = fallingWords;
fallingImageView.textColor = [UIColor purpleColor];
fallingImageView.font = [UIFont systemFontOfSize:30];
fallingImageView.backgroundColor = [UIColor
colorWithRed:.5 green:3 blue:.7 alpha:1]; // Transparent
instead?
fallingImageView.adjustsFontSizeToFitWidth = YES;
int startX = round(random() % 80);
int endX = round(random() % 80);
//speed of falling
double randomSpeed = (1/round(random() % 100) +1) *speed;
// image size;
double scaleH = (1/round(random() % 100) +1) *30;
double scaleW = (1/round(random() % 100) +1) *200;
[self.view addSubview:fallingImageView];
fallingImageView.frame = CGRectMake(startX, −100, scaleW,
scaleH);
fallingImageView.alpha = .75;
[UIView beginAnimations:nil context:fallingImageView];
[UIView setAnimationDuration:randomSpeed];
[UIView setAnimationDelegate:self];
[UIView setAnimationDidStopSelector:@selector(animationDone
:finished:context:)];
fallingImageView.frame = CGRectMake(endX, 500, scaleW,
scaleH);
[UIView commitAnimations];
}
-(void)animationDone:(NSString *)animationID
finished:(NSNumber *)finished context:(id)context {
UIImageView *fallingImageView = context;
[fallingImageView removeFromSuperview];
[fallingImageView release];
}
/*
// Override to allow orientations other than the default
portrait orientation.
- (BOOL)shouldAutorotateToInterfaceOrientation:(UIInterfaceO
rientation)interfaceOrientation {// Return YES for supported orientations
return (interfaceOrientation ==
UIInterfaceOrientationPortrait);
}
*/
- (void)flipsideViewControllerDidFinish:(FlipsideViewControl
ler *)controller {
if (controller.wordsOfWisdom ) {
    fallingWords = controller.wordsOfWisdom;
    [[NSUserDefaults standardUserDefaults]
   setObject:fallingWords  forKey:kWordsOfWisdom];
[fallingWords retain];
  }

  if (controller.slider.value) {
    speed = kMaxSpeed-controller.slider.value; // can access
   it directly or use an ivar as above
    [[NSUserDefaults standardUserDefaults]setDouble:
   controller.slider.value forKey:kSpeed];
  }

   [self dismissModalViewControllerAnimated:YES];
}
- (IBAction)showInfo {
FlipsideViewController *controller
= [[FlipsideViewController alloc]
initWithNibName:@"FlipsideView" bundle:nil];
controller.delegate = self;
controller.modalTransitionStyle =
UIModalTransitionStyleFlipHorizontal;
[self presentModalViewController:controller
animated:YES];
[controller release];
}(The rest of the code in MainViewController.m stays the same; see Chapter 3 of this minibook for the full listing.)
In Listing 4-4, you add the @property declaration for speed. Then in Listing 4-5, you add the @synthesize statement for the property.
Below the animation block in MainViewController.m (see Listing 4-5), you modify the flipsideViewControllerDidFinish: method to save the user preferences:
if (controller.wordsOfWisdom ) {
fallingWords = controller.wordsOfWisdom;
[[NSUserDefaults standardUserDefaults]
setObject:fallingWords forKey:kWordsOfWisdom];[fallingWords retain];
}
if (controller.slider.value) {
speed = kMaxSpeed-controller.slider.value; // can access
it directly or use an ivar as above
[[NSUserDefaults standardUserDefaults]setDouble:
controller.slider.value forKey:kSpeed];
}
[self dismissModalViewControllerAnimated:YES];As you'll recall from earlier in this chapter, you use standardUserDefaults (a NSUserDefaults class method) to gain access to the standard user defaults; you can store data there, and then get it back when you need it. To store data, you use the setObject;forKey: method. The first argument, setObject:, is the object you want NSUserDefaults to save (fallingWords); the second argument is forKey: (kWordsOfWisdom), which is how NSUserDefaults identifies it. For the slider value, setDouble: controller.slider.value forKey: sets the value of the specified default key to the double value.
The dismissModalViewControllerAnimated: method animates the view as it's dismissed. You're sending the message to the view controller that invoked the presentModalViewController method — in this case, the (IBAction)showInfo method. (Take another peek at Listing 4-5 at the end.)
Note
Don't forget to save your changes in Xcode; otherwise, Interface Builder won't be able to find the new code.
You've created the outlets and their accessor methods in your code. Now you can create the connection in Interface Builder so that when the nib file is loaded, the nib loading code will create these connections automatically, using the accessors you had the compiler create for the slider and theTextField.
Now that you have the code ready to connect to the interface objects you want to use in the Flipside view, you can open the view in Interface Builder. Click Resources in the Groups & Files list and then double-click the FlipsideView.xib file to launch Interface Builder, as I describe in Chapter 2 of this minibook.
You can then click the Flipside View icon in the FlipsideView.xib window of Interface Builder, so that you can add the objects to it. If the Library window isn't already open, choose Tools
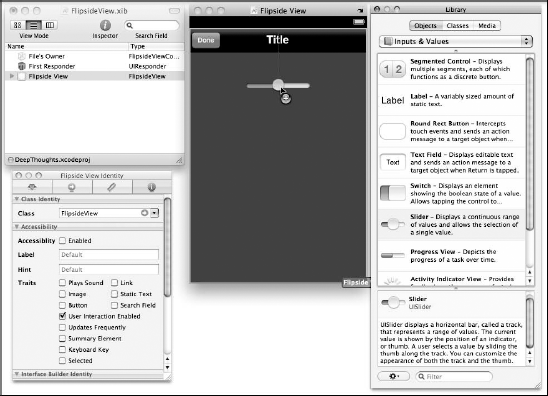
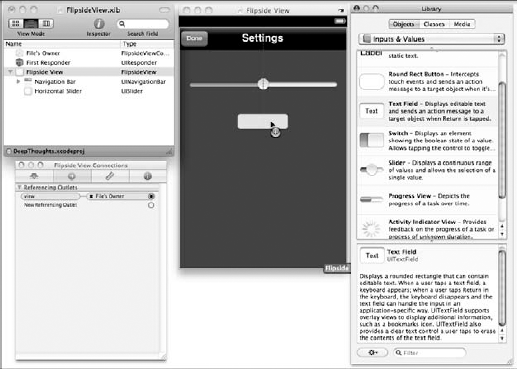
Drag the slider, as shown in Figure 4-15, from the Library window over to the Flipside View window. Horizontal and vertical guides appear to help you place the slider where you want it.
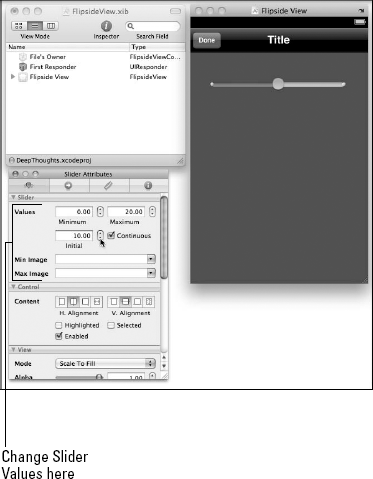
You can select the horizontal slider in the Flipside View window and then drag its edges to make it longer. To set the slider's values, click the Attributes tab in the Inspector window (or choose Tools
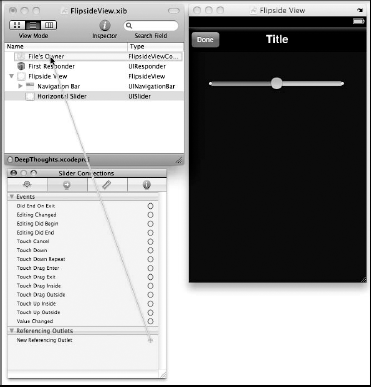
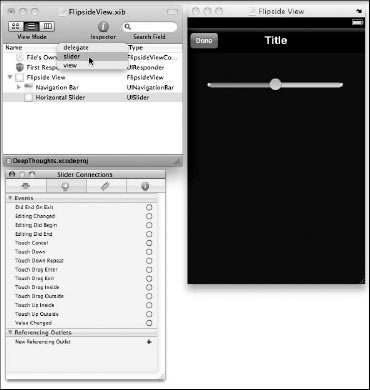
To connect the horizontal slider to your code, first click the triangle next to the Flipside View icon in the FlipsideView.xib window to reveal its contents (which includes Horizontal Slider) and then select Horizontal Slider. Then click the Connections tab in the Inspector window (or choose Tools
Now, perform the same procedure with the Text Field object in the Interface Builder Library window. (If the Library window isn't already open, choose Tools
You can select your new text field in the Flipside View window and then drag its edges to make it longer, and change its attributes by clicking the Attributes tab in the Inspector window (or choosing Tools
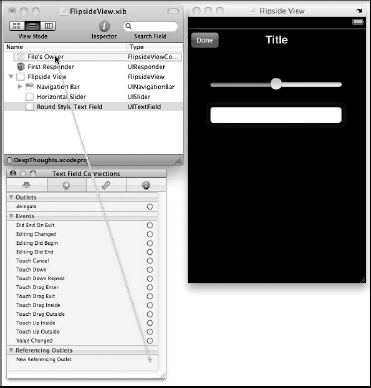
To connect the text field to your code, first select Round Style Text Field (which is now underneath Horizontal Slider) in the FlipsideView.xib window. Then click the Connections tab in the Inspector window (or choose Tools
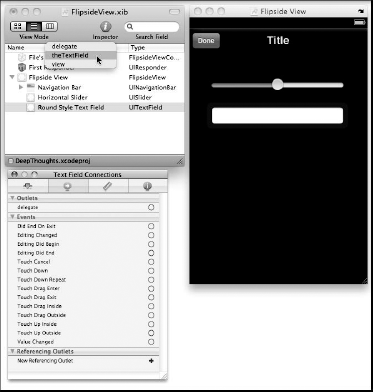
Finally, with Round Style Text Field still selected, drag from the connection point for delegate (at the top of the Text Field Connections window) to File's Owner, in order to hook up the text field's delegate connector to FlipsideViewController.
So it looks like you now have all the pieces in place for the DeepThoughts application — build and run your project to see what you have. You can now enter a new phrase, speed up or slow down the animation, and save both preferences using either the Flipside view or the Settings app.
Ah, but there's more you can do with this little app, as you see in the next chapter.