
Using your friendly Xcode Text editor
Adding your code to the Main view controller
Creating animation in the Main view
I wanted to keep this example iPhone utility app as simple as possible so that you can focus on how it works as an app in the iPhone OS — and you can then go off and design your complex app. The Utility Application template creates the skeleton for a fully functioning iPhone app (DeepThoughts) — and now you get to flesh it all out with some code that transforms it from an app that just sits there and looks pretty to an app that actually does something.
DeepThoughts is supposed to display "falling" words — text flowing down the Main view in different sizes, starting with the words "Peace Love Groovy Music" — at a specified time interval and at a speed the user can change. DeepThoughts should also allow the user to enter text in the Flipside view to substitute different words for "Peace Love Groovy Music" and, eventually, to select a photo from the iPhone's photo library to substitute for the words.
As you add the code to DeepThoughts, I also explain some of the features of the Xcode Text editor.
The main tool you use to write code for an iPhone application is the Xcode Text editor. Apple has gone out of its way to make the Text editor as user-friendly as possible, as evidenced by the following list of (quite convenient) features:
Code Sense: Code Sense is a feature of the editor that shows arguments, placeholders, and suggested code as you type statements. Code Sense can be really useful, especially if you're like me and forget exactly what the arguments for a function actually are. When Code Sense is active (it is by default), Xcode uses the text you typed, as well as the context within which you typed it, to provide suggestions for completing what it thinks you're going to type. You can accept suggestions by pressing Tab or Return. You may also display a list of completions by pressing the Escape key. You can set options for Code Sense by choosing Xcode

Code folding in the focus ribbon: With code folding, you can collapse code that you're not working on and display only the code that requires your attention. You do this by clicking in the Focus Ribbon column to the left of the code you want to hide (right there between the gutter, which displays line numbers and breakpoints, and the editor) to show a disclosure triangle. Clicking the disclosure triangle hides or shows blocks of code.
Switching between header and implementation windows: On the toolbar above the Text editor, you click the last icon before the lock to switch from the
.h(header) file to the.m(implementation) file, and vice versa. While the header declares the class's instance variables and methods, the implementation holds the logic of your code. If you look inside theMainViewandFlipsideViewsections of the Groups & Files list in the Project window, you can see the separate.hand.mfiles for the Main and Flipside view classes.Launching a file in a separate window: Double-click the filename to launch the file in a new window. If you have a big monitor, or multiple monitors, this new window enables you to look at more than one file at a time. You can, for example, look at the method of one class and the method it invokes in the same class or even a different class.
Like many developers, you may find yourself wanting to dig deeper when it comes to a particular bit of code. That's when you'll really appreciate Xcode's Quick Help, header file access, Documentation window, Help menu, and Find tools. With these tools, you can quickly access the documentation for a particular class, method, or property.
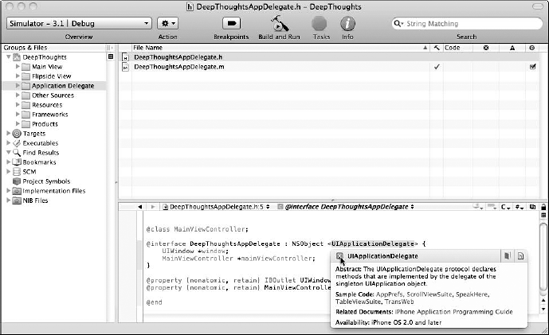
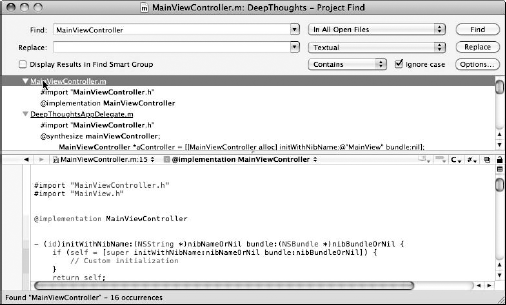
To see how this works, say you have the Project window open with the code displayed in Figure 3-1. What if you wanted to find out more about UIApplicationDelegate?
Quick Help is an unobtrusive window that provides the documentation for a single symbol. It pops up inline, although you can use Quick Help as a symbol inspector (which stays open) by moving the window after it opens. You can also customize the display in Documentation preferences in Xcode preferences.
To get Quick Help for a symbol, double-click to select the symbol in the Text editor (in this case UIApplicationDelegate; see Figure 3-1) and then choose Help
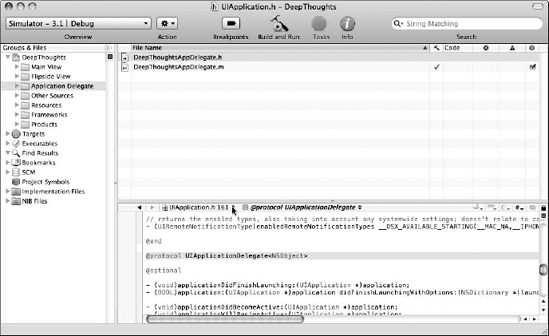
Headers are a big deal in code because they're the place where you find the class declaration, which includes all of its instance variables and method declarations. To get the header file for a symbol, press
Tip
This trick works for the classes you create as well.
The Documentation window lets you browse and search items that are part of the Apple Developer Connection Reference Library (a collection of developer documentation and tech notes) as well as any third-party documentation you have installed.
You access the documentation by pressing
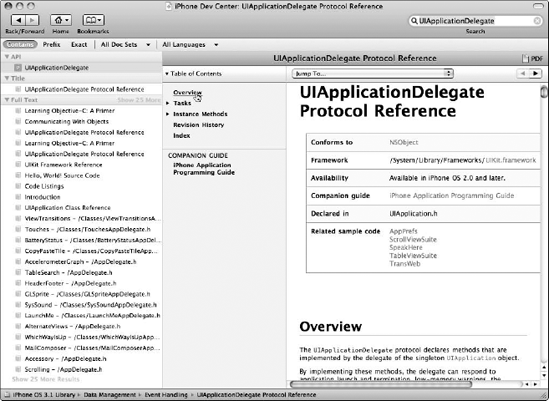
Using the Documentation window, you can browse and search the developer documentation — the API references, guides, and article collections about particular tools or technologies — installed on your computer. It's the go-to place for getting documentation about a method or more info about the methods and properties in a framework class.
The Help menu's search field also lets you search Xcode documentation as well as open the Documentation window and Quick Help.
You can also right-click on a symbol and get a pop-up menu that gives you similar options to what you see in the Help menu, including Quick Help (and other related functions).
Xcode can also help you find things in your own project. The submenu that you access by choosing Edit
You'll find that, as your classes get bigger, sometimes you'll want to find a single symbol or all occurrences of a symbol in a file or class. You can easily do that by choosing Edit
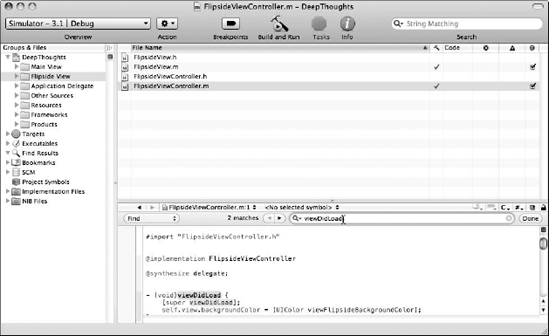
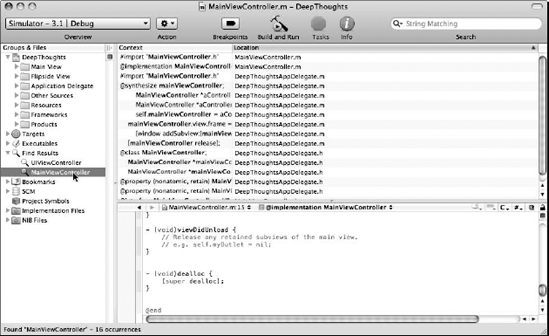
If you select an item in the top pane of the editor, as you can see in Figure 3-4, the file in which that instance occurs is opened in the bottom pane of the editor and the reference highlighted.
You can also use Find to go through your whole project by choosing Edit
Your searches are saved in your project. Click the triangle next to Find Results in the Groups & Files list to reveal your searches, as shown in Figure 3-6. Select a search to see the search results.
Now that you have some idea of how to use the Xcode Text editor, it's time to write some code.
One of the biggest challenges facing a developer working with an unfamiliar framework and template is figuring out where in the control flow — the sequence in which messages are sent during execution — to put the code to get something done.
As you may recall from Chapter 1 of this minibook, UIApplication loads the parts of the MainWindow.xib to create DeepThoughtsAppDelegate and the window, and sends DeepThoughtsAppDelegate the applicationDidFinishLaunching: message. The applicationDidFinishLaunching: method in DeepThoughtsAppDelegate initializes MainView.
The applicationDidFinishLaunching: message is sent at the very beginning, before the user can even see anything on the screen. Here's where you'd insert your code to initialize your application — where you'd load data, for example, or restore the state of the application to where it was the last time the user exited.
MainViewController is the controller responsible for managing MainView. If you look at the code in MainViewController.m (as shown in Chapter 2 of this minibook), you see the following commented-out code:
/*
 // Implement viewDidLoad to do additional setup after
   loading the view, typically from a nib.
 - (void)viewDidLoad {
[super viewDidLoad];
}
*/
The viewDidLoad message is sent right after the view has been loaded from the nib file — check out Chapter 1 of this minibook for a complete explanation of that loading process. This is the place where you insert your code for view initialization, which in this case means displaying the DeepThoughts' falling words.
Tip
Although I don't use it in this example, you could also make use of the viewWillAppear message, which is sent right before the view will appear. This would be the place to insert your code to do anything needed before the view becomes visible. Both viewDidLoad and viewWillAppear are methods declared in the UIViewController class and are invoked at the appropriate times by the framework.
To add the code you need to display the falling words at speed that could be set by the user, first open MainViewController.h and insert the code in bold in Listing 3-1.
Example 3-1. MainViewController.h
#import "FlipsideViewController.h"

@interface MainViewController : UIViewController
   <FlipsideViewControllerDelegate> {
  UIImage *fallingImage;
  NSString *fallingWords;
  double    speed;
}
- (IBAction)showInfo;
@end
This establishes the falling image itself (fallingImage), which will contain the text string in fallingWords and will flow down the display according to the speed.
Next, open MainViewController.m and insert the code in bold in Listing 3-2, which replaces the commented-out code described previously.
Example 3-2. MainViewController.m
#import "MainViewController.h"
#import "MainView.h"

@implementation MainViewController

-  (id)initWithNibName:(NSString *)nibNameOrNil
    bundle:(NSBundle *)nibBundleOrNil {
     if (self = [super initWithNibName:nibNameOrNil
    bundle:nibBundleOrNil]) {
        // Custom initialization
     }
     return self;

}

-  (void)viewDidLoad {

   [super viewDidLoad];
   self.view.backgroundColor = [UIColor colorWithRed:.5
    green:3 blue:.7 alpha:1];}
[NSTimer scheduledTimerWithTimeInterval:.5 target:selfselector:@selector(onTimer) userInfo:nil repeats:YES];fallingWords = [[NSString alloc] initWithString:@"PeaceLove Groovy Music"];speed = 10.0;}- (void)onTimer{UILabel *fallingImageView = [[UILabel alloc]initWithFrame:CGRectMake(0, 0, 100, 30)];fallingImageView.text = fallingWords;fallingImageView.textColor = [UIColor purpleColor];fallingImageView.font = [UIFont systemFontOfSize:30];fallingImageView.backgroundColor = [UIColorcolorWithRed:.5 green:3 blue:.7 alpha:1];fallingImageView.adjustsFontSizeToFitWidth = YES;int startX = round(random() % 80);int endX = round(random() % 80);//speed of fallingdouble randomSpeed = (1/round(random() % 100) +1) *speed;// image size;double scaleH = (1/round(random() % 100) +1) *30;double scaleW = (1/round(random() % 100) +1) *200;[self.view addSubview:fallingImageView];fallingImageView.frame = CGRectMake(startX, −100, scaleW,scaleH);fallingImageView.alpha = .75;[UIView beginAnimations:nil context:fallingImageView];[UIView setAnimationDuration:randomSpeed];[UIView setAnimationDelegate:self];[UIViewsetAnimationDidStopSelector:@selector(animationDone:finished:context:)];fallingImageView.frame = CGRectMake(endX, 500, scaleW,scaleH);[UIView commitAnimations];}-(void)animationDone:(NSString *)animationIDfinished:(NSNumber *)finished context:(id)context {UIImageView *fallingImageView = context;[fallingImageView removeFromSuperview];[fallingImageView release];}
/*
  // Override to allow orientations other than the default
    portrait orientation.
  - (BOOL)shouldAutorotateToInterfaceOrientation:(
           UIInterfaceOrientation)interfaceOrientation {
  // Return YES for supported orientations
  return (interfaceOrientation ==
    UIInterfaceOrientationPortrait);
  }
  */

- (void)flipsideViewControllerDidFinish:(FlipsideViewControl
   ler *)controller {

   [self dismissModalViewControllerAnimated:YES];
}

- (IBAction)showInfo {

   FlipsideViewController *controller
   = [[FlipsideViewController alloc]
   initWithNibName:@"FlipsideView" bundle:nil];
   controller.delegate = self;

   controller.modalTransitionStyle =
   UIModalTransitionStyleFlipHorizontal;
   [self presentModalViewController:controller animated:YES];

   [controller release];
}

/*
 // Override to allow orientations other than the default
    portrait orientation.
 - (BOOL)shouldAutorotateToInterfaceOrientation:(UIInterfaceOrientation)interfaceO
   rientation {
// Return YES for supported orientations
return (interfaceOrientation ==
  UIInterfaceOrientationPortrait);
}
*/

- (void)didReceiveMemoryWarning {
   // Releases the view if it doesn't have a superview.
    [super didReceiveMemoryWarning];

   // Release any cached data, images, etc that aren't in
   use.
}
- (void)viewDidUnload {
// Release any retained subviews of the main view.
// e.g. self.myOutlet = nil;
}
- (void)dealloc {
[super dealloc];
}
@endThe first chunk of code to examine (in bold in Listing 3-2) changes the background color of the Main view and sets up a timer for the interval between each display of falling words or images:
- (void)viewDidLoad {

  [super viewDidLoad];
  self.view.backgroundColor = [UIColor colorWithRed:.5
   green:3 blue:.7 alpha:1];
  [NSTimer scheduledTimerWithTimeInterval:.5 target:self
   selector:@selector(onTimer) userInfo:nil repeats:YES];

  fallingWords = [[NSString alloc] initWithString:@"Peace
   Love Groovy Music"];
  speed = 10.0;
}
The viewDidLoad method enables you to change the background color. A UIColor object represents color and sometimes opacity (alpha value). The colorWithRed:.5 green:3 blue:.7 alpha:1 creates and returns a color object using the specified opacity and RGB component values.
You use the NSTimer class to create timers. A timer waits until a certain time interval has elapsed and then fires, sending a specified message to a target object. I use the scheduledTimerWithTimeInterval:target:selector:userInfo:repeats: class method to create the timer and schedule it on the current run loop in the default mode. The interval is 0.5 seconds, the target is self, and the selector is the message to send to the target when the timer fires — in this case, onTimer. The userInfo is the user info for the timer (set to nil), and the timer is set to repeat — that is, it will repeatedly reschedule itself until invalidated.
An NSString object represents a character string. Representing strings as objects allows you to use strings wherever you use other objects. It also provides the benefits of encapsulation, so that string objects can use whatever encoding and storage are needed for efficiency while simply appearing as arrays of characters. In this case, fallingWords is initialized with the string "Peace Love Groovy Music". The speed is initialized with the value 10.
Connecting the timer to the actual drawing of the display is the onTimer method. Take a good look at the code for this method (from the bold code in Listing 3-2):
- (void)onTimer{

  UILabel *fallingImageView = [[UILabel alloc]
   initWithFrame:CGRectMake(0, 0, 100, 30)];
  fallingImageView.text = fallingWords;
  fallingImageView.textColor = [UIColor purpleColor];
  fallingImageView.font = [UIFont systemFontOfSize:30];
  fallingImageView.backgroundColor = [UIColor
    colorWithRed:.5 green:3 blue:.7 alpha:1];
  fallingImageView.adjustsFontSizeToFitWidth = YES;

  int startX = round(random() % 80);
  int endX = round(random() % 80);
  //speed of falling
  double randomSpeed = (1/round(random() % 100) +1) *speed;
  // image size;
  double scaleH = (1/round(random() % 100) +1) *30;
  double scaleW = (1/round(random() % 100) +1) *200;

  [self.view addSubview:fallingImageView];

  fallingImageView.frame = CGRectMake(startX, −100, scaleW,
   scaleH);

  fallingImageView.alpha = .75;

  [UIView beginAnimations:nil context:fallingImageView];
  [UIView setAnimationDuration:randomSpeed];
  [UIView setAnimationDelegate:self];
       [UIView
   setAnimationDidStopSelector:@selector(
   animationDone:finished:context:)];

  fallingImageView.frame = CGRectMake(endX, 500, scaleW,
   scaleH);

  [UIView commitAnimations];
}
-(void)animationDone:(NSString *)animationID
finished:(NSNumber *)finished context:(id)context {
UIImageView *fallingImageView = context;
[fallingImageView removeFromSuperview];
[fallingImageView release];
}The UILabel class implements a read-only text view. You can use this class to draw one or multiple lines of static text. In this case, the block of code uses the initWithFrame method with CGRectMake to create a rectangle, with the x-coordinate and y-coordinate of the rectangle's origin point at (0, 0) and a specified width and height (100, 30).
The code converts the fallingWords string to fallingImageView for display; sets up the text color, font, and background color; and adjusts the font size for the width. The font and textColor properties apply to the entire text string.
The next block of code uses the random function for the starting and ending points (startX and endX), for speed, and for width (scaleW) and height (scaleH) for fallingImageView. The random function uses a non-linear additive-feedback random number generator, with a default table of size 31 long integers, and returns successive pseudo-random numbers in the range from 0 to 2,147,483,647. Then, addSubview adds a view so that it's displayed above its siblings, and frame specifies the rectangle in the super-layer's coordinate space, using startX, −100, scaleW, and scaleH.
The UIView class provides common methods you use to create all types of views. In this particular code, it's used for a block of animation. The beginAnimations:context: method starts the animation block, and the commitAnimations method ends the block. Inside the block, the code sets property values to make visual changes that comprise the animation. In this case, the code changes the rectangle's starting coordinates from startX to endX, and from −100 to 500:
fallingImageView.frame = CGRectMake(endX, 500, scaleW,
   scaleH);
The setAnimationDuration method sets the animation duration, and setAnimationDidStopSelector sets the message to send to the animation delegate when animation stops. The animation delegate is animationDone, uses removeFromSuperview (an instance method of the UIView class) to remove fallingImageView from its superview, its window, and from the responder chain; and then uses release (an instance method of the NSAutoreleasePool class) to release fallingImageView. Remember, you own any object you create with alloc, which means you're responsible for releasing it when you're done.
Save your Xcode project by choosing File

The animation is quite impressive, but now is not the time to sit on your laurels. There's more work to be done — setting up the Flipside view controls so that users can change the text and speed, and saving the user's preferences. All that and more are covered in Chapter 4 of this minibook.