
An introduction to Core Data
Looking at managed objects
The Core Data architecture
Adding a Core Data stack
Although property lists are definitely cool, they're far from the universal solution to data management. For example, every time you start the app you still have to build the objects (the dictionaries, arrays, and so on) that you have saved. But more importantly, the real issue is that you can save only property list objects in a property list. That means you can't save relationships between objects.
Although there are some workarounds you can try to save relationships — the code kind, not necessarily the human kind — they can be very cumbersome if you have lots of objects. Imagine if you had 50 or so states in your application, with each one having a number of cities you were planning to visit, and each one of those with a number of hotels and sights. And oh yes, what about undo and redo?
What is really needed here is object persistence — you want to create the object once (along with its links to other objects) and then be able to continue to use it across application launches.
Fortunately there is a great way to create object persistence on the iPhone — Core Data. It's a deep, wide, and very mature technology, used on the Mac for years, which makes the iPhone version very attractive. Core Data makes it easy to create, manage, and delete objects as well as shake to undo and redo.
In fact, Apple is heavily promoting the use of Core Data on the iPhone. For example, there used to be some sample code that showed you how to use SQLite — a relational data base built into the iPhone. Those examples are now gone, replaced by Core Data examples instead. (These examples do use SQLite as the persistent store — I explain what that means shortly.)
In this and the next chapter, I show you how to implement Core Data in RoadTrip to support adding a new hotel. I don't get into all the bells and whistles — it would take an entire book to do that. What I do is give you enough background and understanding so you'll be comfortable exploring Core Data on your own — and you'll be able to use the great sample code that Apple provides that shows you how to use Core data to do most of what you'll want to do in your application.
Think about it. You have all those great classes for views and view controllers and what have you. But what do you have for your model? You know, that thing that actually provides the content in your application?
One lousy class. That's right, one, count it, one — NSObject. That was until Core Data became available.
Core Data makes it easy for a developer to do two things.
You do that by
Creating a managed object (data) model that describes the object's data and relationships to other objects.
Deriving your classes that are to be managed by Core Data from
NSManagedObjectinstead ofNSObject.Creating a managed object context that manages your collection of objects — responsible for lifecycle management, validation, maintaining relationships between objects, undo/redo, and managing the persistent store. This mechanism is for storing your objects to disk and is pretty much handled for you.
Creating your objects in the more or less usual way — within the managed object context, of course — and then save them.
Fetching your saved objects, optionally using a
FetchedResultsControllerto get your objects in a way that is optimized for table views.
Note that Core Data isn't restricted to document-based applications. You can, for example, create a Core Data-based application with no user interface.
Before you go any further and get your hopes up, I want to explain what Core Data is not.
Although Core Data can use a relational database — SQLite — as one of its persistent store types, it isn't in and of itself a relational database or a relational database management system. It's about providing an infrastructure for saving objects to (and retrieving them from) storage as well as Undo and Redo support.
Core Data is not an application generator — you still have to write code.
Even though the idea of Core Data can be overwhelming at first — a lot of the documentation assumes that you are both an expert in object-oriented programming (which I am) and a data base aficionado, (which I am not), when it comes right down to it, once you wade through the mess (I personally have taken the bullet for you here) it actually makes sense.
So start at the beginning — what you need.
You want to have Core Data manage Hotel objects for you. You want to be able to create, save, and modify them. You'd also like to support undos and redos for the entry of new Hotel objects.
The right place to start then is with the Hotel class.
If you were going to create a Hotel class on your own, it would sort of look like Listing 4-1.
Example 4-1. A Hotel Class
@class Annotation;

@interface Hotel :  NSObject  {

NSString * city;
NSString * name;
NSString * state;
NSString * street;
NSString * zip;
Annotation * annotation;
}

- (NSString *) returnCity;
- (NSString *) returnName;
- (NSString *) returnState;
- (NSString *) returnStreet;
- (NSString *) returnZip;
- (Annotation *) returnAnnotation;

@end
This code looks a lot like the other model objects in RoadTrip. You would also expect some kind of initialization method — but you get the picture.
You also see a reference in the Hotel interface to an Annotation class. Now, I'd gotten rid of separate annotation objects in the last chapter, and quite frankly, I would prefer to do that here as well. But after much rumination and angst I decide to add them back, only because that would enable me to show you how Core Data maintains relationships between objects.
So keep that in mind as you continue, and don't do it this way at home.
Now take a look at the Annotation class in Listing 4-2.
Example 4-2. An Annotation Class
@class Hotel;
#import <MapKit/MapKit.h>

@class Hotel;

@interface Annotation : NSObject <MKAnnotation >
{

NSString * title;
NSString * subtitle;
CLLocationCoordinate2D coordinate;
}

- (NSString *) title;
- (NSString *) subtitle;

@property (nonatomic) CLLocationCoordinate2D coordinate;

@end
It looks like the MapAnnotation class you declared in Book V, Chapter 5 (sans the initialization method).
As you might have guessed, though, instead of coding these objects on my own, I am going to let Core Data do it. But for Core Data to do it, it needs a description of its objects. You provide this description by creating a managed object model — a schema (or a diagram that represents the elements in a system using symbols) that describes the entities your application uses and the relationships between them.
Core Data uses the model to map between the managed objects in your application and the records in the database. It's important to be aware that if you change the schema in your application, Core Data won't be able to read stores you created using the previous model — you can use a migration mechanism or simply delete the application from the simulator or the phone and start over from scratch.
The managed object model is a collection of entity and property description objects that tell Core Data about the managed objects in your application. Entity description objects provide (meta) data about an entity, including its name, the name of the class that represents it in your application (this doesn't have to be the same as its name), and its attributes and relationships. Similarly, attribute and relationship (property) description objects provide information about attributes and relationships. So, with that info in hand, you're ready to go build a managed object model for Hotels and Annotations in the RoadTrip app.
Although you can create the model programmatically, I show you how to use the Xcode modeling tool (one that is quite similar to Interface Builder) to create the model graphically.
Tip
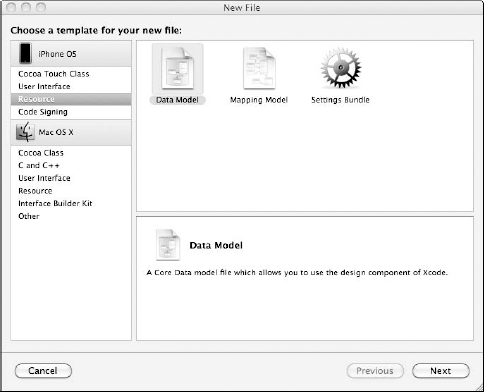
I'm going to put my model in the Resource folder, so before you start, be sure to select that folder first.
Choose File

In the leftmost column of the dialog, first select Resource under the iPhone OS heading, then select the Data Model template in the topmost pane as I have in Figure 4-1. Then click Next.
You see a new dialog asking for some more information.
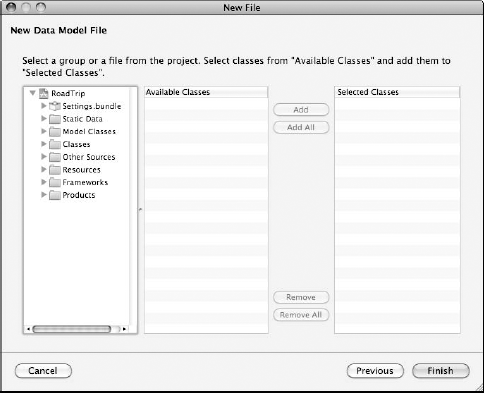
Replace untitled with
RoadTripin the Model Name field — it should readRoadTrip.xcdatamodel— and then click Next.You see another dialog ( see Figure 4-2), which will remain uncommented on because it's beyond the scope of this book, so go ahead and just click Finish.
You have to leave some stuff for your retirement years, right?
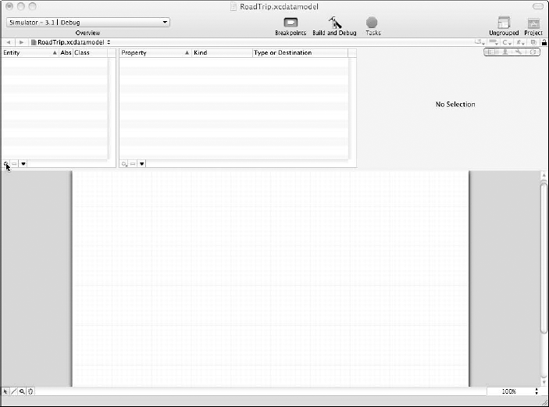
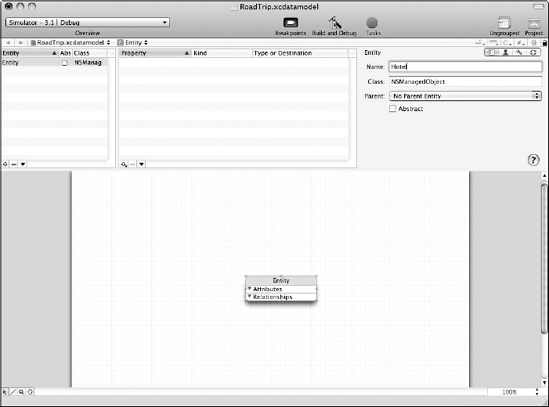
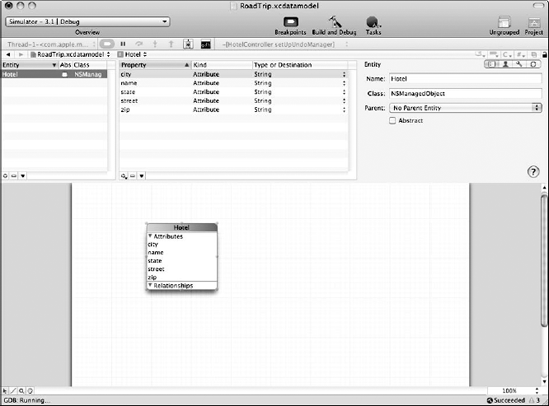
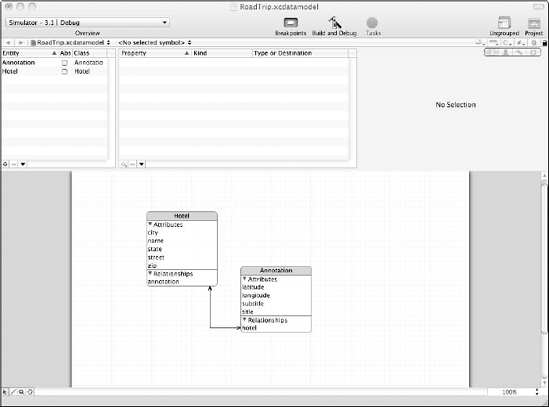
You can find your managed object model RoadTrip.xcdatamodel in the Groups & Files list. I double-clicked it to launch it in a separate window, and if you do the same, you should see the same thing I see in Figure 4-3.
First, add an entity. An entity is the highest level object in a Core Data data model. Entities generally correspond to the classes traditionally used to hold data, but they can also be thought of as the objects you identify in your object-oriented programming model.
You'll have two entities when you're done — Hotel and Annotation — corresponding to the Hotel and Annotation objects you'll use in your application.
With your brand-spanking-new (and empty) data model open, choose Design
You can also click the Add button (+) at the lower left of the entity pane, as I have in Figure 4-3, or right-click to use the shortcut menu within the Diagram view in the Model Editor.
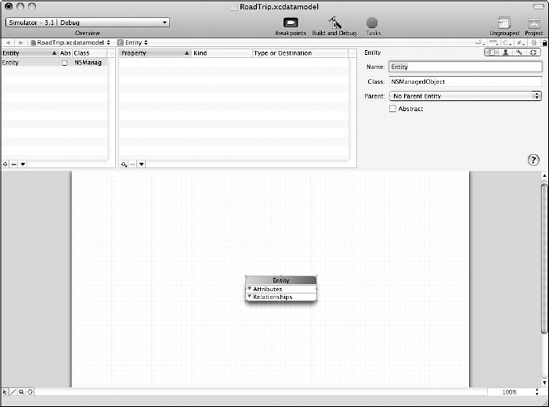
Figure 4-4 shows what you should see after doing one of those things.
You should see a new entry for the entity (called Entity) appear in the Entity pane at the top left of the Xcode Model Editor, and a graphical representation of the entity (a rounded rectangle) appear in the Diagram view. Now you can set the name for the new entity.
Make sure you have the new entity selected in the Entity pane so that you see information about the entity in the Detail pane at the far right, then change the name of the entity to Hotel, as I have in Figure 4-5.
Be sure not to change the class name.
Note
The name of the entity and the name of the Objective-C class used to represent instances of the entity are not the same thing. Core Data uses the entity name to manage its data objects and so it doesn't have to be the same as its class name. In fact, you can often get away without really using any classes (although I use them in this example) other than NSManagedObject (which I explain later).
The next thing you need to do is add the attributes to the entity. These correspond to the instance variables you are used to using, which correspond to the model's data.
You start by adding the Name attribute.
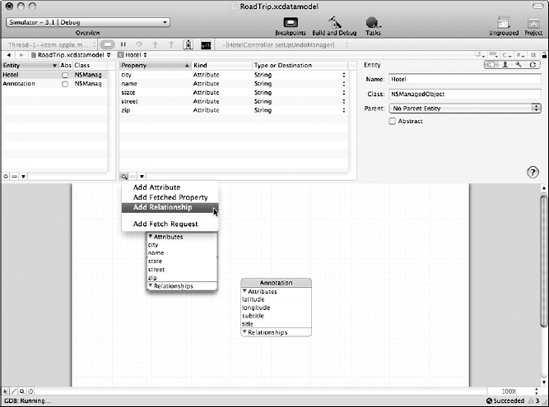
Make sure Hotel is selected in the Entity pane and then choose Design
You can also use the Add button (+) at the lower left of the property pane, as I have in Figure 4-6, or right-click to use the shortcut menu within the Diagram view in the Model Editor.
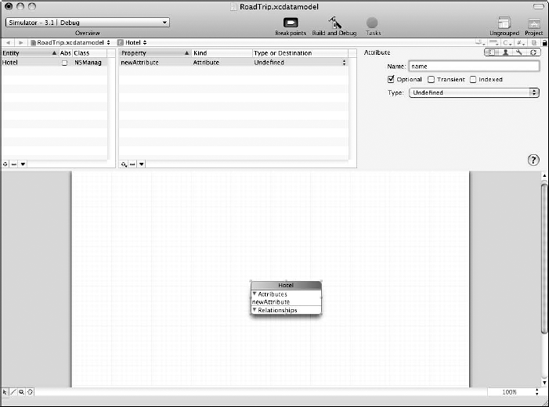
You should see a new attribute (called
newAttribute) appear in the Property pane in the upper-center of the window. Now you need to set its name and type.Make sure you have selected the new attribute in the Property pane; then in the Detail pane change the name of the attribute to
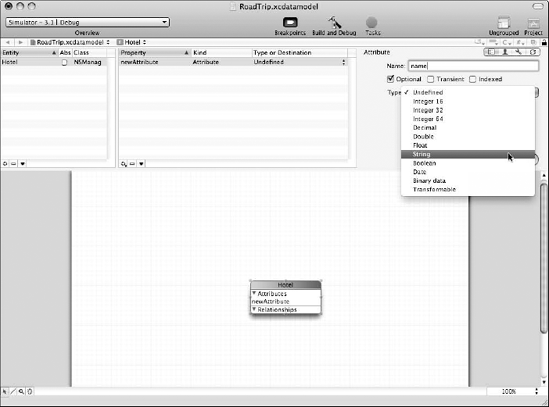
name, as I have in Figure 4-7.Next up, you need to tell Core Data what type this attribute is.
Select String from the Type pop-up menu as I have in Figure 4-8.

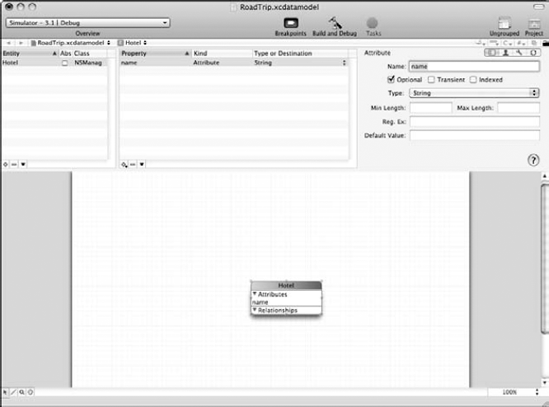
When you're done, your model should look just like mine, as shown in Figure 4-9.
Now add attributes for city, state, street, and zip code by going through Steps 1–3 for each.
When you're done, your model should look like Figure 4-10.
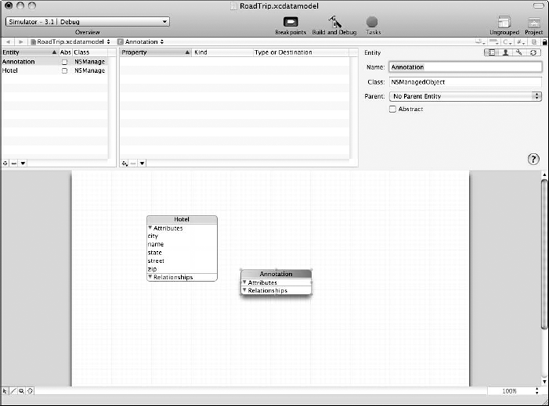
As I mention earlier, you need another entity as well — Annotation.
Create the
Annotationentity by choosing DesignFeel free to use the Add button (+) at the lower left of the entity pane if that is more to your liking.
You should see a new entry for the entity (called Entity) appear in the Entity pane at the top left of the Model Editor, and a graphical representation of the entity (a rounded rectangle) should appear in the Diagram view. Now you can set the name for the new entity.
Make sure you have the new entity selected in the entity pane so that you see information about the entity in the detail pane at the right; then change the name of the entity to Annotation, as I have in Figure 4-11.
Don't change the class name.
As you might expect, you have to add some attributes here as well.
Make sure you have selected Annotation in the Entity pane; then choose Design
You should see a new attribute (called
newAttribute) appear in the Property pane.It probably isn't news to you that you need to set its name and type.
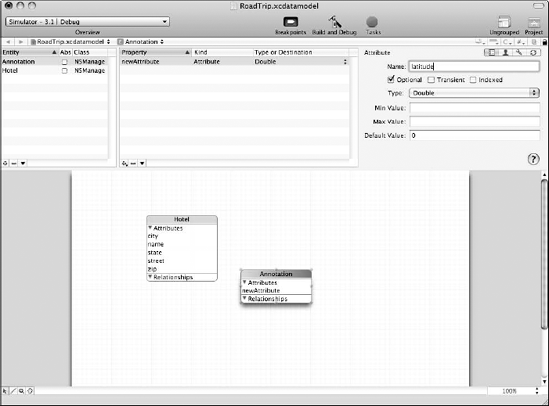
Make sure you've selected the new attribute in the Property pane; then in the Detail pane change the name of the attribute to latitude, as I have in Figure 4-12.
For this particular entity, choose Double from the Type pop-up menu.
Again, Figure 4-12 shows what that looks like.
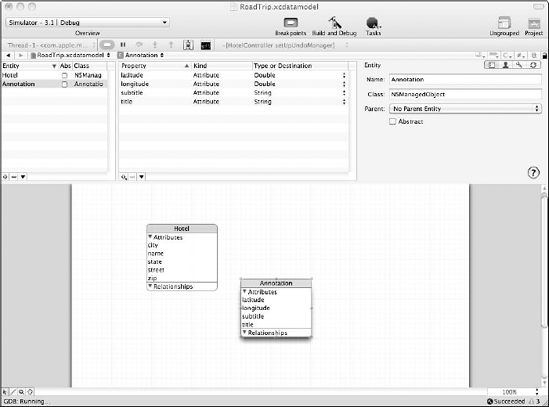
Add another attribute — longitude of type
Double. Then add two more attributes — title and subtitle of typeString.When you're done, your model should look like Figure 4-13.
At this point, you may be saying to yourself, "Fine and good, I have the two entries I need, but shouldn't there be a link between Hotel and its Annotation?"
Thank you for asking. I show you how to do that now.
Now, if I had my druthers, I'd rather have set up title subtitle, latitude, and longitude as part of the Hotel entry, but doing it this way means I get to show you how to create a relation between two entities.
Make sure you have selected Hotel in the Entity pane and then choose Design
You can also use the Add button (+) at the lower left of the Property pane, as I have in Figure 4-14, or right-click to use the shortcut menu within the Diagram view in the Model Editor.
You should see a new relationship (called
newRelationship) appear in the Property pane. You need to set its name and destination.Make sure you've selected
newRelationshipin the Property pane; then in the Detail pane change the name of the relationship to annotation as I have in Figure 4-15.Next you need to tell Core Data what the annotation's destination is — what it has a relationship to, in other words.
Select
Annotationfrom the Type pop-up menu, as I have in Figure 4-15.You don't need to set any of the other values.

When you're done, your model should look like what you see in Figure 4-16.
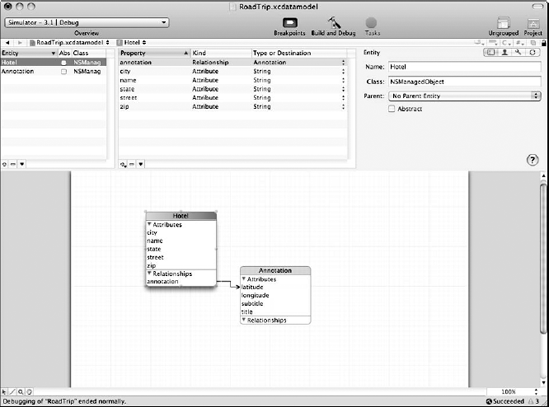
You also may want to be able to reference Hotel from its annotation, so let me show you how to do that as well.
Make sure you've selected Annotation in the Entity pane and then choose Design
As always, you can also use the Add button (+) at the lower left of the Property pane, as I did back in Figure 4-14, or right-click to use the shortcut menu within the Diagram view in the Model Editor.
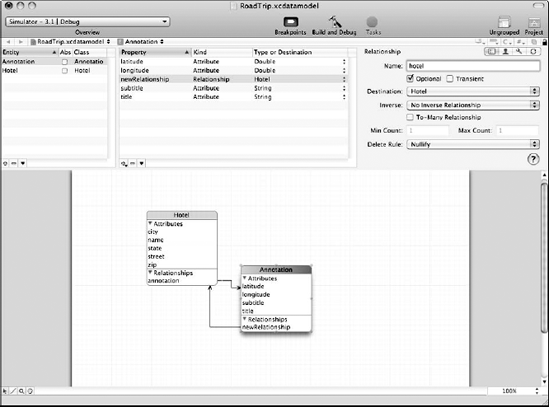
You should see a new relationship (called
newRelationship) appear in the Property pane. You need to set its name and destination — no surprise there.Make sure you have selected
newRelationshipin the Property pane; then in the Detail pane change the name of the relationship tohotel.Still in the Detail pane, choose Hotel from the Destination pop-up menu.
When you're done, it should look like Figure 4-17.
Next you want to refine the relationship a bit more. You need to create an inverse relationship between Hotel and Annotation. That means when Core Data loads your objects, they will point to each other.
You usually model relationships in both directions and specify the inverse relationships accordingly. Core Data uses this information to ensure consistency when a change is made to one or the other.
Make sure Annotation is selected in the Entity pane and then choose Annotation from the Detail pane's Inverse pop-up menu as I have in Figure 4-18.
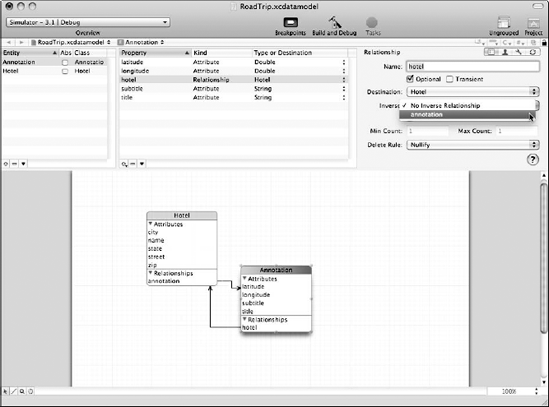
When you're done, your data model should look like Figure 4-19.
Of course, you still need the classes for your program. Remember, all you've done thus far is create a data model for Core Data to use to both save and get your objects. You'll still need the classes to describe them in your program.
Does that mean a lot of copy and paste? Of course not. You can now use Xcode to generate the files for your Hotel and Annotation classes.
With your data model open in Xcode, select either the Hotel or the Annotation entity in the Entity pane.
Base your selection on which item you want to create subclasses for.
Choose File
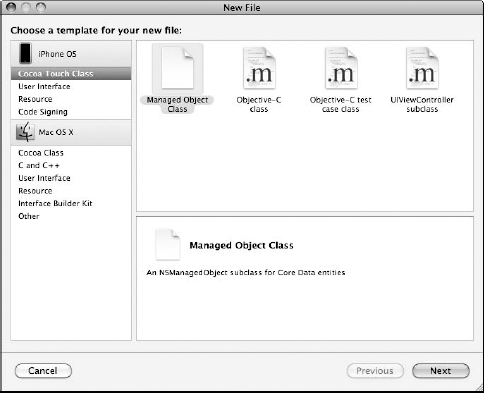
In the New File dialog that appears, first select Cocoa Touch Classes in the iPhone OS section on the left and then select Managed Object Class in the topmost pane, as I have in Figure 4-20.
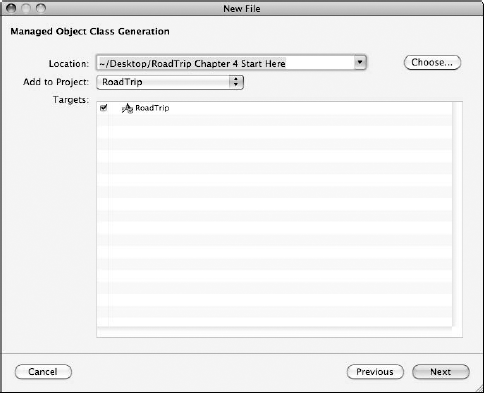
You'll see the screen shown in Figure 4-21.
The correct location and targets should already have been selected for you, so just click Next to accept them.
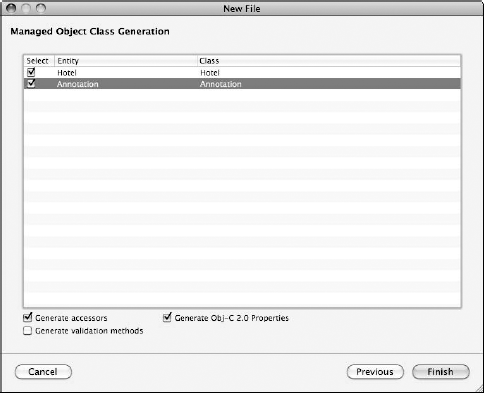
You see the Managed Object Class Generation dialog shown in Figure 4-22. Make sure both Hotel and Annotation are checked. The Generate Assessors and Generate Objective-C 2.0 Properties check boxes should also be selected.
Click Finish in the Managed Object Class Generation dialog to generate the files.
The
HotelandAnnotationclass interface and implementation files are created and added to your project. Just like that.Listings 4-3, 4-4, 4-5, and 4-6 show the
.hand.mfiles forHotelandAnnotation, respectively.
Example 4-3. Generated Hotel.h Class File
#import <CoreData/CoreData.h>

@class Annotation;

@interface Hotel :  NSManagedObject
{
}

@property (nonatomic, retain) NSString * street;
@property (nonatomic, retain) NSString * state;
@property (nonatomic, retain) NSString * zip;
@property (nonatomic, retain) NSString * name;
@property (nonatomic, retain) NSString * city;
@property (nonatomic, retain) Annotation * annotation;

@end
Example 4-4. Generated Hotel.m Class File
#import "Hotel.h"

#import "Annotation.h"

@implementation Hotel

@dynamic street;
@dynamic state;
@dynamic zip;
@dynamic name;
@dynamic city;
@dynamic annotation;

@end
Example 4-5. Generated Annotation.h Class File
@class Hotel;

@interface Annotation :  NSManagedObject
{
}

@property (nonatomic, retain) NSString * title;
@property (nonatomic, retain) NSNumber * latitude;
@property (nonatomic, retain) NSNumber * longitude;
@property (nonatomic, retain) NSString * subtitle;
@property (nonatomic, retain) Hotel * hotel;

@end
Example 4-6. Generated Annotation.m Class File
#import "Annotation.h"

#import "Hotel.h"

@implementation Annotation

@dynamic title;
@dynamic latitude;
@dynamic longitude;
@dynamic subtitle;
@dynamic hotel;

@end
There are a few things you should probably notice
In the interface files, all the attributes you specify in the model are represented by objects. For example even though you specified the
latitudeandlongitudeattribute types asDouble, the property values at runtime are instances ofNSNumberbecause Core Data uses objects to represent values (shades of the property list).In the implementation files, properties are implemented as
@dynamic, and not the "normal"@synthesize.Core Data generates the accessor methods at runtime.@dynamicinstructs the compiler not to generate a warning if it cannot find implementations of accessor methods.In the implementation files, there is no
deallocmethod. This is because Core Data will take care of that for the modeled properties of the generated object. If you do add your own instance variables (and you will), you have to manage the memory for those yourself in the normal way.The model has been updated. The
HotelandAnnotationentities are now those respective classes instead ofNSManagedObject. You need to save the model file because of that.
You also have to add a few things to Annotation.h to make it work. Add the code in bold in Listing 4-7.
Example 4-7. Modify Annotation.h Class File
#import <CoreData/CoreData.h> @class Hotel;#import <MapKit/MapKit.h>@interface Annotation : NSManagedObject<MKAnnotation>{CLLocationCoordinate2D coordinate;} @property (nonatomic, retain) NSString * title; @property (nonatomic, retain) NSNumber * latitude; @property (nonatomic, retain) NSNumber * longitude; @property (nonatomic, retain) NSString * subtitle; @property (nonatomic, retain) Hotel * hotel;@property (nonatomic) CLLocationCoordinate2D coordinate;- (NSString *) title;- (NSString *) subtitle;@end
You've both adopted and added the required methods and properties for the MKAnnotation protocol. Although I could have simply used the title and subtitle properties as is, I want to make you more comfortable with treating the generated classes like you would any other — say, by adding methods or even by adding methods that override the generated accessors.
You also have to implement the new methods in the Annotation.m file. Add the code in bold in Listing 4-8 to that file.
Example 4-8. Update Annotation.m
#import "Annotation.h" #import "Hotel.h" @implementation Annotation @dynamic title; @dynamic latitude; @dynamic longitude; @dynamic subtitle; @dynamic hotel;@synthesize coordinate;- (CLLocationCoordinate2D) coordinate {CLLocationCoordinate2D theCoordinate;theCoordinate.latitude = [self.latitude doubleValue];theCoordinate.longitude = [self.longitude doubleValue];return theCoordinate;}- (NSString *) title {return self.hotel.name;}- (NSString *) subtitle {return self.hotel.city;}@end
You'll also notice one other thing. Instead of being derived from NSObject, Hotel, and Annotation are derived from NSManagedObject. Read on to find out why Managed slipped its way between NS and Object.
NSManagedObject contains the methods and properties necessary to represent any entity. It has a reference to the entity description for the entity of which it is an instance — and using the information in the entity description, information about its attributes and relationships. You can also create subclasses of NSManagedObject to implement additional behavior.
If you feel so inclined, you can think of a managed object as the object representation of a record in a table in a database. Each managed object represents the data you operate on in your application — in this case Hotel objects and their associated data — name, street address, city, state, and zip code. You can even add in reservation data and conformation number at your leisure.
NSManagedObject connects your objects to the Managed Object Context, as explained in the next section.
Warning
If you regenerate the classes, all your work will be lost. If you need to regenerate, I suggest you rename the classes, generate the new ones, and then copy and paste your additions back in.
Now that you have your Core Data-managed object model as well as your classes, you'll want to create, save, and then restore your objects and implement undo and redo.
Luckily for you, the Core Data framework provides most of this functionality for you automatically, primarily through a managed object context (or just plain context) object. Its primary responsibility is to manage a collection of managed objects. The managed object context also allows you to use a collection of Core Data objects — collectively known as the persistence stack — that mediate between the objects in your application and external data stores.
You add objects and remove objects using the context. It tracks the changes you make, both to object attributes and to the relationships between objects. Because of that, the context is able to provide Undo and Redo support. It also ensures that if you change relationships between objects, the integrity of the relationship is maintained.
When you create a new managed object, you insert it into a context. You fetch existing records in the database into the context as managed objects. (I explain fetching in Chapter 5 of this minibook).
In any application, you might have multiple managed object contexts. You might want to maintain discrete sets of managed objects as well as edits to those objects; or you might want to perform a background operation by using one context while allowing the user to interact with objects in another.
When you fetch objects from a persistent store (I explain that next), you bring temporary copies into memory. You can then operate on these objects by doing things such as changing attributes and relationships and adding and deleting objects. When you're done, you save the changes you've made, and the context ensures that your objects are in a valid state. Then the changes are written to the persistent store (or stores), new records are added (for objects you created), and records are removed (for objects you deleted). But unless you actually save those changes, the persistent store remains unchanged — persistent, isn't it?
A persistent store coordinator is an instance of NSPersistentStoreCoordinator and manages precisely what you'd think it would manage — a collection of persistent object stores. A persistent object store is simply an external store (file) of persisted data. The persistent store coordinator is the object that actually maps between objects in your application and records in the database. In an iPhone application, you usually just have a single store, but in complex desktop applications there may be more than one. The persistent store coordinator manages these stores and makes them appear to the managed object contexts as a single store. If you did have multiple managed object contexts, each of these would be connected to the same coordinator.
The persistent store coordinator handles the nitty gritty of reading and writing data files. You probably won't ever directly interact with the persistent store coordinator after you've specified the location of a new external data store to be associated with your application.
After you've created the managed object model and generated your classes and have gotten your mind around the managed object context, you still need to set up what is known as the Core Data Stack in your application. This involves creating the following:
The
NSManagedObjectContextThe
NSManagedObjectModelThe
NSPersistentStoreCoordinator
I run through the creation of each one of these at the end of this chapter, but quite frankly, for what you'll be doing in RoadTrip, and for quite a while in your own application, you'll probably be using the boilerplate provided by Xcode.
Way back when you created the RoadTrip project, I told you to use XCode's Project template for a navigation-based application, but to leave the Use Core Data for Storage check box deselected.
If you had selected that check box way back when, you would have found yourself with an application that had Core Data firmly integrated into your application. You'd find the Core Data stack in your application delegate, and you'd find a RootViewController that used Core Data as well. Although letting Xcode do it might appear to be easier, figuring out how to retrofit Core Data into an existing application is something you'll want to know how to do, and doing so will give you a better understanding of how it all works.
That being the case, you still don't want to have to type all that code in by hand, so in this section I show you how to have the best of both worlds.
To start with, I want you to create a new, throw-away project. Use the Navigation-Based Application template you see in Figure 4-23, but this time select the check box that says Use Core Data for Storage. (If you need a refresher on how to set up a project in Xcode, take another look at Book V, Chapter 1.)
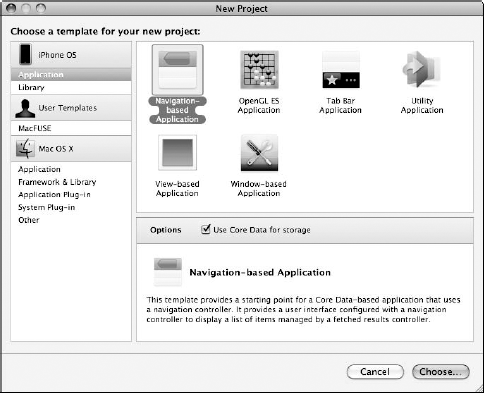
You can name the application anything you'd like, but I use CoreData.
In this new project you just created out of thin air, you'll find that the template contains all you need to set up Core Data, and all you really need to do is copy the generated code into your RoadTrip project. Here's the blow by blow:
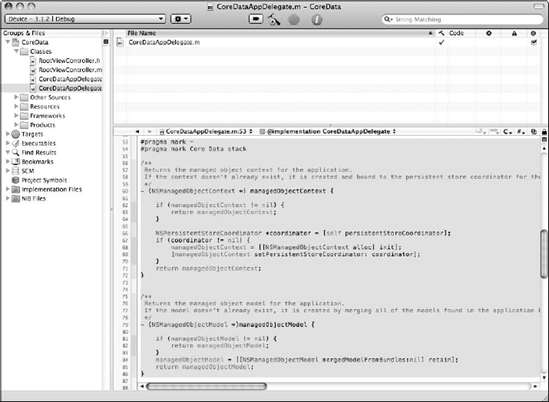
Select the
CoreDatAppDelegate.mfile and scroll to#pragma mark - #pragma mark Core Data stack
Figure 4-24 shows you where to stop.
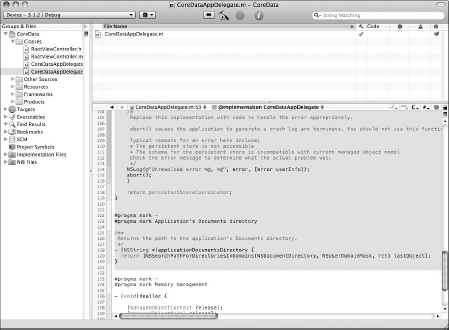
Select the code from that point, as I have in Figure 4-25, up to (but not including) the following two lines
#pragma mark -
#pragma mark Memory management
Note that you will be including the following code as well
#pragma mark -
#pragma mark Application's Documents directory
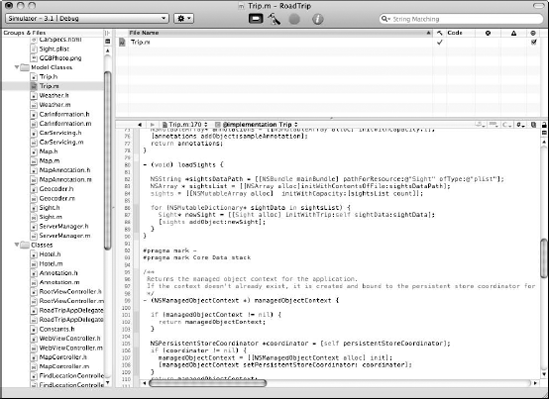
Copy all the code you've selected and paste it into
Trip.m.(See Figure 4-26.)
In your throw-away project, the Core Data Stack is, of course, in the application delegate. In this example, I've shown you how to have it owned by the model instead — with a little help from the Copy and Paste commands.
Okay, you have a Core Data Stack, which, admit it, didn't require much heavy lifting. Next you have to add the Core Data Framework.
Up until now, all you've needed to get by is the framework that more or less came supplied when you created a project. (Except for MapKit back in Book V, Chapter 5, of course, but that was the exception that proved the rule.) Now you need a new framework to enable Core Data.
Click the disclosure triangle next to Targets in the Groups & Files list and then right-click RoadTrip.
Warning
Be sure to do this using the Targets folder, or Step 3 won't work!
From the submenu that appears, choose Add and then choose Existing Frameworks.
Select CoreData Framework in the window that appears in Figure 4-27 and then click add.
The
CoreData.Frameworkicon will appear at the bottom of the Groups & Files list.Drag the
CoreData.Frameworkicon up into the Frameworks folder.

Clean up time. You're going to have to add some instance variables and properties and a method to the Trip.h file — no ifs, ands, or buts about it. Make the modifications you see bolded in Listing 4-9.
Example 4-9. Trip.h
#import <MapKit/MapKit.h>
#import <Foundation/Foundation.h>
@class Weather;
@class CarServicing;
@class CarInformation;
@class Map;
@class MapController;

@interface Trip : NSObject  {

  NSString       *tripName;
  CarServicing   *carServicing;
  CarInformation *carInformation;
  Weather        *weather;
  NSMutableArray *sights;
  Map            *map;
  MapController  *mapController;

// Core Data Stack
  NSManagedObjectModel *managedObjectModel;
  NSManagedObjectContext *managedObjectContext;
  NSPersistentStoreCoordinator *persistentStoreCoordinator;

}

@property (nonatomic, retain) NSMutableArray *sights;
@property (nonatomic, retain) Map* map;
@property (nonatomic, retain) MapController *mapController;

- (NSString *)applicationDocumentsDirectory;

- (id) initWithName:(NSString*) theTripName;
- (CLLocationCoordinate2D) initialCoordinate;
- (NSString*) mapTitle;
- (id) returnSightDelegate:(int) index;
- (id) returnWeatherDelegate;
- (id) returnCarInformationDelegate;
- (id) returnCarServicingDelegate;
// Core data properties and method@property (nonatomic, retain, readonly) NSManagedObjectModel*managedObjectModel;@property (nonatomic, retain, readonly)NSManagedObjectContext *managedObjectContext;@property (nonatomic, retain, readonly)NSPersistentStoreCoordinator *persistentStoreCoordinator;- (NSString *)applicationDocumentsDirectory;@end
Notice that the properties you just added are readonly.
One more thing left to do. You need to add something to the RoadTrip_Prefix.pch file in the Other Sources folder in Groups & Files list. (Figure 4-28 shows you the innards of the RoadTrip_Prefix.pch file.)
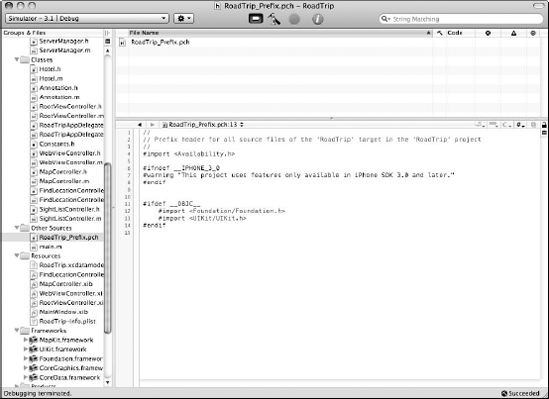
You have to add Core Data to the RoadTrip_Prefix.pch file to make sure it is included wherever you need it. To do so, add the code in bold in Listing 4-10 to the file.
Example 4-10. Modifying RoadTrip_Prefix.pch
#import <Availability.h>

#ifndef __IPHONE_3_0
#warning "This project uses features only available in iPhone
   SDK 3.0 and later."
#endif

#ifdef __OBJC__
    #import <Foundation/Foundation.h>
    #import <UIKit/UIKit.h>
    #import <CoreData/CoreData.h>

#endif

@end
You're now ready to actually use Core Data. Your project should compile and execute with no errors.
If you've been reading closely, you'll remember that I mentioned earlier that the Core Data Stack consists of:
The
NSManagedObjectContextThe
NSPersistentStoreCoordinatorThe
NSManagedObjectModel
Here's where I briefly explain the code in each of these puppies, although, as I said before, for what you'll be doing in RoadTrip, and for quite a while in your own application, you'll probably just be using the boilerplate provided by Xcode.
Listing 4-11 shows you the code for accessing the managedObjectContext property. It's actually an explicit implementation of the managedObjectContext property getter and is invoked every time you access the property.
It returns the NSManagedObjectContext for the application. If the context doesn't already exist, it is created and bound to the persistent store coordinator for the application.
Example 4-11. Creating the managedObjectContext
- (NSManagedObjectContext *) managedObjectContext {

    if (managedObjectContext != nil) {
        return managedObjectContext;
    }

    NSPersistentStoreCoordinator *coordinator =
                     [self persistentStoreCoordinator];
    if (coordinator != nil) {
       managedObjectContext =
                 [[NSManagedObjectContext alloc] init];
       [managedObjectContext setPersistentStoreCoordinator:
   coordinator];
    }
    return managedObjectContext;
}
Notice that it uses (and sets) the persistentStoreCoordinator.
NSPersistentStoreCoordinator *coordinator = [self
   persistentStoreCoordinator];
    if (coordinator != nil) {
      managedObjectContext =
                 [[NSManagedObjectContext alloc] init];
      [managedObjectContext
           setPersistentStoreCoordinator: coordinator];
}Listing 4-12 shows the code for accessing the persistentStoreCoordinator Property. It works the same way — as an explicit implementation of the persistentStoreCoordinator property getter and is invoked every time you access the property.
It returns the NSPersistentStoreCoordinator for the application. If the coordinator doesn't already exist, it's created, and the application's store is added to it.
Example 4-12. Creating the persistentStoreCoordinator
- (NSPersistentStoreCoordinator *)
                              persistentStoreCoordinator {

    if (persistentStoreCoordinator != nil) {
        return persistentStoreCoordinator;
    }

    NSURL *storeUrl = [NSURL fileURLWithPath:
     [[self applicationDocumentsDirectory]
     stringByAppendingPathComponent:@"CoreData.sqlite"]];

    NSError *error = nil;
    persistentStoreCoordinator =
       [[NSPersistentStoreCoordinator alloc]
       initWithManagedObjectModel:
                               [self managedObjectModel]];
    if (![persistentStoreCoordinator addPersistentStoreWit
   hType:NSSQLiteStoreType configuration:nil URL:storeUrl
   options:nil error:&error]) {
                                                        /*
   Replace this implementation with code to handle the error
   appropriately.
                                                        */
   NSLog(@"Unresolved error %@, %@", error,
                                        [error userInfo]);
   abort();
    }

    return persistentStoreCoordinator;
}
Notice the persistent store uses SQLite as its store, although you can use others.
NSURL *storeUrl = [NSURL fileURLWithPath:
 [[self applicationDocumentsDirectory]
     stringByAppendingPathComponent:@"CoreData.sqlite"]];
Warning
Notice the error checking code:
if (![persistentStoreCoordinator
      addPersistentStoreWithType:NSSQLiteStoreType
      configuration:nil URL:storeUrl options:nil
                                          error:&error]) {
You'll see this error (in addition to when the store is not accessible) when the schema for the persistent store is incompatible with current Managed Object Model. And that happens when you change the Managed Object Model (which happens frequently during development) and either don't migrate to the new one (out of scope for this book) or delete the old one and start from scratch.
The current code uses abort() when that happens — causing the application to generate a crash log and terminate. Although it may be useful during development, you shouldn't do this in a shipping application. You should at least display an alert that instructs the user what has happened and/or what to do.
Notice it uses the applicationDocumentsDirectory.
NSURL *storeUrl = [NSURL fileURLWithPath:
     [[self applicationDocumentsDirectory]
     stringByAppendingPathComponent:@"CoreData.sqlite"]];
Listing 4-13 shows how the path to the application's Documents directory is returned.
Example 4-13. Creating the applicationDocumentsDirectory
- (NSString *)applicationDocumentsDirectory {
   return [NSSearchPathForDirectoriesInDomains(NSDocumentDire
   ctory, NSUserDomainMask, YES) lastObject];
}
Also notice that the Persistent Store Coordinator uses the managedObjectModel property.
persistentStoreCoordinator =
   [[NSPersistentStoreCoordinator alloc]
   initWithManagedObjectModel: [self managedObjectModel]];
Listing 4-14 shows you the code for accessing the managedObjectModel property. It, too, is an explicit implementation of the managedObjectModel property getter and is invoked every time you access the property. As you saw, it's accessed when you create the Persistent Store Coordinator.
It returns the Managed Object Model for the application. If the model doesn't already exist, it is created by merging all of the models found in the application bundle.