
Using Mail on the iPhone
How the Mail interface works
Using Mail to create and send an e-mail message with attachments
One of the great features of the handy RoadTrip app is the ability to add places you'd like to stay to the app. That's all fine and dandy, but now it's time to think about being able to tell everyone what a great time you're having while staying at all these places. It's not that I'm into Schadenfreude — but sometimes it's fun to let all your hardworking friends back home know what a great time you are having on your road trip.
One of the best ways to do that is through e-mail. Although you could take care of that by using the built-in Mail app on the iPhone, being able to do it within the app is more convenient and easier for the user, especially when adding context-specific content. In this chapter, I show you how to create a postcard-like e-mail — a Road Card — from directly within the RoadTrip app.
The standard way to interface the Message UI — and therefore use the built-in Mail app to allow a user to create, and then send, an e-mail — is to haul out the Ol' Reliable: MFMailComposeViewController.
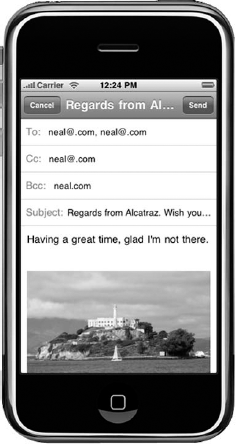
The MFMailComposeViewController class provides a standard interface that manages the editing and sending of an e-mail. You'll use this view controller to display the standard E-mail view inside your application. You can also fill in the fields with initial values for the subject, e-mail recipients, body text, and attachments. Using the standard interface, the user can then edit the values and send the message — or change his or her mind and cancel the whole thing.
You'll want to display the Mail interface modally by using the present ModalViewController:animated: method. (Chapter 1 of this minibook goes more into the details of why.) Figure 2-1 shows the view that will be displayed with some of the fields already filled in.
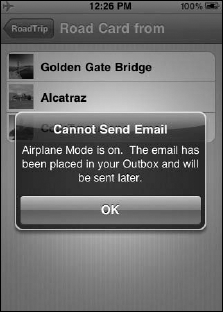
The user, in fact, has the kind of control over the newly created message you would expect. As I said, he or she can edit and send or cancel the message. If he or she decides not to send it, it will remain in the Mail application's outbox. That way, the user can create e-mails even when the network is unavailable (even in airplane mode). You can see that in Figure 2-2.
Tip
Although you'll be able to see the results of your work on the Simulator, you'll only be able to actually send the e-mail (or get the display you see in Figure 2-2) on the device itself.
Also, to protect the innocent, you may have noticed that real e-mail addresses are not being used. You'll have to replace them with real ones when you test your code.
In order to add the ability to send a "Road Card," you're going to need to add (yet another) controller.
In the RoadTrip Project window, select the Classes folder in the Groups & Files list and then choose File

In the left column of the New File window, select Cocoa Touch Classes under the iPhone OS heading, select the
UIViewControllersubclass template in the top-right pane, and then click Next.Be sure the With XIB for User Interface option is not checked.
You see a new dialog asking for some more information.
Enter
RoadCardController.min the File Name field and then click Finish.
Tip
To make things easier to find, I keep my RoadCardController.m and RoadCardController.h classes in the Classes folder.
Next you have to add the MessageUI framework.
At this point, you're probably pretty used to adding a new framework.
Click the disclosure triangle next to Targets in the Groups & Files listand then right-click RoadTrip.
Be sure to do this using the Targets folder, or Step 3 won't work!
From the menu that appears, choose Add and then choose Existing Frameworks.
Select MessageUI Framework in the window that appears, click Add, and then drag MessageUI into the Frameworks folder.
The first thing you need to think about is how the user is going to get to this new functionality. There are probably a number of places you could put the gateway to the Road Card feature, but I'm going to have you add it to the main screen, right there under Weather in The Trip section. That means adding some code to the RootViewController.
First, you need to import RoadCardController.h into RootViewController.m.
#import "RoadCardController.h"
Next, you need to add the Road Card entry. Add the bolded code in Listing 2-1 to viewDidLoad in RootViewController.m and delete the code marked with strikethrough.
Example 2-1. viewDidLoad
- (void)viewDidLoad {

  [super viewDidLoad];
//sectionsArray = [[NSArray alloc] initWithObjects:
      [[NSNumber alloc]initWithInt:4],
      [[NSNumber alloc]initWithInt:2], nil];
  sectionsArray = [[NSArray alloc] initWithObjects:
      [[NSNumber alloc]initWithInt:5],
      [[NSNumber alloc]initWithInt:2], nil];
  trip = [[Trip alloc] initWithName:@"Road Trip"];

  self.title = [[[NSBundle mainBundle] infoDictionary]
   objectForKey:@"CFBundleName"];
  menuList = [[NSMutableArray alloc] init];
  [menuList addObject:
    [NSMutableDictionary dictionaryWithObjectsAndKeys:
     NSLocalizedString(@"Map", @"Map Section"),kSelectKey,
     NSLocalizedString(@"Where you are", @"Map Explain"),
                                             kDescriptKey,
     nil, kControllerKey, nil]];
  [menuList addObject:
    [NSMutableDictionary dictionaryWithObjectsAndKeys:
    NSLocalizedString(@"Sights", @"Sights Section"),
                                               kSelectKey,
    NSLocalizedString(@"Places to see",
                  @"Places to see Explain"), kDescriptKey,
    nil, kControllerKey, nil]];
  [menuList addObject:
    [NSMutableDictionary dictionaryWithObjectsAndKeys:
NSLocalizedString(@"Hotels", @"Hotels Section"),
kSelectKey,
NSLocalizedString(@"Places to stay",
@"Places to stay Explain"), kDescriptKey,
nil, kControllerKey, nil]];
[menuList addObject:
[NSMutableDictionary dictionaryWithObjectsAndKeys:
NSLocalizedString(@"Weather", @"Weather Section"),
kSelectKey,
NSLocalizedString(@"Current conditions",
@"Weather Explain"), kDescriptKey,
nil, kControllerKey, nil]];
[menuList addObject:
[NSMutableDictionary dictionaryWithObjectsAndKeys:
NSLocalizedString(@"Road Card", @"Email Section"),
kSelectKey,
NSLocalizedString(@"Make 'em jealous",@"Post Card"),
kDescriptKey,
nil, kControllerKey, nil]];
[menuList addObject:
[NSMutableDictionary dictionaryWithObjectsAndKeys:
NSLocalizedString(@"Servicing", @"Service Section"),
kSelectKey,
NSLocalizedString(@"Service records",
@"Service records Explain"), kDescriptKey,
nil, kControllerKey, nil]];
[menuList addObject:
[NSMutableDictionary dictionaryWithObjectsAndKeys:
NSLocalizedString(@"The Car",
@"Car Information Section"), kSelectKey,
NSLocalizedString(@"About the car",@"About the car"),
kDescriptKey,
nil, kControllerKey, nil]];
RoadTripAppDelegate *appDelegate =
(RoadTripAppDelegate *)
[[UIApplication sharedApplication] delegate];
if ([((NSNumber*) [appDelegate.lastView
objectAtIndex:0]) intValue] != −1) {
NSIndexPath* indexPath = [NSIndexPath indexPathForRow:
[[appDelegate.lastView objectAtIndex:1] intValue]
inSection:[[appDelegate.lastView objectAtIndex:0]
intValue]];
[self tableView:((UITableView*) self.tableView)
didSelectRowAtIndexPath:indexPath];
}
}The first thing you added was a change in the number of rows in the first section — a change from 4 to 5, to be precise:
sectionsArray = [[NSArray alloc] initWithObjects:
  [[NSNumber alloc]initWithInt:5],
  [[NSNumber alloc]initWithInt:2], nil];
Then you simply inserted a new dictionary for the RoadCardController into the menu list, like so:
[menuList addObject:
   [NSMutableDictionary dictionaryWithObjectsAndKeys:
  NSLocalizedString(@"Road Card", @"Email Section"),
                                             kSelectKey,
  NSLocalizedString(@"Make 'em jealous",@"Post Card"),
                                           kDescriptKey,
  nil, kControllerKey, nil]];
Pretty easy, huh? All that upfront work is now beginning to pay off. After you build and compile the project, you should see what I see in Figure 2-3.

You've added Road Card to your main screen, so you probably should write some code to do something when the Road Card is selected. That code, of course, gets added to tableView:didSelectRowAtIndex Path:. Make the modification to that method's switch statement in RootViewController.m as shown in bold in Listing 2-2.
Example 2-2. Add to the Switch in tableView:didSelectRowAtIndexPath:
switch (menuOffset) {
      case 0:
        if (realtime) targetController =
           [[MapController alloc] initWithTrip:trip];
        else [self displayOfflineAlert:
           [[menuList objectAtIndex:menuOffset]
                                objectForKey:kSelectKey]];
        break;
      case 1:
        targetController =
          [[SightListController alloc] initWithTrip:trip];
        break;
      case 2:
        targetController =
              [[HotelController alloc] initWithTrip:trip];
        break;
      case 3:
        if (realtime) targetController = [[WebViewController
   alloc] initWithTrip:trip delegate:[ trip
   returnWeatherDelegate]
           webControl:YES title:NSLocalizedString(@"Weather",
                                             @"Weather")];
        else
          [self displayOfflineAlert:
              [[menuList objectAtIndex:menuOffset]
                                objectForKey:kSelectKey]];
        break;
      case 4:
        targetController =
         [[RoadCardController alloc] initWithTrip: trip];
        break;
    //case 4:
      case 5:
        targetController =
          [[WebViewController alloc] initWithTrip:trip
   delegate:[trip returnCarServicingDelegate]
           webControl:NO title:NSLocalizedString(@"Car
   Servicing", @"Car Servicing")];
        break;
    //case 5:
      case 6:
        targetController =
          [[WebViewController alloc] initWithTrip:trip
   delegate:[trip returnCarInformationDelegate]
webControl:NO title:NSLocalizedString(@"The Car", @"Car
   Information")];
        break;
}I decided that the ability to send Road Cards would, most of the time, involve a sight. After all, that's what postcards from tourist places usually feature. (I know what you're thinking, but please don't go there).
That being the case, I already have some code written — the SightListController — that does a lot of what I need to do to display some sights and then do something with the selection. To take advantage of stuff I already have, I make RoadCardController a subclass of SightListController.
This also meets my criterion of trying to do as little typing (and copying and pasting) as possible.
Add the code shown in bold in Listing 2-3 to RoadCardController.h.
Example 2-3. RoadCardController.h
#import "SightListController.h"#import <MessageUI/MessageUI.h>#import <MessageUI/MFMailComposeViewController.h>@class Sight;//@interface RoadCardController : UIViewController {@interface RoadCardController : SightListController<MFMailComposeViewControllerDelegate> {}- (void) displayMailCompositionInterface:(int) sightIndex;- (void) unsupportedAlert;- (BOOL) checkConfiguration;@end
Hmm, it seems to work, as shown in Figure 2-4.
The first thing you did here (besides the requisite imports) was make the RoadCardController a subclass of SightListController and adopt the MFMailComposeViewControllerDelegate protocol.
@interface RoadCardController : SightListController
                   <MFMailComposeViewControllerDelegate> {
I also had you add a few methods you'll be implementing. The first will actually display the controller and do all the work. The second will display an alert if the device is not configured for e-mail or it has an older version of the OS that does not support the MFMailComposeViewController class (pre-iPhone OS 3.0, in other words).
Notice you didn't have to add the initializer because you inherited the one from SightListController. (Although I'll override it later in order to change the title.) You also don't need the .xib file because you're letting the inherited SightListController code do all the work for you. (If you're unclear on how the view got created without an .xib file, see Book VI, Chapter 1).
You probably can't help but notice that if you select a sight, you still get what you would have gotten if you had selected the same entry on the Sights view. (Give me a break — you haven't made the changes yet.) But so far so good.
Note
Of course if you're an experienced object-oriented programmer, you know that the "right" way to do this is create a base class from which you derived the SightListController and the RoadCardController.
Go ahead and override the initialization method to at least get the right title. Add the code in Listing 2-4 to RoadTripController.m.
Example 2-4. Override initWithTrip:
- (id) initWithTrip:(Trip*) theTrip {
if ([super initWithTrip: theTrip]) {
self.title = @"Road Card from";
}
return self;
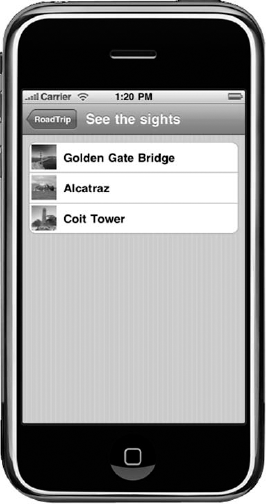
}Yep. "See the sights" is now history, and "Road Card from" reigns in its place. Now it's time to add the code necessary to call the methods that will implement the Mail interface.
You start, as you might expect, with the tableView:didSelectRowAt IndexPath: method you inherit from SightListController. This method will give you the opportunity to do something different when the user selects a sight, and to do that, you simply override the inherited method. Add the code in Listing 2-5 to RoadTripController.m to do that.
Example 2-5. Override tableView:didSelectRowAtIndexPath:
- (void)tableView:(UITableView *)tableView
        didSelectRowAtIndexPath:(NSIndexPath *)indexPath {

  [tableView deselectRowAtIndexPath:indexPath
                                            animated:YES];
  if ([self checkConfiguration])
    [self displayMailCompositionInterface:indexPath.row];
  else
    [self unsupportedAlert];
}
As you can see, what you'll be doing when the user selects a sight is first checking to see whether MFMailComposeViewController is installed and mail is configured. If it is, you display the MFMailComposeViewController. If not, you display an alert informing the user that the e-mail is just not happening.
Go ahead and get the checking out part of the way. Add the code in Listing 2-6 to RoadTripController.m.
Example 2-6. Will It Work?
-(BOOL)checkConfiguration {

  Class mailClass =
       NSClassFromString(@"MFMailComposeViewController");
  if ((mailClass != nil) && ([mailClass canSendMail]))
    return YES;
  else
   return NO;
}
The first statement might be new to you.
Class mailClass =
       NSClassFromString(@"MFMailComposeViewController");
NSClassFromString is a Foundation function that returns the class object you have used as the argument (MFMailComposeViewController) or nil if no class by that name is currently loaded.
Without getting into too much detail, a class object is a pointer to the class data structure. In Objective-C, every object has a data structure whose first member is the isa pointer. The isa pointer, as the name suggests, points to the object's class, which is an object compiled from the class definition.
Note
The class object has a dispatch table of pointers to the methods it implements as well as a pointer to its superclass. This isa pointer makes the dynamic aspects of Objective-C possible.
Although I haven't gotten into targeting your application for a particular OS version (and I won't — in this case I really only support iPhone OS 3.0), this shows you how to determine whether a particular feature is available on a device. Although this app can run on devices running iPhone OS 2.0 or later, the MFMailComposeViewController class is available only in iPhone OS 3.0 or later.
The one thing you will need to do, though, is use the canSendMail method to check whether the current device is configured to send e-mail at all. If the user's iPhone isn't able to send e-mail, you have the opportunity to notify him or her or to simply disable that feature in your app.
If MFMailComposeViewController is there and the device is configured to send e-mail, you continue; if not, you need to display an alert. The code in Listing 2-7 does that for you, so add it to RoadTripController.m.
Example 2-7. It's Not Going to Work
- (void) unsupportedAlert {

  UIAlertView *alert = [[UIAlertView alloc]
    initWithTitle: @"This device does not support the
   required functionality"
    message:@"Mail is not configured or you have an older OS"
    delegate:self cancelButtonTitle:@"Thanks"
    otherButtonTitles:nil];
  [alert show];
  [alert release];
}
There are a number of things you could (and should) do here if your e-mail functionality is on the fritz, but I'll leave that to you to investigate.
After you've determined that the device will work, as you saw in Listing 2-6, you send the displayMailCompositionInterface message to yourself. This is the heart of what you'll need to do. First add the code in Listing 2-8 to RoadTripController.m, and then I go through it with you step by step.
Example 2-8. displayMailCompositionInterface
- (void)displayMailCompositionInterface:(int) sightIndex {
  MFMailComposeViewController *roadCard =
               [[MFMailComposeViewController alloc] init];
  roadCard.mailComposeDelegate = self;
  NSArray *toRecipients = [NSArray
        arrayWithObjects:@"[email protected]", @"[email protected]", nil];
  NSArray *ccRecipients = [NSArray
                            arrayWithObject:@"[email protected]"];
  NSArray *bccRecipients = [NSArray
                            arrayWithObject:@"[email protected]"];

  [roadCard setToRecipients:toRecipients];
  [roadCard setCcRecipients:ccRecipients];
  [roadCard setBccRecipients:bccRecipients];
  Sight* theSight = [trip.sights
                                objectAtIndex:sightIndex];
  [roadCard setSubject:[NSString stringWithFormat: @"Regards
   from %@. Wish you were there", theSight.sightName]];

  NSString *filePath = [[NSBundle mainBundle]
   pathForResource:theSight.image ofType:theSight.imageType];
  NSData *image = [NSData dataWithContentsOfFile:filePath];
 [roadCard addAttachmentData:image mimeType:@"image/jpg"
                             fileName:@"theSight.image"];
  NSString *body = [NSString stringWithFormat:
@"Having a great time, glad I'm not there."]; [roadCard setMessageBody:body isHTML:NO]; [self presentModalViewController:roadCard animated:YES]; [roadCard release]; }
You start by allocating and initializing the MFMailComposeViewController and setting the delegate. (You'll get to the delegate shortly.)
- (void)displayMailCompositionInterface:(int) sightIndex {
  MFMailComposeViewController *roadCard =
               [[MFMailComposeViewController alloc] init];
  roadCard.mailComposeDelegate = self;
You then create three arrays: one for the To recipients, one for CC recipients, and one for BCC recipients. (Only the To one is really required.) You use those arrays to set the recipients for the e-mail you're creating:
NSArray *toRecipients = [NSArray
        arrayWithObjects:@"[email protected]", @"[email protected]", nil];
NSArray *ccRecipients = [NSArray
                            arrayWithObject:@"[email protected]"];
NSArray *bccRecipients = [NSArray
                            arrayWithObject:@"[email protected]"];
Next, you set some initial values in the message. The user, of course, will be able to change those once they're displayed.
Note
The mail composition interface itself isn't customizable, and you can't modify it. In addition, after presenting the interface, your application isn't allowed to make further changes to the e-mail content. The user may still edit the content using the interface, but programmatic changes are ignored. This means you must set the values of any of the content fields before presenting the interface.
setToRecipients:, for example, is a method that sets the initial recipients to include in the e-mail's To field. The argument, as you can see, is an array of NSString objects, each of which contains the e-mail address of a single recipient.
[roadCard setToRecipients:toRecipients];
[roadCard setCcRecipients:ccRecipients];
[roadCard setBccRecipients:bccRecipients];
Tip
This method doesn't filter out duplicate e-mail addresses, so if duplicates are present, multiple copies of the e-mail message may be sent to the same address.
Next, you get the Sight that the user had selected in the list and then use its name to set the subject in the e-mail. (This is the same way you did it in the SightListController.)
Sight* theSight = [trip.sights objectAtIndex:sightIndex];
  [roadCard setSubject:[NSString stringWithFormat:
           @"Regards from %@. Wish you were there",
theSight.sightName]];setSubject:, as you might expect, sets the initial text for the subject line of the e-mail.
Next, you set the message body:
NSString *body = [NSString stringWithFormat:
           @"Having a great time, glad I'm not there."];
[roadCard setMessageBody:body isHTML:NO];
This part sets the initial body text of the message. The text has to be either plain text or HTML, and you tell the mail app which one you want by using the isHTML parameter. Even though I'm having you add simple text here, you can fancy things up using HTML. I leave it to you to be more creative.
Finally, you can add the picture by sending the addAttachmentData:mimeType:fileName: message:
NSString *filePath =
    [[NSBundle mainBundle] pathForResource:theSight.image
                               ofType:theSight.imageType];
NSData *image =
                 [NSData dataWithContentsOfFile:filePath];
[roadCard addAttachmentData:image mimeType:@"image/jpg"
                               fileName:@theSight.image];
As you can see, I get the right sight image from the bundle, the same way I get the images for the thumbnails, and set it in the e-mail message. mimeType lets the Mail program know the type of the specified data. (For example, as you see here, the MIME type for a JPEG image is image/jpeg.) For a list of valid MIME types, see www.iana.org/assignments/media-types. This parameter must not be nil. The filename parameter is the filename you want to associate with the data. I'm using the image name. This is the default name applied to the file when it is sent.
This method attaches the image (or images) after the message body but before the user's signature. You may attach multiple files (using different filenames), but you must do so before you display the mail composition interface. (See the Remember paragraph earlier in this section.)
You also need to import a couple of header files:
#import "Sight.h"
#import "Trip.h"
As I mention in Chapter 1 of this minibook, delegation is the preferred way to deal with dismissing the controller (and doing whatever else needs to be done before the controller is dismissed). There's only one delegation method in the MFMailComposeViewControllerDelegate protocol, so you won't have trouble figuring out which one to use.
Add the code in Listing 2-9 to RoadCardController.m.
Example 2-9. Implementing the Delegate Method
- (void)mailComposeController: (MFMailComposeViewController*)
   controller didFinishWithResult:(MFMailComposeResult)result
   error:(NSError*)error {
  NSString* resultMessage = nil;
  switch (result)                                  {
    case MFMailComposeResultCancelled:
      resultMessage= @"Has been canceled";
      break;
    case MFMailComposeResultSaved:
      resultMessage= @"Has been saved";
      break;
    case MFMailComposeResultSent:
      resultMessage = @"Has been sent";
      break;
    case MFMailComposeResultFailed:
      resultMessage = @"Has failed";
      break;
    default:
      resultMessage = @"Was not sent";
      break;
  }
  UIAlertView *alert = [[UIAlertView alloc]
             initWithTitle:@"Your email message"
             message:resultMessage delegate:self
             cancelButtonTitle:@"Thanks"
             otherButtonTitles:nil];
  [alert show];
  [alert release];
[self dismissModalViewControllerAnimated:YES];
}
This message is sent to the delegate when the user has finished with the interface and is ready to dismiss it. As you've seen, your delegate object is responsible for dismissing the controller when the operation completes. You do this using the dismissModalViewControllerAnimated: method.
Also notice that, before you dismiss the interface, you let the user know the status of his or her request.
The result argument MFMailComposeResult; lets you know what happened, as you can see from the code. You use that in the switch statement to determine the message to place in the alert.
switch (result)                                             {
    case MFMailComposeResultCancelled:
      resultMessage= @"Has been canceled";
      break;
    case MFMailComposeResultSaved:
      resultMessage= @"Has been saved";
      break;
    case MFMailComposeResultSent:
      resultMessage = @"Has been sent";
      break;
    case MFMailComposeResultFailed:
      resultMessage = @"Has failed";
      break;
    default:
      resultMessage = @"Was not sent";
      break;
}
If the user taps Send, the e-mail should be queued in the user's Mail program by the time this method is called. If an error occurred while queuing the e-mail message, the error parameter contains an error object indicating the type of failure that occurred. I'll leave that as an exercise for you.
Finally, you dismiss the controller.
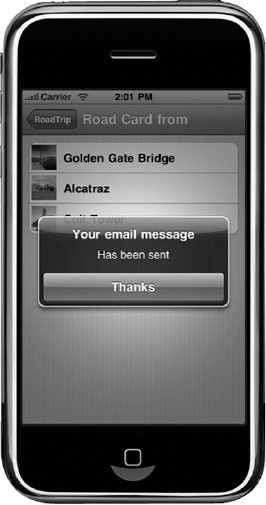
When you put in a real e-mail address and tap send, Figure 2-5 shows what you see.
This whole Road Card thing is something you can have a lot of fun with. You could, as you did in the earlier part of this book, also add your own photos.
Last, but not least, I want to show you a little more about core location, so gear yourself up for one final chapter. Because you're probably tired of hearing me say this by now, core location is one of the features of the iPhone that you really should consider being able to take advantage of (as you have, to some extent, with all the maps) in your app. The next (and final) chapter points you in that direction. I also take the opportunity to show you how to use the accelerometer.