
Seeing what the Foundation framework has to offer
Working with mutable arrays
Using each object in an array in a message
Getting to know C arrays
Creating and using property lists
Discovering how dictionaries work
Updating dictionaries and property lists
In The Foundation Trilogy, an epic science fiction series, Isaac Asimov and his editor John W. Campbell devised the concept of mathematical sociology (analogous to mathematical physics), in which the law of mass action can predict the future, but only on a large scale; it is error-prone on a small scale.
The Foundation framework has nothing to do with that, except that it too was devised to predict the future — what your app and many other apps may want to do — and it works on a large scale while remaining error-prone on a small scale (in the hands of inexperienced programmers). It provides a set of useful object classes in primitive form ready for you to flesh out, and introduces several paradigms that define functionality not covered by the Objective-C language. Think of it as providing the plumbing features such as data storage, text and strings, dates and times, object creation, disposal persistence, and common Internet protocols.
The Foundation framework is designed with these goals in mind:
Provide a small set of basic utility classes.
Make software development easier by introducing consistent conventions for things such as de-allocation.
Support Unicode strings, object persistence, and object distribution.
Provide a level of operating system independence, to enhance portability.
I describe how you can use the Foundation framework in this chapter, starting with useful utility classes for data storage, text and strings, dates and times, and object creation and disposal. I then cover other useful classes for arrays, dictionaries, and property lists.
The Foundation framework includes the root object class, collection classes for storing other objects, classes representing system information (stuff like dates), and classes representing communication ports. It also offers classes representing basic data types such as strings and byte arrays, along with utility classes for working with numbers, dates, arrays, dictionaries, files, and directories. You can see the entire list in "The Foundation Framework" in the iPhone OS Reference Library (http://developer.apple.com/iphone/library/navigation).
Many of the utility classes have closely related functionality:
Data storage.
NSDataandNSStringprovide object-oriented storage for arrays of bytes.NSValueandNSNumberprovide object-oriented storage for simple C data values.NSArray, NSDictionary, andNSSetprovide storage for Objective-C objects of any class.Text and strings.
NSCharacterSetrepresents various groupings of characters that are used by theNSStringandNSScannerclasses. TheNSStringclasses represent text strings and provide methods for searching, combining, and comparing strings. AnNSScannerobject is used to scan numbers and words from anNSStringobject.Dates and times. The
NSDate, NSTimeZone, andNSCalendarclasses store times and dates and represent calendar information. They offer methods for calculating date and time differences. Together withNSLocale, they provide methods for displaying dates and times in many formats, and for adjusting times and dates based on location in the world.Application coordination and timing.
NSNotification, NSNotificationCenter, andNSNotificationQueueprovide systems that an object can use to notify all interested observers of changes that occur. You can use anNSTimerobject to send a message to another object at specific intervals.Object creation and disposal.
NSAutoreleasePoolis used to implement the delayed-release feature of the Foundation framework.Object distribution and persistence. Persistence is the ability to store objects in and retrieve objects from a database, so that the objects exist from session to session. The data that an object contains can be represented in an architecture-independent way using
NSPropertyListSerialization. TheNSCoderand its subclasses take this process a step further by allowing class information to be stored along with the data. The resulting representations are used for archiving and for object distribution.Operating-system services. Several classes are designed to insulate you from the operating system, so that subsequent changes to the system don't affect your code.
NSFileManagerprovides a consistent interface for file operations (creating, renaming, deleting, and so on).NSThreadandNSProcessInfolet you create multithreaded applications and query the environment in which an application runs.URL loading system. A set of classes and protocols provide access to common Internet protocols.
In object-oriented programming, a container class is a class that is capable of storing other objects. In Cocoa, several kinds are available, and I explain the two most widely used, dictionary and array, in this chapter. You probably know what in general an array is: a number of items arranged in some specified way. In the more specific world of object-oriented programming, an array is a group of objects with the same attributes that can be addressed individually.
In the vacation budget examples of Chapters 1 through 3 of this minibook, you can see I use NSMutableArray, which allows you to add objects as needed — that is, the amount of memory allocated to the class is dynamically adjusted as you add more objects.
The following example explains why using a mutable array might be a good idea. You might want to code transactions with spendDollars: statements. For example, for every transaction where you spend dollars in Europe, you would need the following:
[europeBudget spendDollars:numberDollarsInEuroland];
But if you want to process 50 transactions, you need
[europeBudget spendDollars:numberDollarsInEuroland1];
all the way through
[europeBudget spendDollars:numberDollarsInEuroland50];
This is not a pretty picture. In most applications, you need a way to deal with large numbers of objects.
Often you may not even know how many transactions there are going to be. For example, you may be getting the transactions from a database or from a list of previously stored instructions, or user actions may determine how many transactions you're going to have — the user adds address book entries, for example, or enters transactions as they occur (bingo!).
But even if you did know how many transactions you were going to have, a long series of messages simply makes your program too confusing, prone to error, and hard to extend. Because this is a common problem, a widely available solution is available — container classes — and as I said before, the two most widely used are dictionary and array. I cover array first.
There are two kinds of arrays available to you in Cocoa. The first is an NSMutableArray, which (you'll remember) allows you to add objects to the area as needed. The second kind of array is an NSArray, which allows you to store a fixed number of objects — a number which is specified when you initialize the array.
NSMutableArray arrays are ordered collections that can contain any sort of object. In fact, the collection doesn't even have to be made up of the same objects. You can mix and match objects — Budget objects or Xyz objects — to your heart's content, as long as what you add to the mix are objects. One of the reasons for introducing you to NSNumbers, besides showing you how an object can use other objects, is that when you convert your transactions into NSNumbers, you make it possible to store them in an array.
Note
I just said arrays can hold only objects. But sometimes you may, for example, want to put a placeholder in a mutable array and later replace it with the "real" object. You can use an NSNull object for this placeholder role.
The first step in being able to eliminate the prospect of a gazillion spendDollar: messages I mention in the previous section is to create an NSMutableArray of the NSNumber objects you'll be using in the spendDollars: message.
NSMutableArray *europeTransactions =
              [[NSMutableArray alloc] initWithCapacity:1];
This bit of code allocates and initializes the mutable array. When you create a mutable array, you have to estimate the maximum size, which helps optimization. This is just a formality, and whatever you put here does not limit the eventual size. I use 1 to illustrate that; even though I specify one, I can actually add two elements (or more) to the array.
After you create a mutable array, you can start to add objects to it. For example, you can create two NSNumber objects
NSNumber *europeDollarTransaction =
                 [[NSNumber alloc] initWithDouble:100.00];
NSNumber *europeDollarTransaction2 =
[[NSNumber alloc] initWithDouble:200.00];[europeTransactions addObject:europeDollarTransaction]; [europeTransactions addObject:europeDollarTransaction2];
Note
When you add an object to an Objective-C array, the object isn't copied, but rather receives a retain message before it's added to the array. When an array is de-allocated, each element is sent a release message. You can find more information about memory management and retain and release in Chapter 3 of this minibook.
Technically, what makes a collection an array is that you access its elements by using an index, and that index can be determined at runtime. You get an individual element from an array by sending the array the objectAtIndex: message, which returns the array element you requested. For example
[europeBudget spendDollars:
     [[europeTransactions objectAtIndex:0] doubleValue]];
returns the first element in the europeTransactions array (remember the first element is 0) as a double. (You send the NSNumber the doubleValue message so that you can continue to use the spendDollars: method as is — with the argument type of a double.)
Note
In your program, the index you use is the relative position in the array, which starts at 0.
Depending on what you're doing with the array or how you're using it (arrays are very useful), objectAtIndex: will be one of the main array methods that you use. The other is count, which gives you the number of elements in the array.
Arrays have some other methods you might find useful — methods that sort the array, compare two arrays, and create a new array that contains the objects in an existing array, for example. In addition, mutable arrays have methods that include inserting an object at a particular index, replacing an object, and removing an object.
But one of the most powerful things you can do with an array is to use each of the elements in an array as an argument in a message — which means that you won't have to code a spendDollars: message for each transaction. You can even send messages to all the objects in the array.
Objective-C 2.0 provides a language feature that allows you to enumerate over the contents of a collection — which means to process each element of the collection sequentially. This is called fast enumeration, and it became available in Mac OS X 10.5 (Leopard) with version 2.0 of Objective-C. (This book is based on using Mac OS 10.6 and OS 3.0 on the iPhone.) Enumeration uses the for in feature (a variation on a for loop).
What enumeration effectively does is sequentially march though an array, starting at the first element and returning each element for you to do "something with." The "something with" you will want to do in this case involves using that element as an argument in the spendDollars: message.
For example, this code marches through the array and sends the spendDollars: message using each element in the array (an NSNumber "transaction"), eliminating the need for a spendDollars: message statement for transaction.
for (NSNumber *aTransaction in europeTransactions) {
  [europeBudget spendDollars:[aTransaction doubleValue]];
}
Here's the way this works:
Take each entry (
for) in the array (in europeTransactions) and copy it into the variable that you've declared (NSNumber * aTransaction).You then get the value as a
double([aTransaction doubleValue]) and useaTransactionas an argument in thespendDollars:message([europeBudget spendDollars: aTransaction]).Continue until you run out of entries in the array.
The identifier aTransaction can be any name you choose. NSNumber is the type of the object in the array (or it can be id, as I show in Chapter 1 of this minibook).
You may also have noticed that [europeBudget spendDollars: aTransaction] is enclosed in braces. The braces signify a block. (Blocks are described with scoping instance variables in Chapter 1 of this minibook.)
To be more formal (put on a tie to read this), the construct you just used is called for in, and it looks like
for ( TypeaVariableinexpression) {statements}
or
TypeaVariable; for (aVariableinexpression) {statements}
where you fill in what's italicized. There is one catch, however: You are not permitted to change any of the elements during the iteration, which means you can go through the array more than once without worry.
What you have accomplished here is that no matter how many cash transactions you create for Europe, you'll only need one spendDollars: message. While that's pretty good, you can see, in Chapter 2 of this book, how to extend that so that you need only one spend message for every transaction (both cash and change and any other transaction you can come up with) statement for all the countries you visit.
Actually, NSMutableArray is a subclass of NSArray, which manages a static array — after you've created it, you can't add objects to it or remove objects from it. For example, if you create an array with a single NSNumber to represent a transaction, you can't later add another NSNumber object that represents another transaction to that array. While only allowing a single transaction may be good for your budget, it's not very flexible.
NSArrays give you less overhead at a cost of less flexibility. So if you don't need to be able to add and remove objects, NSArrays are the preferred choice. If you want to use an NSArray, you have to initialize it with the objects you want in it when you create it.
So instead of
NSMutableArray *europeTransactions =
            [[NSMutableArray alloc] initWithCapacity:1];
 [europeTransactions addObject:europeDollarTransaction];
you would do the following:
NSArray *europeTransactions =
          [[NSArray alloc] initWithObjects:
          [[NSNumber alloc] initWithDouble:100.00],
          nil];
Even though you added only one object to the fixed array, initWithObjects: allows you to initialize the array with as many objects as you want, separating them with commas and terminating the list with nil as you can see.
Note
As with a mutable array, when you add an object to an NSArray, the object isn't copied, but rather receives a retain message before it is added to the array. When an array is de-allocated, each element is sent a release message.
Arrays are also a part of the C language. Although you'll probably end up using array objects most of the time, you may also find uses for C arrays (and you can see them used in Apple's documentation and code samples).
Arrays in C store elements just as an NSArray does (although they must be of the same type), and you can think about them as an ordered list as well. That means, for example, that you can store five values of type int in an array without having to declare five different variables, each one with a different identifier.
To declare a C array, use
double europeTransactionsArray [2];
Now you have an array with enough room for two doubles, effectively similar to the NSMutableArray you created previously; but this one is of fixed size, just like an NSArray. It's really just like having a set of the same variable types, one right after another.
To access a specific element of the array, use
europeTransactionsArray[0] = 100.00;
This line places 100.00 in the first element in an array. (Again, element 1 is at index 0.)
You can also initialize arrays when you create them. For example
double europeTransactionsArray [2] = {100.00, 200.00};creates a two-element array of doubles. You can access an element in the arrays as though it is a normal variable by doing the following:
transaction1 = europeTransactionsArray[0];
One useful aspect of arrays is the ability to use multidimensional arrays. For example
int twoDArray[3][3] = {{1,2,3}, {4,5,6}, {7,8,9}};declares and initializes an array that has two dimensions, like a tic-tac-toe board. You can make three-dimensional arrays, and even arrays with more than three dimensions.
Although there are no multidimensional array objects in Objective-C per se, you could have an array of arrays that accomplish the same thing. Arrays of arrays are used extensively in Mac and iPhone programming, and you can find them used in some of the samples on their respective Dev Center sites.
The following code shows the previous example of a two-dimensional array in C, and the code it takes to simulate that two-dimensional array in Objective-C.
int main() {

  int twoDArray[3][3] = {{1,2,3}, {4,5,6}, {7,8,9}};
  NSLog (@"twoDArray[2][2] is %i", twoDArray[2][2]);

  NSArray *array1 = [[NSArray alloc] initWithObjects:
                     [[NSNumber alloc] initWithInt:1],
                     [[NSNumber alloc] initWithInt:2],
                     [[NSNumber alloc] initWithInt:3],
                     nil];
  NSArray *array2 = [[NSArray alloc] initWithObjects:
                     [[NSNumber alloc] initWithInt:4],
                     [[NSNumber alloc] initWithInt:5],
                     [[NSNumber alloc] initWithInt:6],
                     nil];

  NSArray *array3 = [[NSArray alloc] initWithObjects:
                     [[NSNumber alloc] initWithInt:7],
                     [[NSNumber alloc] initWithInt:8],
                     [[NSNumber alloc] initWithInt:9],
                     nil];

  NSArray *arrayOfArrays = [[NSArray alloc] initWithObjects:
                     array1, array2, array3,  nil];
  NSLog (@"NSArray of NSArrays equivalent is %i",
   [[[arrayOfArrays objectAtIndex:2] objectAtIndex:2]
   intValue]);
}
The result is
twoDArray[2][2] is 9
NSArray of NSArrays equivalent is 9
Arrays can be passed as a parameter in C. To accept arrays as parameters, the only thing that you have to do when declaring the function is to specify that its argument is an array by using its identifier and a pair of void brackets []. For example, the function
void someFunction (int arg[])
accepts a parameter that is an array of ints.
Dictionaries are cool. They are like the city cousins of arrays. Both do pretty much the same things, but dictionaries add a new level of sophistication. You can store an object in a list and assign a key that you can then use in the future to retrieve the data, eliminating the need to manually move through long lists of objects to find what you are looking for.
You can use them to hold both property list objects (which I describe in "Using Property Lists" in this chapter) as well as application objects — just as you did with the array that holds Transaction objects.
So dictionaries are like arrays, in that they are simply a container for other objects. Dictionaries are made up of pairs of keys and values, and a key-value pair within a dictionary is called an entry. Both the key and the value must be objects, so each entry consists of one object that is the key (usually an NSString) and a second object that is that key's value (which can be anything, but in a property list must be a property list object). Within a dictionary, the keys are unique.
You use a key to look up the corresponding value. This works like your real-world dictionary, where the word is the key, and its definition is the value. (Do you suppose that's why this particular container class is called a dictionary?)
So, for example, if you have an NSDictionary that stores the currency symbol for each currency, you can ask that dictionary for the currency symbol (value) for the euro (key).
Although you can use any kind of object as a key in an NSDictionary, keys associated with property list objects in a dictionary have to be strings (I cover property list objects in "Using Property Lists" in this chapter). You can also have any kind of object for a value, but again if you're using them in a property list, they all have to be property list objects as well.
The same rules hold for arrays. You can use one to hold Transaction objects, but if you want to write and read an array as a property list file, the array can hold only property list objects.
NSDictionary has a couple of basic methods you'll surely be using regularly:
count:— This method gives you the number of entries in the dictionary.objectForKey:— This method gives the value for a given key.
In addition, the methods writeToFile:atomically: and initWithContentsOfFile: cause a dictionary to write a representation of itself to a file and to read itself in from a file, respectively.
Note
If an array or dictionary contains objects that are not property list objects, you can't save and then restore them using the built-in methods for doing so.
Just as with an array, a dictionary can be static (NSDictionary) or mutable (NSMutableDictionary). NSMutableDictionary adds a couple of additional basic methods — setObjectForKey: and removeObjectForKey:, which enable you to add and remove entries, respectively.
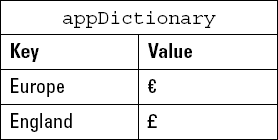
To create a dictionary — say, one that lets you look up the currency symbol for a given country — use the following:
NSDictionary *appDictionary = [[NSDictionary alloc]
 initWithObjectsAndKeys:
         @"€", @"Europe", @"£", @"England", nil];
This creates a dictionary with two keys, Europe and England. (To get the currency symbols, in Xcode select Edit
initWithObjectsAndKeys: takes an alternating sequence of objects and keys, terminated by a nil value. (As you can probably guess, just as with an array, you can't store a nil value in an NSDictionary.)
Note
The order is objects and keys. Developers often get that backward.
This step creates the dictionary that you see in Figure 4-1.
To look up the value for a key in a dictionary, you send the objectForKey: message bolded in the following:
NSLog(@"The currency symbol for the euro is %@",
 [appDictionary objectForKey:@"Europe"]);
In this case, you use the key Europe to look up the currency symbol in the appDictionary. And lo and behold what you get is
The currency symbol for the euro is €
By the way, if there's no key — for Antarctica for example — objectForKey: returns nil, which gives you the opportunity to respond to the user or do whatever you might want to about it.
On Mac OS X v10.5 and later, NSDictionary supports fast enumeration just like its cousin NSArray. You can, for example, iterate through a dictionary by using the for in construct to go through the keys of a dictionary.
for (id key in appDictionary) {
  NSLog(@"key: %@, value: %@", key,
                       [appDictionary objectForKey:key]);
  }
These lines of code will go through every key in the dictionary, returning the key in the key variable, allowing you to look up that entry using the objectForKey: method.
key: Europe, value: €
key: England, value: £
Dictionaries can be used most effectively with property lists to create a "dictionary of dictionaries", as I show in the next section.
You may want your app to store information that will be needed at a later time, or when the app runs again (such as user preference settings). For situations where you need to store small amounts of persistent data — say less than a few hundred kilobytes — a property list offers a uniform and convenient means of organizing, storing, and accessing the data.
Property lists are used extensively by applications and other system software on Mac OS X and iPhone OS. For example, the Mac OS X Finder stores file and directory attributes in a property list, and the iPhone OS uses them for user defaults. You also get a property list editor with Xcode, which makes property list files (or plists as they're referred to) easy to create and maintain in your own programs.
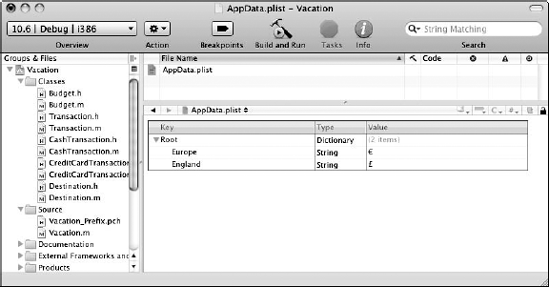
Figure 4-2 shows a property list that enables you to add the euro and pound symbols to your application.
When you know how to work with property lists, it's actually easy, but like most things, getting there is half the fun.
Property lists are perfect for storing small amounts of data that consist primarily of strings and numbers (as you can see in the plist in Figure 4-2, the Europe and England currency symbols are strings). What adds to their appeal is the ability to easily read them into your programs, use or even modify the data, and then write them back out again. That's because Cocoa provides a small set of objects that have that behavior built in.
Note
The technical term for such objects is serializable. A serializable object can convert itself into a stream of bytes so that it can be stored in a file and can then reconstitute itself into the object it once was when it is read back in — yes "beam me up, Scotty" does exist, at least on your computer.
These objects are called property list objects. There are two kinds of property list objects:
Primitives: The term primitives is not a reflection on how civilized these property objects are, but describes the simplest kind of object. They are what they are. The primitive types are strings, numbers, binary data, dates, and Boolean values:
NSDataandNSMutableDataNSDateNSNumberNSStringandNSMutableString
Containers: Containers are a bit more expansive, in that they can hold arrays and dictionaries (other containrs) as well as primitives.
NSArrayandNSMutableArrayNSDictionaryandNSMutableDictionary
One thing that differentiates property list object containers (NSArray, NSDictionary), besides their ability to hold other objects, is that they both have methods called writeToFile::, which write the property list to a file, and a corresponding initWithContentsOfFile:, which initializes the object with the content of a file. So, if you create an array or dictionary and fill it chock-full of objects of the property list type, all you have to do to save it to a file is tell it to go save itself or create an array or dictionary and then tell it to initialize itself from a file.
Given the versatility of property lists, you're sure to turn to them time and again. For example, you can use a plist (property list) with the vacation budget app to store the currency symbol for each country in a file, so that you can later read the file into a mutable dictionary.
Here's how you'd incorporate a plist into your Xcode project:
In the Groups & Files list (on the left in the Xcode Project window), select your project and choose File

The vacation budget app you've been working on in the example is called Vacation — select Vacation at the top of the Groups & Files list and then choose File
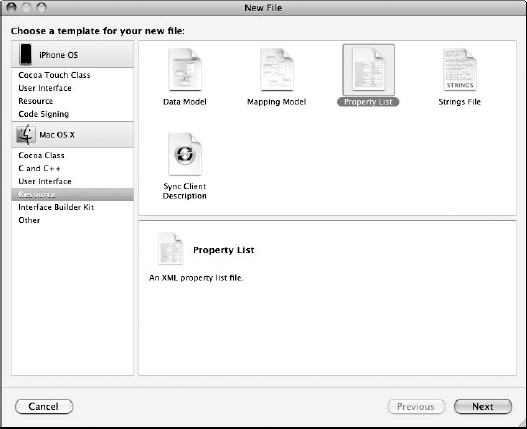
Choose Resource under the Mac OS X heading in the left pane and then select Property List from the upper pane on the right, as shown in Figure 4-3.
Click the Next button.
Enter a filename in the Name text field and then press Return (Enter) or click Finish.
(I went with
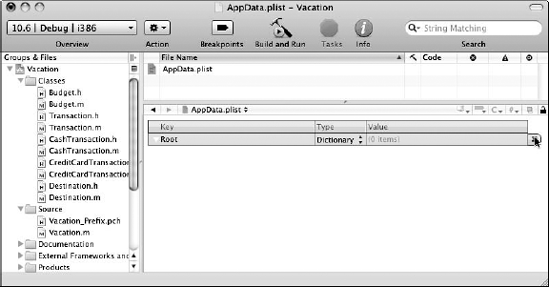
AppData.plist, which is a nice generic name handy for any app.) If you went with my example, you now see a new item calledAppData.plistunder your project name (Vacation), in the Groups & Files list shown in Figure 4-4.In the Editor pane, you can see Xcode's Property Plist editor with the root entry selected. (In this case, it has defaulted to a Dictionary; the other option is Array.)
Click the icon at the end of the entry, as shown in Figure 4-4.
A new entry appears.
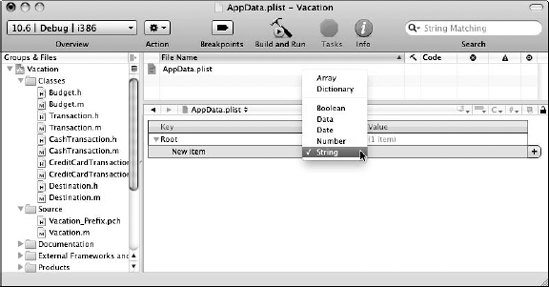
For the new entry, select String from the Type pop-up menu, as shown in Figure 4-5.
It can be any type of property list object, but String, which is already selected, is the one you want for this specific example.
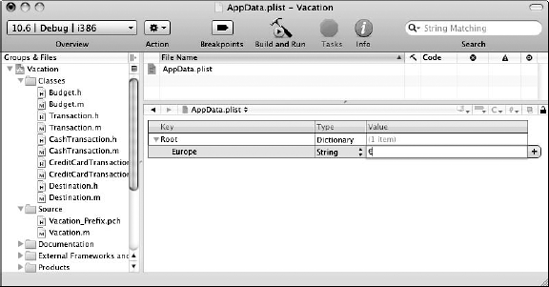
In the Key field, enter Europe, and then double-click (or tab to) the Value field and enter €, as shown in Figure 4-6.
Tip
To get the currency symbols, select Edit
Click the + icon at the end of the entry (row) you just added, and you will get a new entry. This time enter England and £.
When you're done, your plist should look like the one you saw back in Figure 4-2.
To see how you access the plist from your program, see the bold lines of code in Listing 4-1, which is a reworking of the Vacation.m implementation (from Chapter 3 of this minibook) that locates the plist and reads its contents into a mutable dictionary.
Example 4-1. Using plists
#import <Foundation/Foundation.h>
#import "Destination.h"

int main (int argc, const char * argv[]) {

  NSAutoreleasePool * pool = [[NSAutoreleasePool alloc]
   init];
  NSString* appDataPath  =
        @"/Users/neal/Desktop/Example 15A/AppData.plist";
  NSMutableDictionary *appDictionary = [[NSMutableDictionary
   alloc] initWithContentsOfFile:appDataPath];
  NSString* europeSymbol = [[NSString alloc]
   initWithFormat:@"%@",
          [appDictionary valueForKey:@"Europe"]];
  NSString* englandSymbol = [[NSString alloc]
   initWithFormat:@"%@",
          [appDictionary valueForKey:@"England"]];

  NSString* europeText = [[NSString alloc]
                        initWithFormat:@"%@", @"Europe"];
  Destination* europe = [[Destination alloc]
   initWithCountry:europeText andBudget:1000.00
   withExchangeRate:1.25];
  [europeText release];
  NSString* englandText = [[NSString alloc]
   initWithFormat:@"%@", @"England"];
  Destination* england = [[Destination alloc]
   initWithCountry:englandText andBudget:2000.00
   withExchangeRate:1.50];
  [englandText release];


  for (int n = 1; n < 2; n++) {
    double transaction = n*100.00;
    NSLog (@"Sending a $%.2f cash transaction",
   transaction);
    [europe spendCash:transaction];

   NSLog(@"Remaining budget $%.2f", [europe leftToSpend]);
NSLog (@"Sending a $%.2f cash transaction", transaction);
   [england spendCash:transaction];
   NSLog(@"Remaining budget $%.2f", [england leftToSpend]);
 }

[europe setExchangeRate:1.30];
[england setExchangeRate:1.40];

 int n =1;
 while (n < 4) {
   double transaction = n*100.00;
NSLog (@"Sending a %@%.2f credit card transaction",europeSymbol, transaction);[europe chargeCreditCard:transaction];NSLog(@"Remaining budget $%.2f", [europe leftToSpend]);NSLog (@"Sending a %@%.2f credit card transaction",englandSymbol , transaction);[england chargeCreditCard:transaction];NSLog(@"Remaining budget $%.2f", [england leftToSpend]);n++; } NSString *returnedCountry = [england country]; NSLog (@"You have deleted the %@ part of your trip", returnedCountry); [returnedCountry release]; [england release]; [pool drain]; return 0; }
The first bold line of code in Listing 4-1 tells the file system where the AppData file is.
NSString* appDataPath =
      @"/Users/neal/Desktop/Example 15A/AppData.plist";
The file is on the desktop (/Users/neal/Desktop) in a folder called Example 15A (/Example 15A), and the name of the file is AppData.plist (/AppData.plist), which is what you named it way back in Step 4 in "Adding a property list to your project." This is known as a path. A path is a string that contains the location and name of a file. Yours, of course, will be in the folder in which your project is located. You have to change that (unless your name is "neal") to reflect your unique configuration.
You need to change the path every time you change the location or name of a folder your project is in.
Tip
When you start programming with the UIKit (for the iPhone), you won't have to specify the path so precisely. You'll generally have your plist files in either what's called a bundle or in your home directory. An application bundle contains the application executable and any resources used by the application. It includes, for example, the application icon, other images, localized content, and plist files. You could also store your files in your home directory, or some other place where you'll be able to find it using Cocoa functionality available in your program — you won't have to hard code it. In the case of a Foundation Command Line Tool, however, you need to specify exactly where the plist file is.
Next, Listing 4-1 shows how to create a mutable dictionary and read the file into it using the initWithContentsOfFile: method (it needs to be mutable if you want to modify or update it). The next bit of boldness reads as follows:
NSMutableDictionary *appDictionary =
          [[NSMutableDictionary alloc]   initWithContentsOfFi
   le:appDataPath];
In the previous section, the code first specified where the file was located (appDataPath). Now it sends a message to the NSMutableDictionary to initialize itself with that file.
Note
NSDictionary, NSMutableDictionary, NSArray, and NSMutableArray all have the methods initWithContentsOfFile: and writeToFile:: that read themselves in from a file and write themselves out to a file, respectively. This is one of the things that makes property list objects so useful.
Note
Property list containers — and only property list containers — can read themselves in from and write themselves out to a file. The other property list objects can only store themselves, without any effort on your part, as part of a file.
The next set of bold lines of code from Listing 4-1 access the key Europe and create and initialize a string europeSymbol with its value. I do the same thing for England and englandSymbol.
NSString* europeSymbol = [[NSString alloc] initWithFormat:
   @"%@", [appDictionary valueForKey:@"Europe"]];
NSString* englandSymbol = [[NSString alloc]
           initWithFormat:@"%@",
           [appDictionary valueForKey:@"England"]];
The valueForKey: method looks for the key you give it (@"England"). If it finds the key, the corresponding value is returned (in this case, £), if it can't find the key, it returns nil.
The rest of the bold lines of code in Listing 4-1 add the right currency symbol to the NSLog statements for the currency you are using — $ for your dollar-based transactions and the amount of your budget remaining, and europeSymbol (€) and englandSymbol (£) for credit card transactions in euros and pounds, respectively.
Although using a plist and dictionary this way is very clever (at least I think so), it just barely shows what you can do with dictionaries.
Follow these steps to delete all the entries in the plist and create a more interesting plist.
Delete the Europe and England entries from your plist.
That takes you back to what's shown in Figure 4-4. You have no entries.
In the Editor window, the root entry is selected. Click the icon at the end of the entry, as you did in Step 5 in "Adding a property list to your project." (Refer to Figure 4-4.)
A new entry appears.
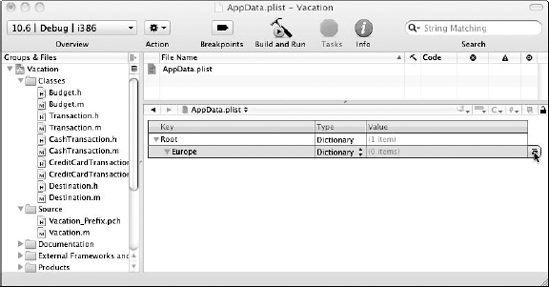
For the new entry, select Dictionary from the Type pop-up menu instead of String. (Refer to Figure 4-5.)
Type Europe as the key.
Click the triangle next to Europe and make sure it is pointing down, as shown in Figure 4-7. Then select the plus icon to the right of your new entry. (Make sure the triangle is pointing down; if it isn't, you won't be able to add a sub-item.)
A subitem is added below Europe.
Note
These disclosure triangles work the same way as those in the Finder and the Xcode Editor. The Property List editor interprets what you want to add based on the triangle. So, if the items are revealed (that is, the triangle is pointing down), it assumes you want to add a subitem. If the subitems are not revealed (that is, the triangle is pointing sideways), it assumes you want to add another item at the same level. In this case, with the arrow pointing down, you'll be adding a new entry to the Europe dictionary. If the triangle were pointing sideways, you'd be entering a new entry under the root.
Tip
The icon at the end of the row also helps. A tiny icon of three lines, as you see under the pointer in Figure 4-7, indicates that you are able to add a new subitem of the entry (at a lower level) in that row. If it is a +, this tells you that you're able to add a new item at the same level.
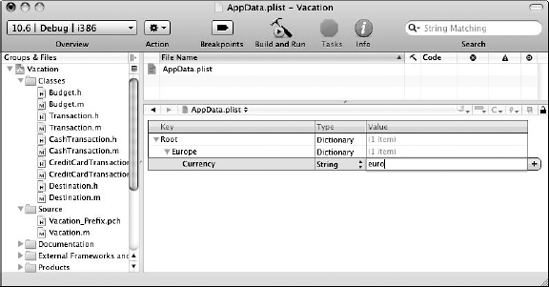
For the subitem entry, choose String from the Type pop-up menu, enter Currency as the Key and euro as the value, as shown in Figure 4-8.
This dictionary will have two entries. One is the name of the currency, in this case
eurowith the key ofCurrency, and the other is the currency symbol with the key ofSymbol. (You won't actually need the currency name until you add more functionality, but you will have it here for future use.)Repeat Step 5 to add the second
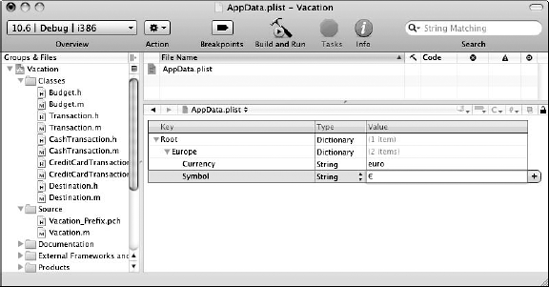
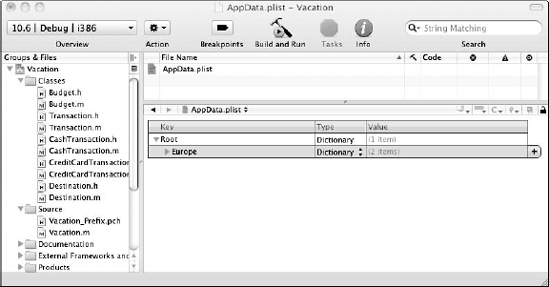
Stringsubitem entry to the Europe dictionary, this time with the key ofSymboland the value of € , as shown in Figure 4-9.Click the disclosure triangle to hide the Europe dictionary entries, as shown in Figure 4-10.
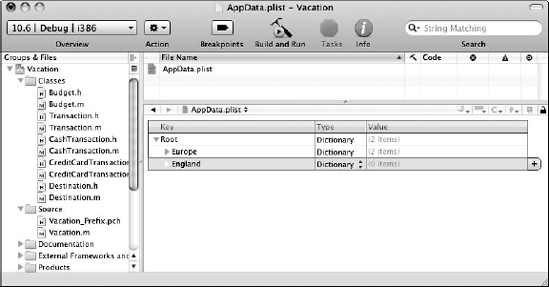
Click the + icon next to the Europe dictionary and add the England dictionary, as shown in Figure 4-11.
Since the Europe dictionary subitems are hidden, clicking the + icon adds a new entry to the root.
Redo Steps 6 and 7 to create two new
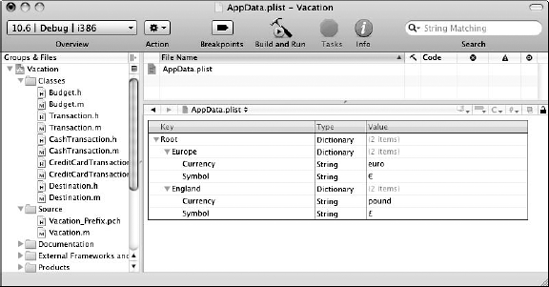
Stringsubitem entries for the England dictionary. This time use the KeyCurrency,the Valuepound,the Keysymbol,and the Value £.When you're done, it should look like Figure 4-12. (Make sure you click all the disclosure triangles to expand it all so you can see it all.)
Remember, the entries in a dictionary can be any property list object. What you have just done is create a dictionary of dictionaries. You have a dictionary for each country that enables you to find the currency (
Currency) for each country you're visiting and its associated currency symbol (Symbol).And because a picture is worth many hours of contemplation, Figure 4-13 shows how everything fits together.
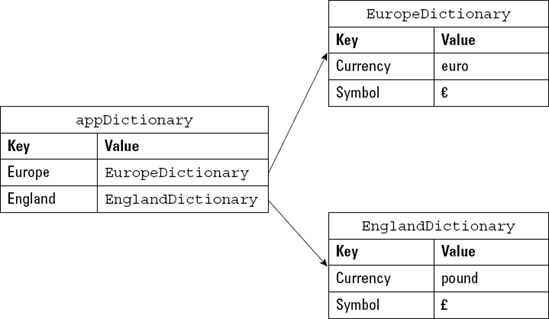
Using your new "dictionary of a dictionary" is a little more complex than using a simple dictionary. Admittedly, though, the first thing you make it do is read in the plist and create a dictionary, just as you did with the simple dictionary in the last version:
NSMutableDictionary* appDataDictionary=[[NSMutableDictionary
   alloc] initWithContentsOfFile:appDataPath];
This time, however, the Europe and England keys have a value of another dictionary instead of a currency symbol. So you treat them as NSDictionary objects. The following code takes the value for both the Europe and England keys and assigns it to pointers to those dictionaries.
NSDictionary* europeDictionary = [appDataDictionary
   valueForKey:@"Europe"];
NSDictionary* englandDictionary = [appDataDictionary
   valueForKey:@"England"];
Now, you can access the dictionary just as you did before using the key Symbol to get the currency symbol and store it in the variables europeSymbol and englandSymbol.
NSString* europeSymbol = [[NSString alloc]
           initWithFormat:@"%@",
           [europeDictionary valueForKey:@"Symbol"]];
NSString* englandSymbol = [[NSString alloc]
           initWithFormat:@"%@",
           [englandDictionary valueForKey:@"Symbol"]];
The methods that add entries to dictionaries (as well as arrays) make copies of each key argument and add the copy to the dictionary. The value object, on the other hand, receives a retain message to ensure that it won't be de-allocated before the dictionary is finished with it.
One thing about property lists is that they can be modified. Although you don't want to directly modify the system-level files that you'll be using (like preferences — you should use the API provided instead), it's open season on your own files.
One of the limitations of the vacation budget application example is that each time you run it, you start with a clean budget. Although this is fun from a fantasy viewpoint, it doesn't help you manage your money. So, because all good things must come to an end, you need to start keeping track of the remaining budget. Each time you run the program, you start where you left off the last time.
You can do this a couple of ways. You can add a new entry to the existing container you created (AppData), or you can create a new file to store what remains in your budget. I show you both ways.
Start by adding a new entry to the AppData plist, a Budgets dictionary. This dictionary will have keys for Europe and England. The value for each key will be the amount of the remaining budget.
Note
Of course, you could have used Xcode's Property List editor to add the new entry, but I want to show you how to do this kind of thing in your program.
To save the budget data, start by declaring two variables to hold the budget balances for Europe and England:
float europeBudget = 1000;
float englandBudget = 2000;
You have to initialize these variables because the first time you run the program, there will be no Budgets key and corresponding dictionary in the AppData plist. Initializing the variables gives you a place to start.
Just as you did with the value for the Europe and England keys, take the value of the Budgets key and assign it to a pointer to that dictionary.
NSMutableDictionary* budgetsDictionary =[appDataDictionary
   valueForKey:@"Budgets"];
This dictionary has to be mutable because you'll be updating the values later with the new balances.
Because the Budgets dictionary isn't in the plist, the first time you run the application you need to create it. You can determine whether it's already there by checking whether valueForKey: returns nil when you look up the Budgets key value.
if (budgetsDictionary) {
   ...
}
else {If valueForKey: returns nil, you create the new dictionary with the default values and add it to the plist.
NSNumber* europeBalance = [[NSNumber alloc]
                          initWithFloat: europeBudget];
NSNumber* englandBalance = [[NSNumber alloc]
                         initWithFloat: englandBudget];
budgetsDictionary = [[NSMutableDictionary alloc] initWithO
   bjectsAndKeys:europeBalance, @"Europe", englandBalance,
   @"England", nil];
If you remember, this is similar to the code (in "Creating a dictionary" previously in this chapter) that you'd write to create a dictionary to hold currency symbols. In this case, you create a budgetsDictionary and initialize it with two objects and their keys: the europeBalance object (your old friend NSNumber) with its Europe key, and the englandBalance objects with its England key.
Note
Because dictionaries require each entry to be an object, you need to create NSNumber objects for each of those balances.
If the dictionary is there, you look up the remaining balances for Europe and England using those keys, and you assign those values to the two variables you declared earlier.
if (budgetsDictionary) {
  europeBudget = [[budgetsDictionary valueForKey:@"Europe"]
   floatValue];
  englandBudget = [[budgetsDictionary valueForKey:@"England"]
   floatValue];
  }
Then, to keep everyone informed, you display the amount left to spend.
NSLog(@"You have $%.2f to spend in Europe",
         europeBudget);
NSLog(@"You have $%.2f to spend in England", englandBudget);
You also now use these balances when you create the destination objects.
Destination* europe = [[Destination alloc]
           initWithCountry: europeText
           andBudget:europeBudget withExchangeRate:1.25];
Destination* england = [[Destination alloc]
          initWithCountry:englandText
andBudget:englandBudget withExchangeRate:1.50];Every time you run your program, you save what's left of your budget by using setObject:forKey:. If you use setObject:forKey: on a key that's already there, it replaces the old value with the new one. (If you want to take a key out of a mutable dictionary, use the removeObjectForKey: method.) Remember, these methods work only for NSMutableDictionary objects.
First you create the europeBalance and englandBalance as objects.
NSNumber* europeBalance = [[NSNumber alloc]
          initWithFloat:[europe leftToSpend]];
NSNumber* englandBalance = [[NSNumber alloc]
          initWithFloat:[england leftToSpend]];
Now that you have europeBalance and englandBalance as objects, you update the dictionary you created earlier when you read in the plist.
[budgetsDictionary setObject:europeBalance
                                 forKey:@"Europe"];
[budgetsDictionary setObject:englandBalance
                                 forKey:@"England"];
Now for the exciting part. After you update the Budgets dictionary, you write the whole file back to the plist file using the path you defined earlier (appDataPath).
[appDataDictionary writeToFile:appDataPath
                                          atomically:YES];
Well, actually you don't write it; in fact, you don't do any work at all. writeToFile:: is an NSDictionary method and does what it implies. You're actually directing the dictionary to write itself to a file. The atomically parameter tells it to first write the data to an auxiliary file and when that is successful, rename it to the path you specified. This writing to an auxiliary file procedure guarantees that the file won't be corrupted even if the system crashes during the write operation.
Now that you've written it out, you can use the new updated dictionary when you read it back in.
The bold lines of code in Listing 4-2 keep a running balance and save it in a new dictionary in the plist.
Example 4-2. Modifying the Dictionary and Plist
#import <Foundation/Foundation.h>
#import "Destination.h"

int main (int argc, const char * argv[]) {

  NSAutoreleasePool * pool = [[NSAutoreleasePool alloc]
   init];

NSString* appDataPath  = @"/Users/neal/Desktop/Example 15 C/
   AppData.plist";
  NSMutableDictionary* appDataDictionary=[[NSMutableDiction
   ary alloc]initWithContentsOfFile:appDataPath];
  NSDictionary* europeDictionary = [appDataDictionary
   valueForKey:@"Europe"];
  NSDictionary* englandDictionary = [appDataDictionary
   valueForKey:@"England"];
  NSString* europeSymbol = [[NSString alloc]
   initWithFormat:@"%@", [europeDictionary
   valueForKey:@"Symbol"]];
  NSString* englandSymbol = [[NSString alloc]
   initWithFormat:@"%@", [englandDictionary
   valueForKey:@"Symbol"]];

  float europeBudget = 1000;
  float englandBudget = 2000;
  NSMutableDictionary* budgetsDictionary = [appDataDictionary
   valueForKey:@"Budgets"] ;
  if (budgetsDictionary) {
    europeBudget = [[budgetsDictionary valueForKey:@"Europe"]
   floatValue];
    englandBudget = [[budgetsDictionary
   valueForKey:@"England"] floatValue];
  }
  else {
    NSNumber* europeBalance = [[NSNumber alloc]
   initWithFloat:  europeBudget];
    NSNumber* englandBalance = [[NSNumber alloc]
   initWithFloat:  englandBudget];
    budgetsDictionary = [[NSMutableDictionary alloc]
   initWithObjectsAndKeys:
          europeBalance,@"Europe",
          englandBalance,@"England", nil];
    [appDataDictionary setObject: budgetsDictionary
           forKey: @"Budgets"];
  }
    NSLog(@"You have $%.2f to spend in Europe", europeBudget
   );
    NSLog(@"You have $%.2f to spend in England",
   englandBudget );
NSString* europeText = [[NSString alloc] initWithFormat: @"%@", @"Europe"];Destination* europe = [[Destination alloc]initWithCountry:europeText andBudget:europeBudgetwithExchangeRate:1.25];[europeText release]; NSString* englandText = [[NSString alloc] initWithFormat:@"%@", @"England"];Destination* england = [[Destination alloc]initWithCountry:englandTextandBudget:englandBudget withExchangeRate: 1.50];[englandText release]; for (int n = 1; n < 2; n++) { double transaction = n*100.00; NSLog (@"Sending a $%.2f cash transaction", transaction); [europe spendCash:transaction]; NSLog(@"Remaining budget $%.2f", [europe leftToSpend]); NSLog(@"Sending a $%.2f cash transaction", transaction); [england spendCash:transaction]; NSLog(@"Remaining budget $%.2f", [england leftToSpend]); } [europe setExchangeRate:1.30]; [england setExchangeRate:1.40]; int n =1; while (n < 4) { double transaction = n*100.00; NSLog (@"Sending a %@%.2f credit card transaction", europeSymbol, transaction); [europe chargeCreditCard:transaction]; NSLog(@"Remaining budget $%.2f", [europe leftToSpend]); NSLog (@"Sending a %@%.2f credit card transaction", englandSymbol, transaction); [england chargeCreditCard:transaction]; NSLog(@"Remaining budget $%.2f", [england leftToSpend]); n++; }NSNumber* europeBalance = [[NSNumber alloc]initWithFloat:[europe leftToSpend]];NSNumber* englandBalance = [[NSNumber alloc]initWithFloat:[england leftToSpend]];[budgetsDictionary setObject: europeBalanceforKey:@"Europe"];[budgetsDictionary setObject: englandBalanceforKey:@"England"];[appDataDictionary writeToFile:appDataPath atomically:YES];
NSString *returnedCountry = [england country];
  NSLog (@"You have deleted the %@ part of your trip",
   returnedCountry);
  [returnedCountry release];
  [england release];
  [pool drain];
  return 0;
}
Of course, after you build and run this project a few times, you find yourself deeply in debt. If you close and then reopen the project, you'll actually see the new entry in the AppData plist. Delete it in the dictionary by using the Xcode Property List editor by selecting the Budgets dictionary entry and pressing Delete, and then choosing File
If you don't see the Budgets dictionary in the plist and you don't want to go to the trouble of closing and then opening the project, click in any Key or Value field in the AppData plist and add and then delete a space. (You really haven't changed anything, but that's the point.) Then choose File