
One thing that makes iPhone software development so appealing is the richness of the tools and frameworks provided in the Apple's iPhone Software Development Kit (SDK). The frameworks are especially important; each one is a distinct body of code that actually implements your application's generic functionality — gives the application its basic way of working, in other words. This is especially true of one framework in particular: the UIKit framework, which is the heart of the user interface.
In this chapter, you find out about most of the iPhone's user interface architecture, which is a mostly static view that explains what the various pieces are, what each does, and how they interact with each other. This chapter lays the groundwork for developing the DeepThoughts app's user interface, which you get a chance to tackle in Book III.
A framework offers common code providing generic functionality. The iPhone OS provides a set of frameworks for incorporating technologies, services, and features into your apps. For example, the UIKit framework gives you event-handling support, drawing support, windows, views, and controls you can use in your app.
A framework is designed to easily integrate your code that runs your game or delivers the information that your user wants. Frameworks are similar to software libraries, but with an added twist: They also implement a program's flow of control (unlike a software library whose components are arranged by the programmer into a flow of control). This means that, instead of the programmer deciding the order that things should happen — such as which messages are sent to which objects and in what order when an application launches, or when a user touches a button on the screen — the order is a part of the framework and doesn't need to be specified by the programmer.
When you use a framework, you provide your app with a ready-made set of basic functions; you've told it, "Here's how to act." With the framework in place, all you need to do is add the specific functionality that you want in the app — the content as well as the controls and views that enable the user to access and use that content — to the frameworks.
The frameworks and the iPhone OS provide some pretty complex functionality, such as
Launching the app and displaying a window on the screen
Displaying controls on the screen and responding to a user action — changing a toggle switch for example, or scrolling a view, like the list of your contacts
Accessing sites on the Internet, not just through a browser, but from within your own program
Managing user preferences
Playing sounds and movies
The list goes on — you get the picture
Tip
Some developers talk in terms of "using a framework" — but your app doesn't use frameworks so much as the frameworks use your app. Your app provides the functions that the framework accesses; the framework needs your code in order to become an app that does something other than start up, display a blank window, and then end. This perspective makes figuring out how to work with a framework much easier. (For one thing, it lets the programmer know where he or she is essential.)
If this seems too good to be true, well, okay, it is — all that complexity (and convenience) comes at a cost. It can be really difficult to absorb the whole thing and know exactly where (and how) to add your app's functionality to that supplied by the framework. That's where design patterns come in. Understanding the design patterns behind the frameworks gives you a way of thinking about a framework — especially UIKit — that doesn't make your head explode.
A major theme of this chapter is the fact that, when it comes to iPhone app development, the UIKit framework does a lot of the heavy lifting for you. That's all well and good, but it's a little more complicated than that: The framework is designed around certain programming paradigms, also known as design patterns. The design pattern is a model that your own code must be consistent with.
To understand how to take best advantage of the power of the framework — or (better put) how the framework objects want to use your app best — you need to understand design patterns. If you don't understand them or if you try to work around them because you're sure you have a "better" way of doing things, your job will actually be much more difficult. (Developing software can be hard enough, so making your job more difficult is definitely something you want to avoid.) Getting a handle on the basic design patterns used (and expected by) the framework helps you develop an app that makes the best use of the framework. This means the least amount of work in the shortest amount of time.
Note
The iPhone design patterns can help you to understand not only how to structure your code, but also how the framework itself is structured. They describe relationships and interactions between classes or objects, as well as how responsibilities should be distributed amongst classes so the iPhone does what you want it to do.
The common definition of a design pattern is "a solution to a problem in a context." (Uh, guys, that's not too helpful.) At that level of abstraction, the concept gets fuzzy and ambiguous. So here's how I use the term throughout this All-in-One book:
In programming terms, a design pattern is a commonly used template that gives you a consistent way to get a particular task done.
You need to be comfortable with these three basic design patterns:
Of these, the Model-View-Controller design pattern is the key to understanding how an iPhone app works. I defer the discussion of the last two until after you get the MVC under your belt.
The iPhone frameworks are object-oriented. The easiest way to understand what that really means is to think about a team. The work that needs to get done is divided and assigned to individual team members (objects). Every member of a team has a job and works with other team members to get things done. What's more, a good team doesn't butt in on what other members are doing — just like how an object in object-oriented programming spends its time taking care of business and not caring what the object in the virtual cubicle next door is doing.
Note
Object-oriented programming was originally developed to make code more maintainable, reusable, extensible, and understandable (what a concept!) by tucking all the functionality behind well-defined interfaces. The actual details of how something works (as well as its data) are hidden, which makes modifying and extending an application much easier.
Great — so far — but a pesky question still plagues programmers:
Exactly how do you decide on the objects and what each one does?
Sometimes the answer to that question is pretty easy — just use the real world as a model. (Eureka!) In the RoadTrip app that serves as an example in Books V, VI, and VII, some of the classes of model objects are Weather and CarInformation. But when it comes to a generic program structure, how do you decide what the objects should be? That may not be so obvious.
The MVC pattern is a well-established way to group application functions into objects. Variations of it have been around at least since the early days of Smalltalk, one of the very first object-oriented languages. The MVC is a high-level pattern — it addresses the architecture of an application and classifies objects according to the general roles they play in an application.
The MVC pattern creates, in effect, a miniature universe for the application, populated with three kinds of objects. It also specifies roles and responsibilities for all three objects and specifies the way they're supposed to interact with each other. To make things more concrete (that is, to keep your head from exploding), imagine a big, beautiful, 60-inch flat screen TV. Here's the gist:
Model objects: These objects together comprise the content "engine" of your app. They contain the app's data and logic — making your app more than just a pretty face. In the RoadTrip application, for example, the model maintains a list of hotels and information about each and allows you to add to that list. Chapter 1 of Book VII shows you how to create a
Hotelmodel object to encapsulate that information.You can think of the model (which may be one object or several that interact) as a particular television program, one that, quite frankly, does not give a hoot about what TV set it is being shown on.
In fact, the model shouldn't give a hoot. Even though it owns its data, it should have no connection at all to the user interface and should be blissfully ignorant about what is being done with its data.
View objects: These objects display things on the screen and respond to user actions. Pretty much anything you can see is a kind of view object — the window and all the controls, for example. Your views know how to display information that it has gotten from the model object, and how to get any input from the user the model may need. But the view itself should know nothing about the model. It may handle a request to find a hotel, but it doesn't bother itself with what that request means. It may display the different ways to get to the hotel, although it doesn't care about the content options it displays for you.
You can think of the view as a television screen that doesn't care about what program it is showing or what channel you just selected.
Tip
The
UIKitframework provides many different kinds of views, as you'll find out later on in this chapter.If the view knows nothing about the model, and the model knows nothing about the view, how do you get data and other notifications to pass from one to the other? To get that conversation started (Model: "I've just updated my data." View: "Hey, give me something to display," for example), you need the third element in the MVC triumvirate, the controller.
Controller objects: These objects connect the application's view objects to its model objects. They supply the view objects with what they need to display (getting it from the model), and also provide the model with user input from the view.
You can think of the controller as the circuitry that pulls the show off of the cable and then sends it to the screen or requests a particular pay-per-view show.
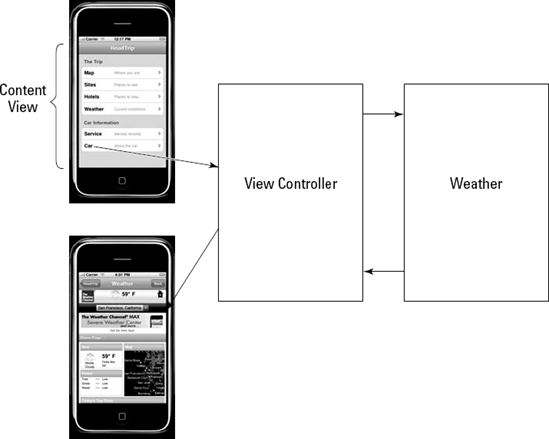
Imagine that an iPhone user is in San Francisco, and he or she starts the handy RoadTrip app mentioned so often in these pages. The view will display his or her location as "San Francisco." The user may tap a button that requests the weather. The controller interprets that request and tells the model what it needs to do by sending a message to the appropriate method in the model object with the necessary parameters. The model accesses the www.weather.com Web site (or fails to access it, due to the lack of an Internet connection), and the controller then delivers that information to the view, which promptly displays the information — either the appropriate page from www.weather.com, or the Weather is not available offline message.
All this is illustrated in Figure 5-1.

Note
When you think about your application in terms of Model, View, and Controller objects, the UIKit framework starts to make sense. It also begins to lift the fog from where at least part of your application-specific behavior needs to go. Before I get more into that, however, you need to know a little more about the classes provided to you by the UIKit that implement the MVC design pattern — windows, views, and view controllers.
After an app is launched, it's going to be the only app running on the system — aside from the operating system software, of course. iPhone apps have only a single window, so you won't find separate document windows for displaying content. Instead, everything is displayed in that single window, and your application interface takes over the entire screen. When your application is running, it's all the user is doing with the iPhone.
The single window you see displayed on the iPhone is an instance of the UIWindow class. This window is created at launch time, either programmatically by you or automatically by UIKit loading it from a nib file — a special file that contains instant objects that are reconstituted at runtime (You can find out more about nib files in Chapter 4 of this minibook). You then add views and controls to the window. In general, after you create the Window object (that is, if you create it instead of having it done for you), you never really have to think about it again.
Note
A user can't directly close or manipulate an iPhone window. It is your app that programmatically manages the window.
Although your application never creates more than one window at a time, the iPhone OS does use additional windows on top of your window. The system status bar is one example. You can also display alerts on top of your window by using the supplied Alert views.
Figure 5-2 shows the window layout on the iPhone for the RoadTrip app.
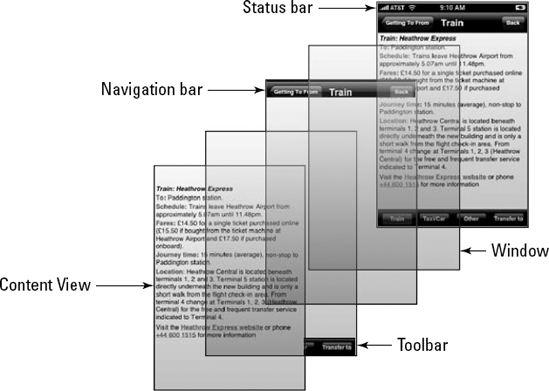
In an iPhone app world, view objects are responsible for the view functionality in the Model-View-Controller architecture.
A view is a rectangular area on the screen (on top of a window). The Content view is that portion of data and controls that appear between the upper and lower bars shown in Figure 5-2.
Note
In the UIKit framework, windows are really a special kind of view, but for purposes of this discussion, I'm talking about views that sit on top of the window.
Views are the main way for your app to interact with a user. This interaction happens in two ways:
Views display content. For example, by making drawing and animation happen onscreen.
In essence, the view object displays the data from the model object.
Views handle touch events. They respond when the user touches a button, for example.
Handling touch events is part of a responder chain (a special logical sequence detailed in Chapter 4 of Book III).
Views and subviews create a view hierarchy. There are two ways of looking at it (no pun intended this time): visually (how the user perceives it) and programmatically (how you create it). You must be clear about the differences, or you will find yourself in a state of confusion that resembles Times Square on New Year's Eve.
Looking at it visually, the window is at the base of this hierarchy with a Content view on top of it (a transparent view that fills the window's Content rectangle). The Content view displays information and also allows the user to interact with the application, using (preferably standard) user-interface items such as text fields, buttons, toolbars, and tables.
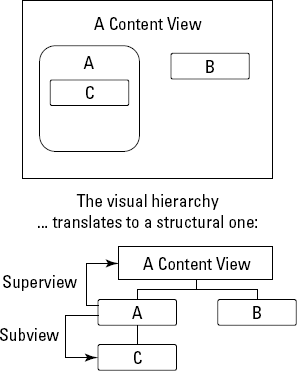
In your program, that relationship is different. The Content view is added to the window view as a subview.
Note
It seems counterintuitive, but a subview is displayed on top of its parent view (that is, on top of its superview). Think about this relationship as containment: A superview contains its subviews. Figure 5-3 shows an example of a view hierarchy.
Controls — such as buttons, text fields, and the like — are really view subclasses that become subviews. So are any other display areas you may specify. The view must manage its subviews, as well as resize itself with respect to its superviews. Fortunately, much of what the view must do is already coded for you. The UIKit framework supplies the code that defines view behavior.
The view hierarchy plays a key role in both drawing and event handling. When a window is sent a message to display itself, the window asks its subview to render itself first. If that view has a subview, it asks its subview to render itself first, going down the structural hierarchy (or up the visual structure) until the last subview is reached. It then renders itself and returns to its caller, which renders itself, and so on.
You create or modify a view hierarchy whenever you add a view to another view, either programmatically or with the help of the Interface Builder. The UIKit framework automatically handles all the relationships associated with the view hierarchy.
Tip
Developers typically gloss over this visual versus programmatic view hierarchy stuff when starting out — and without understanding this, it is really difficult to get a handle on what's going on.
The UIView class defines the basic properties of a view, and you may be able to use it as is — like you do in the DeepThoughts app — by simply adding some controls.
The framework also provides you with a number of other views that are subclassed from UIView. These views implement the kinds of things that you as a developer need to do on a regular basis.
Warning
It's important to use the view objects that are part of the UIKit framework. When you use an object such as a UISlider or UIButton, your slider or button behaves just like a slider or button in any other iPhone app. This enables the consistency in appearance and behavior across apps that users expect. (For more on how this kind of consistency is one of the characteristics of a great app, see Chapter 1 of this minibook.)
Container views are a technical (Apple) term for Content views that do more than just lie there on the screen and display your controls and other content.
The UIScrollView class, for example, adds scrolling without you having to do any work.
UITableView inherits this scrolling capability from UIScrollView and adds the ability to display lists and respond to the selections of an item in that list. Think of the Contacts application (and a host of others). UITableView is one of the primary navigation views on the iPhone; you'll work a lot with table views starting with Chapter 1 of Book VI.
Another container view, the UIToolbar class, contains button-like controls — and you find those everywhere on the iPhone. In Mail, for example, you touch an icon in the bottom toolbar to respond to an e-mail.
Controls are the fingertip-friendly graphics you see extensively used in a typical application's user interface. Controls are actually subclasses of the UIControl superclass, a subclass of the UIView class. They include touchable items like buttons, sliders, and switches, as well as text fields in which you enter data.
Controls make heavy use of the Target-Action design pattern, which you get to see with the Done button in the Flipside view of the DeepThoughts app in Chapter 2 of Book III.
Think of display views as controls that look good, but don't really do anything except, well, look good. These include UIImageView, UILabel (which you use in the DeepThoughts app in Chapter 3 of Book III to display the area in which the falling words appear), UIProgressView, and UIActivityIndicatorView.
Text and Web views provide a way to display formatted text in your application. The UITextView class supports the display and editing of multiple lines of text in a scrollable area. The UIWebView class provides a way to display HTML content. These views can be used as the Content view, or they can also be used in the same way as a display view above, as a subview of a Content view. Neal uses a UIWebView in the RoadTrip app in Chapter 4 of Book V to display car information and servicing views, as well as Weather views. UIWebView also is the primary way to include graphics and formatted text in text display views.
Alert views and action sheets present a message to the user, along with buttons that allow the user to respond to the message. Alert views and action sheets are similar in function but look and behave differently. For example, the UIAlertView class displays a blue alert box that pops up on the screen, and the UIActionSheet class displays a box that slides in from the bottom of the screen.
Tab bars and navigation bars work in conjunction with view controllers to provide tools for navigating in your app. Normally, you don't need to create a UITabBar or UINavigationBar directly — it's easier to use Interface Builder or configure these views through a tab bar or navigation bar controller.
View controllers implement the controller component of the Model-View-Controller design pattern. These Controller objects contain the code that connects the app's view objects to its model objects. They provide the data to the view. Whenever the view needs to display something, the view controller goes out and gets what the view needs from the model. Similarly, view controllers respond to controls in your Content view and may do things like tell the model to update its data (when the user adds or changes text in a text field, for example), or compute something (the current value of, say, your U.S. dollars in British pounds), or change the view being displayed (like when the user hits the Detail Disclosure button on the iPod application to learn more about a song).
As shown in "The Target-Action pattern" section later in this chapter, a view controller is often the (target) object that responds to the on-screen controls. The Target-Action mechanism is what enables the view controller to be aware of any changes in the view, which can then be transmitted to the model. For example, Figure 5-4 shows what happens when the user taps the Weather entry in the RoadTrip app to request the current weather conditions.
A message is sent to that view's view controller to handle the request.
The view controller's method interacts with the Weather model object.
The model object processes the request from the user for the current weather.
The model object sends the data back to the view controller.
The view controller creates a new view to present the information.
View controllers have other vital iPhone responsibilities as well, such as:
Managing a set of views — including creating them, or flushing them from memory during low-memory situations.
Responding to a change in the device's orientation — say, landscape to portrait — by resizing the managed views to match the new orientation.
Creating a modal view, which is a child window that displays a dialog requiring the user to do something (touch the Yes button, for example) before returning to the application.
Note
You would use a modal view to ensure that the user has paid attention to the implications of an action (for example, "Are you sure you want to delete all your contacts?").
View controllers are also typically the objects that serve as delegates and data sources for table views (more about those in Chapter 1 of Book VI).
In addition to the base UIViewController class, UIKit includes subclasses such as UITabBarController, UINavigationController, UITableViewController, and UIImagePickerController to manage the tab bar, navigation bar, table views, and to access the camera and Photo library.
As this chapter shows (and as you will continue to discover), a lot of the functionality you need is already in the frameworks.
But when it comes to the model objects, for the most part, you're pretty much on your own. You need to design and create model objects to hold the data and carry out the logic. In the RoadTrip app, for example, you create a Weather object that knows how to get the weather conditions for the iPhone's current location, and a CarInformation object that returns information about the car.
Earlier in this chapter (by now it probably seems like a million years ago), I mention two other design patterns used in addition to the Model-View-Controller (MVC) pattern. If you have a photographic memory, you won't need us telling you that those two patterns are the Delegation pattern and the Target-Action pattern. These patterns, along with the MVC pattern and subclassing, provide the mechanisms for you to add your app-specific behavior to the UIKit (and any other) framework.
Note
The first way to add behavior is through model objects in the MVC pattern. Model objects contain the data and logic that make, well, your application.
The second way, the way people traditionally think about adding behavior to an object-oriented program, is through subclassing, where you first create a new (sub) class that inherits behavior and instance variables from another (super) class and then add additional behavior, instance variables, and properties (I explain properties in Chapter 4 of Book II) to the mix until you come up with just what you want. The idea here is to start with something basic and then add to it — kind of like taking a deuce coupe (1932 Ford) and turning it into a hot rod. You'd subclass a view controller class, for example, to respond to controls.
The third way to add behavior involves using the Delegation pattern, which allows you to customize an object's behavior without subclassing by basically forcing another object to do the first object's work for it. For example, the Delegation design pattern is used at application startup to invoke a method applicationDidFinishLaunching: that gives you a place to do your own application-specific initialization. All you do is add your code to the method.
The final way to add behavior involves the Target-Action design pattern, which allows your application to respond to an event. When a user touches a button, for example, you specify what method should be invoked to respond to the button touch. What is interesting about this pattern is that it also requires subclassing — usually a view controller (refer to Figure 5-4) — in order to add the code to handle the event.
The next few sections go into a little more detail about Delegation patterns and Target-Action patterns.
Delegation is a pattern used extensively in the iPhone frameworks, so much so that it's very important to clearly understand it. In fact, once you understand it, your life will be much easier.
Delegation, as I mention in the previous section, is a way of customizing the behavior of an object without subclassing it. Instead, one object (a Framework object) delegates the task of implementing one of its responsibilities to another object. You're using a behavior-rich object supplied by the framework as is, and putting the code for program-specific behavior in a separate (delegate) object. When a request is made of the Framework object, the method of the delegate that implements the program-specific behavior is automatically called.
For example, the UIApplication object handles most of the actual work needed to run the application. But, as you will see, it sends your application delegate the applicationDidFinishLaunching: message to give you an opportunity to restore the application's window and view to where it was when the user previously left off. You can also use this method to create objects that are unique to your app.
When a Framework object has been designed to use delegates to implement certain behaviors, the behaviors it requires (or gives you the option to implement) are defined in a protocol.
Protocols define an interface that the delegate object implements. On the iPhone, protocols can be formal or informal, although I concentrate solely on the former because it includes support for things like type checking and runtime checking to see if an object conforms to the protocol.
In a formal protocol, you usually don't have to implement all the methods; many are declared optional, meaning you only have to implement the ones relevant to your app. Before it attempts to send a message to its delegate, the host object determines whether the delegate implements the method (via a respondsToSelector: message) to avoid the embarrassment of branching into nowhere if the method is not implemented.
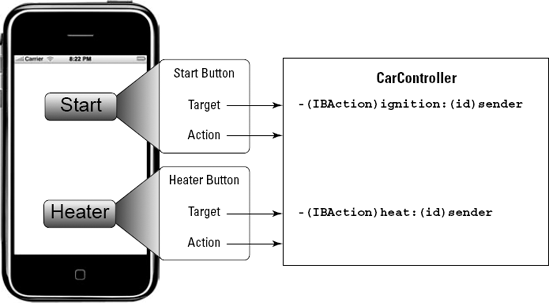
You use the Target-Action pattern to let your app know that a user has done something. He or she may have tapped a button or entered some text, for example. The control — a button, say — sends a message (the Action message) that you specify to the target you have selected to handle that particular action. The receiving object, or the Target, is usually a view controller object.
If you wanted to develop an app that could start a car from an iPhone (not a bad idea for those who live in a place like Minneapolis in winter), you could display two buttons, Start and Heater. You could use Interface Builder to specify, when the user taps Start, that the target is the CarController object and that the method to invoke is ignition. Figure 5-5 shows the Target-Action mechanism in action. (If you're curious about IBAction and (id) sender, I explain what they are when I show you how to use the Target-Action pattern in your application.)
Note
The Target-Action mechanism enables you to create a control object and tell it not only what object you want handling the event, but also the message to send. For example, if the user touches a Ring Bell button onscreen, you want to send a Ring Bell message to the view controller. But if the Wave Flag button on the same screen is touched, you want to be able to send the Wave Flag message to the same view controller. If you couldn't specify the message, all buttons would have to send the same message. It would then make the coding more difficult and more complex because you would have to identify which button had sent the message and what to do in response.
It would also make changing the user interface more work and more error prone.
When creating your app, you can set a control's action and target through the Interface Builder. This setting allows you to specify what method in which object should respond to a control without having to write any code.
Note
You can also change the target and action dynamically by sending the control or its cell setTarget: and setAction: messages.
For more on the Interface Builder, check out Chapter 2 of Book III.
The UIKit framework provides a great deal of ready-made functionality, but the beauty of UIKit lies in the fact that — as this chapter explains — you can customize its behavior using three distinct mechanisms.
Subclassing
Target-Action
Delegation
One of the challenges facing a new developer is to determine which of these mechanisms to use when. (That was certainly the case for me.) To ensure that you have an overall conceptual picture of the iPhone application architecture, check out the Cheat Sheet for Neal's other book, iPhone Application Development For Dummies, which offers a summary of which mechanisms are used when. You can find the Cheat Sheet at www.dummies.com/cheatsheet/iphoneapplicationdevelopment.
Congratulations! You have just gone through the Classic Comics version of hundreds of pages of Apple documentation, reference manuals, and how-to guides.
Well, you still have quite a bit more to explore. But before you get started learning how to use Objective C with iPhone technologies (Book II), it helps to know more about the app publishing process, how to provision your app for development, and the App Store do's and don'ts (Chapter 6 of this minibook), as well as how to go beyond the App Store to market your apps (Chapter 7 of this minibook).
When you've had a stroll through those adventures, you'll know everything you need to know about provisioning your app for the App Store and designing an app that customers might actually want. (How's that for a plan?)