
In This Chapter
Using the Location Manager
Seeing how the accelerometer really works
Incorporating device movement in RoadTrip
One summer, when I was about 8 or 9 and my brother was about 4 or 5, my father and mother decided to drive to Florida for a family vacation. We were living in Northern New Jersey at the time, and my parents packed up the car with their stuff, some toys and books for us, and off we went. (What were they thinking?) This was my very first road trip.
We had gone, oh a good 5 or 6 miles, when my brother piped up from his side of the back seat "Are we there yet?"
"No, Jay" my father replied, "we have quite a way to go."
Well, we actually got another few miles before my brother asked again "Are we there yet?"
"No," my father (still) patiently replied (although I could tell his patience was beginning to wear thin), "we have a really long way to go. A really long way to go. You are going to be in the car for a long time — a couple of days. So we aren't even close to being there yet."
Well, another few miles went by, and sure enough, from my brother's corner of the back seat came "are we there yet?"
My father at this point could see the writing on the wall and said to my brother, "No we are not! And if you ask me that one more time . . . "(Fill in the blank according to your imagination.)
Well, this kept my brother quiet for a while — a very short while. At the point he couldn't stand it anymore, out from his corner of the back seat came the immortal words "how old will I be when we get there?"
By this point in the book, it wouldn't surprise me if you could give my four-year-old brother a run for his money — over 700 pages and still counting and we're not there yet?
So, in this chapter, I show you how to add the last (I promise) feature to the RoadTrip app — one that lets the user know how far he is from his destination.
To do that, you need to find out a bit more about Core Location, and you also explore how to use the accelerometer because, for me at least, the right interface for this kind of question is to have the user shake his or her iPhone.
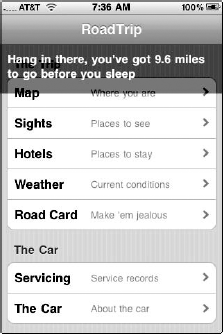
Curious how the finalized feature will look? Take a look at Figure 3-1, which shows what appears onscreen when you shake the phone. Oh, and this too, needs to be tested on your iPhone.
Core Location is an iPhone framework that enables you to determine the current location (as in where you are latitude- and longitude-wise), or heading (as in compass) of the device.
To get Core Location working for you, you start by adding Core Location to your project. To do that, you need to add the Core Location framework.
At this point, you're pretty used to adding a new framework. To refresh your memory refer to Book V, Chapter 5:
Click the disclosure triangle next to Targets in the Groups & Files list and then right-click RoadTrip.
From the submenu that appears, select Add and then select Existing Frameworks.
Select
CoreLocation.frameworkin the window that appears and then click Add.Drag the newly created
CoreLocation.framework— it's there inthe Groups & Files list — into the Frameworks folder.
This time — surprise, surprise — you won't be adding any more controllers. You'll be using what you have; not only that, you'll be working solely with the RootViewController.
You'll start by adding the bolded code in Listing 3-1 to RootViewController.h.
Example 3-1. Updating RootViewController.h
@class Trip;#import <CoreLocation/CoreLocation.h>@interface RootViewController : UITableViewController <CLLocationManagerDelegate> { NSArray *sectionsArray; NSMutableArray *menuList; Trip *trip;CLLocationManager *locationManager;CLLocation *currentLocation;CLLocation *targetLocation;}@property (nonatomic retain) CLLocation *currentLocation;- (int) menuOffsetForRowAtIndexPath: (NSIndexPath *)indexPath; - (void) displayOfflineAlert:(NSString*) selection; @end
You also need to add the appropriate @synthesize statement to RootViewController.m.
@synthesize currentLocation;
Notice that you adopt the CLLocationManagerDelegate protocol. You've also added instance variables so that you can save the present location, specify the target location, and maintain the reference to the instance of the location manager you're about to create.
Notice that you make currentLocation a property. That's because, as you will see, it will be created and sent to you (as a delegate) from the location manager. That means I'll want to retain it and then release it when a new value comes along. So rather than doing all that myself, I make it a property — assigning a new CLLocation to that property will send a release to the CLLocation object there and a retain to the new one.
Note
The CLLocationManager class provides a way for your application to get location and heading events. (You'll need a 3GS with a compass for the latter.)
To get the events, you create an instance of the class and set some parameters: namely the delegate (the one who gets sent the events), what you consider a significant change in location, and how accurate the location needs to be.
Start by doing all that in the viewDidLoad method in RootViewController.m. Add the bolded code in Listing 3-2.
Example 3-2. Setting Up the Location Manager
- (void)viewDidLoad {

  [super viewDidLoad];

  locationManager = [[CLLocationManager alloc] init];
  [locationManager setDesiredAccuracy:kCLLocationAccuracyB
   est];
  locationManager.distanceFilter = 10;
  [locationManager setDelegate:self];
  [locationManager startUpdatingLocation];
  targetLocation = [[CLLocation alloc] initWithLatitude:
           (double)37.3317 longitude:(double)−122.0307];
 ...
 }
The bolded stuff starts by creating an instance of the location manager:
locationManager = [[CLLocationManager alloc] init];
Then you set the desired accuracy:
[locationManager setDesiredAccuracy:kCLLocationAccuracyBest];
You should assign a value to this property that is appropriate for your application's needs. You can use a number of values, all of them pretty self-explanatory:
kCLLocationAccuracyBest(This is the most "expensive" option in terms of time and power.)kCLLocationAccuracyNearestTenMeterskCLLocationAccuracyHundredMeterskCLLocationAccuracyKilometerkCLLocationAccuracyThreeKilometers(This option is probably good enough if you just want to know what city you're in.)
You should know that if you specify kCLLocationAccuracyBest, the initial event is delivered as quickly as possible and may not have the accuracy you want. The location manager will keep at it, though, and will deliver additional events with the accuracy you specified as the data become available.
Next you set the distance filter:
locationManager.distanceFilter = 10;
This is the minimum distance (in meters) that a device must move laterally before you get an event that notifies you that the location has changed.
Next you set the delegate:
[locationManager setDelegate:self];
As you might expect by now, that's how you'll get the location information.
Then you go and tell the location manger to get to work:
[locationManager startUpdatingLocation];
The location manager, as I said, tries to return an initial location as quickly as possible. After that, you may get more events if the distance (as specified by the distanceFilter property) changes or a more accurate location value is determined.
Tip
The user, of course, can deny an application's access to the location service data. When a user starts the app, as you see in Figure 3-2, RoadTrip asks for permission to use the current location. If the user denies the request, the CLLocationManager object reports an appropriate error to its delegate during future requests.
Finally, I hard-code the target location. That's a fancy way of saying "the place I am going to" — the one that the app will be computing the distance to.
targetLocation = [[CLLocation alloc] initWithLatitude:
           (double)37.3317 longitude:(double)−122.0307];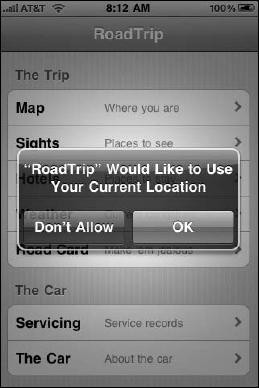
Normally you'd create a view that would allow the user to decide that location for him- or herself, but in this case — because you've already gone through a similar exercise in getting user input in Chapter 1 of this minibook — I leave that part up to you.
No, those coordinates aren't for Florida — there's no need for me to return to former glories. No, that location is for Apple headquarters in Cupertino, California.
Now, although you might want to go to places like the Grand Canyon, Austin, New York, and even Graceland, there's some chance that you might get the urge to drive up to Apple headquarters and try to get a glimpse of something, anything. So I'm using those coordinates. If that road trip doesn't appeal to you, put in what you'd like, or better yet create the view that allows the user to decide.
As I said, as usual, all the action is in the delegate. There are two delegate methods you care about here. The first is locationManager:didFailWith Error:.
Add the code in Listing 3-3 to RootViewController.m.
Example 3-3. locationManager:didFailWithError:
- (void)locationManager:(CLLocationManager *)manager
                       didFailWithError:(NSError *)error {
  NSLog(@"Location manager failed");
}In case of an error, the locationManager:didFailWithError: message is sent. Although implementation of this method is optional, you should do it to create the best possible user experience.
You want to pay attention to these two situations:
If the location manager can't get a location right away, it will keep trying, but you'll get a
kCLErrorLocationUnknownerror. You might want to let the user know that this is the case if she tries to do something that requires location information.If the user denies your request to the use of the location service, this method reports a
kCLErrorDeniederror. Upon receiving such an error, you should stop the location service.
In both cases, you need to implement this capability on your own.
The second delegate method is locationManager:didUpdateToLocation: fromLocation:.
Enter the code in Listing 3-4 to add this method to RootViewController.m.
Example 3-4. locationManager:didUpdateToLocation:fromLocation:
- (void)locationManager:(CLLocationManager *)manager
   didUpdateToLocation:(CLLocation *)newLocation
           fromLocation:(CLLocation *)oldLocation {

   currentLocation = newLocation;
}
This message is sent to the delegate as the user moves away from the old location by the amount you specified in the distanceFilter earlier (or as more accurate information becomes available).
As the delegate method is called, you simply update the current location.
Now that you have the current location, you'll need to do something with it. To enable a user to request how far it is to where they are going, you could add a new choice on the main screen, just as you did with the Road Card in Chapter 1 of this minibook.
But instead I want to show you how to respond to the user shaking the iPhone (out of frustration perhaps) to see how far she is from her destination.
I can just imagine my brother doing this on our trip to Florida.
Guess what? The built-in accelerometer works pretty much the same way as the location manager — through delegation. But using it is a little different because there's only a single instance of the accelerometer, which means that only one delegate can be set for the accelerometer at a time.
The UIAccelerometer class lets you register to receive acceleration-related data from the hardware along the primary axes in three-dimensional space. (See Figure 3-3.)
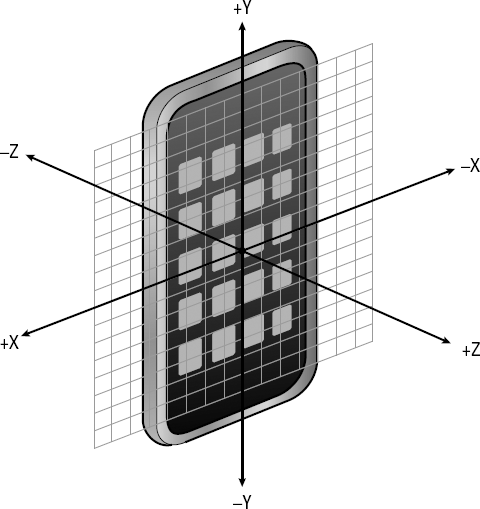
You can use this data to detect both the current orientation of the device (relative to the ground) and any instantaneous changes to that orientation like a shake.
To get a shake to work for you in the context of the Are We There Yet? feature, add the following instance variables and method declarations to RootViewController.h — the bolded stuff in Listing 3-5.
Example 3-5. Enhance RootViewController.h
#import <CoreLocation/CoreLocation.h>
@class Trip;

@interface RootViewController : UITableViewController
    CLLocationManagerDelegate, UIAccelerometerDelegate>   {

  NSArray        *sectionsArray;
  NSMutableArray *menuList;
  Trip           *trip;
  CLLocationManager       *locationManager;
  CLLocation              *currentLocation;
  CLLocation              *targetLocation;
  UIAccelerationValue      xAcceleration;
  UIAccelerationValue      yAcceleration;
  UIAccelerationValue      zAcceleration;
  BOOL                     distanceDisplayed;
  UIView                  *thereYet;
  UILabel                 *resultsDisplay;}
}
@property (nonatomic retain) CLLocation *currentLocation;
- (int) menuOffsetForRowAtIndexPath:(NSIndexPath *)indexPath;
- (void) displayOfflineAlert:(NSString*) selection;
- (void) respondToShake;
- (void) hideResponse;
@end
Start by making RootViewController a UIAccelerometerDelegate.
@interface RootViewController : UITableViewController
   <CLLocationManagerDelegate, UIAccelerometerDelegate> {
Then you add the instance variables you'll use in the two methods, whose declarations you have also added.
Then, access an instance of the UIAccelerometer class and set its parameters as I have using the bolded code in Listing 3-6. You can add this right after the core location code you just added to viewDidLoad.
Example 3-6. Accessing the Accelerometer
- (void)viewDidLoad {

  [super viewDidLoad];
  locationManager = [[CLLocationManager alloc] init];
  [locationManager setDesiredAccuracy:kCLLocationAccuracyB
   est];
  locationManager.distanceFilter = 10;

  [locationManager setDelegate:self];
  [locationManager startUpdatingLocation];
   targetLocation = [[CLLocation alloc]
     initWithLatitude:(double)37.3317
     longitude:(double)−122.0307 ];

  xAcceleration = 0.0;
  yAcceleration = 0.0;
  zAcceleration = 0.0;

 [[UIAccelerometer sharedAccelerometer]
       setUpdateInterval:(1.0 / kAccelerometerFrequency)];
  [[UIAccelerometer sharedAccelerometer]
                                        setDelegate:self];
...
}
First you initialize a few instance variables that you'll use next.
Notice you do not create an accelerometer object. Instead, you use the class method, as shown here:
[UIAccelerometer sharedAccelerometer]
You also specify the interval at which you want to receive events and set the update interval.
setUpdateInterval:(1.0 / kAccelerometerFrequency)];
These events are delivered to your application whether or not there has been any movement and, as you will see, it's up to you to figure out what's really happening with the device.
kAccelerometerFrequency specifies how often you want to receive updates. You need to add kAccelerometerFrequency to Constants.h.
#define kAccelerometerFrequency 25
This value will result in your application receiving updates every 40 milliseconds (1/25).
When specifying the update interval for acceleration events, think about how often you really need to get acceleration events. Frequency values in the 10–20 range are good enough if all you're really using the Accelerometer for is to determine the orientation of the device. For an application like RoadTrip, 25 is adequate; 30–60 is typically used for games and applications that use the accelerometers for real-time user input. Finally, 70–100 works if you need to detect high-frequency motion. The maximum frequency for accelerometer updates is based on the available hardware.
Finally, you assign the delegate.
[[UIAccelerometer sharedAccelerometer] setDelegate:self];
Note
After you assign your delegate, you start getting updates at the frequency you specified, even if the acceleration data didn't actually change. But it's still your job, in your delegate method, to decide what's really going on with the device.
Notice I said events are delivered to your application whether or not there's been any movement. The accelerometer, at least based on the name, may not work exactly like you think it does. (That was definitely the case for me.) That's because, even if the device doesn't move, the device is still "accelerating" to the center of the Earth (if that's the planet you're on) due to the pull of gravity. That means, when my iPhone is resting flat on my desk (which keeps it from falling), the accelerometer is still passing me events that report the z axis is accelerating at approximately 1g or so, with the other axes reporting less (but still measurable) acceleration.
In fact, these are the values the accelerometer reports as my iPhone lies flat on my desk watching me work:
2009-12-14 08:51:38.032 RoadTrip[541:207]
                              Acceleration values at rest:
 x = −0.018112, y = −0.018112, z = −1.086731
The values are negative because the pull is downward.
Although this may seem like a charming interlude, knowing this will become important when I show how to actually use the data.
As one more step along the way of actually using the data, add the code in Listing 3-7 to RootViewController.m.
Example 3-7. The Accelerometer Delegate Method
- (void) accelerometer:(UIAccelerometer*)accelerometer
   didAccelerate:(UIAcceleration*)acceleration {

  xAcceleration = (acceleration.x*kFilteringFactor) +
   (xAcceleration*(1.0-kFilteringFactor));
  yAcceleration = (acceleration.y*kFilteringFactor) +
   (yAcceleration*(1.0-kFilteringFactor));
  zAcceleration = (acceleration.z*kFilteringFactor) +
   (zAcceleration*(1.0-kFilteringFactor));
  UIAccelerationValue xFiltered =
                        acceleration.x - xAcceleration;
  UIAccelerationValue yFiltered =
                        acceleration.y - yAcceleration;
  UIAccelerationValue zFiltered =
                        acceleration.z - zAcceleration;

UIAccelerationValue intensity = sqrt
       (xFiltered * xFiltered +
        yFiltered * yFiltered +
        zFiltered * zFiltered);
  if(intensity >= kAccelerationThreshold)
    [self respondToShake];
}
The data you receive when your app is sent the acceleromete:did Accelerate: message is a UIAcceleration object.
The UIAcceleration class stores the data associated with an acceleration event. It contains the current acceleration readings along the three axes of the device ( x, y, and z properties). Acceleration values for each axis are reported directly by the hardware as G-force values. Therefore, a value of 1.0 represents a load of about +1g along a given axis while a value of −1.0 represents −1g. And while you won't use it here, the object also has a timestamp property.
To figure what's really going on, you need to understand that, depending on the device orientation, some part of the reading for an axis will be simply the pull of gravity. For example, as you saw, if you lay the iPhone flat on your desk, the z value will be close to 1, and the other values will be less.
That means that if you're using the accelerometer data to detect movement, you need to first filter out the portion of the acceleration data that's caused by gravity from the portion that's caused by motion of the device. Now, if you read some of the documentation, or posts on the Internet, you'll read stuff about low pass and high pass filters. My advice to you is ignore all that stuff — your task is actually a lot simpler than that.
Start by creating a base line for the values you'll receive from each axis. For example, for the x axis, the following is done in the computation:
xAcceleration = (acceleration.x*kFilteringFactor) +
   (xAcceleration*(1.0 - kFilteringFactor))
You need to add kFilteringFactor to Constants.h.
#define kFilteringFactor .1
This generates a value that uses 10 percent (kFilteringFactor is equal to .1) of the unfiltered acceleration data — the acceleration.x value in the latest event which you just received in the message argument — and 90 percent of the previously filtered value xAcceleration, which you save after each time you receive the message.
Because acceleration data comes in regularly, this computation serves to create a base line that's pretty stable and doesn't change much in response to sudden but short-lived changes in motion. (This takes into account gravity.)
As long as nothing new is happening, the values in the acceleration events fed to you by the accelerometer will stay about the same. But when something happens, you get a sudden spike in value in one or more of the axes.
To isolate that value, you simply subtract the base line (xAcceleration) from the new value, which gives you the filtered value, or change.
This is the result of the computation:
UIAccelerationValue xFiltered =
                         acceleration.x – xAcceleration;
At the end of the day, what you end up with is a value that tells you the degree of acceleration along each axis above and beyond the base level.
Finally, based on that, you need to decide whether the change in acceleration is really significant — where "significant" here depends on what you're trying to measure.
Intensity of acceleration is measured by taking the square root of the sum of the squares of acceleration data for each of the three axes of motion.
This is computed in
UIAccelerationValue intensity = sqrt (xFiltered * xFiltered +
   yFiltered * yFiltered + zFiltered * zFiltered);
The threshold value I'm having you use is 2.0. You can play around with that value and adjust it to your liking. You'll need to add kAccelerationThreshold to Constants.h.
#define kAccelerationThreshold 2.0
Finally, if the value is over the threshold, you send the respondToShake message.
if(intensity >= kAccelerationThreshold)
                                    [self respondToShake];
Because the UIAcceleration object has a timestamp property, you can also respond based on whether or not a certain about of time has passed (maybe or maybe not a good idea for my brother).
I'll leave it to you to think about it.
After you've decided that the user really has meaningfully shaken the device, you need to display the miles to go in the respondToShake method.
To do that, you need to add the code in Listing 3-8 to RootViewController.m.
Example 3-8. Responding to the Shake
- (void) respondToShake {

  if ( distanceDisplayed) return;
  distanceDisplayed = YES;
  if (!thereYet) {
    thereYet = [[UIView alloc] initWithFrame:
                             CGRectMake (0,−100,320,70)];
    thereYet.backgroundColor = [UIColor blackColor];
    thereYet.opaque = NO;
    thereYet.alpha = .5;
    resultsDisplay = [[UILabel alloc] initWithFrame:
                             CGRectMake (10,−110,300,40)];
    resultsDisplay.numberOfLines = 2;
    resultsDisplay.font = [UIFont boldSystemFontOfSize:17];
    resultsDisplay.textColor = [UIColor whiteColor];
    resultsDisplay.opaque = YES;
    resultsDisplay.alpha = 1.0;
    resultsDisplay.backgroundColor = [UIColor clearColor];
    [self.tableView addSubview: thereYet];
    [self.tableView addSubview:resultsDisplay];
 }
CLLocation Distance theDistance = [currentLocation getDistanceFrom: targetLocation]; resultsDisplay.text = [[NSString alloc ]initWithFormat: @"Hang in there, you've got %.1f miles to go before you sleep", theDistance/1609.344]; [UIView beginAnimations:nil context:NULL]; [UIView setAnimationDelay:1.0]; [UIView setAnimationDuration:2.0]; thereYet.frame = CGRectMake (0,0,320,70); resultsDisplay.frame = CGRectMake (10,10,300,40); [UIView commitAnimations]; [self performSelector:@selector(hideResponse) withObject:self afterDelay:5]; }
If you already have the distance view displayed, you don't want to redisplay it, so you check to see whether it's out there. If it is, you simply return; if not, you set the distanceDisplayed state variable to YES and continue:
if (distanceDisplayed) return;
distanceDisplayed = YES;
Next, if you haven't done so already, you create the view you want displayed.
if (!thereYet) {Because I want to drop it down from the top, I set its origin off the screen. I do the same thing with the label that will hold the distance information.
thereYet = [[UIView alloc] initWithFrame:
                             CGRectMake(0,−100,320,100)];
  resultsDisplay = [[UILabel alloc] initWithFrame:
                            CGRectMake (10,−110,100,40)];
Then you set the background color of the view to black, but since you want it transparent you set opaque to NO, and alpha to .5. Alpha is a measure of how transparent something is — with 0 being clear and 1 being opaque. The label, on the other hand, you want opaque and the text bold so it is readable. I do want the background to be clear, however, so I set it to that and add both views to the Table View superview.
thereYet = [[UIView alloc] initWithFrame: CGRectMake (0,−
  100,320,70)];
   thereYet.backgroundColor = [UIColor blackColor];
   thereYet.opaque = NO; thereYet.alpha = .5;
resultsDisplay = [[UILabel alloc] initWithFrame:
    CGRectMake (10,−110,300,40)];
     resultsDisplay.numberOfLines = 2;
     resultsDisplay.font = [UIFont boldSystemFontOfSize:17];
     resultsDisplay.textColor = [UIColor whiteColor];
     resultsDisplay.opaque = YES;
     resultsDisplay.alpha = 1.0;
     resultsDisplay.backgroundColor = [UIColor clearColor];
     [self.tableView addSubview: thereYet];
     [self.tableView addSubview:resultsDisplay];
Then I send the getDistanceFrom:to message to the currentLocation. This is a CLLocation method and returns the distance (in meters) from the receiver's coordinate to the coordinate of the specified location. I really do love this method — I only wish I had discovered it before I did the math myself.
Tip
In fact, a general philosophy to follow is to really explore what's available before you try to do anything hard yourself. That's especially true if what you want to do seems to be something that other developers need as well.
Then you set the label text accordingly:
CLLocationDistance theDistance =
        [currentLocation getDistanceFrom: targetLocation];
  resultsDisplay.text = [[NSString alloc ]initWithFormat: @"
   %.1f miles from you", theDistance/1609.344];
Finally, you set up and execute the animation that causes the view to drop down from the top.
I explained this in Book III, so I just show you the code here:
[UIView beginAnimations:nil context:NULL];
[UIView setAnimationDelay:1.0];
[UIView setAnimationDuration:2.0];
thereYet.frame = CGRectMake (0,0,320,70);
resultsDisplay.frame = CGRectMake (10,10,300,40);
[UIView commitAnimations];
An interesting thing is going on here — I have you start the animation with a delay. It's not that I'm a sadist, but this seemed like a good place to show you how to do that.
Finally, you set a time limit for how long you're going to display the view. You do that by sending a message (with a delay) to hide the views.
[self performSelector:@selector(hideResponse) withObject:self
   afterDelay:5];
performSelector:withObject:afterDelay: sends the message after a delay. Like the selectors you used in Book VI, the method should not have a significant return value and should take a single argument of type id, or no arguments. afterDelay is the minimum time before which the message is sent and, by the way, specifying a delay of 0 doesn't necessarily cause the selector to be performed immediately. The selector is still queued and then performed as soon as possible.
To slide the view back up, add the code in Listing 3-9 to RootViewController.m.
Example 3-9. Reversing the Process
- (void) hideResponse {

  [UIView beginAnimations:nil context:nil];
  [UIView setAnimationDelay:1.0];
  [UIView setAnimationDuration:2.0];
  thereYet.frame = CGRectMake (0,−100,320,70);
  resultsDisplay.frame = CGRectMake (10,−110,300,40);
  [UIView commitAnimations];
  distanceDisplayed = NO;
}
All you do here is reverse the process — bye-bye view.
Of course, you realize you have the accelerometer and core location busy delivering you events. If this were production code, you might want to consider turning them both off when they aren't needed, and then on again when they are.
On the other hand, especially with the location manager, there will be a lag between the time you start it and when it figures out where you are. It will be up to you to smooth out the user experience.