In addition to objects, images are another important design element. Although all applications handle images, Photoshop is the main tool for working with images. The first task is to load digital images. Photoshop includes lots of features not only to scan and acquire digital photos but also to correct them.
After you load images within Photoshop, you can edit them using Photoshop's vast array of features. You can then easily transport these images to the other CS4 applications using the Clipboard, exported files, or Adobe Bridge.
One method for loading images into Photoshop is with a scanner. Several different manufacturers make scanners that employ several different drivers. Scanners almost always come with a CD-ROM of compatible drivers that you can install to interface with Photoshop or with their own proprietary software.
If your scanner includes Photoshop compatible drivers, then the scanner's name appears in the File
If the scanner manufacturer doesn't have a Photoshop driver available, you can take advantage of a TWAIN compatible interface. The TWAIN compatible device is listed in the File
A third driver option is to scan images using the WIA (Windows Image Acquisition) Support driver. You select this option using the File
Note
WIA Support is available only for Windows XP computers. Macintosh computers use the Image Capture features to access scanning devices.
Clicking the Start button opens a dialog box, shown in Figure 11.2, where you can choose the Scanner, Video Camera, and/or Digital Camera to access. Selecting a device and clicking OK opens the device's software. The Properties button opens a dialog box of properties that let you define how the device can be used to scan directly into Photoshop.

STEPS: Setting up Photoshop Scanning
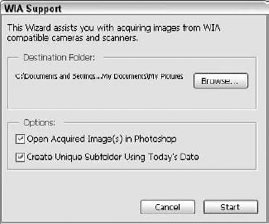
Open Photoshop, and select WIA Support. With Photoshop open, choose File

Set a Destination Folder. Click Browse, and select a destination folder where the scanned images are saved. Enable the Open Acquired Images in Photoshop option to view the images in Photoshop after they are scanned. Then click Start.
Access the Scanner's Properties. In the Select Device dialog box, choose the installed scanner and click Properties. This opens a dialog box of properties for the selected device.
Set the Scan button to open Photoshop. In the device Properties dialog box, shown in Figure 11.3, click the Events tab and select the Scan Button event. In the Actions section, choose the Start this Program option and choose Photoshop as the program to open. Then click OK.

After clicking OK in the Select Device dialog box, a Scan dialog box appears, shown in Figure 11.4. Options to scan the image include scanning as a Color picture, a Grayscale picture, or a Black and white picture or text. The Adjust the quality of the scanned picture link opens another dialog box where you can adjust the Brightness, Contrast, and Resolution of the scanned image. The Preview button shows the scanned image in the preview pane, where you can set its cropping using the corner handles.

Digital cameras work the same as scanners. Images from a digital camera can be accessed using the File
Note
Adobe Bridge also can be used to download images from a digital camera with its File
Most digital cameras have a varied assortment of configuration settings for controlling everything from brightness and aperture to contrast and digital noise. These settings are crucial for getting just the right picture, but they also include many of the same settings found in Photoshop. If you capture an image with the incorrect brightness setting while hanging halfway over a fence at the zoo, you don't need to throw away the image; you can simply download the raw camera data, which is the actual digital data captured by the camera's optical sensor. Then you can reclaim much of the image data in Photoshop at your leisure without having to revisit the zoo to take another shot.
Warning
Not all cameras can record raw camera data. Check the Adobe Web site for a list of compatible cameras.
Raw camera data can be imported into Photoshop using the File
Note
You can open the Camera Raw plug-in from within Photoshop or within Adobe Bridge. More details on this plug-in are covered in Chapter 6.
Working with raw camera data makes lots of sense, but there is a problem with the current raw camera formats. Each camera manufacturer uses a different format to output its raw camera data, which makes it difficult to standardize when you load the data in a program like Photoshop.
Although CS4 supports a majority of the available raw camera formats, there are some less popular camera makers that aren't supported. To address this issue, Adobe has defined and made publicly available the Adobe Digital Negative (DNG) format. One advantage of this new format is that it also includes support for metadata that describes the images.
As of this printing, many camera manufacturers have announced support for this new raw camera format. Adobe also has made a conversion utility available that converts many of the existing raw camera data formats to the DNG format. For more information on this format, see Adobe's Web site.
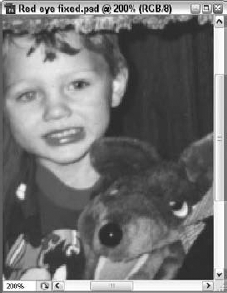
Attentive camera subjects looking directly at the camera typically have red eyes when the digital camera's flash lights their eyes. This can quickly be fixed using the Red Eye tool, which is located as a flyout under the Healing Brush in Photoshop. To use the tool, simply drag it over an eye with this problem. Figure 11.5 shows an example where this tool was used. This toddler's left eye (the eye on ther right in the photo) has been corrected using this tool. When this tool is selected, the Options bar includes settings for controlling Pupil Size and Darken Pupil.
Note
The Camera Raw dialog box available in Photoshop and Bridge also includes a red-eye correction tool.
Another common problem with images taken with a digital camera are lens flaws such as barrel and pincushion distortion. These are especially visible when the image includes many parallel straight lines.
Lens flaws can be remedied in Photoshop using the Lens Correction filter located in Filter
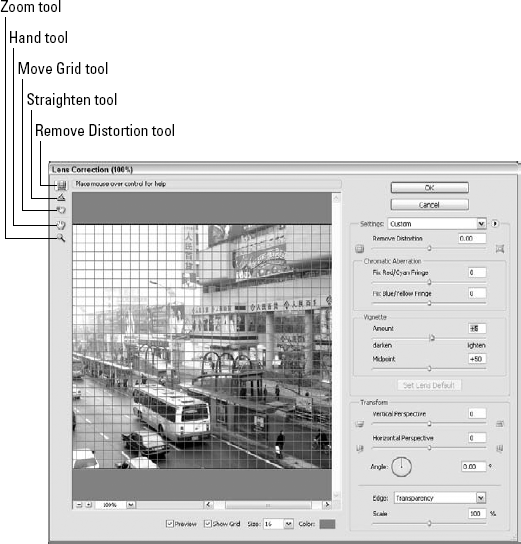
The upper-left corner of the Lens Correction dialog box includes several tools. The Remove Distortion tool alternates the image between a pincushion and barrel settings. Dragging with the Straighten tool causes the image to reorient about the dragged line. This provides a way to recreate the horizontal and vertical axis for the image. Over the top of the image is a grid that can be turned on and off. The Move Grid tool is used to move and reposition this grid.
Note
For additional coverage on Photoshop filters, see Chapter 13.
To the right of the preview pane are several sliders that can be used to further modify the image. The Remove Distortion slider associates a value to the distortion. The Chromatic Aberration values are used to change the colors located at the fringe of the lens. You can adjust for Red/Cyan and Blue/Yellow colored fringes. The Vignette value alters the brightness of the image about the lens center. The Vertical and Horizontal Perspective settings tilt the image to or away from the image center. You also can change the image's orientation Angle and Scale. The Edge setting determines how the edge is colored when the image's perspective, angle, or scale is changed. The options include Edge Extension, Transparency, and Background.
Note
The Camera Raw dialog box also includes a Lens Correction tool and several other handy tools for making adjustments. This dialog box is covered in Chapter 6.
After digital images are loaded into Photoshop, you have lots of control in adjusting the images. This is the power of Photoshop—to correct images.
Note
Many image adjustments also can be applied to a specific layer using Adjustment Layers, but not all. Adjustment Layers are covered in Chapter 25.
One of the first corrections you'll want to make to acquired digital images is to adjust the image's levels. This can be done in the Levels dialog box, shown in Figure 11.7, which is opened for the current image using the Image
At the top of the Levels dialog box is the Channels drop-down list, where you can view the levels for All RGB Channels, or just the Red, Green, or Blue channels. Level settings can be saved and restored using the Load and Save buttons.
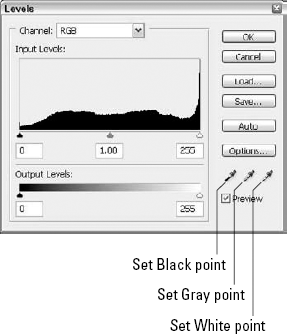
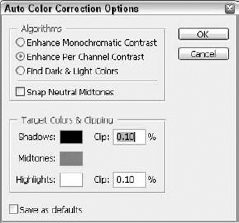
The Input Level values are associated with the black and white color values in the shadows and highlights. The middle value represents the gamma setting for the image. The tonal range can be adjusted manually by changing the Input Level values, by dragging the markers under the level graph or by clicking Auto to automatically set the range. Dragging the middle gray marker under the levels graph alters the image's midtones. The Options button opens the Auto Color Correction Options dialog box, shown in Figure 11.8. Using these settings, you can set how the Auto button corrects the image.
You also can correct colorcast in the Levels dialog box by double-clicking the Set Black, Gray, or White Point icons. You can then select the color in the Color Picker for the selected point and click in the image where that color point is located.
In addition to the Levels dialog box, the Curves dialog box, shown in Figure 11.9, also can be used to alter the tonal range of an image, but with more precision. The Curves dialog box shows the intensity for the entire image range from black's 0 value to white's 255 value.
Most of the settings in this dialog box are identical to those in the Levels dialog box, including viewing individual channels, loading and saving curves, the Auto and Options buttons, and setting black, gray, and white points.
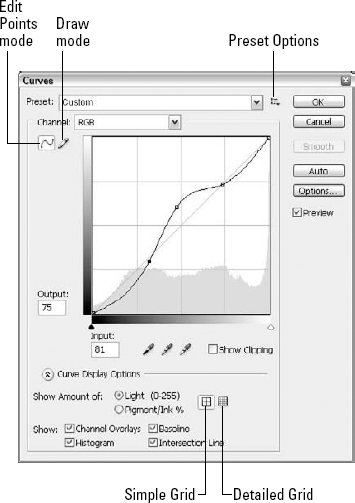
The Curves dialog box can add up to 14 additional points to the curve, each of which you can move as needed by dragging with the cursor. You can remove points by dragging them off the curve or by selecting them and pressing the Delete key. You also can draw a curve using the Draw Curve tool. The Smooth button becomes enabled when a curve is drawn.
If you've configured the Curves dialog box with some unique settings, you can save these settings as a preset that can be recalled and applied to other images.
Within the Image
STEPS: Adjusting Shadows and Highlights
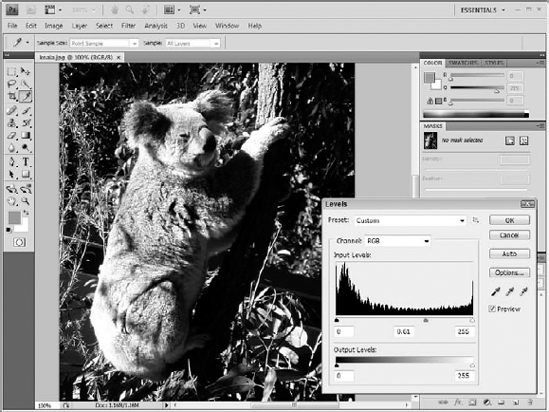
Open Photoshop, and select an image. With Photoshop open, load an image that needs to have its shadows and highlights set. Figure 11.10 shows the image before any adjustments have been made.
Open the Levels dialog box. With the image selected, choose the Image
Adjust the highlights. Drag the midtones marker in the middle of the graph to the right until the midtones are darkened slightly, as shown in Figure 11.11.

In addition to the adjustments available in the Image menu in Photoshop, you can use the Adjustments panel, shown in Figure 11.12. This panel lets you choose from a wide assortment of adjustments including Brightness/Contrast, Levels, Curves, Exposure, Vibrance, Hue/Saturation, Color Balance, Photo Filter, Channel Mixer, Invert, Posterize, Threshold, Gradient Map, and Selective Color.
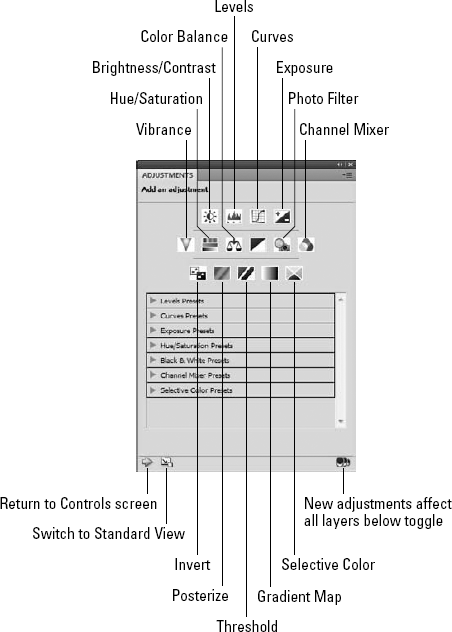
The Adjustments panel includes a wide variety of categorized presets. Selecting these presets automatically applies the applicable adjustment and displays the adjustment's settings. A preview of the adjustment is displayed on the current image.
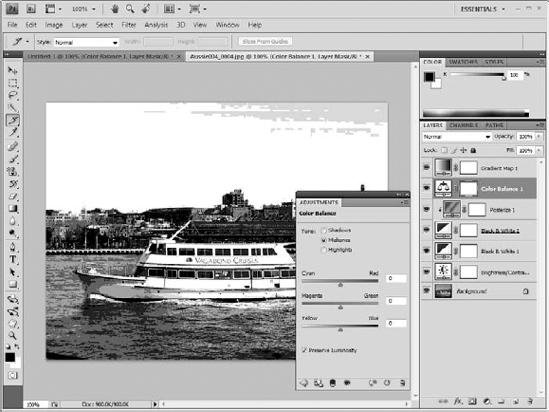
You can move back and forth between the Adjustment selection screen and the adjustment settings using the arrow keys in the lower-left corner of the panel. The coolest part of these adjustments is that each applied adjustment is placed on a separate layer, which makes it non-destructive. You can remove the adjustment at any time if you need to return to the unadjusted image. Figure 11.13 shows an image with several adjustments added.
Even if you adjust the tonal range of an image, our eyes can detect a greater range than a computer monitor represents. Think of how your eyes react when you walk out in the bright sun. The range that makes everything seem to glow can't be represented using any of the existing image formats, but another format has been developed that captures this extended range and it actually allows the color range to change as needed. This new format is called High Dynamic Range (HDR) images.
HDR images are represented using 32-bit numbers instead of the standard 8-bit or 16-bit image formats. The extra numeric values are used to represent the luminance associated with each pixel in the image. HDR images are created by merging in multiple photographs of different exposures.
To merge several images of the same scene taken with different exposure settings into a single HDR file, use the File

Photoshop's File
Photoshop includes many tools to retouch an image. Most of these tools redistribute pixels by moving or copying pixels to other places within the same image. The tools used to retouch images include the Clone Stamp tool, the Pattern Stamp tool, the Healing Brush tool, the Spot Healing tool, the Patch tool, and the Color Replacement tool.

Two tools are available in Photoshop: the Clone Stamp tool and the Pattern Stamp tool.
The Clone Stamp tool allows you to paint pixels copied from a selected area to another area in the image. With the Clone Stamp tool selected, you can choose a brush tip and blending mode to use in the Options bar. Then hold down the Option/Alt key and click in the image to mark the area that you want to clone pixels from and paint in the area where you want the cloned pixels to appear.
If the Aligned option is selected, the pixels relative to the marked area are copied for every painted stroke. If the Aligned option is disabled, every new stroke starts painting from the marked area.
When the Clone Stamp tool is selected, you can use the Clone Source palette, shown in Figure 11.16, to select up to five different clone source locations. For each clone source, you can set the Offset, Width and Height, and Rotation values. You also have an option to display an Overlay, which helps to show how the cloned areas look when painted.
Note
If you're using Photoshop CS4 Extended, then you can use the Clone Stamp tool across video and animation frames. The Frame Offset value is the current frame being painted.

Figure 11.16. The Clone Source palette lets you specify up to five different positions from which to clone.
The Clone Stamp includes a preview that shows the area from which the clone will be painted. This is a great check to make sure that the correct area is being copied, as shown in Figure 11.17.

The Pattern Stamp tool works just like the Clone Stamp tool, except it lets you paint with the pattern selected in the Options bar.
The Healing Brush tool, like the Clone Stamp tool, lets you select an area of pixels where the painted pixels are taken from using the Option/Alt key. But the Healing Brush tool matches the surrounding pixels where they're painted, making the pixels blend in with the image. This tool is great for removing small imperfections from a scanned image or a digital photo.
The Patch tool also can copy an area of pixels to another area in the image, and the moved pixels are blended into their new area matching the surrounding pixels. With the Patch tool, you can drag to select a freehand area like the Lasso tool. You can add to the selection by dragging with the Shift key held down or remove from the selection by dragging with the Option/Alt key held down. Holding down the Shift+Option/Alt keys while dragging over the selection keeps only the intersected selection. You also can change the selection area using the Add, Subtract, and Intersection buttons on the Options bar.
After a selection is made, you can choose the Source option in the Options bar and drag from within the selection. This projects the area under the cursor to the selected area, and if you release the mouse, the displayed pixels are copied to the selected area.
If the Destination option in the Options bar is enabled, then you can drag the selected area to the pixels that you want to cover. Each time the mouse is released, the dragged area is copied over the area that it's on top of. Dragging and releasing the mouse lets you replace many areas quickly.
One drawback to the Healing Brush is that you need to take time to select an area where the painted pixels are taken, but the Spot Healing Brush doesn't require this step. The Spot Healing Brush is specifically made to replace spots in the image by sampling pixels around the area. It provides a quick clean way to remove spots from images without the fuss. Figure 11.18 shows an original image and the same image fixed with the Spot Healing Brush. Notice how the bright reflection off the glass has been removed without drastically altering the image.
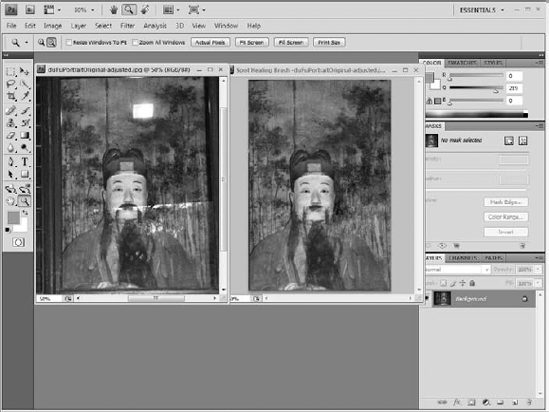
Figure 11.18. The Spot Healing Brush can quickly remove spots from an image by sampling the pixels surrounding the area.
The Color Replacement tool, located as a flyout under the Brush tool, may be used to replace a selected color with the foreground color. The Mode options let you choose to replace pixels based on Hue, Saturation, Color, or Luminosity. The Sampling options let you replace the pixels continuously, just once, or using the background swatch color to replace the background color with the foreground color.
The Limits options include Discontiguous, which replaces any colors that you paint over; Contiguous, which paints only connected areas of color; and Find Edges, which also replaces only connected areas of color but keeps the edges sharp.
Photoshop includes three different eraser tools used to remove pixels. The Erase tool removes pixels revealing the background color underneath. If there is no background layer, then the Eraser tool erases to transparency. The Mode options let you choose a smooth-edged brush, a hard-edged pencil, or a square block, which is useful to get the sharp corner areas. You also can set the opacity and flow to use as you erase. The Erase to History option removes all changes applied to an image, leaving the base saved image when enabled.
The Background Eraser tool is used to replace the background of an image with transparency. When you drag with this tool, the color that is immediately under the center of the tool is sampled and removed from the areas where you paint, but the other colors and the edges of the images are retained.
The Magic Eraser tool works like the Magic Wand tool, letting you click a background color that you want to erase. All connected pixels (if the Contiguous option is enabled) are erased, or all similar pixels in the entire image are deleted (if the Contiguous option is disabled).
Another useful way to edit images is to distort the pixels using the various distorting tools. These tools include Smudge, Blur, Sharpen, Dodge, Burn, and Sponge.
Note
The effects of these pixel distortion tools also may be accomplished using the various Filters, which are covered in Chapter 12.
Smudge tool: This tool is used to smear the color of several pixels together like wiping wet paint across the canvas. This tool lets you choose from several different modes and a Strength value. The Finger Painting option uses the foreground color as you begin to smear the pixels.
Blur and Sharpen tools: These tools are the opposite of each other. The Blur tool softens hard edges and reduces details, and the Sharpen tool makes edges harder and more pronounced.
Dodge and Burn tools: These tools are used, respectively, to lighten and darken the pixels of an image. For each tool, you can set the Range to lighten or darken the highlights, the midtones, or the shadows.
Sponge tool: This tool increases or decreases the saturation of pixels in the image. For this tool, you can select a brush tip, a Flow amount, and a Mode to be either Saturate or Desaturate.
History Brush and Art History tools: As you make changes to an image, you may want to return to the original image, but only in one section. The History Brush lets you paint over pixels and replace the painted area with the pixel from the saved image file. The History palette keeps a list of commands applied to the current image. From this palette you can choose a specific state and snapshot to restore as you paint.
The Art History brush, like the History Brush tool, replaces the painted pixels with pixels from the original saved image file, but it paints them using a specialized Style simulating various famous artistic painting methods. These styles include Tight Short, Tight Medium, Tight Long, Loose Medium, Loose Long, Dab, Tight Curl, Tight Curl Long, Loose Curl, and Loose Curl Long.
Photoshop allows you to acquire images from scanners and digital cameras and includes tools to clean up problems such as red eye and lens flaws.
Many of Photoshop's key features let you correct and adjust images. You can make tonal adjustments with the Levels and Curves dialog boxes.
In addition to acquiring loaded images, Photoshop also can create custom images using the Painting tools and a robust set of paintbrushes.
You also can obtain images by rasterizing vector objects from Illustrator, but the reverse also is possible with Illustrator's Live Trace feature.
Photoshop includes several tools for selecting pixels including the Marquee tools and freehand tools like the Lasso tool. The Quick Select tool makes choosing odd-shaped selections easy. Pixels with similar colors are selected using the Magic Wand tool.
However you decide to obtain Photoshop images, you have many tools to edit them, including features such as Crop and tools such as the Stamp and Healing Brush tools.