With increasing demand for more dynamic messaging, the world of advertising and graphic design has changed greatly in recent years from the delivery of static printed matter to more interactive content. With the advent of the Web and its fruition in the mid-1990s, the vehicle for communication has set standards for creative professionals to meet demands for more interesting delivery of information in the form of multimedia and interactive tools that enable readers to explore information according to personal interests. Today's reader audience is becoming more familiar with information that stimulates the senses and provides for quick access to the interests of individual readers.
With the Creative Suite applications, you have many tools for creating dynamic content in the form of integrating video, sound, and interactive buttons that provide readers methods for exploring information in exciting ways. In one way or another, each CS4 program provides you with opportunities to add dynamic content and/or interactive elements to your documents.
Hyperlinks are nothing new to computer programs and computer systems. In the late 1980s, Apple Computer introduced a program called HyperCard that might be thought of as the foundation for interactive document viewing that we now see on the Web. HyperCard was designed to provide users a tool whereby they could create links and buttons to branch out to other HyperCard pages containing information according to user interest. The premise was that we investigate and explore information in a nonlinear form according to our areas of interest. Unlike newspaper and magazine articles designed for linear viewing starting at the beginning and reading through to the end, hypertext reading enables you to navigate to a page and then branch to another page you choose from a selection of hypertext references (buttons).
Hyperlinks obviously are tools you use when viewing electronic documents and therefore require you to move away from print and look at other alternatives for deploying your creative work, such as CD/DVD-ROM, the Internet, or locally on your own computer. The CS4 programs provide you with tools to create hypertext references and enable you to explore new markets for eMagazines, eBooks, and a variety of other eContent.
When creating electronic brochures, magazines, and other content designed for interactive viewing, you have choices for creating interactive elements in the CS programs or in Adobe Acrobat. The final packaging of your content is likely to be either PDF documents or Web pages. In some cases, you may create interactive PDFs that are deployed as Web-hosted documents.
Note
When it comes to creating hyperlinks, Dreamweaver is clearly the best tool for the job, but this chapter extends hyperlinks to other CS4 programs including Acrobat and InDesign. Making hyperlinks in Flash is also a simple matter.
At the creation stage of your workflow, you choose either of the following paths:
Add hyperlinks in a program like Adobe InDesign.
Create an InDesign document without hyperlinks, convert to PDF, and then create the hyperlinks in Acrobat.
If you decide to create the links in Adobe InDesign, you can export the InDesign document to PDF, and the resultant PDF recognizes the hyperlinks you added in InDesign. Where you create the links is a matter of personal choice. In some cases, you may find it easier to create links in InDesign, and at other times, you may find it easier to create links in Acrobat. Therefore, it's helpful if you know a little bit about the methods in each program so you can recognize benefits and limitations of using one program or another.
Tip
Regardless of what program you work with, the process for creating links is the same. You always navigate to the destination view and then assign the link properties. In InDesign, you create a destination view, such as Page 3 at 200 percent. You then create a hyperlink where you select the destination view in the hyperlink properties. In Acrobat, you create a link or button, navigate to the destination view, and then assign the link/button properties to the view. This is a consistent method regardless of whether you link to page views or layer views or you open secondary document views.
The most common hyperlinks are used for page and document navigation. You create a button or link with an action that opens a page view in the existing document or opens another document. InDesign supports creating these views. However, before you decide to create links in InDesign, you should be aware of the benefits and limitations of InDesign links. The primary benefit and limitation are:
Benefit: If you intend to export to PDF, you can create interactive links in InDesign that are included in the exported document. This option eliminates a need to know more about creating links and buttons in Acrobat. When you need frequent revisions on an InDesign document, creating links in InDesign can be beneficial.
Disadvantage: If you intend to export your InDesign file to PDF, links that you create in InDesign are converted to Destinations in Adobe Acrobat. Destinations are similar to bookmarks where destination views are captured. You click the link button, and the action takes you to the destination. Destinations have one disadvantage over bookmarks and links in Acrobat because they carry with them lots of unnecessary overhead, resulting in larger files sizes. Therefore, when files need to be smaller for Web hosting, creating links in Acrobat keeps the files smaller.
Hyperlinks and destinations are managed in the Hyperlinks palette, shown in Figure 29.1. Choose Window

The tools at the bottom of the palette are used for navigating links. Click the left arrow takes you to the link source and the right arrow jumps to the link destination. The Update Cross-Reference button updates any changed cross-reference links. The Create New Cross-Reference and Create New Hyperlink buttons are used to create new entries in the list. The Trash icon is used to delete the selected cross-references or hyperlinks listed in the palette. The palette menu icon opens a palette fly-out menu where options appear for selecting hyperlink attributes such as editing names, destinations, sorting the link names, resetting links, and updating them.
Before creating a hyperlink, it's easiest if you first to create a destination. This is the target location for the hyperlink. To create a new destination, select the New Hyperlink Destination palette menu command. This opens the dialog box shown in Figure 29.2 and presents three different destination types: Page, Text Anchor, and URL.

Note
If you link to a text anchor, you must first select text on a page before you create the hyperlink destination. Creating page and URL destinations doesn't require selecting any content.
A Page destination lets you create a hyperlink that jumps to a specified page, like what you'd link from in a table of contents or an index. The Name field lets you enter a name that you can select when you create the hyperlink, or you can enable the Name with Page Number option to automatically set the name to the selected page number. The Zoom Setting option lets you specify the zoom level when the page is displayed. The options include Fixed, Fit View, Fit in Window, Fit Width, Fit Height, Fit Visible, and Inherit Zoom.
The Text Anchor option makes the selected text an anchor that the hyperlink jumps to. For this anchor, you may give it a name that is used to select the anchor in the Create Hyperlink dialog box. The URL option lets you name and specify the Web address of a site on the Web.
After you create and name a destination, you can select an item in the current document for use as a new hyperlink. You then create the hyperlink using the New Hyperlink palette menu command or by clicking the Create New Hyperlink button at the bottom of the Hyperlinks palette.
This opens the New Hyperlink dialog box, shown in Figure 29.3, where you can give the hyperlink a name, specify a destination, and determine its appearance. In the Destination section, select a document from the open documents, or browse to another local document using the Browse option. The Type list includes the Page, Text Anchor, URL, and All Types options, and the Name drop-down list lets you choose from the named destinations already created. A None option is available if you have not yet created or named the destination.
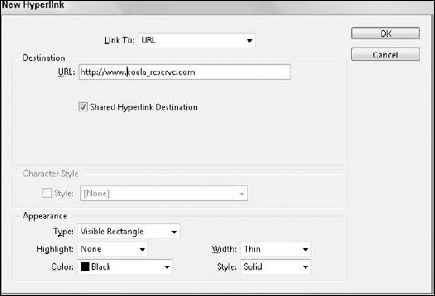
The Appearance section lets you define how the hyperlink looks. The Type could be Visible Rectangle or Invisible Rectangle; the Highlight could be None, Invert, Outline, or Inset; the Color could be one of many default named colors; the Width could be Thin, Medium, or Thick; and the Style could be Solid or Dashed. The Highlight appearance shows up only when the document is exported to PDF.
After the Create Hyperlink dialog box is closed, the new hyperlink appears in the Hyperlinks palette, and the hyperlink content in the document is highlighted using the designated appearance settings. An icon denoting the type of hyperlink appears to the right of the hyperlink name in the Hyperlinks palette. Choose View
To test a hyperlink, simply select it in the Hyperlinks palette and choose the Go to Destination palette menu command. To see the hyperlink's source, select the Go to Source menu command. These commands also are available as icon buttons at the bottom of the Hyperlinks palette. If the destination is a URL, a Web browser opens and tries to load the requested URL.
You can create buttons in InDesign to jump to a page or perform a certain action like playing a movie or sound. When you export an InDesign document containing buttons to Acrobat, the defined button and its function remain active.
To create buttons in InDesign, begin by designing the button object. You create simple buttons in InDesign using any designed object. Drag the tool in the layout where you want to locate the button, or click in the document to open a simple dialog box where you enter the button's width and height. Holding down the Shift key while dragging constrains the button to a square shape. Holding down the Option/Alt key while dragging lets you drag from the button's center. If you hold down the spacebar while dragging, you can move the button's location. Buttons are identifiable by a button icon and name that displays in the corner of the button.
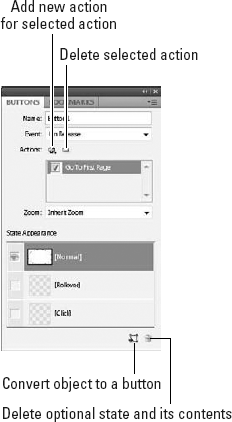
Once you have a good design, open the Buttons panel, shown in Figure 29.4, using the Window
Regular shape objects created with the Rectangle or another tool can be selected and converted to buttons by choosing Object
Once a button is defined, you can create alternate states for the Rollover and Click states. The Actions section of the Buttons palette lets you define what happens when you interact with a button. The Event options are different ways to interact with a button. You also can select an Event such as On Release, OnClick, OnRollOver, OnRollOff, OnFocus, and OnBlur. The OnRelease and OnClick events occur when the mouse button is pressed and released. The OnRollOver and OnRollOff events occur when the mouse moves over and away from the button's bounding box. The On Focus and On Blur events occur when the button has or loses focus. A button has focus when it's been selected with the mouse or Tab key.
For the selected event, you can tie it to an Action such as Close, Exit, Go to First, Next, Last, Previous Page, Go to URL, Play a Movie, Open a File, Play a Sound, or Zoom. The Action options are all the actions that may be set when the designated event happens. The available behaviors include the following:
Close: Closes the current PDF document.
Exit: Causes the application to exit.
Go to Anchor: Jumps to a specified hyperlink anchor or bookmark.
Go to First Page: Jumps to the first page in the document.
Go to Last Page: Jumps to the last page in the document.
Go to Next Page: Jumps to the next page in the document.
Go to Next View: Jumps to the next page in the view history. This behavior becomes active only after the Go to Previous View behavior is used.
Go to Previous Page: Jumps to the previous page in the document.
Go to Previous View: Jumps to the last viewed page in the view history.
Go to URL: Opens a Web browser with the designated URL address loaded.
Movie: Lets you play, pause, stop, and resume a movie.
Open File: Opens another selected PDF file or opens another file type in its default application.
Show/Hide Fields: Show or hide a specified form field.
Sound: Lets you play, pause, stop, and resume a sound.
View Zoom: Lets you designate how the current page zooms. The options include Full Screen, Zoom In, Zoom Out, Fit in Window, Actual Size, Fit Width, Fit Visible, Reflow, Single Page, Continuous, Continuous-Facing, Rotate Clockwise, and Rotate Counterclockwise.
If you place a button on the master page, then it automatically appears on all the pages in the spread. The document can be exported using PDF, which retains the page transitions. The flyout menu even includes a library of sample buttons, shown in Figure 29.5.

Various settings appear under the Behavior field depending on the behavior that you select. For example, selecting the Go to Anchor behavior displays settings for choosing the document from the active documents, a Browse button for locating a local document, and a field for selecting an anchor by name. The Go to URL behavior lets you type a URL. The Movie and Sound behaviors display a field where you can select a movie or sound added to the document, as well as an option to Play, Pause, Stop, or Resume. The Open File behavior lets you browse and select a file to open. All the go to page options, plus the Go to Anchor and the View Zoom behaviors, offer a list of zoom options to use when the user jumps to the page. The Show/Hide Fields behavior presents a list of fields in the current document along with check boxes to mark which ones are visible.
Although you can create various button states for rollovers using behaviors, button states are more easily defined using the various states. Each button maintains three different states—Normal, Rollover, and Click:
Normal: The button's default state.
Rollover: Occurs when the mouse cursor moves over the top of the button.
Click: Occurs when a user clicks the button.
You can use the States settings in the Buttons palette to change the button's look for each of these states.
If your InDesign document or any other CS4 application document is designed for deployment in PDF, then you can create the interactivity for the document in either InDesign or in Acrobat. InDesign's button system is intuitive and easy to use. InDesign also includes a Buttons Library that works in a manner similar to Acrobat. Acrobat also provides many options for adding hypertext and interactivity in a document, so you'll want to work in either.
For a moment, let's deviate from Acrobat and look at how you might go about creating icons that can be used for button faces in Acrobat. In order to use a button face, simply create a shape in InDesign and make it into a button. You can then use the Buttons panel to add in the interactive values.
To create button icons, you can use Illustrator, InDesign, or Photoshop. In Illustrator CS4, you can create multipage PDF files, and Illustrator provides you with all the tools needed to create some nifty buttons. To create such a file, follow these steps.
STEPS: Creating Link Button Faces in Adobe Illustrator
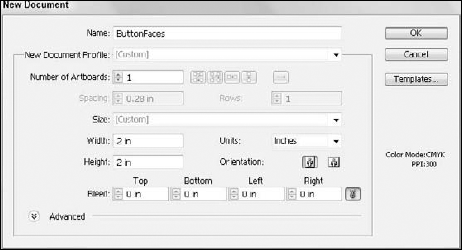
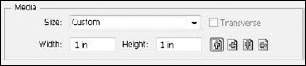
Create a new document in Adobe Illustrator. Choose File

Note
If your unit of measure is not set to inches, press Command/Ctrl+K to open the Preferences dialog box. Select Units and Display Performance from the pull-down menu. Select Inches from the General pull-down menu, and click OK. When you return to the document window, your unit of measure displays inches.
Draw ruler guides. Press Command/Ctrl+R to show rulers. Drag a guideline to the vertical and horizontal centers (the 1-inch mark on the rulers). The guidelines display four quadrants that eventually become your four pages.
Create an icon. Choose Type
Note
For more information regarding working with the Glyphs palette, see Chapter 17.
Define the type attributes. Set the type character to a size within one-eighth inch of the first quadrant. Open the Control palette, and stroke and/or fill as you like.
Create the rollover icon. Duplicate the icon by pressing Option/Alt, and drag it to the second quadrant. Use a different color for the rollover appearance. Repeat Steps 3 through 5 to create icons symbolizing moving in an opposite direction. The final image should look like something similar to the preview shown in Figure 29.8.
Set the tile attributes. Illustrator does not support multiple pages, but you can print tiles (divisions of a page) as separate PDF files. To set up the tiling of a document, choose File
Set the tile marks. Click Setup in the left pane of the Print dialog box. Open the Tiling pull-down menu, and select Tile Imageable Areas. Note the preview in the Print dialog box. You should see the page tiles represented by dashed lines (refer to Figure 29.9). Click the Print button. Figure 29.10 shows the resulting printed page.


Note
If you select the View
Note
For more information on tiling pages in Illustrator, see Chapter 39.

Acrobat Professional has two tools you can use for creating links to document views and to link to secondary documents. The Link and Button tools can be used to link to the same destinations. Where links and buttons differ is with appearances and the ability to replicate across multiple pages. Only the Button tool offers you icon representations for image appearances and the ability to duplicate the buttons across all pages in a document. As an example, you might use a button as a navigation instrument to help users move forward and backward between pages while viewing PDFs in Full Screen mode. While in Full Screen view, the navigation tools are hidden. If you followed the steps for Creating Link Button faces in Adobe Illustrator, you can use the PDF file to follow the following steps.
STEPS: Adding Linked Buttons in Acrobat
Open a PDF document in Acrobat. Create a design in InDesign, and convert it to PDF. Try to use a design of multiple pages.
Open the Advanced Editing toolbar. Choose Tools
Create a button. The first tool in the Advanced Editing toolbar is the Button tool. Select the tool, and drag a rectangle on the first page in the document. You can draw the rectangle anywhere on the page and move it after setting the button properties.
Name the button field. After creating a rectangle on the document page, the Button Properties dialog box opens with the General pane in view, as shown in Figure 29.12. Type a name in the Name text box. In this example, goNext is the name used for the button field.
Set the button appearance. Click the Appearance tab to open the Appearance pane shown in Figure 29.13. Click the Border Color and Fill Color to open pop-up palettes, and select No Color from the palette options.
Add a button face. Click the Options tab to open the Options pane. From the Layout pull-down menu, select Icon only. Select Push from the Behavior pull-down menu. Click Up in the State window, and click Choose Icon. A Select Icon dialog box appears. Click Browse, and navigate your hard drive to locate a file to use as your button image. The file should be a PDF document. If using a multipage PDF document, you can scroll pages in the Select Icon dialog box by moving the scroll bar at the right side of the dialog box, shown in Figure 29.14.
Add a rollover effect. Click OK in the Select Icon dialog box, and you return to the Button Properties. Select Rollover in the State window, shown in Figure 29.15, and click Choose Icon. Select the icon you want to use for the rollover appearance in the Select Icon dialog box, and click OK to return again to the Button Properties.
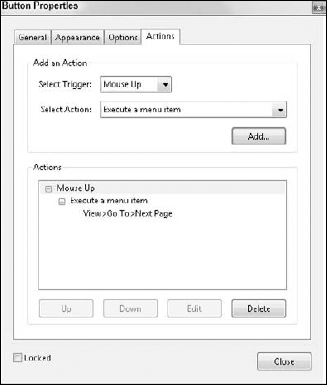
Assign an Action. Click the Actions tab to open the Actions pane. From the Select Action pull-down menu, select Execute Menu Item. The Execute Menu Item action enables you to use all the menu commands in Acrobat as the button action. For example, if you want to open a file, you would use the Execute Menu Item and choose File
Define the Action. With the Execute a Menu Item option selected, click Add in the Actions pane. Clicking this button makes the Menu Item selection dialog box appears. Select the menu item in the dialog box you want to use. In this example, choose View


The advantage of using buttons in Acrobat instead of links has to do with the options you have for quick and easy duplication of buttons across all pages in a document. To duplicate buttons, follow these steps.
STEPS: Duplicating Button Links
Duplicate a button on a page. To follow these steps, first complete all previous steps in the section "Adding Hypertext Links in Acrobat." Click the Select Object tool in the Acrobat Toolbar Well (selection arrow). Move the button rectangle on the page to the lower-right corner of the document page. Press Option/Ctrl, and then press Shift and drag the rectangle to the left corner of the page. The button is duplicated.
Name the new button. You should still have the Button Properties dialog box open. If not, double-click the new button using the Select Object tool. Click General, and type a new name for this button. In this example, goPrev is used for the second button name.
Change icon appearances. Click Options. Select Up in the State window, and click Choose Icon. Select the icon you want to use for the button to navigate backward in the document. Click OK, and you return to the Button Properties. Click Rollover, and click Choose Icon. Select the rollover icon, and click OK. If using a multipage PDF document, you don't need to search for the document in the Select Icon dialog box. The last file you visited becomes the new default and remains the default until you select another file.
Edit the Action. Click Actions. When you copied the button, all the button attributes were also copied. The last action assigned to the button was Execute Menu Item. Select Execute Menu Item in the Actions list window, and click Edit. Visit the View menu, and choose View
Duplicate the buttons across all pages. Draw a marquee through both buttons with the Select Object tool. Open a context menu, and select Duplicate from the menu commands, as shown in Figure 29.17.
Specify the page range. The Duplicate Field dialog box opens after selecting the Duplicate command. Select All in the Duplicate Field dialog box, shown in Figure 29.18, to duplicate the button across all pages. Click OK, and the button is duplicated.
Remove nonfunctional buttons. The first page goPrev button doesn't have a page to open, and the last page goNext button doesn't have a page to open. Click each of these buttons with the Select Object tool, and press Delete/Backspace or Num Pad Del to remove the buttons. To test the actions, click the Hand tool in the Toolbar Well and click the buttons to navigate pages. As you move the cursor over a button, you should see the button appearances change with the rollover effects.


All CS4 programs work with animations in one way or another. You can create animations in some programs while other programs offer options for viewing animations. Of all the CS4 programs, Flash includes the strongest feature set for creating, but simple animation effects can be created and viewed in the programs.
Adobe Illustrator supports exporting files as Adobe Flash files (SWF). You can create layers in Illustrator and export the layered Illustrator document as SWF.
Note
For a complete description on exporting to SWF format from Adobe Illustrator and creating simple animations using Flash, see Chapter 23.
The Animation palette in Photoshop is used to create animation sequences from layered Photoshop files. You create the animation in the Animation palette and export the Photoshop file as an animated GIF or SWF file that can be viewed in Dreamweaver and used in Web page designs. Photoshop CS4 Extended also includes the ability to render video in a number of different formats.
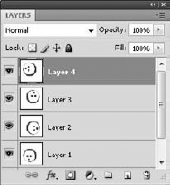
The first step in creating an animation is to create a layered Photoshop file, as you see in Figure 29.19. Each layer should contain an image that is transformed in one way or another different from the previous layer. For example, if you want to rotate an object so the animation displays a revolving icon, you rotate each layer using the transformation tools in Photoshop so each image appears with a different rotation. When the animation is played, the different layer views appear at short intervals to create the illusion of a moving object.
Note
For more information about transforming images and objects, see Chapter 13.
Choose Window
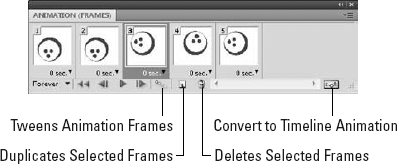
The palette has tools to set the frame intervals and preview the animation. The frames are created by selecting New Frame from the fly-out menu or by clicking the Duplicate Selected Frames button in the palette window. When a new frame is added, select the layer view you want for that frame by clicking the respective layer in the Layers palette. Continue adding frames and changing layer views to create the animation. After previewing the animation by clicking the right-pointing arrow in the Animation palette, choose File
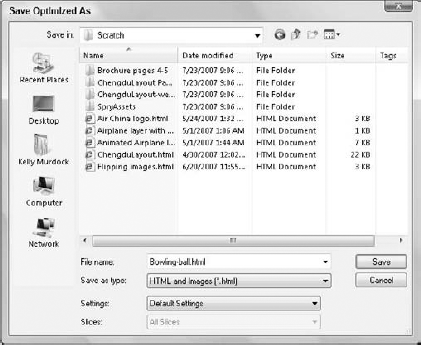
Figure 29.21. Select HTML and Images to save the animated GIF and the HTML code that creates the animation in a Web browser.
Tip
If you use another form of animation other than rotating objects such as fading an object from 0 to 100% opacity or vice versa, you can create a quick transition between the layers using the Tween animation frames tool in the Animation palette. Just create two layers containing an image with different opacities and display the two layers as separate frames in the Animation palette. Click the Tween animation frames tool (to the left of the Duplicates selected frames tool). The Tween dialog box opens, where you can select parameter attributes and the number of frames to create for the transition.
The HTML export from Photoshop can be opened directly in Dreamweaver, or you can copy the code and paste it into the source code of a Dreamweaver project. If you click the Preview tab in Dreamweaver, shown in Figure 29.22, the animation plays exactly as you previewed in Photoshop.

Animation files are placed in InDesign and viewed in Acrobat. You can choose to import an animation file such as SWF in InDesign or in Acrobat. Animation files are handled like other multimedia files where compatibility options and play buttons can be assigned.
Note
For information regarding compatibility options in Acrobat, see the section "Using Multimedia in Designs.".
Acrobat has an added benefit with the ability to capture Web pages containing animation and video. You might have a client who has a Web site containing animation files and needs to repurpose documents or convert Web pages to PDF documents that you intend to integrate in a PDF collection of files to be published on CD/DVD-ROM. Once converted to PDF, the animation files can be copied and pasted into other PDF files.
Note
You can capture Flash animation from Web sites in Acrobat, but animated GIF files are not converted with the animation effect. Captured Web pages containing animated GIF files capture the first image in the animation sequence.
There are a number of benefits in converting Web pages to PDF. You can create a Web site for a client, convert HTML files to PDF, and secure the PDF documents against any unauthorized copying or editing; you can convert pages from several sources and search the PDFs locally on your hard drive using Acrobat Search; and you can integrate captured Web pages in designs for display ads or brochures, and more. To understand how Acrobat is used to capture Web pages, follow these steps.
STEPS: Converting Web Pages to PDF
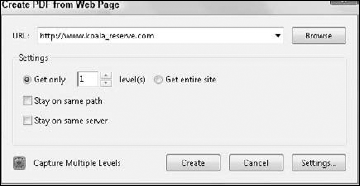
Open a URL in Acrobat. Launch Acrobat. From the Create PDF task button pull-down menu, select From Web Page. The Create PDF from Web Page dialog box shown in Figure 29.23 opens.
Adjust download settings. Add the URL for the Web site you intend to capture. Type 1 in the Get only text box to capture one level of Web pages. Select the Stay on same path and Stay on same server check boxes to be certain you are capturing Web pages from the specified URL.
Adjust Web Capture Settings. Click Settings in the Create PDF from Web Page dialog box to open the Web Capture Settings dialog box shown in Figure 29.24. Select HTML, and click Settings to open the HTML Conversion Settings dialog box.
Embed the media in the Web page. From the Multimedia pull-down menu, select Embed multimedia content when possible, as shown in Figure 29.25. Media can be either a link to a Web page or embedded in the resultant PDF document. When you embed the media, it is available locally on your hard drive and can be played when you are offline.
If you capture a Web page containing an animation or video clip, you can select the clip with the Select Object tool and copy it. The clip then can be pasted in another PDF document.
Note
You can paste copied media from Acrobat only into PDF documents. You cannot paste the media in an InDesign file.


Of course, none of the CS4 programs are dedicated video editors, so if you need to create video clips, you need to work with iMovie on the Macintosh or MovieMaker on Windows for low-end video-editing programs. If you do serious video editing, you need to use more professional editing tools such as Adobe Premiere Pro CS4 or Apple's Final Cut Pro. Photoshop CS4 Extended includes the ability to work with video.
Regardless of what application is used to create media, you can import the media in InDesign, Acrobat, and Dreamweaver. The CS4 programs supporting media imports offer you options for creating buttons and links to control the media visibility.
Both movies and sound files can be imported into InDesign layouts. Although InDesign supports the placing of these files in a document, they cannot actually be played until the document is exported in PDF.
The movie formats supported by InDesign include QuickTime, AVI, MPEG, and SWF movies, and WAV, AIF, and AU sound files.
Note
The MPEG and SWF movie formats are playable only in Acrobat version 6 or greater or Adobe Reader version 6 or greater. QuickTime and AVI movie formats are playable only in Acrobat version 5 or later.
You add movie and sound files to the current document by choosing File
The Movie Options dialog box, shown in Figure 29.26, includes Name and Description fields. The Name appears in the object's frame; the Description appears in Acrobat when the mouse cursor is moved over the top of the object.
The Movie Options dialog box lets you either choose a file or specify a URL. Although you cannot embed movies within the InDesign document, you can embed the movie in the PDF. If you select the Embed Movie in PDF option, the movie file embeds within the PDF file when it's exported. If you deselect this option, you must move the movie file along with the exported PDF file that references it. The Specify URL option lets you type the address to a media file on the Web. If a connection to the Internet is established when the media file is viewed, the movie file is downloaded into the PDF document. The Verify URL and Movie Size button checks the URL to make sure it's valid and points to a movie file.
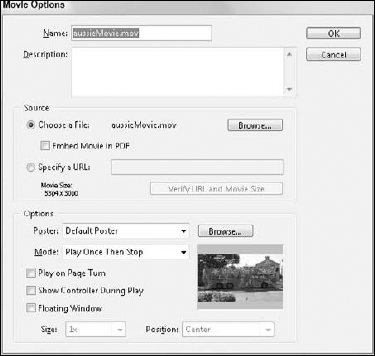
A Poster is an image that fills the movie frame. This image appears when the movie isn't being played. There are several Poster options you can add to movie frames:
None: Hides the movie file when it isn't being played.
Standard: Displays the image contained in the
Default Posterimage file. This generic image displays to the right in Figure 29.25.Default Poster: Presents the poster image that is bundled with the movie file. If the movie doesn't include a poster image, the first frame of the movie is used.
Choose Image as Poster: Lets you browse and load an image and display it as the movie poster.
Choose Movie Frame as Poster: Lets you view the movie using the pane to the right, where you may select a single frame of the movie to use as a poster.
The Mode options define how many times the movie file plays. The options include Play Once Then Stop, Play Once Stay Open, and Repeat Play. The Play on Page Turn option causes the movie to start playing when the page that includes the movie is displayed. The Show Controller During Play option shows controls along with the movie file. These controls let the viewer play, pause, and stop the movie file. The Floating Window option displays the movie within a floating window. The size and position of the floating window are set using the fields at the bottom of the dialog box.
The Sound Options dialog box, shown in Figure 29.27, includes Name and Description fields. The Name is the name that appears in the object's frame; the Description appears in Acrobat when the mouse cursor is moved over the top of the object.
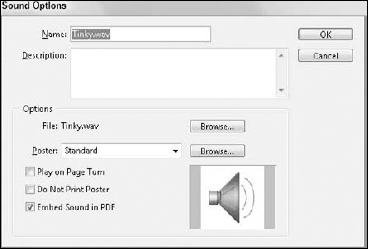
The Sound Options dialog box, like the Movie Options dialog box, also lets you Browse for a new sound file. The Poster options are limited to None, Standard, and Choose Image as Poster. The Play on Page Turn option causes the sound file to play when the page that contains it is displayed. The Do Not Print Poster option ensures that the sound frame isn't printed with the rest of the document when the document is printed. The Embed Sound in PDF option causes the sound file to be embedded within the PDF, which frees you from the concern of copying the sound file along with the exported PDF, but it increases the PDF file size. Note that InDesign adds no more compression to media files to reduce their sizes.
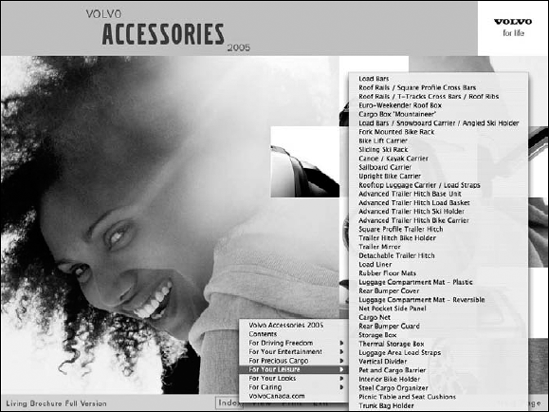
If your ultimate display for designs containing multimedia is Acrobat PDF, you have much better solutions in Acrobat for assigning button behaviors and file linking. Acrobat provides you with a rich set of features that are expanded to almost limitless options when you consider the flexibility you have with writing JavaScripts. As an example of an impressive electronic brochure design containing interactive buttons and imported multimedia, take a look at Figure 29.28.

Figure 29.28. An electronic brochure created by Robert Connolly of BC Pictures in Toronto, Canada, contains interactive buttons and multimedia.
The Volvo brochure created by Robert Connolly of BC Pictures in Toronto, Canada (www.bcpictures.com) has interactive links at the bottom of the page. The design was originally created in InDesign, and the interactive elements were added in Acrobat. The brochure opens in Full Screen mode in Adobe Acrobat or Adobe Reader. Therefore, the navigational buttons provide the reader options for moving about the brochure.
The photo in the lower-left corner contains a button that opens an embedded movie clip as a floating window. The movie frame in the lower-right corner of the page is a QuickTimeVR movie where the reader can click and move the cursor around the movie frame to view a 360-degree view of the auto interior.
On the opening page of the electronic brochure, a pop-up menu, shown in Figure 29.29, contains links to pages throughout the brochure. This menu is created with JavaScript in Acrobat. With the extensive list of links, the pop-up menu conveniently economizes space by serving as an alternative to a list of links on the page. When the menu is collapsed, the reader sees the nicely constructed design and photo images.
To import a movie in Acrobat, you use the Video tool. Double-click the Video tool, and the Insert Video dialog box appears, as shown in Figure 29.30. After selecting a video file, a preview of the file is displayed in the Insert Video dialog box. Using this preview, you can view the loaded video and select an image from the video to use as a poster image.
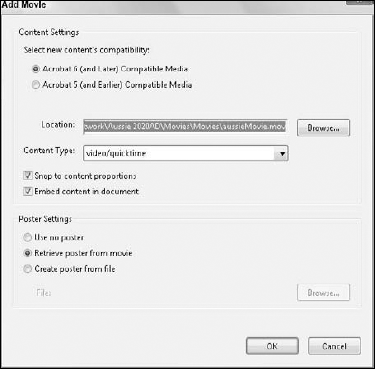
All loaded videos are automatically converted to the Flash format, which provides broad support across all Adobe products. However, if you want to use an older video format, you can click the Create Legacy Multimedia Content button, which opens the Add Movie dialog box, shown in Figure 29.31.
The first two radio buttons offer options for choosing the compatibility setting:
Acrobat 6 (and later) Compatible Media: Acrobat 6-compatible media permits you to embed media clips in the PDF file. If you choose Acrobat 6-compatible media, you have a choice for embedding the media or linking to it. Users of Acrobat 6 and above can see the media. Users of Acrobat and Adobe Reader below version 6 won't see the media.
Acrobat 5 (and earlier) Compatible Media: Selecting this option allows the user to see the media as a link to the PDF file. If you use this option, users of Acrobat/Reader prior to version 6 can see the media. The PDF and the movie file need to be copied to a CD/DVD or a Web site together for the media to play in Acrobat/Reader.

Note
Mac users need to upgrade to Acrobat to a version higher than version 7.03 to play Acrobat 6-compatible media on Mac OS X Tiger.
The poster options provide you the same settings as when importing media in InDesign.
One of the advantages of setting media attributes in Acrobat versus InDesign is the ability to add renditions. You can add a media clip to a PDF document and specify settings for the media such as playback attributes, playback location, showing or hiding player controls, and system requirements such as download speeds. You then can create a different rendition in the same PDF document for different media attributes. For example, you may have one media setting for users with broadband Internet feeds to download movies at 384 Kbps (kilobytes per second). You then can open the media properties, create a second rendition, and in the Rendition Settings dialog box specify a different download speed, as shown in Figure 29.32.

You create buttons to play media the same way buttons are created as links to views. In the Actions tab, you have options for selecting Acrobat 5- or Acrobat 6-compatible media. When you select the action and click Add in the Actions dialog box, the Multimedia Properties dialog box opens as shown in Figure 29.33. From the pull-down menu, select the play options. You can create buttons to play, stop, resume, play from beginning, and add a custom JavaScript when selecting Acrobat 6-compatible media.

Figure 29.33. Select Play Media (Acrobat compatibility), and click Add. The Multimedia Properties dialog box opens where play actions are assigned.
In Figure 29.34, a PDF file contains buttons assigned with different play actions.

Buttons and links are items you add to InDesign or PDF pages. In order to invoke an action, you need to have the button or link appear on a page when you want to initiate the action. If you have the same action assigned to a button such as opening another PDF document, it makes more sense to add the action to a bookmark. Bookmarks are visible from all pages, and they add significantly less overhead to a PDF file than when creating multiple buttons or links on pages.
If you create long documents such as manuals, books, guides, and so on, your document viewing and searching information is much faster if you break up the documents to multiple PDFs and use bookmarks to open and close files. You can organize and add interactive links to many files and create an illusion for the end user that browsing multiple files actually appears as a single file. The user is not likely to know the difference between scrolling pages in one document and opening and closing files from many documents.
Bookmarks in many ways are very similar to hyperlinks. They also mark text or images that link to places with the PDF file for quick navigation. Bookmarks are available in PDF files and appear in the left Bookmark pane, but they aren't recognized when the layout is converted to a Web page. Bookmarks are also available in InDesign and can be used for navigation in the InDesign document.
Note
When InDesign creates a table of contents, all entries in the table of contents are automatically added to the document as bookmarks if you enable the Bookmark option when you export to the PDF format.
You create and manage bookmarks using the Bookmarks palette, shown in Figure 29.35, which is accessed by choosing Window

You add new bookmarks to the document by selecting the bookmark item and choosing the New Bookmark palette menu command or by clicking the Create New Bookmark button at the bottom of the Bookmark palette. If no bookmarks are selected in the palette, the new bookmark is added to the bottom of the list of bookmarks. But if a bookmark is selected, the new bookmark is added as a child bookmark under the selected bookmark.
After creation, a bookmark's name appears as highlighted text, which you can edit. The bookmark's name appears in Acrobat's Bookmark pane. If some selected text is the bookmark, the selected text appears as the bookmark's name unless you change it.
The order of bookmarks within the Bookmarks palette also determines the order in which the bookmarks appear in Acrobat's bookmark pane. You can rearrange the listed bookmarks by dragging the bookmarks within the Bookmarks palette. As you're dragging a bookmark, a line appears defining where the bookmark appears when you release the mouse. If you drop a bookmark on top of an existing bookmark, the bookmark becomes a child to the highlighted bookmark.
The most common bookmark used in Acrobat is a bookmark to a page in the existing document. Bookmarks in Acrobat are easy to create. You first navigate to the page and view you want and press
If you have title headings on pages such as Chapter 1, Section 1, Part 1, and so on, you can use the Select tool and drag across the title on the pane or a section heading. When you press
The real power in using bookmarks is when you add different action types to the bookmark properties. In particular, writing JavaScripts provides a limitless number of opportunities to create dynamic interactive PDF documents.
When assigning properties to bookmarks, you can create the bookmark from any given page. Bookmarks and their associated actions are accessible from any page in a PDF document. If you are organizing long publications broken into sections, bookmarks provide the ideal avenue for opening and closing the various sections. Using buttons or links requires you to add a button or link to every page so a reader can quickly explore a different section. Adding these elements increases the file size considerably. Adding bookmarks to do the job results in file size increases that are hardly noticeable.
To organize a collection of PDF documents, follow these steps.
STEPS: Navigating Files with Bookmarks
Organize a collection of related documents. If you intend to distribute documents, you must be certain that the file paths for all linked files remain identical within folders and nested folders. To simplify your file organization, create a folder in Adobe Bridge and add the folder as a Favorite. You can drag files to this folder from the content area. If you want to copy files, press Option/Alt and drag to your Favorite folder.
Note
For more information on creating Favorites and organizing files in Adobe Bridge, see Chapter 6.
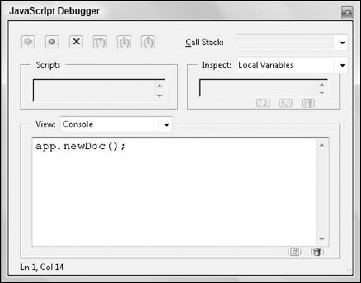
Create a blank document. Acrobat does not have a command for you to create a new document; however, you can use one short line of JavaScript code to create a blank page that opens in the Document pane. Press

app.newDoc();
The line of code is case sensitive, so be certain to type it as shown in Figure 29.36. Press the Num Pad Enter key, and a new blank document opens in the Document pane. Click the Close button in the Debugger to dismiss the window.
Create a new bookmark. Press
Type a name for the bookmark. Type a name, and the highlighted bookmark name is replaced with the text you type. Press the Num Pad Enter key to register the name.
Open the Bookmark Properties dialog box. Place the cursor on the bookmark name, and open a context menu. Select Properties from the menu choices, and the Bookmark Properties dialog box opens.
Open the Actions tab. By default, the Appearance tab is selected. Click the Actions tab in the Bookmark Properties dialog box. The Actions tab opens.
Delete the existing action. When you created the bookmark, the action was automatically set as a link to the view of the blank page in the Document pane. Delete this action by selecting the first line of text in the Actions window and clicking Delete. The Actions window should now appear empty.
Add an Action to open a file. Open the Select Action pull-down menu. Select Open a File from the menu options. Click Add.
Select a file to open. The Select File dialog box opens. Search your drive for the folder you created in Adobe Bridge, and select the file you want to use for a contents page or opening file. Click OK in the Select File to Open dialog box.
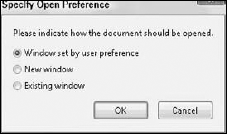
Select a window preference. The Specify Window Preference dialog box opens. You have three choices as shown in Figure 29.37. Select Existing Window from the available choices. When you select Existing Window, the document containing this action closes as the target file opens. Click OK, and you are returned to the Actions pane.
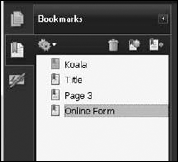
Create another bookmark. Follow Steps 3 through 10 to add new bookmarks for additional files to open. Be certain to set the same window preference for all actions. Your bookmarks should appear listed in the bookmarks pane as shown in Figure 29.38.
Tip
You can leave the Actions pane open while creating new bookmarks.
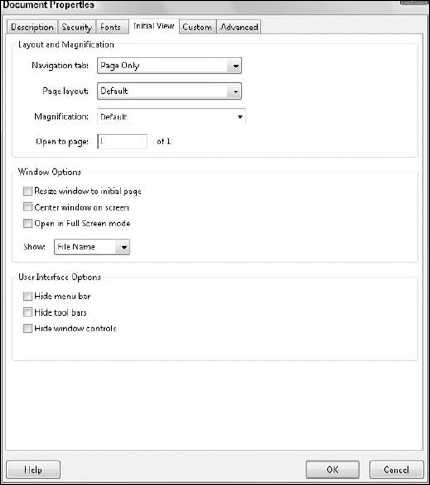
Specify initial view options. Choose File
Add metadata. Click the Description tab. Add data common to all your files if any exist for the Author, Subject, and Keywords fields. Note that the Title field should be different for each file.
Note
For more information about adding Initial Views and Document Descriptions, see Chapter 34.
Save the file. Choose File
Import bookmarks. You can import a file in your temp document, or you can import the temp document into other files. In order to preserve the Initial View and the metadata, you should import each file in your template. To import a PDF in the open document, click the Pages tab in the Navigation pane. Open a context menu on the first page, and select Insert Pages. The Select File to Insert dialog box opens. Select a file to insert, and click Select.
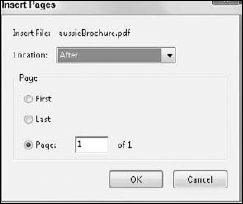
Select the location for the inserted pages. The Insert Pages dialog box opens. Select After from the Location pull-down menu to insert pages after the selected page. Click OK to insert the pages, as shown in Figure 29.40.
Delete the blank page. The template page is contained in the document. Open a context menu on the Blank page and select Delete. Click OK in the alert dialog box.
Delete the dead bookmark. If you added bookmarks to open every file contained in your folder, the file you inserted in the open document does not need a bookmark. Select the respective bookmark in the Bookmarks pane, and open a context menu. Select Delete from the menu.
Edit the Title field and any unique metadata. Open the Document Description (
Save the file. Choose File
Finish the project. Open the template file, and insert the next file to modify. Follow Steps 15 through 20 for each file contained in your collection. When one of the files opens, the Bookmarks pane is opened. Clicking a bookmark from any page closes the open file and opens the target file. The reader can browse your collection freely without opening several documents in the Document pane, thereby eliminating confusion when navigating documents.
The power of interactivity is best exemplified in PDF documents with JavaScript routines. JavaScript provides you with a limitless opportunity to create new design looks, add more sophisticated dynamic linking, and explore a world of features not available with tools and menu commands in the other CS4 programs. As Emeril says, "It's time to kick it up a notch."
To illustrate an example for where you might use JavaScript and PDF documents, let's assume you have a document used to record ongoing progress on a campaign or design assignment. The document might be a PDF form used to fill in form data on a series of designs as they are completed by members of your workgroup. Contained within the form is the respective design piece itself. Therefore, you start with two documents. One document is a form template, and the other is a design piece.
Your task is to merge the two documents for the purpose of record keeping and for your client to sign off on the final designs. Because one file contains form fields in a PDF, you can't copy and paste one document on the same page as the other in Adobe InDesign. You need some way to merge the two files together to create a single page document with the form fields.
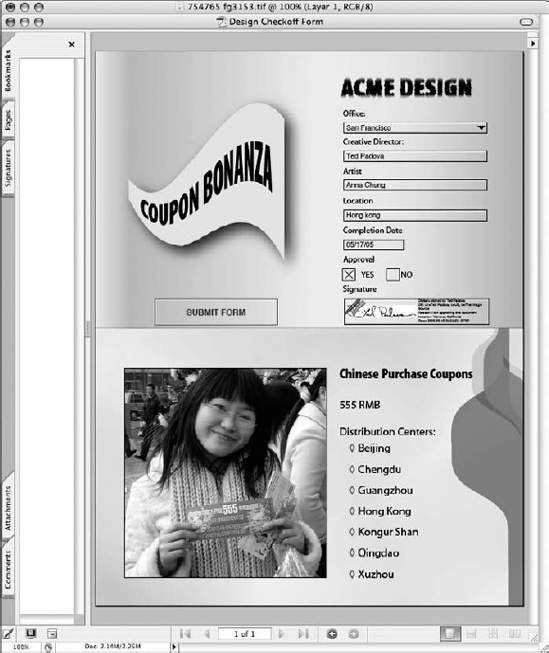
To begin, you'll need two files that, when merged together, appear as a single page layout. You might initially lay out a document in InDesign, convert to PDF, and add form fields like you see in Figure 29.41. In Adobe Acrobat, the bottom half of this design is where the merged file will eventually appear.
Note
Working with PDF forms and adding form fields in Acrobat is not difficult, but there is much to it. For a more comprehensive view of creating Acrobat PDF forms, see the Adobe Acrobat 9 PDF Bible (Wiley Publishing).
To understand how to merge data in PDF documents, follow these steps.
STEPS: Dynamically Creating Content Using JavaScript
Add a bookmark. You should have two PDF documents that you want to merge together. If you're not familiar with creating a PDF form, you can use any layout where two halves of a layout are converted to PDF. One layout is used as a template. Open the file in Acrobat, and press
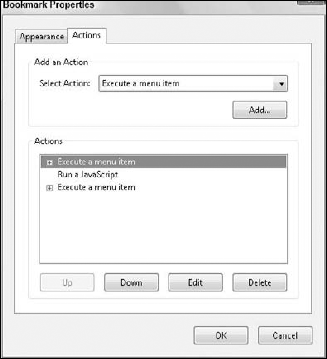
Add an Execute a menu item action. Open a context menu on the bookmark name, and select Properties. Click Actions. Select the existing page view action, and click Delete to remove it from the Actions list. Open the Select Action pull-down menu, and select Execute a menu item. Click Add, open the Document menu, and select Insert Pages. Click OK, but leave the Bookmark Properties dialog box open.
Note
For more information on creating an Execute a menu item action, see "Adding links in Acrobat" earlier in this chapter.
When the user clicks the bookmark, the Insert Pages dialog box opens. This enables the user to locate and select the file to merge with the template.
Add a JavaScript. After a page is inserted, you need to move ahead to the inserted page to follow the remaining steps. You could use another Execute a menu item action, or you can add a JavaScript to accomplish the same task. Add a JavaScript here to do the job. Select Run a JavaScript from the Select Action pull-down menu and click Add, and the Create and Edit JavaScripts window opens. Type the following code in the window, and be certain to use the exact same letter case:
this.pageNum++;
Add another Execute a menu item action. Click OK in the Create and Edit JavaScripts window, and you return to the Bookmark Properties dialog box. Select Execute a menu item from the Select Action pull-down menu, and choose Advanced
Add another JavaScript. Your final action is a script that you write to spawn a page from the page template, delete the page after spawning it, and delete the bookmark so a user doesn't inadvertently click it again to create another template. Select Run a JavaScript from the Select Action pull-down menu, and click Add. In the Create and Edit JavaScripts window, type the following code exactly as shown here and in Figure 29.43:
this.pageNum--;

if(this.templates.length)
{
        var a = this.templates[this.templates.length-1];
if(a != null) { a.spawn ({ nPage:this.pageNum, bRename:true, bOverlay:true, }) this.deletePages(this.pageNum+1); bookmarkRoot.remove(); }Save the file. Click OK in the Create and Edit JavaScripts window, and click Close in the Bookmark Properties dialog box. Choose File


Note
Before saving the document, open the Initial View document properties and select Bookmarks and Page for the opening view. When a user opens the file, the bookmark is in view in the Bookmarks pane. See the section "Opening files using bookmarks."
The code written in Step 5 of the "Dynamically Creating Content Using JavaScripts" series of steps performs several actions. The actions specified in the script include:
this,pageNum--;: The first line of code moves the user to the first page in the file and makes that page the active page.
if(this,templates.length) through the 5th line of code (if (a != null)): This sets up a condition where the user can type any name for the page template name. As page templates are created, they need to be named. Rather than have the user try to remember a name, this code accepts any name for the page template.
a.spawn ({ through line 10 (bOverlay:true,): This spawns the page from the template. The
bOverlay:truestatement takes the page template data and overlays it on the existing page.this.deletePages(this.pageNum+1): This deletes page 2 in the template. Because the user is currently on page 1, the
pageNum+1portion of the statement targets the next page for deletion.bookmarkRoot.remove();: This deletes the bookmark from the document.
After you add the Execute a menu item and JavaScripts actions, test the sequence of actions to be certain they work properly. Be certain you save the file before attempting to run any actions. You can always revert to the last-saved version by choosing File
To test your series of actions, follow these steps.
STEPS: Executing Menu Items and JavaScripts
Click the bookmark. To invoke the actions, click the bookmark with the Hand tool.
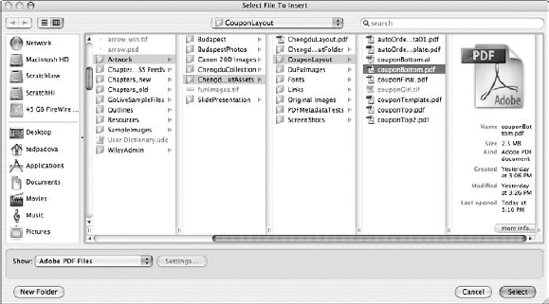
Insert a page. The first item you see after clicking the bookmark is the Select File to Insert dialog box, shown in Figure 29.44. Select a file to be merged with the open template document, and click Select. The Insert Pages dialog box opens next. Be certain that the Location pull-down menu shows After, and click OK.
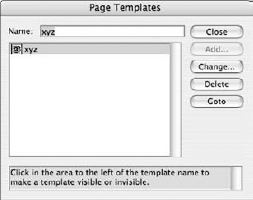
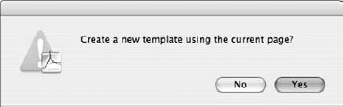
Add a template. The next dialog box appearing is the Page Templates dialog box, as shown in Figure 29.45. Type a name for the template. The name can be any text you want to add in the Name text box. In this example, we use xyz. Click Add, and an alert dialog box opens as shown in Figure 29.46. Click Yes to continue.
Close the Page Templates dialog box. After a template name is added, the name appears in the Page Templates window, as shown in Figure 29.47. Click Close to continue.
Save the file. The remaining part of the JavaScript finishes up the job. The inserted page data are overlaid on the first page, the second page is deleted, and the bookmark is deleted. If you have form fields in the document, fill in the fields. The final document is shown in Figure 29.48. Choose File
Spawning pages in Acrobat is a powerful tool that enables you to create pages on demand according to user needs. You might have a law firm as a client that needs to have comments added on separate pages in an arbitration agreement. Rather than adding blank pages throughout the document, you let the client create pages as needed for commenting on arbitration issues. You might have an accounting firm that needs calculation fields added to various pages in a tax organizer for auditing purposes, or you might have needs in your own design studio to merge layouts with form templates for tracking jobs. The more you become familiar with this powerful feature in Acrobat, the more you'll find solutions for your clients and your in-house needs.
Note
For more information on spawning pages from templates and writing JavaScripts, see the Acrobat JavaScript Scripting Reference. You can download it free from Adobe's Web site at partners.adobe.com/public/developer/acrobat/sdk/index_doc.html#js.
You can add various interactive elements including hyperlinks, bookmarks, buttons, and media files to InDesign documents and Acrobat PDF files.
Hyperlinks can link to pages or text anchors within the document or to a URL in InDesign. You can link to page views, open files, and link to URLs in Acrobat. For URLs contained in text in a PDF file, Acrobat 8 and Adobe Reader 8 do not require adding links.
Bookmarks in an InDesign document may link to pages, text anchors, or URLs. These bookmarks show up in the Bookmarks tab within Acrobat if the Bookmark option is enabled.
During the PDF export process from InDesign, you can include or exclude interactive elements.
In Acrobat, you can link to views as well as add actions to bookmark properties for executing menu commands and running JavaScripts.
You can endow buttons with events and behaviors that define a resulting action. This action occurs when a user performs an event such as a mouse-click or a mouse-rollover.
You can add media files, including movies and sounds, to an InDesign document and select options for playing them.
You can add media files, including movies and sounds, in Acrobat as Acrobat 5- or later-compatible media. Acrobat 6 and later-compatible media enables you to embed media files in the PDF.
You can add different renditions for media clips in Acrobat. You can assign renditions according to end-user download speeds.
You can create PDF documents that meet user needs for modifying files on demand using page templates and JavaScripts.