The Web's popularity has seen the appearance of several new technologies that add interactivity and portability within Web pages. Of these, Flash (SWF) files are vector-based image formats used for creating files a fraction of the size of their raster-based counterparts and making them useful for creating Web graphics and, specifically, Web animations. You also can use these formats to scale images to any size without sacrificing image quality.
You can create Flash (SWF) files using both Flash and from within Illustrator and use them in Dreamweaver and Acrobat. You create SWF animation in Illustrator by placing the graphics for each frame of the animation on a separate layer, which you then convert to animation frames.
You also can use InDesign to create SWF files. InDesign CS4 allows exporting documents directly to SWF or exporting to the XFL format that can be imported by Flash.
Note
Another related technology is Adobe's Scalable Vector Graphics (SVG). These files are also vector-based and saved as XML files. However, Adobe has announced that it will drop support for SVG from its upcoming developments.
Creative Suite 4 Design Premium includes the best package that can generate Flash files—the Flash CS4 program itself. Flash is a valuable addition to CS4 and provides a powerful tool for creating amazing Web site graphics and animations.
Although Flash files can include bitmap images, it really is designed to use vector-based objects like those found in Illustrator. These objects have some distinct advantages when used in Web pages. First, the graphics are resolution-independent, which allows them to be mathematically perfect regardless of their size. And second, vector-based objects are a fraction of the size of their pixel-based siblings. This means that visually rich graphics can be downloaded at a much quicker rate than other graphics.
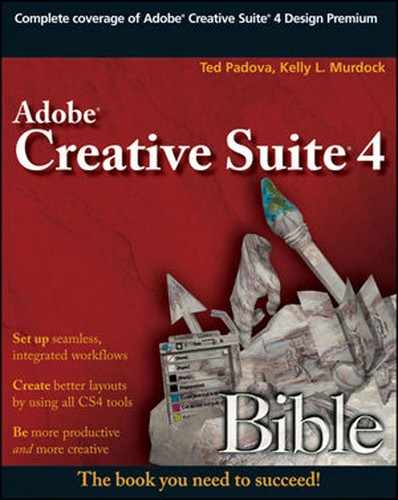
Flash animations are created on the section in the middle of the interface called the stage, shown in Figure 23.1. Keyframes are added to the layers in the Timeline palette at the top of the interface, and all object properties are set in the Properties palette at the bottom of the interface. Tools for selecting and drawing objects are found in the Toolbox, located on the left side of the interface.
In addition to these main windows, Flash also includes a large set of palettes that work in the same way as the other CS apps. You can open palettes using the Window menu, and palettes can be stacked and docked as needed.
Note
Working with CS palettes is covered in Chapter 4.
Flash allows a large assortment of content including images, sounds, and video to be imported into either the Flash stage or into its Library palette using the File

Objects that are imported into a Library appear in the Library palette, as shown in Figure 23.3. From the Library palette, objects can be dragged and dropped on the stage. Libraries stay with the current Flash file, but you can open a Library with a new Flash file using the File

Multiple Library panels can be opened at the same time. Click the New Library Panel icon to create a new panel. In addition to imported content, Libraries also can contain symbols. Symbols in Illustrator are collections of small pieces of artwork that can be easily reused, but symbols in Flash are simply artwork saved in the Library. Symbols can be drawn in Flash or imported from another application.
An instance is a copy of a symbol that is used elsewhere in the same document. The advantage of using instances is that they are included in memory only once and referenced for any other appearances of the instance. This can help keep the file size down. To create a new symbol instance, click the New Symbol icon button at the bottom of the palette.
The Library palette also can include folders to organize groups of content together. New folders are created using the New Folder button at the bottom of the palette. Items can be dragged and dropped into the folders.
Library content can be edited using the Edit palette menu command. The Edit With command lets you open the current item for editing in a designated application.
Within the Flash toolbox, shown in Figure 23.4, you find several tools for creating content within Flash. Many of these are similar to the tools found in Illustrator. The drawing tools found in the Flash toolbar include the following:
Note
Several of the Flash drawing tools have multiple keyboard shortcuts. One shortcut is from the original Flash product, and the new shortcut synchs the tools with the other CS apps. Note that the Rectangle tool shortcuts are not the same as the other CS4 apps.

Pen tool: This tool is used to draw smooth curves by placing control points and manipulating handles. Tools found under the flyout include the same options as found in Illustrator: the Add Anchor Point, Remove Anchor Point, and Convert Anchor Point tools. When a Pen object is selected, you can change its Stroke width, line style, color, fill, cap, join, and meter settings.
Tip
A nifty preference setting in the Drawing panel of the Preferences dialog box called Show Path Preview shows the path as you move to the next point. This option is handy when you're starting to learn to control the Pen tool.
Type tool: This tool creates text. The properties for text include font, size, color, style, auto kerning, anti-aliasing, and hyperlinking.
Line tool: This tool draws straight lines and has similar properties to the Pen tool.
Rectangle tool: Drag with this tool to create rectangular shapes. Flyouts under this tool include the Oval, Rectangle Primitive, Oval Primitive, and Polystar tools. The Rectangle Primitive object creates rectangles with rounded corners, and the Oval Primitive tool includes Start and End Angle values and an Inner Radius value for creating C-shaped objects. The Polystar tool creates polygons and star objects where you can specify the number of sides and/or points.
Pencil tool: This tool allows freehand drawing on the stage using a consistent width pencil.
Brush tool: This tool allows you to paint with a freehand brush. In the Toolbox are options to change the Brush shape, size, and mode. Available modes include Paint Normal, Paint Fills, Paint Behind, Paint Selection, and Paint Inside.
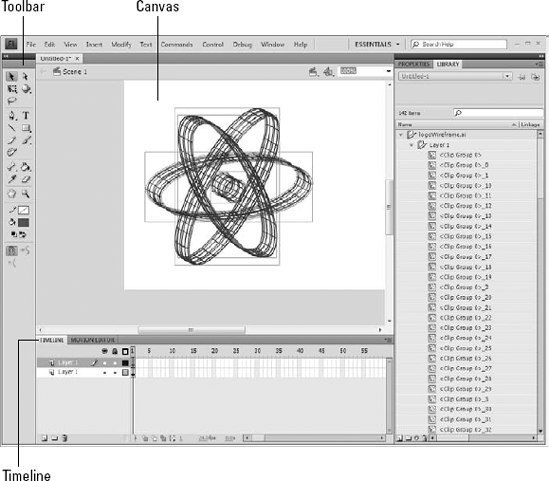
Deco tool: This tool allows drawing effects including Vine Fill, shown in Figure 23.5, which fills the background with a connected set of vines; Grid Fill, which creates a defined grid of regularly spaced lines; and the Symmetry Brush, which draws duplicate objects simultaneously with the current path about an axis or radially.
Shapes drawn in Flash are unique when compared to Illustrator, Photoshop, and InDesign. One of the key differences is that when two objects on a layer are overlapped, path operations are performed immediately. For example, if you draw a simple closed circle and then overlap it with another circle, the two paths are immediately joined and the whole shape moves together, but Illustrator keeps these paths separate until you use the join command.
Another interesting difference is that when two strokes overlap, they cut the existing stroke, but when two strokes that are the same fill color intersect, the strokes are all joined together. So, if a red circle is intersected by a drawing vertical line, the red circle is cut into two halves. If the circle is intersected with another red line, then the red line joins the red circle and they all move as one object.
All Flash edges are fluid and can be bent by dragging the edge away from the shape. If you move the cursor over a shape edge, it switches to an arc shape, as shown in Figure 23.6. If you drag when this arc cursor is present, you can pull and bend the shape edge away from the other edge without moving the edge's corners.

If you create some artwork that you don't want to be combined with other edges, you can do this in several ways. One way is to simply group the pieces you don't want combined. Grouped objects aren't joined to other paths. Another method is to place the artwork on another layer, or you can save the artwork as a symbol to keep it safe from combining and slicing with other strokes.
Flash doesn't include a Layers palette, like the other CS apps. Instead, layers are listed in order in the Timeline palette, as shown in Figure 23.7. Top layers appear at the top of the Timeline palette, and objects on the top layers obscure any objects that are overlapped on layers underneath.

If you drag and drop the layers in the Timeline palette, you can reorder the layer order. When a layer is selected, all objects contained on that layer are highlighted. Any new objects that are created are automatically added to the current layer. The current layer is marked by a pencil icon to the right of the layer name.
You see three columns to the right of the layer name. The first column is used to hide/show layers. When layers are hidden, a red X icon appears in the row for the hidden layers. The second column is used to lock layers. Objects on locked layers cannot be selected or moved. The third column allows layer objects to be viewed as outlines. The third column also shows the layer color. Clicking this icon opens the Layer Properties dialog box, shown in Figure 23.8.

To create a new layer, click the Insert Layer icon at the bottom left of the Timeline palette. Layers can be grouped together in Layer Folders. To create a new layer folder, click the Insert Layer Folder icon.
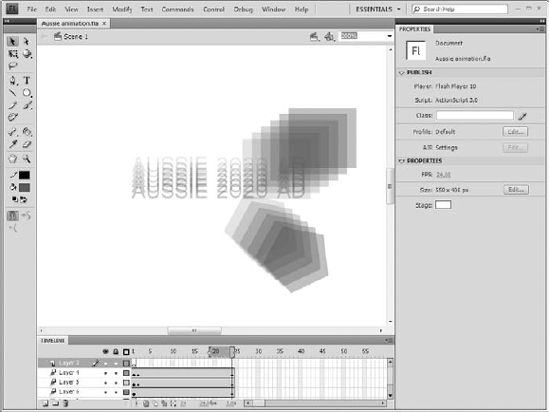
Although drawing in Flash is accomplished with tools that are similar to the other CS applications, the animation features found in Flash are a distinguishing feature. Any object that may be selected can be animated using the Timeline palette found at the bottom of the interface.
Animating objects in Flash is accomplished by setting keyframes in the Timeline. These keyframes mark the position and properties of objects during different frames of the animation. After two or more keyframes are set, Flash computes all the intermediate positions and properties for the tweened object by interpolating between the two keyframes when a tween command is used. Keyframes are marked on the Timeline as small solid dots, as shown in Figure 23.9.

The available frames for the animation are numbered sequentially at the top of the Timeline palette. The current frame shown on the stage is indicated by the red rectangle called the Playhead. You can drag the Playhead back and forth to move through the frames, or you can manually control the playback using the controls found in the Controller panel.
When an object is in the correct position for the animation, a keyframe is created by selecting the object, dragging the Playhead to the right frame, and choosing the Insert
Keyframes aren't enough by themselves to create motion; they only mark the position and/or properties of an object for a given frame. To have Flash compute the intermediate steps between two keyframes, you need to drag over the range of frames between and including the two keyframes and select the Insert
The preceding paragraph describes the manual process for creating a motion tween, but a new method is now available that is much simpler. For this new process, you select the object that you want to animate, right-click, and select the Create Motion Tween option. This converts the art to a symbol and inserts a tween and a keyframe positioned one second from the current position. The playhead is then moved forward one second. The only remaining step for the user is to move the object to a new position. This creates a tween path that can be reformed. All in all, what used to be about five to ten precise steps are now just two easy steps.
Note
Because selecting keyframes can be tricky, it is easier to select the first keyframe and add the tween. The tween always is identified with the first keyframe.
Another way to animate an object is to change its shape. You do this by altering the object's properties for two different keyframes. Then you select the frame range between the two keyframes and choose the Insert
Note
When a tween is broken because it is incomplete or has only one key, it is shown as a dashed line. Broken tweens can be fixed by creating a new end key. Light gray ranges indicate that the object has no tween and that it doesn't change over the marked range.
Onion skinning is a feature that displays an object's position and size in the frames before and after the current frame. The onion skinned object can be set to be displayed as an outline. This feature gives you a good idea of how the object is moving in the scene and helps as you try to synch an object's motion.
The settings for enabling and configuring onion skinning are found at the bottom of the Timeline palette, as shown in Figure 23.10. When enabled, two bracket markers appear around the Playhead. Dragging these markers out increases the number of frames that are onion skinned.
The frame rate determines how long each frame is displayed before the next frame appears. Frame rate is the number of frames that are displayed per second. Common frame rates include 24 frames per second (fps) for film, 30 fps for television, and 12 fps for Web animations. The current frame rate setting is displayed at the bottom of the Timeline palette.

You can change the current frame rate using the Document Properties dialog box, shown in Figure 23.11. This dialog box is opened with the Modify

After the animated sequence is completed, you can save the file using the File
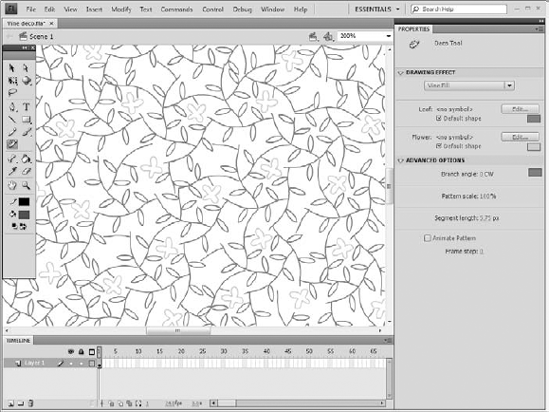
To control the publishing process, the Publish Settings dialog box is accessible using the File
STEPS: Creating a Flash Animation
Open Flash, and load content. With Flash open, choose File

Create a rectangle object. Create a new layer in the Timeline panel, click the Rectangle tool, and drag in the stage to create a rectangle shape. Then move this rectangle to the lower-left corner of the stage. Change the fill color to blue.
Create some text. Create another new layer in the Timeline panel, click the Text tool, and type China Air. Then, in the Properties palette, change the font to Tunga, the style to bold, the size to 25, and the color to red. Move the text to the top of the stage to the right, as shown in Figure 23.13.
Create motion tweens. Select the rectangle shape, and choose the Create Motion Tween menu from the right-click menu. Then move the rectangle to the upper right. Then repeat this step for the other two elements.
Enable onion skinning, and view the resulting animation. Click the Onion Skin button at the bottom of the Timeline palette, and drag the Onion Marker at the top of the palette so all frames are included. Then drag the Playhead back and forth to check the resulting animation on the stage, as shown in Figure 23.14.
Publish the resulting animation. When the final animation looks fine, save the file as an .FLA file so you can work on it again in the future. Then select File

The common approach to repurposing designs that are created for print and layouts is to use InDesign to export the documents for use in Dreamweaver. This is a valid workflow and is demonstrated in Chapter 27. However, designs often fall apart when converted to HTML because HTML lays out elements in a linear left-to-right, top-to-bottom flow. These issues can be addressed with CSS, but another alternative exists.
Designs also can be exported from InDesign to the Flash SWF format. Because Flash is vector-based and viewed in a Player within Web browsers, it doesn't have to follow the linear constraints imposed by HTML. The end result is a site that is closer to the original design. The drawback is that visitors need to have a Flash-enabled browser to view the design. This is a minimal problem because Flash-enabled browsers are common.
To export an InDesign document to the SWF file format, select the File
The Export SWF dialog box, shown in Figure 23.15, appears as you export the design. Using this dialog box, you can set the size of the exported document with a Scale value. You can set it to fit within a given set of dimensions, and you can set to export a specific set of pages. The Generate HTML File option creates a small HTML file that opens and displays the SWF file.

Figure 23.15. The Export SWF dialog box includes options for setting the scale of the exported document.
The Export SWF dialog box includes options for how to handle text. The options include converting the text to Flash text, converting the text to vector paths, and converting the text to raster images. All interactive elements created in InDesign; including buttons, hyperlinks, page transitions, and interactive page curl effects; can be exported. You also can set the image compression values.
Figure 23.16 shows the exported SWF file within a Web browser. The design is intact and much closer to the original design than its HTML equivalent.

Although you typically create SWF files using the Adobe Flash program, Flash isn't the only application that works with vector-based images. Adobe Illustrator also creates vector-based designs, so converting a native Illustrator graphic to the SWF format is a simple conversion. You can save any Illustrator graphic as an SWF file for use on the Web. You also can use Illustrator to create SWF animations by placing each frame of the animation in a separate layer.
You have two different paths for exporting Illustrator graphics to the SWF file format. You can choose File
Note
Keep in mind that SWF files require that you install the Flash Player browser plug-in to view files on the Web.
Choose File
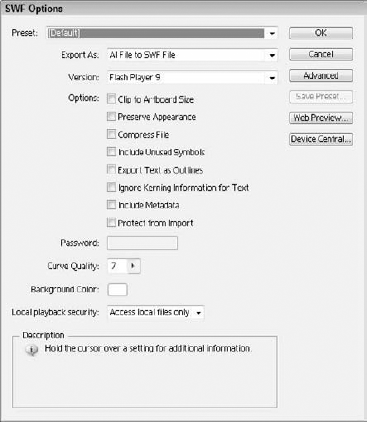
Export As: You have four options—AI File to SWF File, AI Layers to SWF Frames, AI Layers to SWF Files, and AI Layers to SWF Symbols. You also can choose which version of Flash to export to. The AI File to SWF File option exports the Illustrator document to a single frame. The other two options convert the artwork contained on each layer to either an SWF frame or to a separate SWF file.
Clip to Artboard Size: This option sets the size of the exported file to match the entire art board document.
Preserve Appearance: This option flattens all objects before exporting.
Compress File: This option compresses the exported file to reduce its size, making it quicker to download.
Warning
Flash Players prior to version 6 cannot load compressed files.
Export Symbols in the Panel: To keep all defined movie and graphic symbols as part of the file, enable this option.
Export Text as Outlines: This option converts all text to object paths as part of the export. This helps maintain the look of the text in all browsers without relying on fonts.
Ignore Kerning Information for Text: This option removes all kerning from text objects to keep them clean and to guarantee their appearance.
Include Metadata: The metadata added in the File Info dialog box is included with the file.
Protect from Import: This option prevents the SWF file from being downloaded and edited, thereby protecting your design. You also can specify a Password required to view the file.
Curve Quality: This option sets the accuracy of the Bézier curves for the artwork. Lower Curve Quality values reduce the file size by decreasing the number of points as well as the curve's quality. Higher values maintain the curve quality but increase the overall file size.
Tip
Most standard curves are adequately maintained with a Curve Quality setting of 7.
Background Color: A color swatch lets you set the background color for the exported file.
If you click the Web Preview button, the file is loaded within the default Web browser or you can click the Device Central to view the file in a number of different mobile devices.
The Advanced button opens a panel of additional controls, as shown in Figure 23.18, for defining the quality settings of the exported file include the following:
Image Format: This option can be set to Lossless, which keeps all the image data, resulting in large file sizes, or Lossy, which compresses the images using a JPEG format that throws away image data depending on the JPEG Quality setting. If you select Lossy, you can specify the amount quality as Low, Medium, High, or Maximum (or using a numeric value from 1 to 10). The Low setting results in the smallest file sizes at the expense of image quality, and the High setting yields a large file size but maintains the image quality.
JPEG Quality: If the Lossy (JPEG) option is selected, you can alter the quality settings. Lower-quality images result in smaller file sizes.
Method: You also can select to use the Baseline (Standard) or Baseline Optimized compression method. The Baseline Optimized method provides an additional level of compression. When the Export As setting is set to AI File to SWF File, you can choose between the Preserve Appearance and the Preserve Editability Where Possible options. The Preserve Appearance option flattens all layers to a single layer. The Preserve Editability Where Possible option maintains all layers during exporting.
Resolution: This option lets you specify the resolution value for the SWF artwork. For SWF files that are viewed online, a setting of 72 ppi is sufficient, but if you plan to print your artwork, select a higher ppi setting. Higher resolution settings result in larger file sizes.
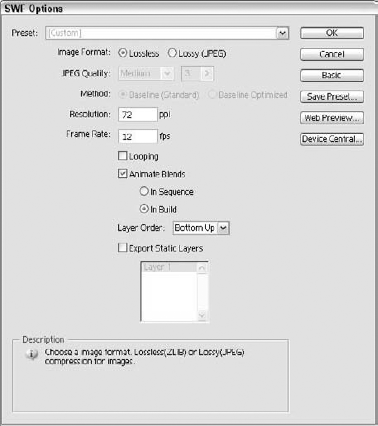
The Animation controls become available when the Export As option is set to All Layers to SWF Frames. The animation controls include the following:
Frame Rate: This setting is the rate at which the animation frames play. Most animations on the Web are fine at 12 frames per second (fps), but if your animation includes lots of fast-changing details, you may want to increase this value to 24 fps.
Looping: This setting lets the animation play continuously. If disabled, the animation plays through only once.
Animate Blends: This setting allows blended objects to be animated using two different options. The In Sequence option places each object of the blend on a separate frame. The In Build option keeps the existing objects and adds a new blend to each frame, so that the final frame includes all objects that make up the blend.
Layer Order: This setting sets the order in which the layers are drawn when the SWF is rendered. The options include Bottom Up and Top Down. The Bottom Up option displays the background before the higher layer content. This makes it easy to reverse an animation.
Export Static Layers: Selecting this option lets you choose a single layer or several layers to export, along with every layer that is used as a background. It also is used to control which layers are not exported with an animation of blends.
Another way to save Illustrator artwork using the SWF format is with the Save for Web window. Open this interface by choosing File
Tip
The preview pane in the Save for Web window is convenient for viewing the changes to the artwork as a result of lowering the Curve Quality setting.
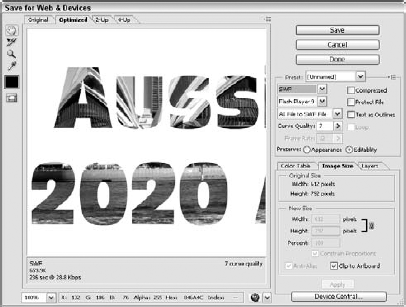
To save the artwork to the SWF format, you must select SWF from the format drop-down list located to the right. All the settings for this format type appear, including many of the same settings mentioned for the File
Note
When using the Save for Web window, all image files (including the SWF file) are exported to a separate images folder when you select to save both the HTML and Image files.
With the SWF format selected, the drop-down list under the Format list includes only options to save the AI file to an SWF file or to save the AI layers to SWF frames. In the Save for Web window, you cannot choose to save each layer as a different SWF file. The window also doesn't include options for setting how you save raster images, nor does it include an option to generate HTML. However, when the file dialog box appears, you can save the images only, the HTML only, or both. The Clip to Artboard option is found within the Image Size panel.
Note
Although the Save for Web window doesn't include any options for setting how raster images are saved, any raster images included within the artwork are saved using the last used settings specified in the Export SWF Options dialog box.
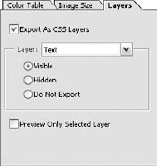
The Save for Web window does offer an option to export the layers as CSS Layers. The Export As CSS Layers option is found in the Layers panel, as shown in Figure 23.20. After the Export As CSS Layers options is enabled, you can select each layer and set it as Visible, Hidden, or Do Not Export. Layers set to Visible or Hidden are included within the HTML file where JavaScript controls which layers are visible and which are hidden.
Several objects behave differently between Illustrator and Flash, which could affect the file when it's exported:
Gradients and meshes: Gradients and mesh objects that use eight stops or more convert to a raster image during export. Gradients with less than eight stops export as gradients. To keep file sizes low, only use gradients with fewer than eight stops for artwork exported to the SWF format.
Patterns: All patterns are rasterized and tiled when exported to the SWF format.
Text and strokes: Text and strokes that are filled with a pattern are converted to paths and then filled with a rasterized pattern during export.
Text kerning, leading, and tracking: These are not supported in exported SWF files. Instead, the text is exported as a separate text object positioned to simulate the kerning, leading, and tracking. To maintain text as a single object, enable the Convert Text to Outlines option during exporting.
You can create simple animations in Illustrator using layers. By placing each frame of an animation on a separate layer, you can then cycle through the layers to create an animated sequence. The Layers palette includes a feature that automatically creates a layer for each object in the current file and places each object in its own layer.
Before using this feature, you must create and position each object that appears in the animation. If the animation features a single moving object, you must duplicate that object for each frame of the animation. Here's an easy way to do this: Create the object, choose Edit
Tip
You also can duplicate the selected object by pressing and holding Option/Alt while dragging the object to a new location. Another easy way to create multiple copies along a path is to use Illustrator's Blend feature.
After you copy and position all the objects, you can select the Release to Layers (Sequence) palette menu command from the Layers palette, as shown in Figure 23.21. This command creates a new layer for each object, placing each in its own layer.

You may now export the file to the SWF format by choosing File
The Layers palette also includes a Release to Layers (Build) menu command. This command is similar in that it also creates a new layer for each object, but each new object is cumulatively added to the existing objects. For example, if the original layer includes five objects, the first layer includes a single object, the second layer two objects, and the fifth layer all objects.
If a simple animation sequence requires a separate object for every frame of an animation, file sizes could potentially grow progressively larger as an animation sequence gets longer. However, a solution that keeps file sizes small is to use symbols.
When you use a symbol in an SWF file, the symbol is included only once and simply referenced every other time it is used within the file. So a simple animation that includes a symbol moving across the screen would require that you duplicate the symbol multiple times and place a copy of the symbol on a separate layer for each frame of the animation, but the SWF file would include the symbol only once.
You can either use a symbol from Illustrator's Symbols palette or create your own symbol:
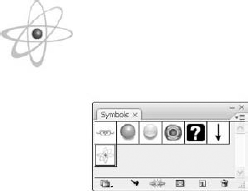
Using the Symbols palette: Illustrator includes many symbols in the Symbols palette, shown in Figure 23.22. You can access additional symbols using the symbol libraries, which you open by choosing Window
Creating your symbols: Draw and select the artwork that you want to use as a symbol, and then select the New Symbol panel menu command (F8) or drag the artwork to the Symbols palette. If you double-click a symbol in the Symbols palette, a dialog box appears where you can rename the symbol.

Note
Illustrator CS4 has borrowed a keyboard shortcut from Flash. The F8 key is used to create a symbol.
STEPS: Creating a Simple Animation Sequence and Exporting It as an SWF File
Open a new file in Illustrator. Within Illustrator, choose File
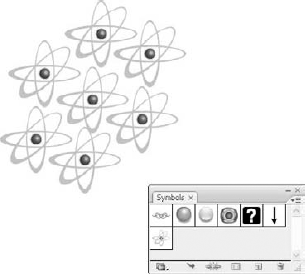
Add a symbol to the document. Choose Window
Duplicate and position the symbol. Hold down the Option/Alt key, and drag the atomic symbol to the right. Repeat this action four times until several atomic symbols surround the original, as shown in Figure 23.24.
Release objects to layers. Choose Window
Export to SWF. Choose File
Set export options. Clicking Save opens the Adobe Flash (SWF) Format Options dialog box, shown in Figure 23.26. Within this dialog box, set the Export As option to AI Layers to SWF File. This makes each layer a separate SWF frame. Also enable the Protect from Import option. Then open the Advanced panel, and enable the Clip to Artboard Size and Looping options. Finally, set the Image Format to Lossless with a Resolution of 72 ppi. Then click OK.
View the animated SWF file. Locate the saved
Atomic Symbol animation.htmlfile in the Finder (Mac) or in Explorer (Windows), and double-click it. This launches the default Web browser for your system and displays the animated SWF file.

Note
To import the SWF file in an Acrobat PDF document, use the Movie tool and double-click in the Document pane. The Add Movie dialog box opens. Click the Choose button in the Add Movie dialog box, and locate the SWF file. Click the filename, and click Select. The SWF document is added as a movie clip.

After you create an SWF file, you can use it to enhance a Web page in Dreamweaver. You add SWF files to a Web page as objects by dragging them from the Layout tab of the Insert toolbar or by using the Insert
After you have an SWF file saved on your hard drive, you can add it to a Dreamweaver Web page by dragging the respective SWF object icon from the Insert panel and dropping it on a Web page at the position where you want the SWF file to appear. You also can insert SWF files using the Insert
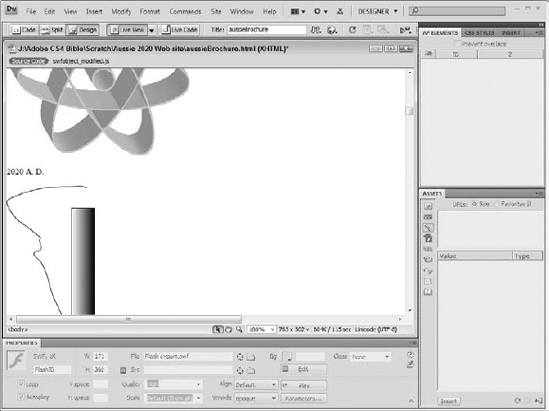
Dropping an SWF object onto a Web page displays an object icon. These object icons are placeholders for the file, and you can resize them by dragging their borders. The properties for the selected object also display in the Properties palette. Figure 23.27 shows a blank Web page with an SWF object dropped onto it.
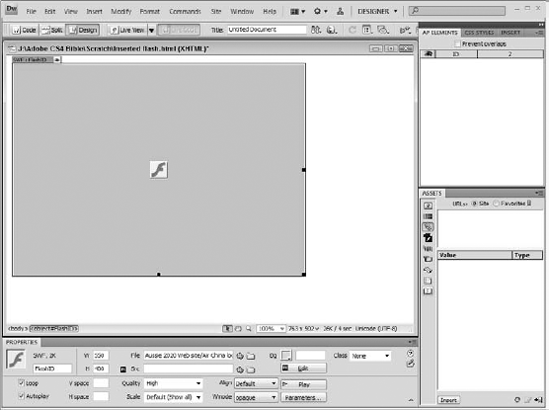
After you select the command to load a Flash object, a file dialog box appears where you can specify the object. The filename then appears in the Properties palette, and the file loads into the Web page within the Design view. The size of the loaded SWF file is set automatically when the object is loaded.
When the SWF object is selected in the Web page, the Properties palette includes several unique settings:
Edit: The Edit button opens the designated file within Flash where it can be modified as needed.
Note
When you click the Edit button, you must navigate to the original .FLA file to edit the file in Flash. After this file is located, you can get roundtrip editing, but you need to use the Done Editing button in Flash to generate a replacement SWF when you're finished.
Loop: This causes the animation sequence to repeat after it's finished.
Autoplay: This causes any animation associated with the SWF file to begin as soon as the Web page is loaded in a browser.
Quality: You can set this to High, Auto High, Auto Low, and Low. These settings correspond to the appearance of the animation versus the playback speed. The Low setting sacrifices the quality of the animation frames in order to play back the animation at the target frame rate. The Auto High and Auto Low settings work to maintain image appearance and playback speed, respectively, while improving the other when it can.
Scale: This setting determines how to handle the display of SWF files where the size specified on the Web page is different from the size of the actual SWF file. The Default setting maintains the aspect ratio of the original file within the designated Web page area. This causes borders to appear on two sides of the SWF object. The No Border option also maintains the aspect ratio of the SWF file but crops the file so no borders appear. The Exact Fit option stretches the SWF file to fit within the given area. This may distort the SWF file.
Play: This button plays the animated file. It changes to a Stop button when enabled.
Parameters: This option opens a dialog box where the defined parameters for the Flash file are displayed.
STEPS: Adding an SWF File to a Web Page
Open a Web page in Dreamweaver. Within Dreamweaver, choose File
Insert the SWF objects to the Web page. With the Web page open, select the Insert
Preview the SWF file. With the Flash object selected, click the Play button in the Properties panel to preview the animation. Figure 23.29 shows the Web page with the file loaded.
Set the SWF properties. With the SWF object selected, enable the Autoplay and Loop options and set the Quality setting to Auto Low. This ensures that the playback speed stays constant.

Acrobat offers you two interesting ways to import SWF files in PDF documents. One method is to convert animated Web pages containing SWF files to PDF documents. The other use for SWF with PDFs is to import the motion graphics directly in a PDF file as a movie-file import. Depending on your source files and the content you want to create in Acrobat, you'll find benefits using both of these methods.
You can convert Web pages to PDF using the File
Acrobat 6 and greater viewers support two different media compatibilities. You can import a variety of media files using either the Acrobat 5 compatibility or Acrobat 6 compatibility. A few differences between the two compatibility levels are that you can embed Acrobat 6–compatible media in the PDF document and more media formats are supported. When you convert Web pages or import SWF files, the files are imported as Acrobat 6–compatible media and either embedded or linked to a PDF file. You have no option for importing SWF files as Acrobat 5–compatible media.
To convert a Web page to a PDF document, choose File
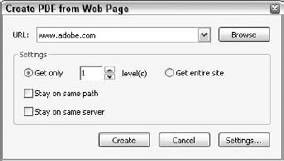
The Create PDF from Web Page dialog box has the following options:
URL: To select a Web site, type the URL in the URL field box or click the Browse button to select a Web site stored locally on your hard drive or network server.
Settings section: You have the following options:
Get only/Get entire site: You can select linked pages according to the number of levels contained on a Web site, or you can convert the entire site to PDF. Note that if you convert more than one level or use the Get Entire Site option, you can convert an extraordinary number of pages. When converting Web sites you aren't familiar with, be certain to gradually convert pages rather than the entire site to avoid creating PDFs of extraordinary size.
Stay on same path/Stay on same server: These options prevent linked Web pages from other sites and servers being converted to PDF, thereby keeping your resultant PDF smaller in size with less clutter. Obviously, if you need linked pages to be converted to PDF, you'll want to reach out to other servers and levels. You can always return to the PDF file and append more pages if needed.
Any SWF files included in the converted Web pages are added to the final PDF document. You can embed the SWF files in the PDF document or link the files to the PDF. Either way, you can select, copy, and paste them between PDF files.
Note
You can embed or link multimedia files, including SWF, to a PDF file. By default, the media is embedded in the PDF during HTML-to-PDF conversion. If you want to link the files, click Settings in the Create PDF from Web Page dialog box. In the Web Capture dialog box, scroll the list and select HTML. Click the Settings button, and the HTML Conversion Settings dialog box opens. From the Multimedia pull-down menu, select Reference Multimedia Content by URL. The file is then linked to the PDF.
If you want to convert a Web site containing an animated page using an SWF file, convert the file and use either the Movie tool or the Select Object tool in Acrobat to select the movie frame. Copy the file by choosing Edit
Note
SWF files can be viewed in PDF documents, but SVG files are not supported in Acrobat. As of this writing, you cannot convert SVG files to PDF nor import them in existing PDFs.
You use the Movie tool to import SWF files into Acrobat PDFs. If you convert Web pages to PDF, you need to copy and paste SWF files using the Video tool or the Select Object tool to select the movie frame and copy the file. However, you cannot export the frame back to an SWF file for use in HTML documents or for viewing in standalone SWF viewers. If you create an SWF file in either Flash or Illustrator, you can import the SWF file directly into a PDF document.
To import an SWF file, click the Movie tool in the Advanced Editing toolbar. You can either drag open a rectangle frame or double-click the Video tool in the Document pane. Either action opens the Add Video dialog box. In the Add Video dialog box, click the Browse button and locate a SWF file to add to the document. Then click OK, and the SWF appears in the PDF.
Note
InDesign also supports SWF placement within its documents.
You have the following options in this dialog box:
Adobe Compatibility options: The first two items let you choose either Acrobat 5 or Acrobat 6 compatibility. If you select Acrobat 5 (and Earlier) Compatible Media, Acrobat won't recognize the SWF files on your computer as you try to import them into the open PDF document. You need to select Acrobat 6 (and Later) Compatible Media and click the Choose/Browse button to open the Select Movie File dialog box where movie files are identified for importing. You select the file and click the Select button; the file is imported into the PDF document. After importing the movie file (including SWF files), you're returned to the Add Movie dialog box.
Snap to content proportions: This keeps the movie frame proportional as you size it, thereby preventing distortion when playing the movie.
Embed content in document: This offers an option to either embed the content (when the check box is enabled) or create a link to the file (when the check box is disabled). If you uncheck this box, the movie file needs to travel along with the PDF document as you send the file to other users.
Poster Settings: These settings have to do with the visual contained within the movie frame known as the movie poster. You can choose to use no poster, create a poster from the first frame in the movie, or create a poster from a file. When creating posters from files, you click the Choose/Browse button to navigate your hard drive to locate the image you want to use as the poster. Any file compatible with Create PDF from File can be used as a poster image. Select the file you want to use, and it's converted to PDF and placed as the contents for the movie frame. As the movie plays, the poster disappears; it returns after the movie stops playing.
After using the Movie tool and importing an SWF file or other type of movie file, you can adjust various properties for the movie and the playback in Acrobat. To open the Properties dialog box, select either the Movie tool or the Select Object tool and open a context menu on the movie frame, or double-click with either tool on the movie. Select Properties from the menu options, and the Multimedia Properties dialog box opens, as shown in Figure 23.31.
The default pane that appears when opening the Multimedia Properties dialog box is the Settings pane. To edit various options for the movie play, click the Edit Rendition button. The Rendition Settings dialog box, shown in Figure 23.32, opens. In this dialog box, you have a considerable number of choices to describe attributes for playing media files.
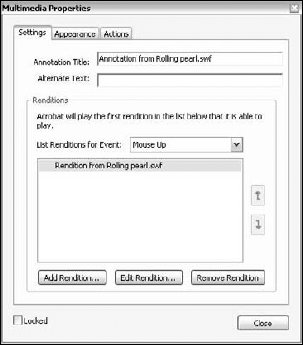

Of particular importance to many users are the settings found in the Playback Settings pane. Click Playback Settings at the top of the Rendition Settings dialog box, and the pane shown in Figure 23.33 opens.

If you want to show player controls where a media clip can be stopped, paused, restarted, and so on, check the box for Show player controls. After exiting the Renditions Settings dialog box, you'll see a player control appear at the bottom of the movie frame.
The rendition settings offer you much more than controlling the media play with player controls. You can create several renditions in the same PDF document and identify what rendition is played according to download speeds for different users. For example, users who have modem connections at 28.8 baud can receive and view a small media file, while users with DSL and cable-modem connections can view media clips of larger sizes. You can create renditions that play according to user download speeds, where Acrobat analyzes a user's connection and delivers the media defined for the respective speed. Other options in the rendition settings offer choices for where media is played within the document, embedding or linking options, associating JavaScripts with media plays, timing movie plays for a given length of time, foreign-language selections, showing subtitles, and much more.
Note
For a detailed review of multimedia and PDF files, refer to the Adobe Acrobat 9 PDF Bible (published by Wiley).
Keep in mind that the SWF files you create in Illustrator are ultimately media clips. They're handled in Acrobat and assigned properties, as any movie file would be.
Flash is the primary tool for creating SWF files.
Flash includes some powerful drawing and animation tools.
You can use Illustrator to export graphics to SWF files or copy and paste artwork directly from Illustrator and Photoshop into Flash.
You create SWF animation sequences in Illustrator by placing the objects for each frame on a separate layer. These layers convert to frames during export.
You can separate several objects included on a single layer in layers using the Layers palette's Release to Layers command.
You place SWF objects within Web pages using Dreamweaver.
You convert Web pages containing SWF files into PDF documents using Acrobat's File
You import SWF files into PDF documents using the Movie tool. As movie clips, you can assign SWF files a number of different play options and rendition settings.