The best way to understand the possibilities that the various Creative Suite applications offer is to walk through an example workflow that takes a project through each of the various applications. This tour starts out with Acrobat, where you can create a PDF file of an initial sketch that you can e-mail to all members of the creative team for review. The reviewers' feedback return is in the form of comments compiled within a single PDF file. This cycle continues until all members of the creative team approve the design.
With an approved design, you can use Photoshop and Illustrator to create and edit images and objects for the project. You can then import all this content into InDesign, where you lay them out with text. The final layout is then exported back to Acrobat, where you can print it or repurpose it for use on the Web using Dreamweaver and Flash.
When a project first starts, you typically want to get input from several individuals on the creative team before the design is approved. Calling a meeting where all members of the creative team meet to discuss the design would accomplish the goal, but Acrobat makes another solution possible.
Using Acrobat, you can scan a rough design sketch into Acrobat where it is converted to a PDF file. Then you can e-mail this PDF file to members of the creative team. Each member of the team makes his comments into the PDF file and e-mails the document back to its owner. All the comments are then compiled into a single PDF document that provides feedback. This cycle can then be iterated until all involved approve the design.
Note
You can find complete coverage on e-mail review sessions in Chapter 36.
Projects always start with an idea, but to share these ideas with others, you usually sketch them out roughly. You may then scan these rough sketches into a digital format where you can more easily distribute them. Using a scanner or a digital camera, you can directly import sketches or scan images into Acrobat.
STEPS: Scanning a Sketch into Acrobat
Initiate a scan in Acrobat. Within Acrobat, choose File

Set the scanner preferences. After you click Scan, a dialog box for your scanner appears. Select the options appropriate for your sketched image, and click Preview to check the scanning options. If you're comfortable with the preview, click Scan.
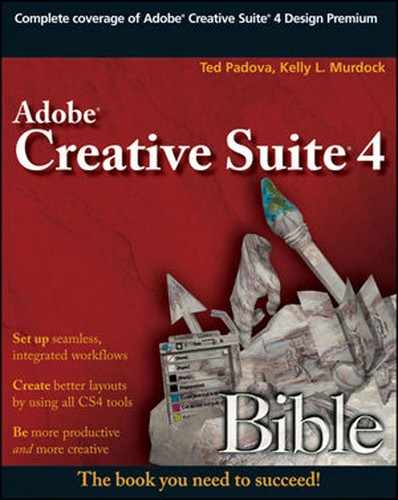
Save the PDF file. After the scanned file is loaded into Acrobat, as shown in Figure 2.2, you need to save the file before you redistribute it. To save the scanned image, choose File

With a sketch scanned into Acrobat, you can send the PDF file out for review using e-mail or using a browser. These steps walk you through an e-mail review cycle. In actual projects, this review cycle may be repeated many times as needed.
STEPS: Submitting a Sketch for E-mail Review
Send a PDF file for e-mail review. To send the selected PDF file out for e-mail review, choose Comments
Specify the reviewers' e-mail addresses. The next step in the Attach for Email Review wizard, lets you enter the e-mail addresses of the individuals you want to review the attached PDF document. Clicking the Address Book button opens a contact manager where you can enter lists of individuals.
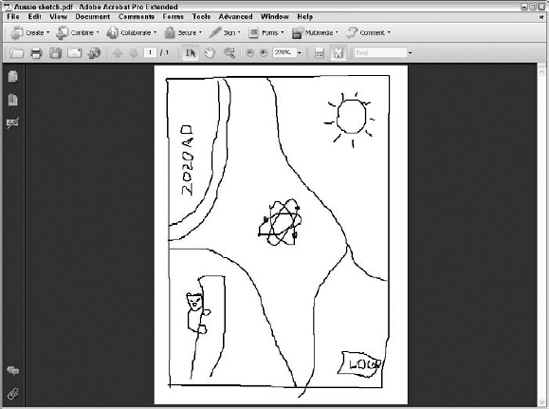
Extending a review invitation. The final step of the Attach for Email Review wizard automatically composes the e-mail subject and message body text for you, as shown in Figure 2.4, but you can edit the e-mail text as desired. When the e-mail addresses and message are completed, click Send Invitation. Acrobat delivers the e-mail message to your system's default e-mail application. If your e-mail system is set to automatically send out e-mails, the e-mail is sent automatically. But if not, you need to send out the e-mails manually.

When a reviewer receives an e-mail requesting feedback, he can double-click the attached file to open it in Acrobat. Within Acrobat, the Commenting toolbar may be used to add notes and comments to the sketch.
STEPS: Adding Comments to an E-mail PDF File
Open an e-mail that you have received and want to review. Using your system e-mail client, the review request is sent out with the PDF file attached.
Note
E-mail reviews can mix comments from Macintosh and Window platforms without any issues.
Open the attached PDF in Acrobat. If you double-click the attached PDF file, it opens within Acrobat. Comments are added to the document using the Commenting toolbar, which opens automatically when a review-enabled PDF is opened. The Commenting toolbar also may be accessed by choosing Tools
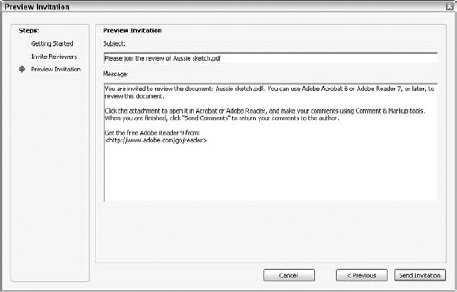
Add review comments to the PDF. Click the Note Tool button in the Commenting toolbar. Click in the document where you want the note to be positioned. A note text area appears where you can type your message. Figure 2.5 shows the sketch document with some review comments added.
Return comments. After you've finished making comments, choose Comments
When the reviewed documents are returned to the original sender, the comments are merged into the original document. These comments may then be summarized and printed.
STEPS: Collecting Review Comments
Merge comments with the original document. When a review PDF file is returned, it also can be double-clicked within the e-mail message to open it within Acrobat. Acrobat recognizes the document as one that was sent out for review and incorporates the comments into the original document. When this happens, a message dialog box appears.
View and print a list of comments. After a reviewed document is merged into the original PDF file, you open the list of comments by clicking the Comments tab to the left. All comments in the PDF file appear at the bottom of the document, as shown in Figure 2.6.
Sort comments. The buttons along the top of the comments list let you set the status of comments and sort them by type, page, author, date, color, or check mark status.
Print comments. To print the comments, click the Print button at the top of the Comments list or choose File

When you have a good idea of the content that needs to be in the final document, you can use Photoshop to edit and prepare the images to be included. These edits can include altering the image properties to adjust the image levels, color balance, brightness, and contrast. Another common way to edit images is to crop the image to the relevant portion. For images that aren't rectangular, you may need to extract a portion of an image. For images that appear on top of other page elements, you'll want to add transparency. All these tasks may be completed in Photoshop.
Note
Many Photoshop editing features are covered in Chapter 10.
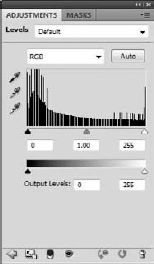
After all the images for the project have been identified, Photoshop's image adjustment features may be used to change the image levels or its brightness and contrast. Adequate contrast is essential for objects that are to be combined with text.
STEPS: Adjusting Image Levels and Contrast
Open an image in Photoshop. Within Photoshop, choose File
Auto-adjust the image levels. With the image selected, open the Adjustments panel with Window
Adjust the brightness and contrast. To change the brightness and contrast of the image, click the Return button in the Adjustments panel and then choose the Brightness/Contrast button. This opens settings with sliders for the Brightness and Contrast values. Set the Brightness value to −35 and the Contrast value to −30. A preview of the settings is shown on the image. This provides ample contrast for the image. Figure 2.9 shows the resulting image.
Save the image. Choose File


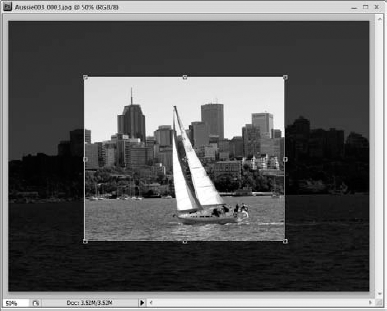
Although the levels and the contrast of the image look good, the image contains some background items that distract from the main image. These unwanted details are easily removed using Photoshop's Crop tool.
Open an image in Photoshop. Within Photoshop, choose File
Use the Crop tool. Click the Crop tool in the toolbar, and drag within the interior of the image. This places a marquee with handles on each edge and corner. Click and drag the handles to precisely position the cropping marquee, as shown in Figure 2.10. Double-click within the cropping marquee to complete the crop.
Save the image. Choose File
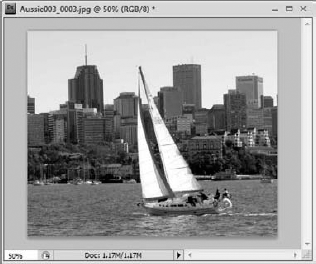
Photoshop includes many different tools for editing an existing image, but some of the most useful are the Clone and Healing Brushes. With these brushes, you can remove unwanted details and generally clean up an otherwise unusable image. In the following steps, the unwanted detail is the reflection off the glass of the cabinet in which the statue sits.
STEPS: Using the Spot Healing Tool
Open an image in Photoshop. Within Photoshop, choose File
Select the Spot Healing tool from the Toolbox. With the Spot Healing tool selected, drag over the areas that you want to fix. In the example, you drag over portions of the sky where some unwanted dots exist. The Spot Healing brush uses surrounding pixels to color over the spots. Figure 2.11 shows the image after the spots have been removed.
Save the image. Choose File
Images included in a design are best edited in Photoshop, but your design also might call for vector-based objects such as logos, maps, and shapes. These objects are easiest to create in Illustrator. For this example, we trace images into objects using the Live Trace feature and create some background objects.
Note
Many Illustrator and Photoshop editing features are covered in Chapter 10 and Chapter 11.
Illustrated elements can add much to a design, and Illustrator's new Live Trace feature makes tracing bitmap images into objects easy. You can define and reuse the Live Trace presets to create unique looks such as cartoons, rough sketches, and technical illustrations.
STEPS: Tracing Bitmap Images with Live Trace
Open a raster image in Illustrator. Within Illustrator, create a new file with the File
Tip
An alternative to creating and placing a file in Illustrator is to locate an image in Adobe Bridge and with the image selected, choose the File
Create a Live Trace object. With the bitmap image selected, click the Live Trace button in the Options bar. This applies the default Live Trace preset. From the Options bar, choose the Color 6 preset. Figure 2.12 shows the results of applying Live Trace to the bitmap image.
Save the image. Choose File

Illustrator's Toolbox includes many tools for creating objects. These objects may be freehand lines drawn with the Pen, Pencil, or Paintbrush tools; straight lines; text; or various shapes, including rectangles, ellipses, polygons, stars, arcs, spirals, and grids.
After you create an object by dragging it in the art board, you can select a fill color or define the width and color of its outline, called a stroke.
STEPS: Creating a Background Object
Open Illustrator. Within Illustrator, choose File
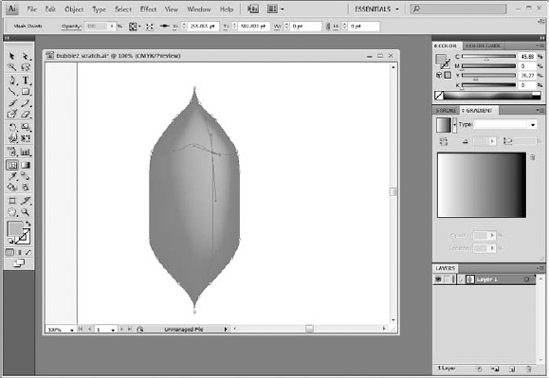
Create an object profile curve. Click the Pen tool in the Toolbox. Then click and drag in the art board to create a profile curve. Select the Direct Selection tool, align the top and bottom points and drag the tangent handles to make the profile curve smooth, as shown in Figure 2.13. The profile curve should have the first and last points aligned horizontally.
Add fill and stroke colors. Open the Appearance panel with the Window
Reflect the object. Select the Object
Align the two halves. Select the View
Join the paths. With the Direct Selection tool, select the two bottom points and choose the Connect Selected End Points on the Options bar. Select the Corner option in the dialog box that appears. Then repeat the same command for the top two points. This makes the object fill span the entire interior space.
Add a gradient mesh. Click the Mesh tool, and select a point on the top half of the object where the light is shining and change its color to a lighter blue. Figure 2.15 shows the final bubble ready to be used as part of the background.
Save the file. Choose File


One common way to distort objects in Illustrator is with effects. Effects are applied to objects in memory, allowing you to edit, remove or turn them on and off anytime using the Appearance palette. A large variety of effects are available in the Effect menu.
Note
Applying Illustrator effects is covered in Chapter 25.
STEPS: Extruding an Object
Open Illustrator and select a file. Within Illustrator, choose File
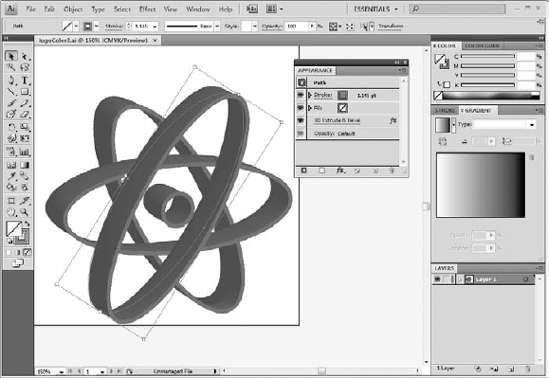
Create the objects. Before you can apply an effect to separate objects, you need to create the objects. For this example, a simple atom is created using overlapping ellipses and a circle in the center.
Extrude the object. With the objects selected, choose Effect
Save the file. Choose File
The best tool to access the volumes of content available in a project is Adobe Bridge. You open Adobe Bridge using the Go To Bridge icon in the upper-left corner of most of the CS4 applications.
Note
Adobe Bridge is covered in more detail in Chapter 6.
After you create a new project, you can easily add files to the project. Simply drag and drop the files from their current location into the Project folder in Adobe Bridge.
STEPS: Accessing Files using Adobe Bridge
Open Adobe Bridge. From within Illustrator, click the Go to Bridge button in the upper-left corner of the interface. This opens the Adobe Bridge interface.
Locate the project folder. Within Adobe Bridge, locate the folder that holds all the edited content from the pane on the left. Thumbnails for all files within the folder display within Adobe Bridge, as shown in Figure 2.17.
Open a file to work with. Select a file within the project file, and right-click the file thumbnail. A pop-up menu appears. Select the Open With option. The submenu lists all the various CS4 applications. You also can drag thumbnails directly to the different CS4 applications.

Tip
If you double-click a file, then it will be opened automatically in its default editor.
After you create all the content for the project using Photoshop and Illustrator, you can use InDesign to lay out the project in preparation for printing. Each object within InDesign is contained within a frame. These frames are easily moved and resized.
Images and objects placed within frames in a layout aren't embedded within the layout but instead are only links to the actual image and object files. This allows the representative images to be updated quickly. When the layout is exported or printed, InDesign looks at content referenced as links and loads the actual linked files into the exported or printed document.
Note
Creating layouts and using master pages are covered in Chapter 36.
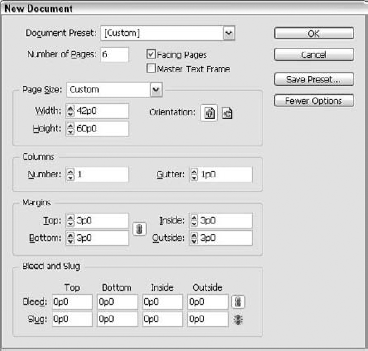
Before the content is placed on the pages, creating a document lets you create all the pages and spreads contained in the project. You also can specify the number of pages as well as the page dimensions, margins, and columns.
STEPS: Creating an InDesign Layout
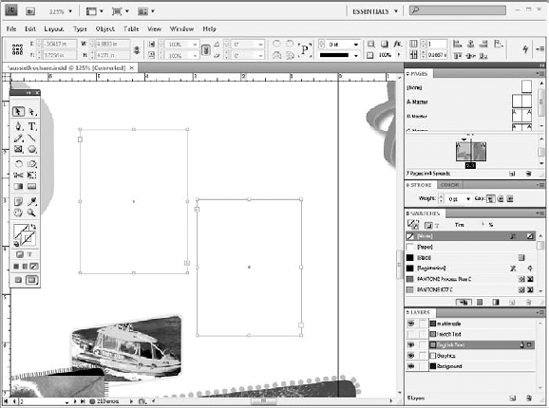
Create a new InDesign document. Within InDesign, choose File
Set the bleed and slug dimensions. While still in the New Document dialog box, click More Options to reveal the fields for setting the bleed and slug dimensions. Set the Top Bleed value to 0.125 inches, and click the Make All Settings the Same button to the right of the Bleed fields. Then set the Bottom Slug value to 0.75 inches, and click OK.
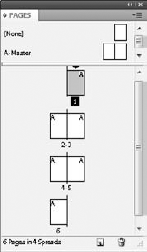
View the layout pages. To see the layout pages, open the Pages palette by choosing Window
Save the file. Choose File
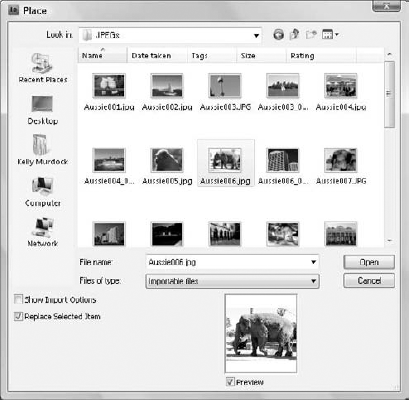
With a layout created, you can begin to import content into the InDesign layout by choosing File
Another easy way to import content is to select multiple files in the Adobe Bridge interface and simply drag them into InDesign.
STEPS: Importing Content into InDesign
Place images from Photoshop. Choose File
Place objects from Illustrator. You also can use the File
Resize the placed object. The placed object appears within a frame. By dragging the handles, you can resize the frame, but the placed object's size doesn't change until you choose Object
Save the file. Choose File

Using Master pages, you can place objects such as page numbers that appear on every page of the document. Master pages are created and accessed using the Pages palette.
STEPS: Using Master Pages
Create a new Master spread. Master pages are defined using the Pages panel. Using the panel menu (which can be accessed by clicking on the small icon in the upper-right corner of the palette), select the New Master palette menu command. In the New Master dialog box, shown in Figure 2.22, type a prefix and a name for the master. Then type 2 as the number of pages, and click OK. The Master appears in the top of the Pages palette.
Apply the Master to pages. With the new Master spread selected in the Pages palette, select the Apply Master to Pages palette menu command. In the Apply Master dialog box that appears, type the page numbers to which you want to apply the Master spread. The Pages palette is updated with the Prefix for the Master spread, as shown in Figure 2.23.
Add page numbers to the Master spread. Switch to the new master page by selecting it in the Pages palette. Select the Type tool, and drag within the Master pages where you want the page numbers to appear. With the text cursor blinking in the text object, choose Type
Save the file. Choose File


You can make text flow continuously from one text frame to another. This process is called threading text. You accomplish it by clicking the small plus icon in the lower-right corner of the text frame and then click another text frame. This small plus icon in the lower right of the text frame is contained within the out port and the similar icon on the upper left of the second text frame is called the in port. The out port turns red when some overflowing text exists in the text frame.
STEPS: Threading Text Across Multiple Text Frames
Create a text frame. Text frames hold text. To create a text frame, click the Type tool and drag in the layout where you want the frames to be located, as shown in Figure 2.24.
Add text to the text frame. With the text cursor blinking in the text frame, type the text into the first text frame. (Or you can select the text that you want to paste from another application like a Word Processor and copy it to the Clipboard. Then, within InDesign, choose Edit
Click the red out port for the first text frame. Then click the second text frame, and the text spills over into the second text frame. Click the out port for the second text frame, and link it to the third text frame until all five text frames are linked, as shown in Figure 2.26.
Save the file. Choose File


When the document layout is complete, InDesign includes some useful features that are helpful as you prepare the document to be printed such as previewing separations and exporting the document as a PDF file.
Note
See Part IX for more on printing using the Creative Suite applications.
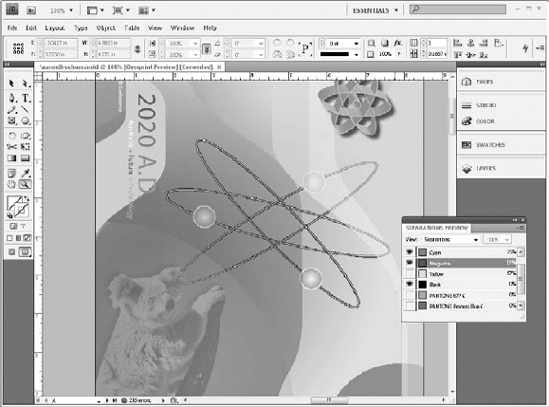
When InDesign documents are printed, they are split into four different passes called separations, one for each color representing Cyan, Magenta, Yellow, and Black (CMYK). These separations are then combined or overlaid to create the finished print. Often, previewing a document's separations prior to printing can help identify potential problems, allowing you to fix these problems before a costly print run. Separations for the current document may be viewed using the Separations Preview palette.
STEPS: Previewing Separations
Open the Separations Preview palette. To open the Separations Preview palette, shown in Figure 2.27, choose Window
View a separation. To see a separation in the layout, click the separation's name and all separations except for the one you click are hidden, and the document is updated to show only the selected separation, as shown in Figure 2.28.


After a print file is exported to the PDF format, you can use Acrobat to soft-proof the print before it is sent to the print house. Acrobat 9 Pro includes some powerful print tools that can detect potential print errors before they occur. These print production tools are located in the Advanced
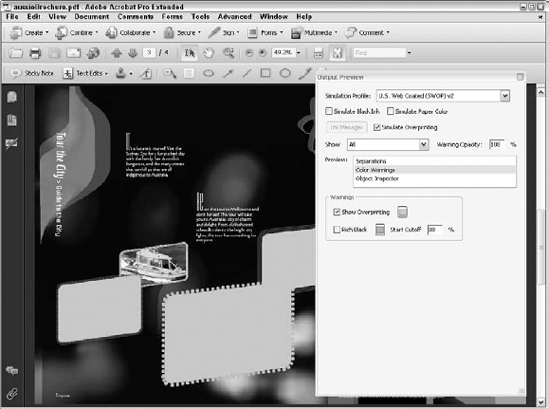
You use the Output Preview tool to check the colors within the current PDF document. Selecting this menu option opens the Output Preview dialog box, shown in Figure 2.30. This dialog box offers options to preview the color Separations and any Color Warnings caused by Overprinting and Rich Black.
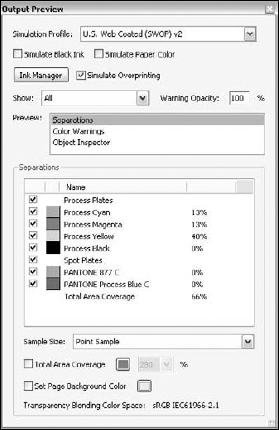
The Convert Colors tool is used to convert RGB, CMYK, and Grayscale color definitions to the target color space. It also lets you embed the color profile within the PDF document.
The Advanced

Adobe is a contributor and supporter of several ISO defined standards for high-resolution print formats. The most aggressive format is the PDF/X format. In order for a document to meet this standard, it must pass a rigorous battery of tests. You can check a document for PDF/X compliance using the Preflight tool, which is accessed using the Advanced
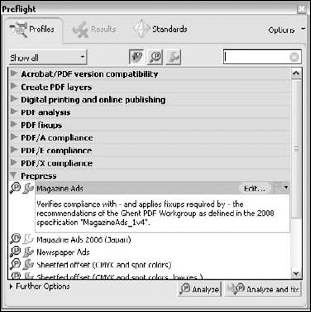
Figure 2.32. The Preflight dialog box is used to check the current document for PDF/X compatibility.
The Preflight dialog box lists the potential errors being checked. Clicking Execute tests the document and displays all noncompliant errors in the Results tab.
STEPS: Checking a PDF Document for Errors
Open Adobe Acrobat. Locate the exported InDesign PDF print document, and open it within Acrobat.
View the Output Preview. Choose Advanced
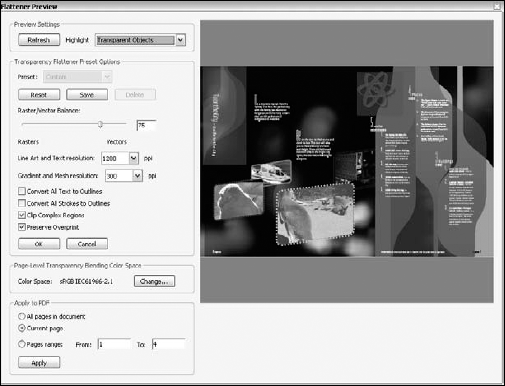
Check the transparency flattening. Choose Advanced
Check the document against the PDF/X format. Choose Advanced

Completed print projects may be repurposed easily and used on the pages of a Web site. By doing this, you won't have to re-create designs specific to the Web. But Web pages require that the elements be optimized to reduce their file sizes.
Creative Suite 4 offers several ways to repurpose designs for delivery on the Web. Acrobat files may be posted online and viewed using an Acrobat Reader plug-in, but before posting existing PDF files, Acrobat's PDF Optimizer feature may be used to reduce the size of the PDF file.
In addition to PDF files, InDesign includes a feature that exports all content elements included in a layout into XHTML documents that can be opened within Dreamweaver where the elements may be reused in a Web page.
InDesign also can export designs to the Flash SWF file format or to the XFL format that can be imported within Flash.
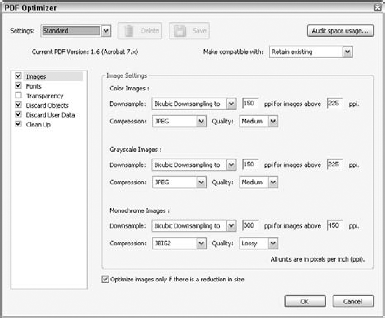
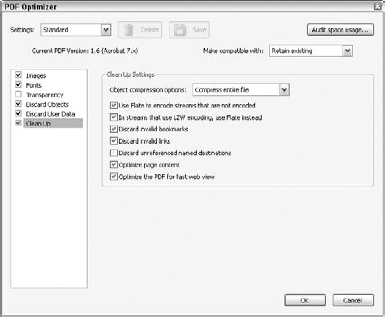
The PDF Optimizer interface in Acrobat includes many settings to downsample images, unembed fonts, and provide several cleanup options.
Note
The PDF Optimizer is covered in Chapter 34.
STEPS: Using the PDF Optimizer
Open the PDF Optimizer. With the file that you want to optimize open in Acrobat, choose Advanced
Audit space usage. Before changing any of the options, click Audit Space Usage at the top of the dialog box. Acrobat computes the size of all the various objects found in the PDF file and reports them in a Space Audit dialog box, shown in Figure 2.37.
Configure image downsampling. In the Images panel, select the Bicubic Downsampling option of 72 pixels/inch for all images above 72 pixels/inch. Then enable JPEG Compression with a Medium quality setting.
Specify cleanup options. Select the Clean Up panel, shown in Figure 2.38, and enable all the Remove and Discard options, making sure the Optimize the PDF for Fast Web View check box is enabled. Then click OK. In the file dialog box that opens, give the file a name and click OK.

InDesign documents may be exported and saved for use in Dreamweaver. This can make all images and objects in the design be downsampled and compressed and moved into a folder where Dreamweaver can reference them. How the images are optimized is customizable.
Note
More details on exporting content to Dreamweaver are covered in Chapter 26.
STEPS: Exporting an InDesign Layout for Dreamweaver and SWF
Open an InDesign document. Choose File
Select the Export command. Choose File
Set the Export options. After a folder is selected, the XHTML Export Options dialog box, shown in Figure 2.39, appears. Using this dialog box, you can specify the look of the bullet and number lists and whether the entire document is exported or just the selection.
Set the Image options. Click the Images option in the left list to open the Images settings panel, shown in Figure 2.40. In this panel, you can specify how the layout's images get converted to the GIF or JPEG formats.
View the exported file in Dreamweaver. After you click the Export button, all the elements used in the layout are copied to the designated HTML file and all the converted images are copied to a subfolder. If you open the exported file in Dreamweaver, you can see the various images, text, and chart elements, as shown in Figure 2.41.
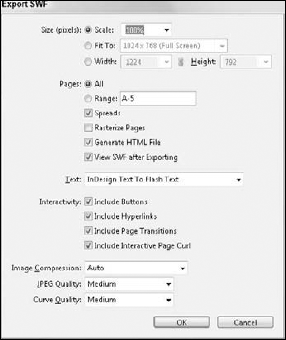
Export to SWF. To export to the SWF format, select the File
View the exported SWF file in a Web browser. Once the design is exported to the SWF file, you can open the HTML file to see the resulting file in a Web browser, as shown in Figure 2.43.


To add visual impact to your exported Web pages, you can use Flash to add movies and interactive elements. Flash can produce SWF files that are placed on a Web page. These SWF files require the Flash player be installed in the Web browser to view the Flash elements, but adding the Flash player is a simple installation and a common element for most browsers.
Note
Flash is an extensive product and coverage of Flash within this book is limited, but you can find the basics of using Flash in Chapter 23.
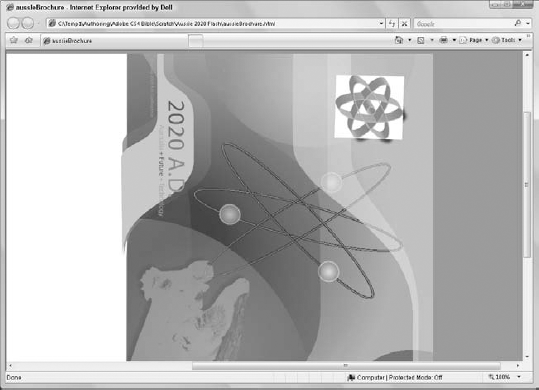
Figure 2.43. After the exported SWF file is opened in a Web browser, you can check how effective the export was.
STEPS: Adding an animated item to a Web page
Open Flash and load content. With Flash open, choose File
Move the logo to its initial location. With the Selection tool, drag the logo to its initial position.
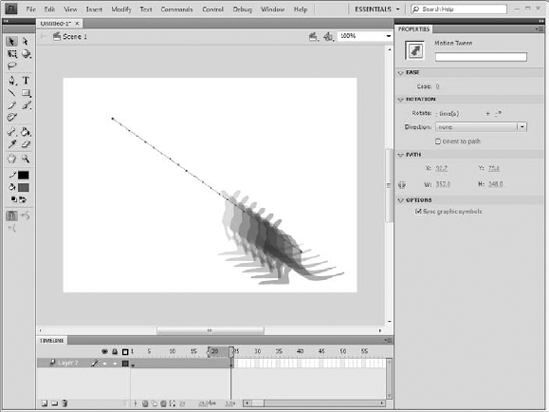
Create a motion tween. Right-click the kangaroo logo and select the Create Motion Tween option. A dialog box appears asking if you want to convert this item to a symbol. Click Ok to continue. Flash creates the necessary keys and the motion tween.
Position the logo's end location. Drag the logo with the Selection tool to its ending location. Drag the red frame marker to see the logo move between these two positions.
Enable onion skinning. Click the Onion Skin button at the bottom of the Timeline panel to see the intermediate positions of the logo, as shown in Figure 2.44.
Publish the resulting animation. When the final animation looks fine, save the file as an FLA file so you can work on it again in the future. Then select File
Sketched ideas may be scanned directly into Acrobat and saved as PDF files.
PDF files may be submitted to reviewers by using e-mail. Reviewers can use Acrobat to enter comments into the PDF file, and those comments are returned to the original sender.
Photoshop is useful for editing images including adjusting image properties, cropping, extracting, and editing images.
Illustrator objects also are useful for enhancing a design. Using Illustrator's features such as Live Trace, fills, strokes, effects, and 3-D extruding, many interesting objects may be created.
Adobe Bridge provides direct access to project assets including thumbnails.
Content from multiple sources may be compiled and laid out in InDesign in preparation for printing and exporting.
InDesign's Master pages let you place common elements that appear on multiple pages.
Acrobat's print production tools are useful for soft-proofing documents.
Using the PDF Optimizer found in Acrobat, complex PDF files may be significantly reduced in size.
InDesign files may be exported for use in Dreamweaver making it possible to repurpose layouts for use on the Web.
Flash is used to add animated and interactive elements to Web pages.