After you select objects, you can easily move them by clicking and dragging them to a new location. You also can move selected images using Photoshop's Move tool, but there is much more to transforming than just dragging an object or image to a new location.
The CS4 applications include many different ways to transform objects and images. You also can use the bounding box that surrounds a selection to rotate and scale an object. Understanding the visual cursor cues allows you to transform objects without bothering with tools or menus.
Within the Photoshop, Illustrator, InDesign, and Flash toolboxes are several tools that are used to transform objects, such as the Rotate tool, the Scale tool, the Reflect tool, the Shear tool, and the Free Transform tool. If you choose Object
In addition to covering altering a selection's position and orientation, this chapter also discusses stacking order, alignment, and distribution, all of which are nothing more than special transformation cases.
Objects are found in most of the CS4 applications. The various transformation methods let you place those objects into the precise location needed to create an appealing design. Acrobat and Dreamweaver are the oddballs among the group. In Acrobat, you can rotate pages and you can move objects, but you have no options for transforming objects on a PDF page. Dreamweaver allows only the placement of layers, and transformations of these layers are limited. The remaining CS4 applications offer you tools and methods for transforming objects.
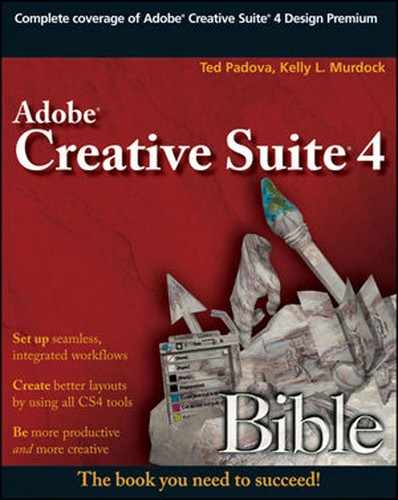
A selected object or group is identified by a bounding box that surrounds the object. The color of this bounding box is the layer color. If multiple objects are selected, the bounding box encompasses all the selected objects, as shown in Figure 12.1.
Note
Selecting objects is covered in Chapter 9.

Figure 12.1. Selected objects are surrounded by a bounding box, which is the same color as the layer where the object appears.
You can move and scale even the simplest objects in most of the CS4 applications using the bounding box. Clicking inside the bounding box and dragging moves the selected object. Dragging on one of the handles that surrounds the object scales its size. But these actions are common features, and the bounding-box features covered next enable a wider range of transformations.
Perhaps the easiest and certainly the quickest way to transform objects is to use the selection's bounding box. You can use bounding-box transformations in Illustrator, Photoshop, InDesign, Flash, and Dreamweaver (except for rotate).
For all these applications, the bounding box is always rectangular and includes transformation handles at each corner and along each edge. By dragging these handles, you can scale or rotate an object using the Selection tool. Dreamweaver lets you scale objects, but doesn't let you move or rotate objects.
Note
In Illustrator, you can hide the bounding box by choosing View
To move selected objects, you simply need to click the object's path or fill and drag it to its new position. If you drag an object with the Option/Alt key held down, then a duplicate copy of the original object is moved and the original copy stays in its place. Holding down the Shift key while dragging an object constrains it to move along regular 45-degree angles. The Preferences dialog box includes a setting for the Custom Constrain Angle if you want to constrain the angle with the Shift key to something besides 45 degrees.
In addition to dragging with the mouse, you also can move objects using the arrow keys. The distance that the object moves when pressing each arrow key is determined by the Keyboard Increment value set in the General panel of the Preferences dialog box, shown in Figure 12.2. The default is set to 1 point. Holding down the Shift key while pressing an arrow key moves the selected object ten times the increment value.
Snapping Objects
You can control where an object moves in Illustrator by choosing View
If the Snap to Grid option is enabled, the corner points of objects that are moved snap to align with the grid intersection points. This enables you to precisely position objects relative to one another. Make grids visible by choosing View
The Snap to Point option aligns the point under the cursor when the selected object is clicked to the anchor point of another object or to a guideline. The cursor turns white when it's over a point to which it can snap.
Photoshop, InDesign, and Flash also include snapping options. In Photoshop, you can select to snap to Guides, Grids, Slices, or Document Bounds using the View
Note
In InDesign, you can use the Ctrl/
Note
For more information on adjusting preferences, see Chapter 3.

When you move the Selection tool cursor near one of the bounding-box handles, the cursor changes. When the cursor looks like two small arrows and a curved line, you can drag the object to rotate it about its center point. Figure 12.3 shows three selected objects in Illustrator being rotated by dragging on the bounding box when the rotation cursor is visible.
Rotating an object also rotates its bounding box. If you want to reset the bounding box in Illustrator, you can choose Object
When objects are selected in Photoshop, a Reference Point is positioned within the center of the object. If the object is moved or scaled, the reference point remains in the center, but if you click and drag, you can reposition the reference point. This reference point is used to define the center about which the object is rotated. It can be positioned anywhere within the canvas.
Note
When an object is selected within InDesign, its bounding box doesn't enable rotation. InDesign objects can be rotated using the Object

Positioning the cursor directly over one of the bounding-box handles changes it to a double-headed arrow, and dragging the object with this cursor scales the object, as shown in Figure 12.4. If you drag a corner, the object scales horizontally and vertically; if you drag one of the segment midpoint handles, the object scales in a single dimension.
Holding down the Shift key while dragging one of the corner handles constrains the scaling to be uniform so that no distortion is introduced. Holding down the Option/Alt key while dragging, scales the object about the center of the bounding box. Figure 12.5 shows an object that has been scaled with the Shift and Option/Alt keys held down. Notice how all objects have been scaled equally from the center outward.

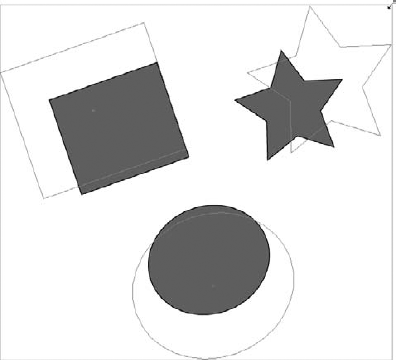
Figure 12.5. Scaling objects with the Shift key held down maintains the proportions of the object; with the Option/Alt key held down, it scales the objects about the selection center.
If you drag one of the handles through the object to its opposite side, the object is reflected about the bounding-box sides through which it was dragged.
The third section of tools in both the Illustrator Toolbox and the InDesign Toolbox includes several tools that you can use to transform objects. These tools include the Rotate, Scale, Reflect, Shear, and Free Transform tools, as shown in Figure 12.6. In InDesign, the Reflect and Rotate buttons are in the Control panel.
Note
The Shear tool is located as a flyout under the Scale tool and the Reflect tool is a flyout under the Rotate tool in Illustrator. InDesign doesn't include a Reflect tool.

Double-clicking any of these tools opens a dialog box where you may enter precise values.
When the Rotate tool is selected, the rotation center for the selected object, called the reference point, is positioned in the center of the object as indicated by a small circle icon with four small lines extending from it, as shown in Figure 12.7. Dragging in the art board rotates the selected object, but if you click in the art board with the Rotate tool, you can position the rotation center. Any dragging then rotates about the new rotation center. Holding down the Shift key rotates the selected object using 45-degree increments.

If you double-click the Rotate tool or choose Object

The Scale tool works like the Rotate tool in that the scale point is positioned initially in the center of the selected object, but by clicking the art board, you can place it in a different location. Dragging up and down scales the selected object in the vertical direction; dragging left and right scales the selected object in the horizontal direction about the scale point. Holding down the Shift key while dragging at a 45-degree angle constrains the scaling, making it uniform or equal both horizontally and vertically.
Double-clicking the Scale tool or choosing Object

The Reflect tool allows you to flip the selected object about an axis. To select the axis about which to flip the selected object, click once to place one point of the axis line and click a second time to define the second point of the axis line. When you click a second time, the selected object is reflected about this line. Figure 12.10 shows several selected objects that have been reflected about an imaginary axis created by clicking two times in the art board.
If you hold down the Option/Alt key while clicking the second point, a copy of the original object is reflected. If you drag after clicking the second point, you can control the position of the reflected object; holding down the Shift key constrains the axis to 45-degree increments.
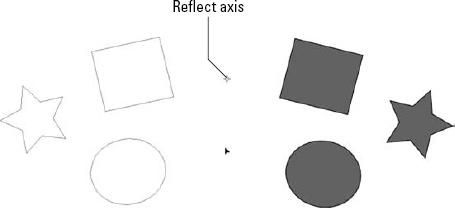
Figure 12.10. The Reflect tool mirrors the selected object on the opposite side of a designated axis.
Note
The Reflect tool is available in Illustrator as a flyout under the Rotate tool, but you can flip and reflect objects in InDesign using the Control panel buttons and in Photoshop using menu commands.
The Reflect dialog box, shown in Figure 12.11, opened by double-clicking the Reflect tool or by choosing Object

The Shear tool is a flyout under the Scale tool in Illustrator and InDesign. It lets you distort the selected object by moving the opposite bounding-box edges in opposite directions. Dragging up and down shears the object vertically; dragging left and right shears the object horizontally. Clicking twice in the art board lets you place a shear axis, just like with the Reflect tool. If the shear axis is located below an object, the entire object slants in the same direction with portions farther from the shear axis being sheared to a greater extent. Holding down the Shift key maintains the height or width of the object as it's sheared. Figure 12.12 shows several objects that have been sheared to the right. The square background was added to make the shear effect more obvious.

Figure 12.12. Placing the shear axis below the object causes the entire object to be sheared in one direction.
The Shear dialog box, shown in Figure 12.13, lets you specify a shear angle and the shear axis as horizontal, vertical, or a specified angle.

The Free Transform tool enables you to perform all the transformations with a single tool. In many ways, it works just like the bounding box, but it has some additional features built in. Moving, rotating, scaling, and reflecting work just like with the bounding box, but you also can shear an object by holding down Ctrl+Alt (
Note
In Photoshop, you can enable free transformation of paths using the Edit
Another unique feature of the Free Transform tool is that you can distort the selected object by moving a single bounding box corner without moving any of the other corner points. To do this, start dragging a corner handle and then press the

Figure 12.14. You can distort the bounding box by moving a single corner handle by holding down the
You also can use the Free Transform tool to alter perspective by moving two corner points at the same time. You can accomplish this by dragging a corner point and then holding down Shift+Ctrl+Alt (Shift+

Figure 12.15. Dragging a bounding box corner handle with the Free Transform tool while holding down Shift+Ctrl+Alt (Shift+
Note
The Free Transform tool has no dialog box that opens when you double-click the tool.
STEPS: Transforming in Illustrator
Create a symbol. Create a sample object in Illustrator, or drag an object from the Symbols palette. The symbol for these steps comes from the Logos Symbol Library accessed by choosing Window

Select the object. With the Selection tool, click the symbol to select it. A bounding box surrounds the selected object.
Create several duplicate copies. Click the symbol, and begin to drag it downward. Then press and hold down the Shift and Option/Alt keys to create an aligned duplicate underneath the original. Repeat this step until six planets are aligned, as shown in Figure 12.16.
Use the Rotate tool. Select the second planet, and double-click the Rotate tool. In the Rotate dialog box, set the Angle value to 60 and click OK. The second planet is rotated so its rings are almost vertical.
Use the Scale tool. Select the third planet, and double-click the Scale tool. In the Scale dialog box, select the Non-Uniform option and set the Horizontal value to 60% and the Vertical value to 120%. Then click OK.
Use the Reflect tool. Select the fourth planet, and click the Scale tool. Click to the right of the planet, and click again directly below the first click to form a vertical axis. Drag with the Option/Alt key held down to create a reflected duplicate of the planet to the right.
Use the Shear tool. Select the fifth planet, and double-click the Shear tool. In the Shear dialog box, enter 45 for the Shear Angle and choose the Horizontal axis. Then click OK. The planet is elongated by fitting it into a stretched bounding box.
Use the Free Transform tool. Select the sixth planet, and choose the Free Transform tool. Drag the upper-right corner while holding down the Option/Alt key to scale the object about its center. Figure 12.17 shows all the resulting transformed planets.


The Object

Figure 12.18. The Move dialog box lets you specify an object's horizontal and vertical position values or move an object a given distance along a specified angle.
Photoshop also includes several menu commands for transforming paths. These are located in the Edit
Choosing Object
For example, if you select and move an object downward with the Shift and Option/Alt keys held down, the result is a duplicate copy of the object that is positioned directly under the first. After this is done, you can use the Transform Again menu command to quickly create a whole column of objects.
A similar command is found in Photoshop, Edit
STEPS: Creating an Array of Objects in Illustrator
Create an object to duplicate. Create or select an object that you want to duplicate many times in a repeating pattern. A simple symbol like this planet may be used.
Select the object. With the Selection tool, click the symbol to select it. A bounding box surrounds the selected object.
Create a single duplicate copy. Click the symbol, and begin to drag the symbol downward. Then press and hold the Shift and Option/Alt keys to create an aligned duplicate underneath the original.
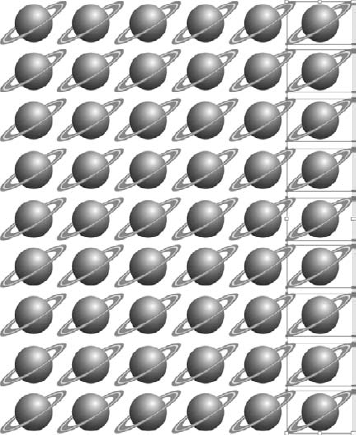
Use the Transform Again command. Choose Object
Select the column of planets. With the Selection tool, drag over the entire column of planets to select them all.
Create a duplicate column. Begin to drag the selected planets to the right, and then press and hold down the Shift and Option/Alt keys to constrain the movements of the planets to the horizon, and the Option/Alt key creates a duplicate column of planets.
Use the Transform Again command. Choose Object

Tip
Another technique to accomplish this same task in InDesign is to use the Edit
The Transform Again feature also is found in InDesign. Every transformation applied to an object is remembered and can be reapplied to another selection using the Object
The Transform Again menu in InDesign includes four options:
Transform Again: This option applies the last single transformation to the selected object, not to the individual objects within the selection.
Transform Again Individually: This option applies the last single transformation to all selected objects separately instead of as a group.
Transform Sequence Again: This option applies the last sequence of transformations to the selected object.
Transform Sequence Again Individually: This option applies the last sequence of transformations to all selected objects separately instead of as a group.
In Illustrator, choosing Object
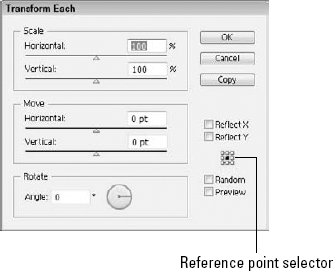
Figure 12.21. The Transform Each dialog box combines the transformation values of several different transformations into a single dialog box.
The small icon underneath the Reflect options lets you select the point about which the selected object is transformed. The selected transformation point is marked black. You can click any of these points to specify the transformation point, which could be the object center, any object corner, or any object side.
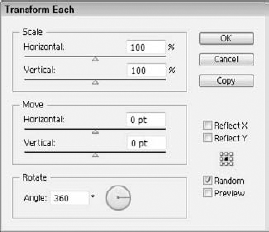
The Random option chooses a random value between the default value and the specified value and applies the transformation using these random values. To see some of the random possibilities, enable and disable the Preview option multiple times to see some of the random transformations. Figure 12.22 shows many random stars created using the Random option in the Transform Each dialog box.

Figure 12.22. Enabling the Random option in the Transform Each dialog box produced a varied assortment of stars.
STEPS: Creating a Flower in Illustrator
Create a simple path. Click the Paintbrush tool, and drag in the art board to create a simple, mostly vertical line. In the Stroke palette, set the Weight to 3 pt, select the Round Cap button, and set the color to a dark red, as shown in Figure 12.23.
Open the Transform Each dialog box. Choose Object
Create duplicate objects. With the duplicate selected, reopen the Transform Each dialog box using the Alt+Shift+Ctrl+D (Option+Shift+

Add a flower center. Create a simple circle with the Ellipse tool, and set its fill color to a bright yellow. Then drag the circle to the center of the flower. The resulting flower is shown in Figure 12.25.


You can quickly rotate and/or flip selected objects in InDesign using the commands in the Object
InDesign also includes a feature to rotate the spread view about 90-degree increments.
In addition to the bounding box, tools, and menus, several of the CS4 applications include a Transform palette including Illustrator, InDesign, and Flash.
Illustrator's Transform palette, shown in Figure 12.26 and which you can open by choosing Window
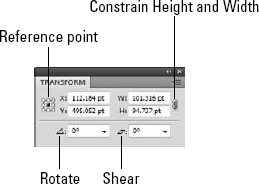
Figure 12.26. The Transform palette displays information about the position and dimensions of the selected object.
The X and Y values denote the horizontal and vertical positions of the reference point selected using the icon at the left of the Transform palette relative to the art board's lower-left corner. For example, if the object's center point is selected and the object is positioned on the page 100 points above the bottom of the art board and 50 points from the left edge, then the X and Y values in the Transform palette would be 100 pt and 50 pt. Changing the X and Y values in the Transform palette moves the selected object. The X and Y values are measured from the upper-left corner in Photoshop, InDesign, Flash, and Dreamweaver, but Illustrator measures X and Y values from the lower-left corner. InDesign also has several different measurement options that deal with the spine positions and spreads.
Note
All the same values found in the Transform palette also are displayed in the Control panel panel in InDesign and in the Properties panel in Flash.
The W and H values denote the object's Width and Height. Clicking the link icon to the right of these values links the values together, so that changing one automatically changes the other. Changing the W and H values in the Transform palette scales the selected object. If the link icon is enabled, changing the values causes the selected object to be scaled uniformly. The Width and Height values are located in the Control panel.
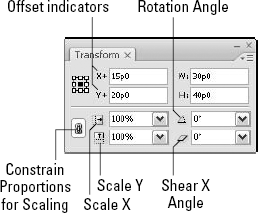
At the bottom of the Transform palette are Rotate and Shear values. Changing these values causes the selected object to be rotated or sheared the given amount. InDesign's Transform palette also includes values for the Scale X and Scale Y Percentage values. These values can be linked to stay equal.
Illustrator's Transform palette also may be used to reflect the selected object using the Flip Horizontal or Flip Vertical palette menu commands. The palette menu also includes an option to Scale Strokes & Effects and options to Transform the object only, the pattern only, or both.
The palette menu options for the Transform palette in InDesign are different than the options in Illustrator. Within InDesign, you can select options to Scale Text Attributes, Transform Group Content, and Reset Scaling to 100%. You also have options to Rotate and Flip the selected object.
At the bottom of InDesign's Transform palette menu are several toggle options that can be enabled including Transform Content, Dimensions Include Stroke Weight, Transformations are Totals, Show Content Offset, and Scale Strokes. The Transform Content option causes the content within the selected frame to be transformed along with the frame when enabled. The Dimensions Include Stroke Weight option changes the Width and Height displayed values to include the stroke weight.
The Transformations are Totals option causes the displayed transformation values to be absolute relative to the document. For example, if a selected image inside a rotated frame also is rotated even further, enabling the Transformation are Totals option displays the image's angle relative to the bottom of the document page, and disabling the Transformations are Total option displays a rotation value that includes the rotation values of both the image and its frame.
The Show Content Offset option is used when content is selected within the frame. It displays the amount that the content is offset from the frame's reference point. When an offset value is displayed, two small plus signs appear next to the X and Y values, as shown in Figure 12.27.
When an object is filled with a solid color, rotating the object has no affect on the fill color. However, if an object is filled with a gradient or a pattern, rotating an object may or may not impact the filled gradient or pattern depending on the setting in the Transform palette.
Using Illustrator's Transform palette menu, you can select to apply a transformation to the object only, the pattern only, or to both. When the Pattern Only option is selected, a small warning icon appears in the lower-left corner of the Transform palette, as shown in Figure 12.28, to remind you that any transformations are applied only to the pattern.
Note
Selecting the Pattern Only option in the Transform palette applies only to transformations that are done using the Transform palette. Transformations completed using the transform tools or by choosing Object

Figure 12.28. A small warning icon appears in the lower-left corner of the Transform palette when the Pattern Only option is selected.
To transform a pattern or gradient using one of the transform tools or the Object
STEPS: Rotating a Pattern in Illustrator
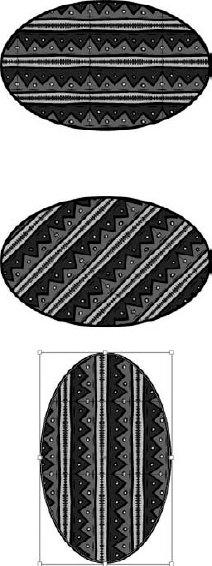
Create a filled object. Select the Ellipse tool, and drag in the art board to create a simple ellipse object. In the Swatches palette, select a striped pattern as the fill. The stripes run horizontally across the ellipse object, as shown in Figure 12.29.
Select and duplicate the object. With the Selection tool, click the ellipse object to select it. Then drag it downward with the Option/Alt key held down to create a duplicate copy.
Create a single duplicate copy. Then choose Object
Enable the Transform Pattern Only option. Choose Window
Rotate the pattern. Select the second ellipse object, and type 45 in the Rotate field of the Transform palette. The pattern within the ellipse is rotated.
Enable the Transform Both option. In the Transform palette menu, select the Transform Both option.
Rotate the pattern. Select the third ellipse object, and type 90 in the Rotate field of the Transform palette. The pattern and the ellipse are both rotated. Figure 12.30 shows the resulting rotations.

When a path or shape is created in Photoshop, it is automatically filled with the Foreground color. This color of the selected object may be changed to a pattern or a fill using the Layer
After a pattern or a gradient is applied to a path or shape, a fill thumbnail appears in the Layers palette next to the Vector Mask. Double-clicking this fill thumbnail in the Layers palette opens the Pattern Fill dialog box again where you can change the Scale value.

Figure 12.31. The Pattern Fill dialog box lets you scale the pattern used to fill an object. A similar scale setting also is available for Gradients.
Note
More on working with layers is covered in Chapter 25.
A pixel selection also may be filled with a pattern using the Layer
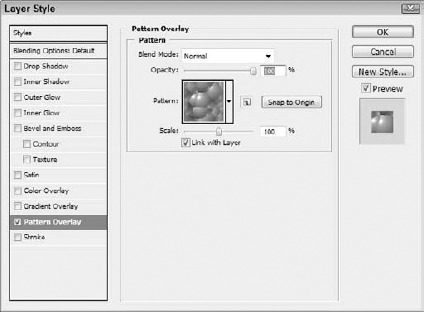
Another way to apply a pattern to a layer is with the Pattern Overlay layer effect. To apply a layer effect, select a layer in the Layers palette and choose the Layer
InDesign is unique in how it handles content positioned within objects because all content in InDesign are placed within containers such as a frame or a drawn object. Images and drawings are added to a document using the File
With a frame that holds some content selected, the Control panel lists the position and dimensions of the selected frame, as well as its Scale, Rotate, and Shear values. From the Object
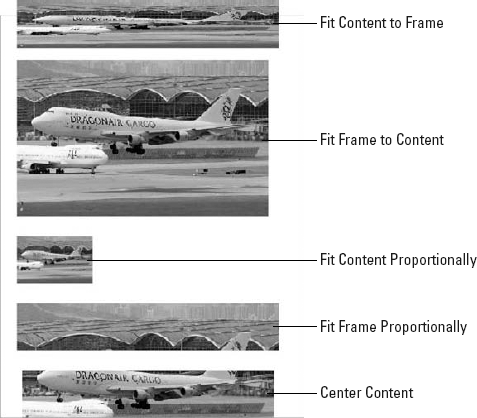
When a filled container is selected, the Object
Fit Content to Frame: Scales the placed image to fit the frame.
Fit Frame to Content: Scales the frame to fit the placed image.
Fill Frame Proportionally: Proportionally scales the frame to fill the image.
Fit Content Proportionally: Proportionally scales the placed image to fit within the frame.
Center Content: Moves the placed image so its center matches the frame without scaling the image.
The keyboard shortcuts are Fit Content to Frame (Option/Alt+
Images in Illustrator and InDesign are contained within objects and may not be selected or edited using pixel selections. But in Photoshop, pixel selections are very common, and they have several tricky aspects when dealing with transformations. One of the key differences between transforming objects and transforming images is that image selections are usually not rectangular, depending on the selection tool that was used. But if the Move tool is selected, a rectangular bounding box is placed about the selection. Using the bounding box, you can move, rotate, and scale the selected pixels in a manner that is the same as that used for objects.
Another key aspect of transforming images is that every time you apply a transformation to a pixel selection, you potentially alter the selection. Applying multiple successive transformations to a pixel selection distorts the pixels. To limit this effect, Photoshop keeps track of all the transformations that are made to a pixel selection at one time. Then when a different tool is selected, a confirmation dialog box, shown in Figure 12.34, appears asking if you want to apply the transformation with buttons for Apply, Cancel, and Don't Apply. By waiting until all the desired transformations are completed before applying them, the number of actual transformations is minimized and the fidelity of the pixel selection is maximized.

Figure 12.34. This confirmation dialog appears after several transformation operations have been combined within Photoshop.
When a selection is made, marching ants surround the selection and show the selected area. If you choose the Select
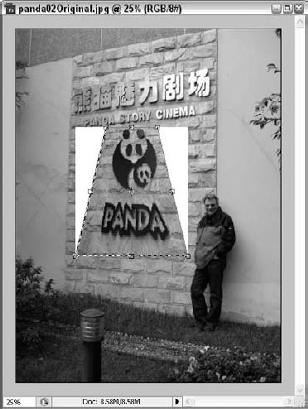
When an area of pixels is selected with one of the Marquee tools, dragging the selection with the Marquee tool has no impact on the pixels; instead, it moves only the selection. To move the selected pixels, you need to select the Move tool. With the Move tool selected, you can click within the selection and drag it to move the actual pixels. Figure 12.35 shows an image where a pixel selection has been moved using the Move tool.

Figure 12.35. Moving a pixel selection with the Move tool can abruptly alter the continuity of an image.
Holding down the Option/Alt key while dragging a pixel selection creates a duplicate copy of the pixels and leaves the original pixels in place. Holding down the Shift key while dragging a pixel selection constrains the movement to regular 45-degree angles.
Photoshop's Edit
This bounding box works just like the bounding boxes used to transform objects. Clicking within the bounding box and dragging moves the selection. Dragging one of the corner or side handles scales the selection; moving the cursor near one of the handles until it changes to a rotation icon allows you to rotate the selection. You also can reflect an object by dragging it through its opposite side.
Holding down the Shift key while dragging a corner handle causes uniform scaling; holding down the Shift key while moving constrains the movements to 45-degree angles; and holding down the Shift key while rotating constrains the rotations to 15-degree increments. To scale opposite handles relative to the reference point, hold down the Option/Alt key while dragging. To move a corner handle independent of the other corner handles, hold down the
With the Free Transform command selected, the values for the various transformations appear on the Options bar, as shown in Figure 12.36. The Reference Point icon lets you select the position about which the transformations take place. The X and Y values denote the position of the reference point relative to the upper-left corner of the image. The W and H values denote the Width and Height of the selection's bounding box. The final three values are the rotation, horizontal, and vertical shear values.
Note
The link icon between the W and H values links the W and H values together so that altering one automatically alters the other. This causes all scaling to be uniform.
In Photoshop, choosing Edit
If remembering all the various keyboard keys to use for the various transformations is tricky, you can select the specific type of transformation that you want to apply to the object from the Edit
The Edit
Photoshop includes a transform feature for changing the perspective of an image selection. With a selection made, choose Edit
Note
Photoshop includes a valuable feature for setting and painting in perspective view called Vanishing Point. This feature is covered in Chapter 13.
You also can set perspective using the Crop tool by enabling the Perspective option in the Control panel. This tool changes the perspective when the image is cropped.
In addition to the Free Transform mode, Photoshop includes another unique transformation method called Warp mode. Warp mode covers the current selection with a grid that you can modify by dragging its control points.
To access Warp mode, choose Edit
Note
If the warp presets look familiar, then you probably remember seeing them in Illustrator's Effects menu or in Photoshop's Type Warp presets. You can see examples of each in Chapter 13.
At the right end of the Control panel are buttons for switching between Warp and Free Transform modes and for canceling or committing the transform. Figure 12.38 shows an image warped with the Squeeze preset.

The order in which objects are displayed or printed is determined by the stacking order in Illustrator and InDesign. This order places the object at the bottom of the stacking order on the document first and then stacks each additional object in order on the document up to the top object based on their layers. If an object that is higher in the stacking order is placed on top of an existing object, and if the top object doesn't include any transparency, the lower object is obscured.
When objects are created, each new object is placed higher in the stacking order than those already created.
The easiest way to control stacking order is using layers. Layers at the top of the Layers palette have a higher stacking order and appear on top of all layers below it. By placing objects on a new higher layer, you may be assured that it appears above the objects on a lower layer.
Note
Layers and the Layers palette are covered in more detail in Chapter 25.
Layers provide a way to control stacking order, but within a single layer, objects may be stacked on top of one another. If you expand a layer in Illustrator by clicking the arrow button to the left of the layer name, all objects within the layer are visible, as shown in Figure 12.39. The expanded objects in the Layers palette are listed in their stacking order with the top objects toward the top of the Layers palette.
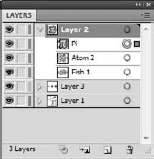
Figure 12.39. You can make all the objects contained on a single layer visible by expanding the layer.
If you select a layer in the Layers palette and drop it above another object, the stacking order is changed.
You also can reverse the order of several objects or layers using the Reverse Order palette menu command in the Layers palette. To use this command, select several adjacent objects or layers by selecting a layer, holding down the Shift key, clicking the last sequential layer, and then selecting the Reverse Order palette menu command.
Illustrator also includes the Object
You also can control an object's position in the stacking order within a layer using the Object
The Object
Bring to Front (Shift+Ctrl+] in Windows; Shift+
Bring Forward (Ctrl+] in Windows;
Send Backward (Ctrl+[ in Windows;
Send to Back (Shift+Ctrl+[ in Windows; Shift+
The Bring to Front and Send to Back menu commands move the selected object to the very top or very bottom of the stacking order, and the Bring Forward and Send Backward menu commands move the selected object forward or backward one place in the stacking order. With these commands, you can quickly arrange the objects within a layer.
Another way to change the stacking order of objects in Illustrator is to copy and paste them using the Edit
If no object is selected or if the Edit
Objects within a group also have a stacking order, but only within Illustrator. You can alter a group's stacking order by expanding the group in the Layers palette and dragging the one object above another, or by selecting an object within the group with the Group Selection tool and using the Object
The concept of objects in Photoshop is much more limited that Illustrator and InDesign, but you can work with objects in Photoshop. However, the stacking order of Photoshop objects is controlled by their layers, except for the Background layer, which always appears at the bottom of the layer's stack.
Flash allows groups and symbols to have a stacking order that can be manipulated, but objects within a layer don't have a stacking order.
Most objects on a Web page cannot be stacked on top of one another. The exception to this rule is Dreamweaver layers, which are called AP DIVs. The stacking order for Dreamweaver layers is determined by a Z-Index value, which is set in the Properties palette for the selected layer. Layers with a higher Z-Index value appear in front of layers with a lower value.
To create aesthetic designs, there are times when you'll want to precisely orient two or more objects together. You can do this by recording the position values of the various objects and then changing those values for one of the objects to align it with the other one, but these can be time consuming if you have lots of objects to align. Instead of a manual process, all the CS4 applications include palettes and controls that make aligning and distributing objects easy.
Commands to align and distribute objects are contained on the Control panel in Photoshop, Illustrator, and InDesign and in the Align palette (shown in Figure 12.40) for Illustrator, InDesign, and Flash. Dreamweaver offers align commands in a menu. You can access this palette by choosing Window
Illustrator offers a command to align and distribute individual points. To use this feature, select several points with the Direct Selection tool, and the align and distribute buttons appear on the Control panel. You can also align points to the artboard of to a crop area.
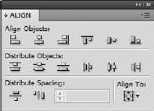
Figure 12.40. The Align palette includes several rows of buttons used to align and distribute multiple objects.
Before you use an align or distribute icon button, you must select more than one object with the Selection tool. When you select one of the align or distribute icons, you can move all the selected objects to match the edge or center of the selection boundary box. However, if you click one of the objects after making the selection, that object becomes the Key Object and you must complete all alignment using the Key Object's center and edges.
If you select the wrong object as the Key Object, you can use the Cancel Key Object palette menu command to cancel the existing key object and select a new key object or you can just click the preferred key object with the Key Object tool to set it when the Align to Key Object option in the Options bar is selected. The Key Object is displayed with a bold border.
Note
The Align and Distribute buttons have no affect on objects that have been locked, except in InDesign where a locked object can be selected and used as a key object.
To use the Align palette, select two or more objects that you want to align; then click the align icon in the Align palette for the alignment that you want. The align options include Align Left Edges, Align Vertical Centers, Align Right Edges, Align Top Edges, Align Horizontal Center, and Align Bottom Edges.
If you enable the Use Preview Bounds option in the Align palette menu, you can align the objects by their edges using the stroke width. If the Use Preview Bounds option is disabled, the objects are aligned by the path edge, denoted by the bounding box.
To align objects to the artboard edges, enable the Align to Artboard option in the Align palette menu. This option works for aligning objects to the center of the art board as well as the artboard edges.
Distributing objects is different from aligning objects in that the distribution icons in the Align palette position the selected objects so that the distance between the selected edges or centers of the selected objects is equal. For example, if three objects are selected and the Distribute Vertical Centers button is clicked, then the middle object is moved so that the distance between the center of the bottom object and the middle object is equal to the distance between the center of the top object and the middle object.
The Distribution icons available in the Align palette include Distribute Top Edges, Distribute Vertical Centers, Distribute Bottom Edges, Distribute Left Edges, Distribute Horizontal Centers, and Distribute Right Edges. These options are also available in the Options bar at the top of the window.
If the Show Options palette menu command is selected, the Distribute Spacing buttons for Distribute Vertical Space and Distribute Horizontal Space appear. Using these buttons and the spacing value, you can space all the selected objects from the Key Object by the specified space amount.
The drop-down field at the bottom of the Align palette also includes an Auto option that automatically spaces the objects using an average of their current position. The Auto option also doesn't require that a Key Object be selected.
STEPS: Aligning Objects in InDesign
Open an InDesign document. Choose File
Select all the objects to align. With the Selection tool, drag over the top of all the objects that you want to align or hold down the Shift key and click each one individually.
Aligning objects with the Align palette. With the objects selected, choose Window
Distribute the image objects. The alignment of the image objects looks good, but the spacing between the objects is still a problem. To fix this, use one of the Distribution buttons in the Align palette. With the image objects still selected, click the Distribute Right Edges button in the Align palette. This action evenly spaces the image objects, as shown in Figure 12.43.
Move the final objects. As a final step, you'll want to drag the image objects upward slightly with the Selection tool. With all the objects selected and aligned, they move together, maintaining their alignment and spacing.


Photoshop includes align buttons on the Control panel when the Move tool is selected. Using these buttons, you can align the current layer with the current selection. When three or more layers are selected, the distribution buttons become active on the Options bar.
Image selections may be aligned and distributed to a selected layer using the Move tool in Photoshop. With a selection made, click the Move tool. Several align and distribute icon buttons appear on the Options bar, as shown in Figure 12.44.
Figure 12.44. When you select the Move tool, several align and distribute buttons appear on the Options bar.
To align a selection to a layer, make an image selection, choose a layer in the Layers palette, and then click one of the align icon buttons in the Options bar. For example, if you have a rocket ship image selected and you want to center it with a layer that holds a starry background, you can select the rocket image on one layer and then choose the layer that holds the starry background and click both align center buttons. This moves the starry background layer so it is centered on the rocket image. If multiple layers are linked together, each of the linked layers is aligned with the selection.
The align icon buttons include the following: Align Top Edges, Align Vertical Centers, Align Bottom Edges, Align Left Edges, Align Horizontal Center, and Align Right Edges.
Note
More on aligning and distributing layers is covered in Chapter 25.
If three or more layers are selected, the distribute icon buttons become active and may be used to distribute the layer objects. The distribute icon buttons include Distribute Top Edges, Distribute Vertical Centers, Distribute Bottom Edges, Distribute Left Edges, Distribute Horizontal Centers, and Distribute Right Edges.
Guides are helpful as you begin to move objects and image selections about a document, but Photoshop includes another incredibly useful feature—Smart Guides. You can enable Smart Guides by choosing View
Smart Guides in Illustrator are enabled from the View menu. These guides have been improved in a couple of ways. They are aware of centers and the bounding box of the selection rather than just the cursor position.
InDesign also includes Smart Guides. The Smart Guides in InDesign can detect alignment, spacing, and even rotation. The guides are also aware of how far you zoom in on a document, so as you get closer to objects, the guides are more detailed.

The CS4 applications include many different ways to transform objects including the bounding box, transform tools, a Transform menu, and a Transform palette.
The common transformation tools include Move, Rotate, Scale, Reflect, Shear, and Free Transform.
The Transform Each dialog box in Illustrator lets you combine several transformations into a single operation.
In addition to objects, patterns and gradients also may be transformed.
Images may be transformed in many of the same ways as objects using the Photoshop tools.
Stacking order determines which objects appear in front of other objects and is altered using layers and the commands in the Arrange menu.
Aligning and distributing objects is accomplished using the Align palette or the Control panel in Photoshop, Illustrator, and InDesign.