Whether it is copy for an InDesign layout, product descriptions for a Dreamweaver Web page, or a marketing line you want to manipulate in Illustrator, the standard workflow for most text starts in a word processor like Microsoft Word and then the text is imported into one of the CS4 applications. Although the CS4 applications handle type very well, many copywriters are more comfortable with word processors; so importing design text is common.
This chapter covers the crucial workflow step of importing text from a word processor like Word to the CS4 applications. Although several different word processors are available, Microsoft Word is the most popular word processor available today, and it is used for all the examples in this chapter.
You have essentially two methods for importing text from Microsoft Word. One method uses the Clipboard and the Cut, Copy, and Paste features. The other method exports (or saves the Word document) in a format that you can easily import into the CS4 applications. Both Illustrator and InDesign open or place Word documents saved in the Word (DOC) format, and Dreamweaver can import Word documents directly. After you import the text, you can easily move the text among any of the CS4 applications using the PDF format.
Importing a Word document into InDesign or Illustrator not only moves text but also can import the text styles.
In Microsoft Word, you copy selected text to the Clipboard by choosing Edit

In addition to the standard Edit
InDesign includes Paste without Formatting (Shift+Ctrl+V on Windows; Shift+
Text pasted into Illustrator and InDesign appears within a newly created text object unless you previously selected some text using the Type tool. If you selected text, the pasted text replaces the selected text.
In addition to transporting text using the Clipboard, text that you select in Word and drag and drop in an Illustrator or InDesign document moves the text into the target application.
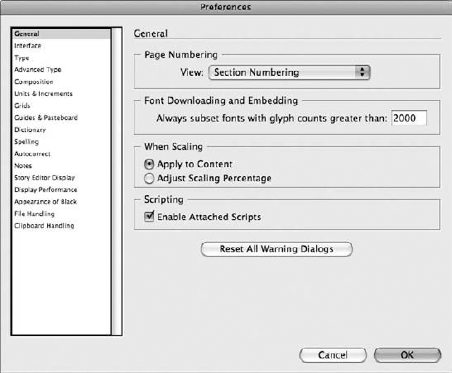
Although text pasted into Illustrator maintains formatting, text pasted into InDesign gives you the options to paste All Information or Text Only. This is set in a Preference setting found in the Clipboard Handling panel of the Preferences dialog box. The InDesign Preferences dialog box is opened by choosing Edit
Note
By default, InDesign's preferences are set to paste Text Only without preserving formatting. Open the Clipboard Handling Preferences and click the All Information (Index Markers, Swatches, Styles, etc.) radio button to preserve formatting.
Text pasted into Dreamweaver from Microsoft Word also maintains formatting, but you can use the Paste Special option to access a dialog box that gives you options to paste the Text Only, Text with structure, Text with structure plus basic formatting, and Text with structure plus full formatting.

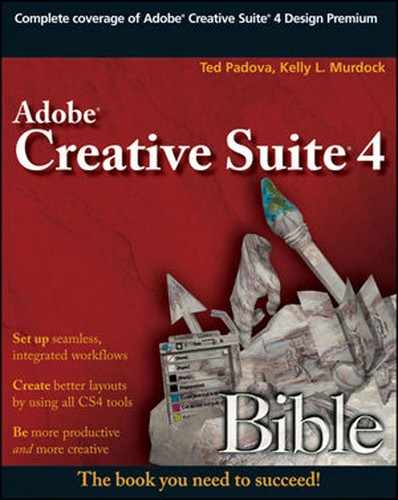
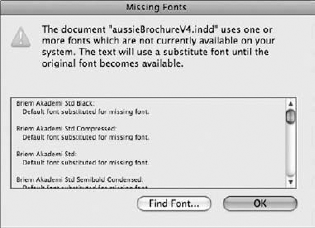
If the text that you paste into Illustrator or InDesign from Microsoft Word is missing a font, a warning dialog box, like the one in Figure 19.3, appears listing the offending font. In addition to the warning dialog box, both applications list the missing font in brackets in the Control palette, and highlight the text that uses this font in pink, as shown in Figure 19.4.
If you choose Type
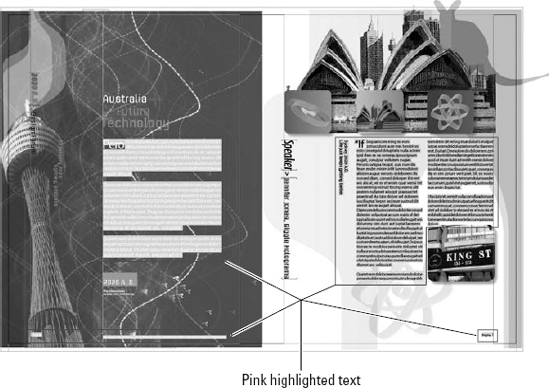
You can choose to have Illustrator highlight all Substituted Fonts and all Substituted Glyphs using the Document Setup dialog box, shown in Figure 19.5. You open this dialog box by choosing File
Note
For more information on glyphs, see Chapter 18. Installing and locating missing fonts is covered in Chapter 16.
Part IV covers in-depth working with text in the CS4 applications, but if you already have the text available in a Word documents, the easy workflow path is to export it from Word and import it into the CS4 applications.
Word doesn't include a File
Warning
Although Word includes a File
The difference between the Rich Text Format and Plain Text is that the former maintains any formatting within the text and the latter strips out all formatting.
Importing text into the various CS4 applications happens by opening a file saved from within Word into a CS4 application. The two most useful CS4 applications for doing this are Illustrator and InDesign, but Dreamweaver can import Word text also on Windows only. All three of these CS4 applications can use native Word documents (DOC), as well as files saved using the Plain Text (TXT) format. Illustrator and InDesign also can open Rich Text Format (RTF) files. Illustrator can open these files using the File
Note
Working with fonts and text is covered in Part IV.
You open Word documents natively within Illustrator by choosing File
After you select and open a file, another dialog box of options opens, as shown in Figure 19.6. This dialog box lets you specify whether to import the Table of Contents Text, Footnotes/Endnotes, and Index Text. You also can select Remove Text Formatting.

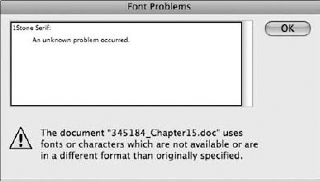
If the fonts used in the Word document are not available to Illustrator, a Font Problems dialog box opens, shown in Figure 19.7, listing the fonts in question.
Text files saved using the Rich Text Format (RTF) and Plain Text (TXT) formats also are opened in Illustrator with the File
Note
Although it may seem unlikely that you'd want to open a Word document within Illustrator, there are several unique workflows where opening a text file in Illustrator is helpful. For example, using Illustrator's dynamic data features along with some actions, you can automatically turn a client list into a set of personalized greeting cards.

The Text Import Options dialog box lets you specify the encoding platform as Windows or Mac and which Character Set to use. The dialog box also has options to select how to handle extra carriage returns and to replace a specified number of spaces with a tab.
If you want to import a Word document into an existing Illustrator document, choose File
Although Illustrator can both open and place Word, RTF and TXT files, InDesign can only place these text formats. The File
Note
Importing Excel data as tables is covered in Chapter 21.
The Place dialog box, shown in Figure 19.9, includes a Show Import Options check box and a Replace Selected Item check box. Holding down the Shift key while clicking the Open button forces the Options dialog box to appear. If you disable the Show Import Options check box, then the document is imported using the same settings used the last time the Import Options dialog box was set.

The Microsoft Word Import Options dialog box, shown in Figure 19.10, includes the same features as mentioned previously for Illustrator including the ability to specify the inclusion of table of contents text, footnotes and endnotes, and index text. It also offers the Use Typographer's Quotes check box.
This Word Import Options dialog box includes several options for handling formatting. You can select to Remove Styles and Formatting from Text and Tables or preserve the same. If you select to remove styles and formatting, the Preserve Local Overrides options become available along with options to Convert Tables to Unformatted Tables or Unformatted Tabbed Text. If you select to preserve styles and formatting, several additional options become available including handling Manual Page Breaks. The options include Preserve Page Breaks, Convert to Column Breaks, or No Breaks. You also can select to Import Inline Graphics, Import any Unused Styles, and Convert Bullets & Numbers to Text. The dialog box also shows the number of Style Name Conflicts that exist between the current InDesign file and the imported Word document. For Paragraph and Character Style Conflicts, you can choose to automatically import styles with options to Use the InDesign Style Definition, Redefine the InDesign Style, or Auto Rename; or you could Customize the Style Import by defining a style mapping between the two documents. Defined options can be saved as a preset for easy recall. For RTF files, the same options are available.
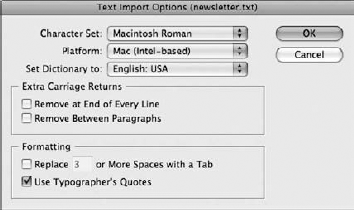
Plain Text files open the Text Import Options dialog box, shown in Figure 19.11. This dialog box lets you select a character set, platform, and dictionary. It also offers options for handling extra carriage returns, replacing spaces with tabs, and using typographer's quotes.

If you select the Custom Style Import option in the Microsoft Word Import Options dialog box (or when importing RTF files), the Style Mapping button becomes active. Clicking this button opens the Style Mapping dialog box shown in Figure 19.12. The Style Mapping dialog box includes two lists of styles, one for Word styles and one for InDesign styles. For each imported Word style, you can select an InDesign style to map the Word style to.

At the bottom of the Style Mapping dialog box is a count of the style name conflicts. Clicking the Auto-rename Conflicts automatically maps all the conflicted style names with the Auto Rename option. Once imported, the auto rename styles are appended with "wrd_1" on the end of the style, making them easy to identify and rename in the Paragraph Styles palette.
After all the work to map styles has been completed, you can use the Save Preset button on the Microsoft Word Import Options dialog box to save the import options including the style mapping to a file that can be recalled for another file using the drop-down list at the top of the dialog box.
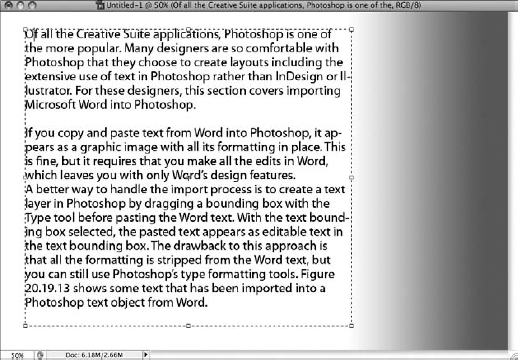
Of all the Creative Suite applications, Photoshop is one of the more popular. Many designers are so comfortable with Photoshop that they choose to create layouts including the extensive use of text in Photoshop rather than InDesign or Illustrator. For these designers, this section covers importing Microsoft Word into Photoshop.
If you copy and paste text from Word into Photoshop, it appears as a graphic image with all its formatting in place. This is fine, but it requires that you make all the edits in Word, which leaves you with only Word's design features.
A better way to handle the import process is to create a text layer in Photoshop by dragging a bounding box with the Type tool before pasting the Word text. With the text bounding box selected, the pasted text appears as editable text in the text bounding box. The drawback to this approach is that all the formatting is stripped from the Word text, but you can still use Photoshop's type formatting tools. Figure 19.13 shows some text that has been imported into a Photoshop text object from Word.
Tip
If you hold down the Option/Alt key while dragging with the Type tool, a dialog box is drawn from the center and opens a dialog box. If you press Option/Alt and click, the draw is from the click point (down and to the right) and a dialog box opens.
You also can import Word text into a Point text object. You create Point text objects by simply clicking in the document rather than dragging an area. Be warned that importing text into a Point text object won't limit the text within an area but places an entire line of text (up to a paragraph return) on a single line. All paragraph returns in the pasted text wrap the text to a new line.
Note
More details on creating text layers and Point text objects are in Part IV.
When you import text into a Photoshop text layer, you use the Type tool to select and edit the text. Clicking once on the text object text with the Type tool selects the text layer. When the text layer is selected, you can drag with the mouse over the text to select words or characters. The selected text is highlighted. Clicking twice selects a word, clicking three times selects an entire line of text, clicking four times selects an entire paragraph, and clicking five times selects all the text in the text layer.
Pressing the Delete key deletes any selected text, and typing new text replaces the selected text with the newly typed text. Any characters that you add to the text use the same formatting as the existing text area.
Selected text is formatted using the Character panel, which is opened by choosing Window
Paragraph formatting such as text alignment, indentation, and paragraph spacing is set for the selected paragraph in the Paragraph palette, which is accessed by choosing Window
Acrobat is typically used to turn Word documents into PDF files by choosing File
Warning
You can edit text within a PDF file with the TouchUp Text tool only if the font you used to create the PDF file is installed on your system or embedded within the PDF document.
When using the TouchUp Text tool, you can copy and paste text from within Word. To do this, choose Tools
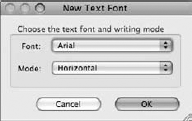
You also can use the TouchUp Text tool to add new portions of text to the existing PDF document. With the TouchUp Text tool selected, hold down the Option/Ctrl key and click the position where you want to place the new text. A dialog box appears, shown in Figure 19.14, letting you select a font face to use for the new text. Clicking OK creates a text object with "New Text" selected in it.
With the new text object selected, you can type new text to replace this text or paste text from Word by choosing Edit
If you need to move the newly created text object, you can select the TouchUp Object tool by choosing Tools
This process requires some additional work, and it's not a chore we recommend undertaking. If some major edits are to be made in a document, you can export from PDF in a variety of formats and lay out a new piece in Adobe InDesign.
When importing text files into InDesign, both paragraph and character styles are imported as determined by the import settings. All imported styles from Microsoft Word appear in the Paragraph and Character Styles palettes using the same style name. The imported styles also are identified by a small disk icon to the right of the style's name, as shown in Figure 19.15. Both types of styles are also supported when opening a Word file in Illustrator, except that the small disk icon isn't shown in the Illustrator palettes.
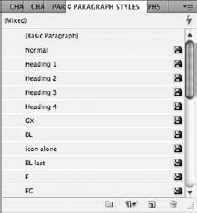
Figure 19.15. Placing a Word document within InDesign can import the Word styles into the Paragraph Styles palette.
Note
Using text styles in Illustrator and InDesign is covered in Chapter 16.
You can prevent the styles from being imported by enabling the Remove Styles and Formatting from Text and Tables option in the Microsoft Word Import Options dialog box. If the Preserve Styles and Formatting from Text and Tables option is enabled, styles also are imported when text is pasted from Word using the designated settings. The Import Options settings take precedence over the application preferences set in the Type panel of the Preferences dialog box.
Note
If the imported style has the same name as an existing InDesign style and if the Style Conflicts option in the Word Import Options dialog box is set to Use InDesign Style Definition, then the style is not imported from Word, and the text is formatted using the InDesign style. Or, you can set the Style Conflict options to redefine the InDesign Style or Auto Rename the imported style.
Note
You can load styles in the Character and Paragraph panels too. For more information on loading styles see Chapter 16.
In the Paragraph Styles palette, right click on a style to select it. Then choose Edit from the pop-up menu. This action opens the Paragraph Style Options dialog box, shown in Figure 19.16. Using these options, you set the paragraph formatting style options.
The Paragraph Styles panel menu includes several useful commands. When a layout is complete, use the Select All Unused menu command to instantly select all the styles that aren't referenced in the document. These styles, whether native or imported, are then deleted with the Delete Style palette menu command. Deleting unused styles is an easy way to clean up a document, especially if text has been imported from Word.
As a final working example of the process of importing and using Microsoft Word documents, we'll walk you through the steps involved. These steps are similar for both Illustrator and InDesign, with only slight differences between the two.
STEPS: Importing Microsoft Word Text into InDesign
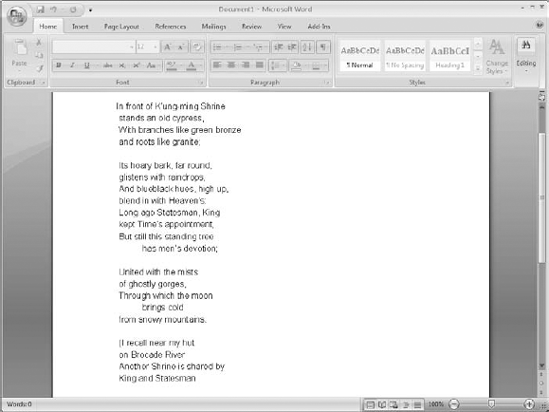
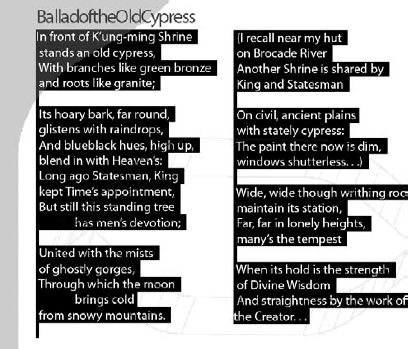
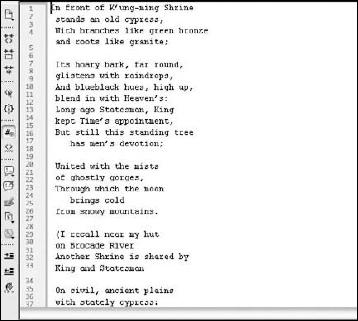
Open the DOC document in Word. Figure 19.17 shows a Word document that includes all the text for a poem. Using the features of Word, the document has been spell-checked and grammar-checked, and all edits are ready to be moved to InDesign.
Save the Word document. Choose File

Warning
If you forget to close the Word document within Windows, InDesign opens an alert dialog box stating "This file is already in use by another application," when you try to place the Word document in InDesign. The same alert doesn't seem to happen on Macintosh systems.
Open the current InDesign file. If you already have a start on the layout, open the existing file in InDesign by choosing File
Place the text file in InDesign. Choose File
Set the import options. In the Microsoft Word Import Options dialog box, shown in Figure 19.18, you can disable the Table of Contents Text, Footnotes and Endnotes, and Index Text options because none of these elements is included in the original document. Also, make sure the Preserve Styles and Formatting from Text and Tables option is enabled. Notice how 28 paragraph style conflicts have been identified in the Import Options dialog box. Select the Import Styles Automatically option, and set the Paragraph Style Conflicts setting to Auto Rename. Click OK to proceed.
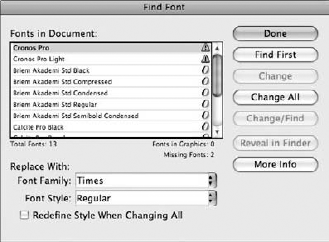
Locate the missing fonts. When the import options are set, the import process proceeds and a Missing Fonts dialog box appears. The dialog box lists all the fonts used in the Word document that aren't available to InDesign. Click the Find Font button to open the Find Font dialog box, shown in Figure 19.19. Using this dialog box, locate and change the missing fonts. The Find Next button locates the first instance of text in the InDesign document that uses the specified font. If you enable the Redefine Style When Changing All option, then all paragraph and character styles font family settings are updated also. Click Done when you're finished.
Place the text into the InDesign document. The cursor holds the imported text. Click at the location in the InDesign document where you want to place the imported text. The Word styles are imported into InDesign and appear in the Paragraph Styles panel. The result is shown in Figure 19.20.

Text for Web pages can start out in Word, but if you don't follow the right path, it could end up being a real mess. Although Microsoft Word can save text files as an HTML document, Word files saved using the HTML format include many unnecessary markup tags recognized only by Word. However, Dreamweaver also includes a command for cleaning up Word documents saved as HTML pages.
The best way to move text from Word to Dreamweaver is to use the Clipboard. Simply copy the selected text to the Clipboard in Word by choosing Edit
If you need more control over the pasted text, you can choose Edit
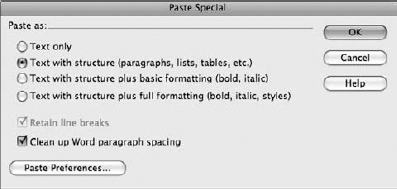
If you click the Paste Preferences button, then the Copy/Paste panel of the Preferences dialog box appears. In this dialog box, you can globally set the paste settings that are used for the Paste command.
The Paste Special menu is available only in Dreamweaver's Design view and not in the Code view.
Text files dropped in Dreamweaver make the Insert Document dialog box appear. This dialog box lets you insert the text in the dropped document as text only, with structure, or with structure and formatting. There is also an option to create a link to the dropped document. After clicking OK, the text or link is added to the Web page at the position where the cursor is located.
Dreamweaver also can import text files by choosing File
Even though Dreamweaver can open text files directly, Word files saved with the .doc extension are imported into a Dreamweaver document using File
Although Word files can be saved as HTML files, Word adds in specific markup that it uses to display the file. These markup tags can cause problems when the page is loaded into Dreamweaver, but Dreamweaver includes a command for eliminating this problem markup. After an HTML-saved Word document is loaded into Dreamweaver, select the Command
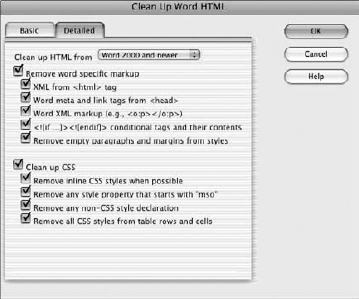
Using this dialog box, select which options to remove. You can choose the version of Word that was used to generate the HTML file. It is a good idea to enable all the options to ensure that the Word markup doesn't interfere with the current Web page. The Detailed panel breaks down the markup into more specific options.
A word processor like Microsoft Word makes a good workflow piece for creating importable text.
Text in Word may be easily copied and pasted into all of the CS4 applications.
Illustrator can open and InDesign can place existing Word documents using Word's native DOC file format. The Rich Text Format (RTF) and Plain Text (TXT) file formats also are supported.
Text styles defined in Microsoft Word also are imported and show up in the Paragraph Styles panel in InDesign.
Dreamweaver also includes methods for opening Word, text, and HTML files.