Reviewing documents, marking up comps for corrections, and adding comments are standard practices for creative professionals. In electronic review sessions, your client needs to have the same software applications as you have if you exchange native files. For most of your clients, however, it's unlikely that the people you serve use any of the Creative Suite programs. What you need is a file format that can be read by anyone, and a program that permits your clients to engage in electronic reviews and markup documents for corrections and comments. Furthermore, your clients need to use a program they don't have to purchase.
That's a tall order, but don't worry. You have all you need with the Creative Suite. Using Adobe Acrobat 9 Pro or Adobe Acrobat 9 Pro Extended (Windows only), you can add special rights to PDF files that permit users of the free Adobe Reader software to add comments and markups on your files and save their edits. You need Acrobat that comes as an part of the Creative Suite software, and your clients only need Adobe Reader 7 or above that can be freely downloaded from Adobe's Web site.
Comment review sessions are handled several ways in Acrobat. You can create an Attach for Email Review, or create a shared review either via e-mail, using Acrobat.com, or via your own Web server. E-mail reviews and shared review sessions are the easiest methods available to you for creating reviews and are the primary subject of this chapter.
Adobe Acrobat permits you to add special usage rights to PDF files so Adobe Reader users can take more advantage of participating in comment reviews and working with Acrobat PDF forms. In Acrobat Standard 9.0, as well as the Acrobat Pro products, you can add special rights for form filler to save form data and add digital signatures to forms. Using Acrobat Pro and Pro Extended, you can add rights for Adobe Reader users to comment and mark up PDF documents. PDF documents without special usage rights cannot be saved from within Adobe Reader, and the comment and markup tools are not available to Reader users.
Acrobat 7 Professional introduced the ability to add usage rights to PDFs for saving comment notes and markups from within Adobe Reader. In Acrobat 8 Professional, usage rights were extended to Reader users for saving form data and adding digital signatures from within Adobe Reader. In Acrobat 9, Acrobat Standard was added to the list of Acrobat products that could enable PDFs with usage rights, but just for form saves and digital signatures.
You can add usage rights in the Acrobat Pro products for either or both comment and review and form saves and digital signatures via menu commands such as selecting Comments
If you plan to engage in either an Attach for Email Review or Send for Shared Review Session, a wizard automatically adds usage rights for saving comments and markups in Adobe Reader when you activate the review.
Note
For more information on adding usage rights to PDFs for saving form data, see Chapter 30.
Acrobat provides you an extensive set of comment and markup tools. To view the Comment & Markup toolbar where all the comment and markup tools are contained, select Tools
Note
Alternately, you can open the Comment & Markup toolbar by opening a context menu (Ctrl-click on the Macintosh; right-click in Windows) on the Acrobat Toolbar Well and selecting More Tools. You also can use the Comments>Show/Hide Comment & Markup Toolbar command. When the More Tools window opens, check the box adjacent to Comment & Markup Toolbar.
These tools are available to you for commenting and marking up documents:
Sticky Note tool: This tool adds a note comment similar to a Post-It note.
Text Edits: Click the down-pointing arrow to open a menu where tools exist for highlighting text, underscores, cross-outs, and similar markups. Using these tools permits you to export the markups on a PDF document to the original MS Word file that was converted to PDF. Unfortunately, exporting comments to Word is available only to Windows users. You can use the tools on either platform to display the markups in the PDF file.
Stamp tool: Some predefined stamps are available to you with your Acrobat installation for common office stamps such as Approved, Sign Here, Accepted, Rejected, Revised, and so on. In addition, you can create custom stamps and add them to the menu.
Highlight tool: Use this tool to mark through text like you might highlight text on paper with a yellow marker.
Crossout tool: This tool crosses out text.
Attach a File tool: Use this tool to attach a file (any file type) to a PDF document. This tool is especially helpful if you want to secure a PDF document with password security. All the file attachments such as InDesign files, Illustrator files, Microsoft Office files, and so on are protected if a user doesn't have a password to open the PDF document and extract the attachment.
Record an Audio Comment: With a microphone attached to your computer, you can record sounds to use for commenting on a file.
Paste a Copied Image as a Stamp tool: Content copied to the clipboard can be pasted as a Stamp comment.
Callout tool: Use this tool to create a callout box with a line pointing to the area where you make the comment.
Text Box tool: Use this tool to add a text box where you can add a long passage of text for a comment.
Cloud tool: Use this tool to mark a graphic or text passage with a freeform line made up of a series of arcs.
Arrow tool: Use this tool to point to a graphic or text where you want to make a comment.
Line tool: Use this tool to underscore or create a diagram where you want to add comments.
Rectangle tool: Use this tool to draw rectangles around a graphic or body of text.
Oval tool: This tool is used in a similar manner as the Rectangle tool but for drawing ovals and circles.
Polygon Line tool: Use this tool to draw a polygon shape where you want to leave the polygon open ended.
Polygon tool: Use this tool to draw polygons such as pentagons, octagons, and so on.
Pencil Eraser tool: Use this tool to remove parts of a pencil drawing.
Show Pull-Down Menu: A number of menu commands for handling comments are contained in the pull-down menu.
All the tools in the Comment & Markup toolbar with the exception of the Text Box tool, Attach a File tool, Record an Audio Comment tool, and Pencil Eraser tool have associated comment notes. A comment note is the same type of note you create with the Sticky Note tool. Just double-click a markup made with any of the remaining tools in the Comment & Markup toolbar, and a comment note opens where you can add a description for the comment you make for a particular markup.
You can change the colors and various styles of comments and markups by opening the Properties dialog box. Control (Mac) or right (Windows) + click to open a context menu and choose Properties.
The abundant number of comment tools, properties, and menu commands are nothing more than overkill if all you want to do is add some comments on PDF pages for your own use. Acrobat is designed with much more sophistication when it comes to commenting, and the tools provided to you are intended to help you share comments in workgroups.
Comment and review among workgroups is handled in two ways. You can set up an Attach for Email Review and exchange comments with your coworkers and colleagues where PDFs and data are exchanged through e-mail, or you can set up a Send for Shared Review where comments are uploaded and downloaded by participants to your Acrobat.com account or via e-mail exchanges.
Adobe's Acrobat team wanted to make it almost seamless for any user not only to start a review session but also to participate in a review session. With the ability to enable documents with usage rights for Adobe Reader users, anyone with the free Adobe Reader software can participate in a review.
An Attach for Email Review is a method for you, the PDF author, to share a document that needs input from other members of a workgroup (in an e-mail exchange), such as a proposal or draft document, and ask them to make comments for feedback. As comments are submitted, you can track comments from others and make decisions about how the comments are treated. Decisions such as accepting or rejecting comments are part of this process. The comment exchanges between you and your workgroup members are handled through e-mail exchanges. When using this kind of review, the review initiator is the only person who sees comments from all the reviewers.
When you send a file for review, the PDF contains information about you, the author/initiator, who's invited to the review, and where the original is located on your system. When a recipient receives the e-mail inviting him or her to review your document, the attachment to the e-mail is a PDF that the recipients use to make comments. The recipients open the PDF e-mail attachment in Acrobat or Adobe Reader and make comments. When a reviewer finishes commenting, the reviewer sends the data back to the PDF author. The data sent from the reviewers can either be a data file such as FDF (Form Data File) data or XML data or both the data and the PDF document. If you start with a large PDF file, the comment exchanges using FDF/XML data require much less data transfers because the comment data are typically much smaller than the original PDF files.
When reviews are initiated, you must send the PDF file to all reviewers. You can then make a decision in the Reviewing Preferences for whether the PDF or an FDF file is returned to you. In the Preferences dialog box (
When comments are returned to you either in PDF or FDF form, double-click the file attachment in your e-mail application. Double-clicking either file type appends comments from recipients to the original PDF you used when you invited recipients to participate in a review.
Note
Before initiating a review, be certain to add your e-mail address in the Identity preferences. If you don't add the Identity preferences, Acrobat prompts you in a dialog box and opens the Identity preferences for you. You can't proceed until you fill in the preferences text boxes. Open the Preferences dialog box (
To understand how to start an e-mail–based review, follow these steps.
STEPS: Initiating an E-mail–based Review
Open a document in Acrobat Professional. Opening a document is optional because you can begin a review without a document open in the Document pane. In this example, we start with a document open in Acrobat Pro 9.0. If you don't have a document open you can select a document to share in a review by clicking the Browse button in the Getting Started wizard that opens when you make the menu choice for initiating a review.
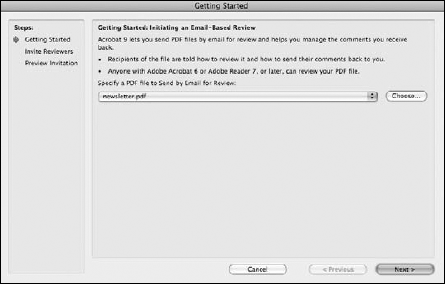
Initiate the review. If you want to make a comment on your document, you can do so, but be certain to save all your updates. After saving the file, select Attach for Email Review from the Comment task button pull-down menu. The Getting Started wizard opens, as shown in Figure 36.2. This is the first of three panes appearing in the wizard when you initiate a review.
By default, a document active in the Document pane are specified in the field box in the first pane. If you change your mind or you start a review without a document open in Acrobat, click the Browse button and browse your hard drive to locate a file.
Note
You can access the same menu command by choosing Comments

Invite reviewers. After identifying the file to send out for review, click the Next button to open the Invite Reviewers pane, as shown in Figure 36.3. The Address Book window contains a list of recipients for your review. Type the e-mail addresses for the people you want to participate in the review, or click Address Book to launch your e-mail address book to select reviewers to invite.
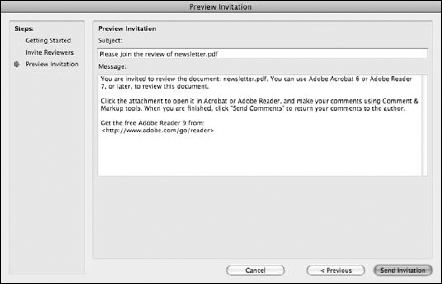
Send the invitation. Click Next, and click Send Invitation in the Preview Invitation pane, as shown in Figure 36.4. Acrobat alerts you with a dialog box informing you that a new e-mail message has been sent to your e-mail client, as shown in Figure 36.5. When you send the invitation, your PDF document is automatically enabled for Adobe Reader users to participate in the review, add comments, and save their edits.
Initiate a send in your e-mail program. Click OK in the information dialog box. If your e-mail program does not immediately send the invitation to reviewers, open your default e-mail program and click the Send (or Send/Receive) button to commence the e-mail initiation. In Figure 36.6, an invitation is displayed in Apple Mail showing the recipients in the To field, the Subject of the e-mail, and a file attachment. The message is derived from the Send by Email for Review dialog box. Note that you can still edit the message before initiating a send. Click the Send (or Send/Receive) button, and the e-mail and attachment are sent to the reviewers.


Participants in a review include you—the PDF author and review initiator—and the people you select as reviewers. In your role, you field all comments from reviewers. If you use the Attach for Email Review to send comments back to users, Acrobat permits you to reply to users' comments. A review session is designed for a single set of responses between you and the recipients; however, you can exchange comments back and forth in comment threads between you and individual reviewers.
Before you begin a review, be certain to save any edits made on the PDF. If you insert pages, delete pages, or perform a number of other edits without saving, the comments retrieved from others will appear out of place and make it difficult to understand where comments are made from the reviewers. Also, be certain to keep the original PDF in the same folder. If you decide to move the PDF to another folder, be certain to keep track of the location where the PDF resides. As you update comments, Acrobat needs to keep track of the directory path where the original PDF can be found. If Acrobat can't find the PDF, you are prompted to search for it.
During a review period, you and your recipients use tools in Acrobat/Reader designed for use with e-mail reviews. When starting an e-mail review, the first time you access the Attach for Email Review menu command, the PDF is sent to recipients. All subsequent comment exchanges between you and reviewers are handled with other tools. Be certain to not return to the Attach for Email Review command if you decide to respond to user comments. Doing so sends another PDF to a recipient.
A recipient receiving your e-mail with the PDF attachment can open the attachment directly within the e-mail message. Double-clicking the e-mail file attachment launches Acrobat or Adobe Reader and loads the PDF in the Document pane.
Reviewers make comments with any of the comment tools discussed earlier in this chapter in the section "Understanding the Comment and Markup Tools." After a reviewer completes a review session, the reviewer clicks the Send Comments button in the Comment & Markup toolbar, as shown in Figure 36.7.
Figure 36.7. When working on a PDF in review, the Send Comments tool is added to the Comment & Markup toolbar to the right of the Show tool.
When the reviewer sends a response to the PDF author, the PDF author's e-mail address is automatically supplied in the To field in the e-mail program. The reviewer clicks Send, and either a PDF or FDF is sent back to the PDF author. Again, the file type is determined in the Reviewing Preferences.
As comments are submitted from reviewers, you'll want to track reviews and decide to mark them for a status such as accepted, rejected, and so on. If you want to reply to the recipients, you can elect to send a reply to recipient comments; however, in many cases, you'll want to make corrections and start a new review session. If you send a reply, each comment is treated as a separate thread in Acrobat. Rather than your having to select different tools to make responses scattered around a document page, Acrobat keeps each thread nestled together to make following a thread easier. Replies are contained in Note pop-up windows. If you want to reply to a comment, open a context menu on the note pop-up and select Reply or select Reply from the Options pull-down menu on a comment note. Additionally you can click the Reply tool in the Comments panel.
Tip
You can open a context menu on a comment in the Comments panel and select Reply to reply to a comment.
You send a file to recipients for review. The reviewers then send comments back to you. Your original document needs updating to reflect the new additions added by other reviewers. When you receive an e-mail attachment, the comment data are submitted back to you. Only a single PDF resides on your computer. If you want to merge the data sent by other reviewers with your existing PDF document, double-click the file attachment sent back to you. Acrobat updates the original PDF document with the new comments.
You may begin a review and later decide you want to add new users to participate in the review. You can add new reviewers to a review at any time. To add a reviewer, open the Tracker from the Comments menu, the Review & Comment task button, or the Options pull-down in the Comments panel. The Tracker opens in a separate window. Click Add Reviewers in the Tracker to add additional reviewers. The same wizard opens where you can add recipients' e-mail addresses and any additional message in the Invitation Message window, and click OK.
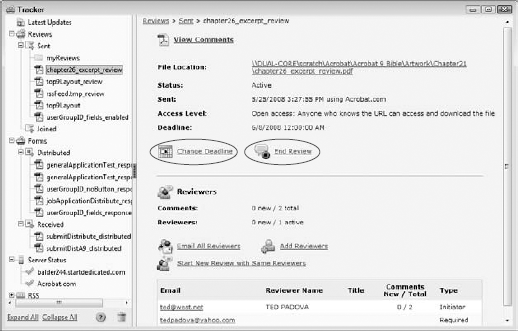
The Tracker is a separate window that opens on top of the Acrobat window where you find menu commands to help manage e-mail–based, browser-based, and shared reviews as well as distributed forms. To open the Tracker, select Track Reviews from the Comment task button, or choose Comments
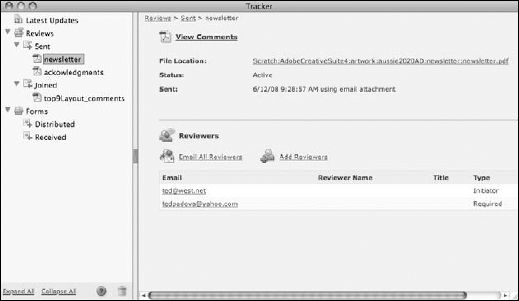
Figure 36.8. The Tracker window provides information and tools for working with documents in review.
The left pane in the Tracker lists all documents you have in review under the Reviews category. From the list, select a filename. The right pane changes to reflect information related to the selected review.
Two categories appear in the left pane in Figure 36.8. All reviews we initiated are listed in the Sent list. Expand the list to see reviews by filename. The Joined list contains all reviews sent to me by another review initiator.
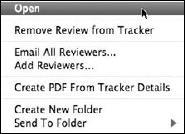
From a context menu opened on a document listed in the Sent list shown in Figure 36.9, you have the following commands:
Open: This command opens the selected file the same as clicking the Open tool.
Remove Review From Tracker: This command removes the selected file from the review category and is the same as clicking the Remove tool.
Email All Reviewers: Select this option, and your default e-mail application is opened with the To field populated with all review participants. This command is a review reminder for participants to receive an e-mail from you to remind them to send back comments.
Add Reviewers: This command also launches your default e-mail application with an automated message to invite other reviewers. The selected PDF file used for initiating the original review is added as a file attachment.
Create PDF From Tracker Details: Click this item, and you can create a PDF document summarizing the details for your reviews.
Create New Folder: You can create a folder in the tracker Sent list and organize your reviews in folders.
Send To Folder: As you add new folders, open the submenu and select the folder to send a particular review to the given folder.
On Windows, a collapsed list is marked with a plus (+) symbol. On the Macintosh, a collapsed list is marked with a right-pointing arrowhead. Click this symbol, and the list is expanded. If a list is already expanded, a minus symbol (Windows) or down arrow (Macintosh) appears. Click this symbol, and the list is collapsed.
The Forms Tracker lists all forms you have distributed and received.
Note
For more information on the Forms Tracker, see Chapter 30.
Click the RSS button, and you open the Subscriptions pane in the Tracker. RSS (Really Simple Syndication) is a lightweight XML format designed for sharing headlines and other Web content. The Tracker allows you to manage subscriptions using RSS feeds. By default the RSS button is not shown in the Tracker. You need to open Acrobat's Preferences (Ctrl/
You might want to list RSS feeds that provide you with technical support for solving problems with a program like Adobe Acrobat. You can subscribe to an RSS feed and receive up-to-date information from the service.
This is a valuable tool at your hands in the Tracker. When you subscribe to a service, you can create a PDF file of all the threads shown in an RSS feed.
Working with shared reviews just got easier in Acrobat 9. From the beginning of when browser-based reviews where introduced in Acrobat 5, Adobe has been trying to simplify review sessions for people to comment on documents in real-time where all participants can see each other's comments. We've seen simplicity added in each release of Acrobat, and now in Acrobat 9 things have gotten much better.
The bottleneck for many users, especially independent graphic designers and small ad agencies, has been lack of access to sophisticated IT departments. Unless you had the programming skills to set up a server and configure it for shared reviews and file exchanges, you were left out of server-based reviews.
Now with Acrobat 9 and Acrobat.com, you can easily engage in shared reviews without the complex task of having to configure a server.
You have several choices to make when working in Shared Reviews. You can share reviews locally on your computer and on network servers, or you can share reviews on a Web server. In regard to Web servers, you have several types of Web servers from which to choose. Depending on the choice you make, the process can be very simple or quite complicated.
These are among the choices you have for setting up a shared review:
Acrobat.com: You can set up review sessions onAcrobat.com, and you don't need to worry about any special configurations of a server to collect comments and integrate the comments from multiple users.Network Folder: You can configure a network folder locally on your intranet to set up a shared review among a workgroup.
SharePoint Workspace: For Windows SharePoint workspaces, users must have read and write access to engage in reviews. This option requires some help from your IT department to configure the server and set up the permissions for the participants.
Web Server: Again, this option requires some help from your IT department to configure a Web server with a shared folder and configure the participants for read/write services.
One of the best new additions to Acrobat 9 is the introduction of Acrobat.com. This choice takes the configuration steps out of the process for initiating and engaging in shared reviews. For individual graphic designers and small design firms without intranets and sophisticated IT departments, using Acrobat.com is something you'll learn to love.
For the purposes of this chapter, we cover only two of the options you have for conducting shared reviews: setting up network folders and using Acrobat.com. If you work in an enterprise where you want to share reviews on Web servers, look to the Acrobat help document and online information you can find at www.adobe.com/devnet/acrobat/pdfs/online_collaboration.pdf and www.adobe.com/devnet/acrobat/online_review_admin.html.
Setting up a network folder for shared reviews is intended for workgroups having internal local area networks. You begin setting up a network folder the same way as when using Acrobat.com for shared reviews. From a menu command, a wizard opens that walks you through the steps to configure a folder on a network server.
To see how easy it is to set up a network folder for shared reviews, do the following.
STEPS: Starting a Shared Review using a Network Folder
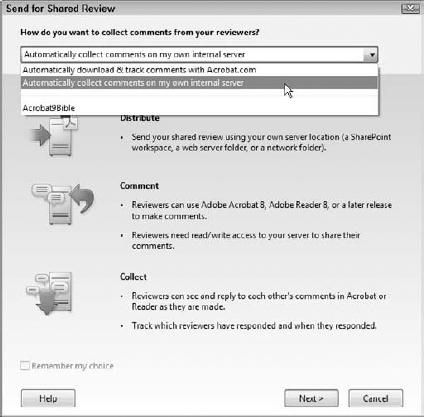
Open the Comment task button pull-down menu, and select Send For Shared Review. The Send for Shared Review wizard opens as shown in Figure 36.10.
Choose a location for collecting reviewer's comments. Open the pull-down menu at the top of the Send for Shared Review wizard, and choose Automatically collect comments on my own internal server.
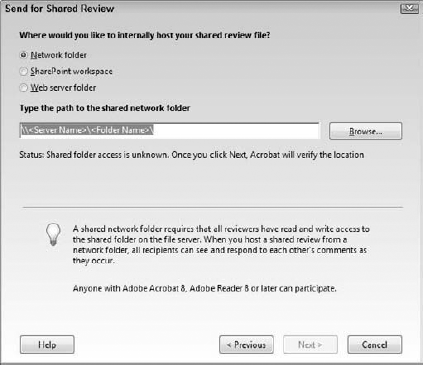
Select a host. Click Next in the Send for Shared Review wizard, and the second pane in the wizard opens, as shown in Figure 36.11. For setting up a network folder, click the first radio button for Network folder.
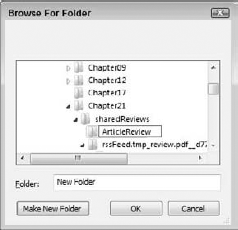
Target a location to host your review. Click the Browse button, and the Browse for Folder dialog box opens, as shown in Figure 36.12. Choose a directory path, and if you need a new folder created, click the Make New Folder button. Name a new folder, and click OK. Click OK in the Browse for Folder dialog box, and you return to the second pane in the Send for Shared Review wizard.
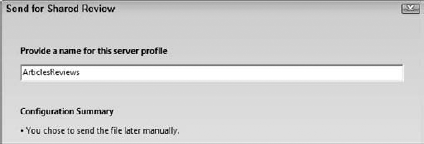
Review the configuration summary. Click Next, and the third pane in the Send for Shared Review wizard opens. This pane summarizes your choice for the location where the comments will be collected as shown in Figure 36.13. Review the summary, and click Next.
Determine how you want to distribute the PDF document for review. You have two choices when you arrive at the last pane in the Send for Review wizard. Choose either
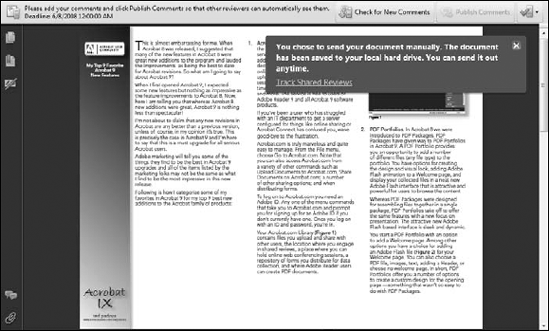
Acrobat.comor Save a local copy and manually send the file later to recipients. If you choose the second option, you have to manually send the document to reviewers. The space on the network server will collect comments from all the reviewers. When you finish the setup, the PDF document appears in the Document pane with a message informing you that the file has been saved to your local hard drive and you can send the file to recipients at anytime, as shown in Figure 36.14.
In the Document Message bar in Figure 36.14, you find some new tools for commenting. The Check for New Comments button checks the network folder for new comments added by recipients and populates your PDF document with new comments. The Publish Comments button uploads any new comments you add to the PDF file as XML data collected at the network folder.
From the pull-down menu adjacent to the Publish Comments button, you have a few choices for opening the Tracker and working offline. If you work in an area where you don't have access to your server, choose Work Offline and you can make comments while on the road. When you return to your office and connect to the network folder, your offline comments can be published.
Perhaps the easiest way to initiate and participate in shared reviews is via Acrobat.com. As we said earlier, you don't have to worry about any configurations as long as you have set up your Adobe ID and can log onto Acrobat.com. This option provides you a seamless, hassle-free approach to engaging in shared reviews.
Note
For setting up an Adobe ID and logging onto Acrobat.com, see Chapter 33.
To learn how easily you can initiate and participate in shared reviews on Acrobat.com, do the following.
STEPS: Starting a Shared Review using Acrobat.com
Open the Comment task button pull-down menu, and select Send For Shared Review. The Send for Shared Review wizard opens the same as shown in Figure 36.10.
Choose
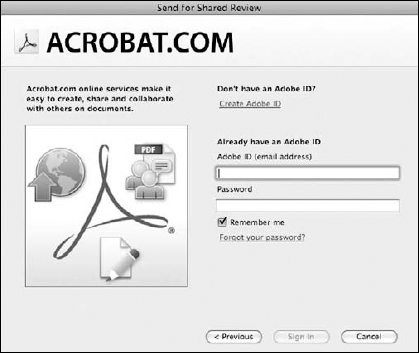
Acrobat.comfor your host. When you open the Send for Shared Review wizard, choose Automatically download & track comments withAcrobat.com.Log onto
Acrobat.comwith your Adobe ID. Click Next, and the Send for Shared Review Adobe ID login pane opens, as shown in Figure 36.15. Type your ID and Password, and click Sign In to log ontoAcrobat.com.Identify recipients. The next item you see is an e-mail message box in the Send for Shared Review wizard, as shown in Figure 36.16. Type the names of recipients in the To text box. If you want to edit the Subject and/or message, you can edit the respective items in the wizard. Click Send, and several things happen to your PDF document:
The file you send to
Acrobat.comis enabled with Adobe Reader usage rights so Adobe Reader users can participate in the review.The e-mail message is sent to your list of recipients when you click the Send button.
The file is automatically uploaded to
Acrobat.com. You don't need to do anything else other than identify your recipients and click the Send button. What could be easier?You have an option for choosing an access level —either Open so anyone visiting your
Acrobat.comlibrary can download the file or Closed so only those you invite to share the file with can download it.
Amazingly, the four preceding steps are all you have to do to initiate a shared review using Acrobat.com. Creating, publishing, and downloading comments are handled just like using network folders described in the section "Using network folders" earlier in this chapter.
Acrobat confirms your upload with the message box shown in Figure 36.17 when you click the Send button in the e-mail message. As with network folder reviews, you have a Check for New Comments button and a Publish Comments button to download recipient comments and upload your own comments.
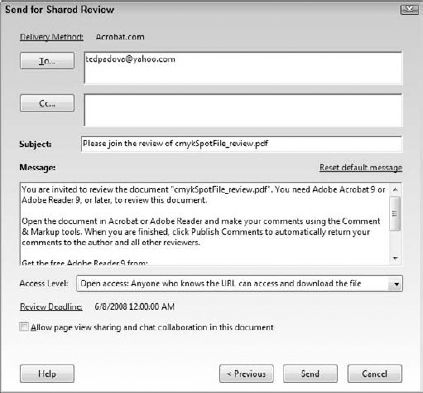

Figure 36.17. The buttons for checking for new comments and publishing comments available with network folders are identical when engaging in reviews on Acrobat.com.
When you check for comments on Acrobat.com by clicking the Check for New Comments button in the Document Message bar, new comments added in the review are reported in a message box, as shown in Figure 36.18. To accept the comment, click the Click here to accept link, and the comments are downloaded and populated to your PDF document on your computer.
In Windows, you can easily monitor new comment additions on Acrobat.com in the Windows Status bar shown in Figure 36.19. A mouse-over on the Tracker icon in the Status bar reports any activity or no activity with shared reviews. Right-click the Tracker icon and choose Open Tracker from a context menu, and the Tracker opens.
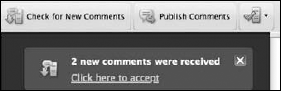
Figure 36.18. When new comments are downloaded from Acrobat.com, a message box reports the number of comments added to your PDF file.
Figure 36.19. You can open the Tracker for reviews and when distributing forms from a context menu opened on the Tracker icon in the Windows Status bar.
Additional items available in the Tracker when working with shared reviews include changing the deadline for a review and ending a review. In Figure 36.20, the text for these items will open windows for informing recipients that a review deadline has been extended or the review has ended.
Acrobat also offers you an opportunity to work offline when sharing comments on any kind of server. You may be temporarily away from an Internet connection or network connection and want to organize comments and later submit them. To work offline, open the pull-down menu on the Server status button in the top-right corner of the Document Message bar, as shown in Figure 36.21. Select Work Offline, and you can add comments while disconnected from the server.
Note
If you open a document that is in a shared review and you don't select Work Offline and you are disconnected from the Internet, Acrobat automatically puts you in an offline state. The Document Message Bar changes to reflect your offline status.
Figure 36.21. Select Work Offline from the Server status pull-down menu to add comments to the PDF file while working offline.
When you want to (or are able to) go back online, click Reconnect to Server. Your server connection is completed, and you can upload and download comments.
You can initiate e-mail and shared reviews in Acrobat and participate in reviews in any Acrobat viewer. For Adobe Reader participation, documents need to be saved from Acrobat Pro or Pro Extended with Reader usage rights or by using a wizard that enables files.
The Tracker lists all documents initiated from Attach for Email Reviews, Send for Shared Review, Upload for Browser Review, forms that have been distributed, and RSS Subscriptions.
Send for Shared Review enables you to send files to
Acrobat.com, a network server, or your own company server.You can host shared reviews using network folders, SharePoint servers, Web servers, and
Acrobat.com. When it comes to server configuration,Acrobat.comis the easiest method for sharing reviews on servers.When files are enabled with Adobe Reader usage rights, the Adobe Reader users can participate in ad-hoc review workflows.