During the release of Acrobat 8 and subsequently the release of the Creative Suite 3, Adobe introduced Acrobat Connect and Acrobat Connect Professional. Acrobat Connect and Connect Pro were paid subscriptions for hosting Web conferences in meeting rooms. With Acrobat Connect, you could host meetings for 15 or more participants; with Connect Pro, you could host meetings with up to 2,500 participants.
When Acrobat 9 was introduced, Adobe introduced Adobe ConnectNow, which is part of Acrobat.com and designed as a free Web conferencing service to conduct meetings for a maximum of three people. You still have options for using Acrobat Connect and Connect Pro, but these services are still paid subscriptions.
Adobe ConnectNow is just the ticket for independent graphic designers and small ad agencies. Using Acrobat.com to enter your Adobe ConnectNow meeting room, you can host meetings in real-time for engaging in meetings with clients, no matter where they are on the planet. And to top it off, Adobe ConnectNow is free!
In this chapter, we talk about using Adobe ConnectNow for hosting and participating in online meetings.
Before we get into using Adobe ConnectNow for Web conferencing, we want to point out one of the outstanding features you find with the design of this Acrobat.com service. In Acrobat 8, we had Acrobat Connect to allow users to host a meeting. You can step through PowerPoint presentations and Adobe InDesign files in online meetings to describe an advertising campaign such as the introduction of a new product, a new marketing program, an event, or some similar type of discussion.
Using Acrobat 8 and the PDF documents you created using Acrobat 8 worked well for an Acrobat Connect meeting. The only pauses you experienced were momentary delays when a new page came into view.
In Acrobat 9 and with many CS4 applications, we have a quantum leap in the delivery of files. The user audience palette has changed over the past several years, and people are asking for more dynamic presentations such as those you create with Adobe Presenter (as covered in Chapter 31), adding Adobe Flash to your documents (as covered in Chapter 23), and presenting documents in the form of PDF Portfolios (as covered in Chapter 35).
If you viewed media-rich PDF files in a Web conferencing application like Acrobat Connect, as it was introduced with Acrobat 8, then the meeting participants had to wait for video, manipulation of 3D objects, and Adobe Flash animations. These files came across the Internet very choppy and sluggish and were painfully slow even with the fastest Internet connections.
In Acrobat 9 using Acrobat.com (and particularly when hosting meetings in Adobe ConnectNow), Adobe introduces real-time collaboration. When you choose File
As you conduct meetings in Adobe ConnectNow, you can upload files that contain rich media to your meeting room, and your participants can download these files for uninterrupted viewing.
Note
Although we're covering the features in the CS4 applications, the introduction of Acrobat.com services for CS4 users first appeared with the CS3.3 upgrade.
To take advantage of using Adobe ConnectNow, you first need to acquire an Adobe ID and log onto Acrobat.com. If you don't have an Adobe ID, you need to follow the steps for acquiring an ID, which are outlined in Chapter 33.
After you have your Adobe ID, you can access Adobe ConnectNow from any CS4 application. From within Acrobat 9, choose File
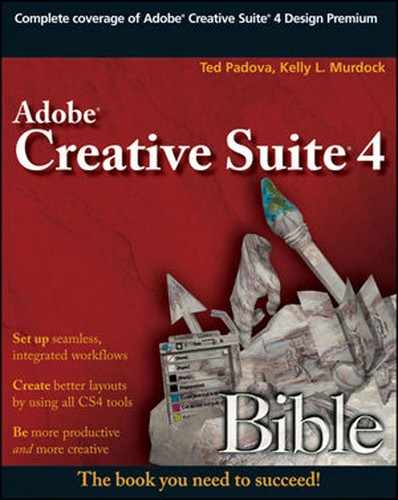
Your first view in Adobe ConnectNow displays your meeting room and a dialog box with a URL, as shown in Figure 37.1. Your participants use this URL to log onto your meeting room. On your clients' end, the only application they need is a Web browser; they don't even need an Adobe ID to be a meeting participant.
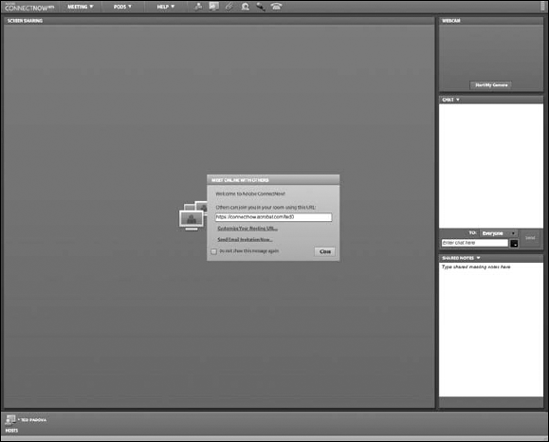
Figure 37.1. Choose File
Note
You can also log onto Adobe ConnectNow by opening Acrobat.com in your Web browser and clicking the Adobe ConnectNow button on the welcome page.
As shown in Figure 37.1, two links appear in the Meet Online With Others dialog box. Click Customize Your Meeting URL, and your Web browser opens the screen shown in Figure 37.2. You can make changes for your login information and take a snapshot from your webcam or upload an image to be displayed on your meeting room Web page. After making edits, click OK to return to the initial login page.
Figure 37.2. Click Customize Your Meeting URL, and a window opens in your Web browser where you can change your login attributes and upload a photo.
Click Send Email Invitation Now, and your default e-mail client opens with the meeting URL added in the message box, as shown in Figure 37.3. You can copy the URL from the initial screen when you first log on and send the e-mail later, or you can use this link to send an e-mail right away when you're ready to start a meeting. The location of your meeting room is always at the same URL, so you can keep a copy of the URL and send e-mails in advance when you want to schedule meetings.

At the top of your screen in your meeting room, you find a toolbar with tools available for making settings adjustments and displaying various views as shown in Figure 37.4. The tools include the following:

Figure 37.4. Across the top of your screen, some tools are available to customize settings and views.
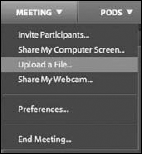
Meeting: The first item in the toolbar across the top of the screen is the Meeting pull-down menu with the options shown in Figure 37.5.
These commands are available:
Invite Participants: Click this command, and you can add additional participants to your meeting. You can have a maximum of three participants in a meeting.
Share My Computer Screen: Your screen is invisible to other viewers until you either select Share My Computer Screen when you first arrive as Adobe ConnectNow, choose this menu item, or click the Share My Computer Screen tool in the toolbar. You can prepare your files and the choose this menu command or click the Share My Computer Screen tool when you're ready for the participants to see your screen.
Upload a file: Click this command, and a Browse dialog box opens where you can locate a file on your hard drive and upload it to your meeting room. The file limit size for any file you upload is 10MB.
Share My Webcam: Click this command, and you can share a webcam.
Preferences: Click Preferences, and the Preferences screen opens, as shown in Figure 37.6. In the Preferences window, you can determine whether participants require approval to enter your room or allow anyone having the URL to enter your room. In terms of permissions for attendees, you can choose to allow attendees to share their screens, share files, share a webcam, type notes on chat and draw on a white board, or limit the attendee participation to viewing your presentation only with questions they can type in a Chat Pod.
End Meeting: When you're finished with a meeting, choose Meeting

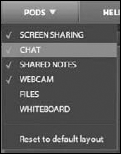
Pods: Pods are those items you see loaded when you log onto your meeting room. The large pod occupying most of your screen is the Screen Sharing pod where you display files you are discussing. On the right, as shown earlier in Figure 37.1, you see the Webcam, Chat, and Shared Notes pods. Open the Pods pull-down menu, and you find a few other pods, as shown in Figure 37.7.
The Files pod is a window that displays file uploads you and the attendees have made during a session. The Whiteboard is a drawing board where you can draw notes and markups using the elaborate set of tools shown in Figure 37.8.
Help: The Help menu provides some links to Web pages where you can customize settings and obtain help information on Adobe ConnectNow.
Invite Participants: This tool is used the same as choosing Meeting
Share My Computer Screen: This tool is used the same as choosing Meeting
Upload a File: This tool is used the same as choosing Meeting
Share My Webcam: This tool is used the same as choosing Meeting
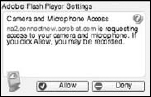
Share My Microphone: Click the tool, and the Adobe Flash Player Settings dialog box opens, as shown in Figure 37.9. To share your microphone (and also when you choose Share My Webcam), click Allow so participants can hear you when speaking into a microphone connected to your computer.
Set up your phone conferencing information: You can set up a phone conversation between you and your participants. Click this tool to set up the phone number.


When you want to host a session, you log onto your Adobe ConnectNow workspace using your Adobe ID and login information and arrive at the screen shown earlier in Figure 37.1. You send the URL for your meeting room to participants via an e-mail message.
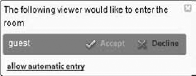
When a user logs onto your meeting room, and assuming you want to verify participants as they enter your room, the pop-up window shown in Figure 37.10 opens. To accept a visitor, click Accept.
When your participants are in attendance, click the Share My Screen button appearing in your Screen Sharing pod, and the Start Screen Sharing dialog box shown in Figure 37.11 opens. Click the Share button to confirm sharing your screen, and you arrive at another information screen, as shown in Figure 37.12. This screen is informational, and you can eliminate displaying it in subsequent sessions by clicking the check box for Do not show this message again.
At this point, whatever you display on your monitor is shown on your participants' screens. Your view when you share a screen appears as shown in Figure 37.13. The pods on the right are loaded by default. You can use the Chat pod to type messages and see responses from participants.


If you want to eliminate the view of the pods, click the close box (X) in the top-right corner of the Pods panel. Clicking the close box simply minimizes the view, and you can return to the Pods view by clicking the ConnectNow icon in the Status bar (Windows) or Dock (Mac).
Participants see the view shown in Figure 37.14. They can click the full screen button to open the window up to a full screen view, select tool options in the top-level toolbar, type text in the Chat pod, and share notes in the Shared Notes pod.
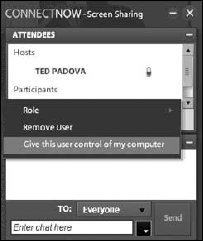
At times, you may want to give control over your computer to a participant to navigate documents or promote a user to share his screen. Click a user in the Attendees pod, and from the Role pop-up menu, you can promote a user to a host level. At the bottom of the menu, you can select Give this user control of my computer, as shown in Figure 37.15 and the participant can navigate documents on your computer.
All the options described in Adjusting settings are available where you can upload files, have participants upload files, use audio via a microphone, share webcams, use a white board, load additional pods, and promote users to host levels.


Using Adobe ConnectNow, you can host online meetings free for a maximum of three participants.
As a host, you are required to log on to Adobe ConnectNow with your Adobe ID.
Participants don't need an Adobe ID to participate in a meeting.
You can share your screen with participants, ask participants to share their screens with you, and allow participants to take control over your screen.
A number of tools and Pods are installed with ConnectNow that provide many options for sharing files, using audio and video, opening pods, finding helpful information, and more.