Adobe products have always focused on 2D graphics. Using special techniques, you could make 2D graphics have a 3D look, but the end result always could be printed. While the Adobe products have continued to introduce new features and more efficient workflows, a host of 3D programs have continued along the same vein.
Today several robust 3D packages are available such as Autodesk's 3ds Max and Maya, and the ability to produce 3D objects is becoming much easier. 3D objects are common in many avenues of graphical design. The ability to work with these assets defines an efficient workflow.
This chapter takes a closer look at working with 3D objects in CS4. Photoshop CS4 Extended includes a host of features for incorporating and working with 3D objects. Illustrator also includes the ability to work with basic 3D objects.
The 3D features available in Photoshop CS4 Extended include the ability to load, move, rotate, and scale 3D models. You also can paint on the surface of the 3D objects.
The first step in working with 3D objects is to load the 3D objects into Photoshop. 3D objects are saved using a 3D file format that keeps track of all the vertices, edges, and faces that make up the object. These formats also keep track of other information including the object's texture, any scene lights, and animations.
A large number of 3D file formats are available and Photoshop supports several of them. The supported file formats include the following:
U3d: This format is produced by Acrobat 3D Version 8.
3ds: This format is created by Autodesk's 3ds Max product.
obj: This format was initially created by Wavefront, but is a common format used by many different 3D packages.
kmz: This format is exported by Google Earth and holds geographical data used for maps and earth features.
Collada: This format is a fairly new non-proprietary format with broad industry support.
3D models saved using one of these formats are loaded into Photoshop using the File
3D models can be loaded into an existing document using the 3D
3D layers also can be exported from Photoshop to the U3d, OBJ, KMZ, and Collada formats using the 3D
Several tools in the Toolbox allow you to move, rotate, and scale loaded 3D objects. Once these tools are selected, you can drag in the scene to transform the 3D object or the view. These tools are available as flyouts under the 3D Rotate tool (N) and include:
3D Rotate tool: Rotates the 3D object about its center.
3D Roll tool: Spins the 3D object about its center point.
3D Pan tool: Moves the 3D object to either side.
3D Slide tool: Moves the 3D object toward or away from the current view.
3D Scale tool: Resizes the 3D object.
The Toolbox includes several tools that change the view of the 3D object. Changing the view keeps the 3D objects in their current orientation but changes the camera view that is used to view the 3D scene. This is most noticeable when several objects are next to one another. The tools under the 3D Orbit tool (K) flyout include:
3D Orbit tool: Rotates the camera view about the object's center.
3D Roll View tool: Spins the camera view about the object's center point.
3D Pan View tool: Moves the camera view to the left or right.
3D Walk View tool: Moves the camera toward or away from the center.
3D Zoom tool: Zooms into and out of the 3D scene.
When the 3D layer is selected and any of the tools in the preceding list are selected, a transformation widget is displayed in the upper-left corner of the document. Using this widget you can move, rotate, or scale the 3D object. As you move the mouse over the top of the transformation widget, different parts of the widget are highlighted yellow, as shown in Figure 14.2. Dragging when the different parts are highlighted yellow transforms the 3D object in different ways:

Conic arrows: Dragging when one of the conic arrows is highlighted yellow moves the 3D object along the highlighted axis.
Arched section: Dragging when one of the arched sections is highlighted yellow rotates the 3D object about the perpendicular axis. A ring appears about the rotation axis when highlighted.
Rectangular block: Dragging when one of the rectangular blocks is highlighted yellow scales the 3D object along a single axis.
Centered square block: Dragging the centered square block from which all axes extend causes the entire 3D object to be uniformly scaled.
Square plane: Positioning the mouse between two axes causes a square plane to appear. Dragging when this square plane is highlighted allows the 3D object to be moved within the defined plane.
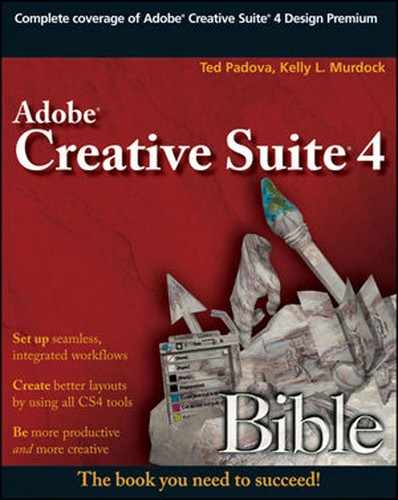
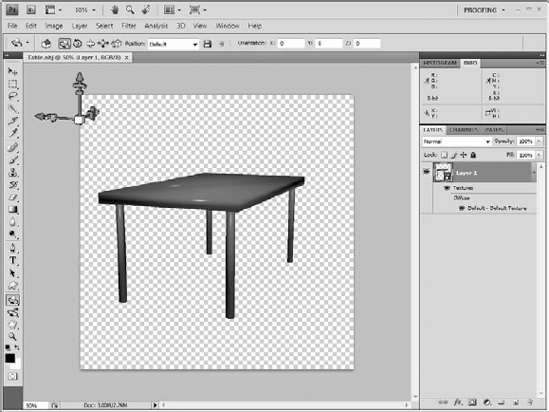
After the 3D model is transformed, you can save the view and recall these views using the controls on the Options bar. The drop-down list in the Options bar includes standard views for Default, Left, Right, Top, Bottom, Back, and Front. The Return button takes you to the initial camera position if the camera movement gets lost. Figure 14.3 shows the 3D table object after it has been rotated to its side.
Within the 3D menu are several menu options for making 2D drawings into 3D objects. These features include the following:
New 3D Postcard from Layer: Any layer can be placed on a 3D plane that can be rotated using the 3D tools. This menu converts any standard layer to a 3D layer as if it were place on a postcard. Figure 14.4 shows a kangaroo image that has been placed on a 3D postcard and rotated.
New Shape from Layer: This menu option includes a number of standard 3D primitive objects that are placed in a 3D layer. The available shapes include Cone, Cube, Cylinder, Donut, Hat, Pyramid, Ring, Soda Can, Sphere, Spherical Panorama, and Wine Bottle. Figure 14.5 shows the Wine Bottle 3D shape added on top of the table object.
New Mesh from Grayscale: Uses the grayscale values in a standard layer to create a 3D depth map. These depth maps can be Planar, Two-Sided Planar, Cylindrical, or Spherical.
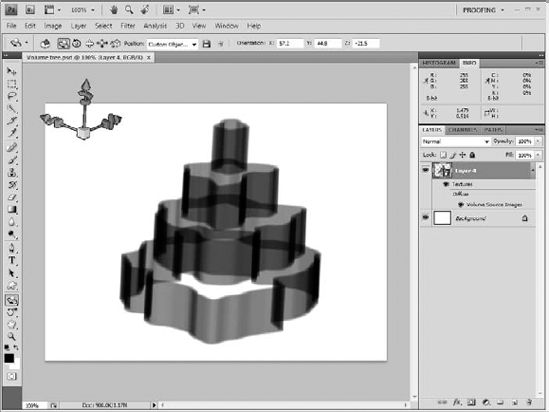
New Volume from Layers: This menu requires that you select at least two layers. Each layer defines a different cross-sectional area. Once selected, a dialog box appears where you can specify the depth of the volume for each cross-section. For Figure 14.6 several cross-sections of a tree were created on four different layers. All four layers were then selected and the 3D


3D objects are interesting, but sometimes they can be boring. Adding textures to the surface of a 3D objects adds a level of visual quality to the object. Photoshop is often used to create the textures that are applied to 3D objects, but using the 3D texturing and painting features in Photoshop is a much more efficient workflow.
When a 3D object is loaded into Photoshop, its textures are listed in the 3D layer in the Layers palette. These textures can be turned on and off using the Visibility icon. Better yet, if you click the texture name, you can open the texture in another window for editing.
3D objects can have several different textures. The default texture that holds the surface colors is called the Diffuse texture, but other textures are available. For example, the Bump texture holds the height of each surface point and is used to add bumps and relief to the model. The textures supported by Photoshop CS4 Extended include:
Diffuse: The Diffuse texture holds the surface color information.
Bump: The Bump texture holds the height information at each surface point.
Glossiness: The Glossiness texture defines how bright and sharp the highlights are at each surface point.
Opacity: The Opacity texture defines the places on the object where the surface is transparent or semi-transparent.
Shininess: The Shininess texture shows those places where the highlights are the strongest and where the object reflects its surroundings.
Self-Illumination: The Self-Illumination texture defines areas where the surface tends to glow like a light-bulb.
Reflectivity: The Reflectivity texture defines the areas where the surface is highly reflective.
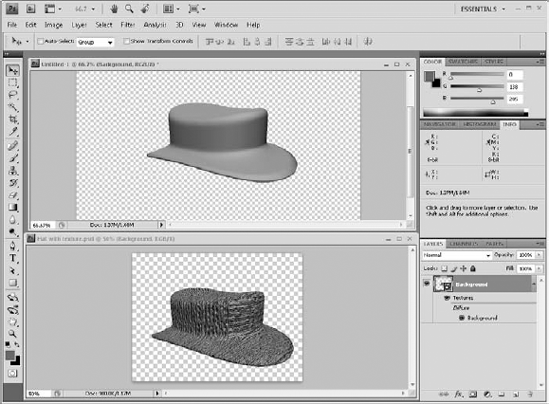
Typically the Diffuse texture shows colors, but other textures such as Bump and Opacity use a grayscale map to define how the Opacity is applied. White areas show where the surface is completely opaque and black areas show where the surface is fully transparent. Gray areas are semi-transparent. Figure 14.7 shows a 3D hat object with and without textures applied.
Once the 3D models are placed, you can define the visual style of the rendered objects using the 3D

For the Face rendering option, several face styles are available including Solid, Ray Traced, Unit Texture, Flat, Constant, Bounding Box, Normals, Depth Map, and Paint Mask. You also can specify a color to be used if no diffuse texture is present. You also can enable reflections, refractions, and shadows.
At the top of the Render Settings dialog box is a list of available presets. You also can define and save your own presets.
After the settings are configured, you can have Photoshop render the final result with all shadows and lighting effects with 3D
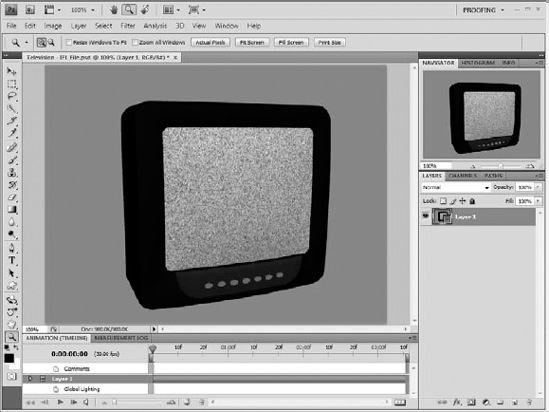
Photoshop CS4 Extended not only loads video and animation files; it also edits and paints on the frames of these files. Video and animation files that are loaded into Photoshop appear in the Layers palette as a special video layer, which is marked with a filmstrip-like icon in the lower-right corner of the thumbnail. The layer gives you access to the video's frames using the Animation palette.
The video formats supported by Photoshop CS4 Extended include MPEG, MOV, AVI, and image sequence formats including BMP, DICOM, JPEG, OpenEXR, PNG, PSD, Targa, and TIFF.
The Animation palette can display the video sequence in Timeline mode or in Frame mode. Timeline mode, shown in Figure 14.10, shows the duration of the sequence and all the animation properties. Frame mode displays a thumbnail of the animation at each frame.
Using the Animation palette menu, you can navigate and manipulate the timeline frames, copy and paste keyframes, and set the keyframe interpolation. Additional options let you change the frame rate and the sequence duration.
The 3D category of effects lets you convert simple 2D paths into simple 3D objects. The 3D menu includes three different effects—Extrude & Bevel, Revolve, and Rotate. For example, a simple square path can be made into a cube with the Extrude effect, and a half circle path may be revolved to create a sphere. 3D objects in Illustrator created with these effects include shading using controllable lights.
Extruding a 3D path is simply the process of adding depth to the path. This is accomplished using the 3D Extrude & Bevel Options dialog box, shown in Figure 14.11.
The Position field at the top of the dialog box lets you select one of the default preset positions. Selecting a position preset automatically updates the X-axis, Y-axis, Z-axis, and Perspective values. If any of these values are changed, then the Custom Rotation preset is used. The default position presets include positions such as Front, Left, Top, Off-Axis Front, Off-Axis Top, Isometric Left, and so on. Isometric views are views where the Perspective value equals 0 and all parallel lines remain parallel.
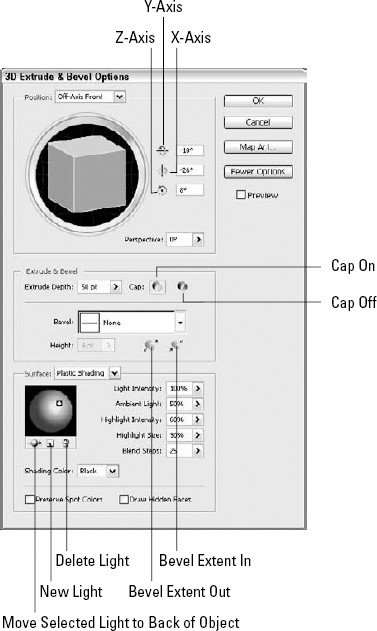
Figure 14.11. The 3D Extrude & Bevel Options dialog box lets you specify the direction and distance to extrude the selected path.
Tip
You can drag in the Preview pane, and the X-Axis, Y-Axis, and Z-Axis values are automatically updated. Dragging a cube face spins the object about all three axes, but clicking an edge spins the object about only a single axis.
The Extrude Depth value determines how far the path is moved to create depth. The Cap On and Cap Off buttons determine whether the extruded object is hollow or capped on either end.
The Bevel pop-up menu lets you choose the type of bevel to apply to the object. Each bevel type shows a profile curve. This curve matches the extruded portion of the object, and the Height value sets the maximum distance from the edge of the path. The bevel profile curve may be applied outward or inward using the Bevel Extent In and Bevel Extent Out buttons.
The Surface options define how the extruded object is shaded. The options include Wireframe, No Shading, Diffuse Shading, and Plastic Shading. If you click the More Options button, several lighting controls appear. Figure 14.12 shows several extrude, bevel, and shading options applied to an object.
The Wireframe option only draws the lines used to make up the 3D object. The No Shading option colors each face of the object using the selected fill and stroke colors. Neither the Wireframe nor the No Shading options have any lighting settings.

Figure 14.12. The Extrude & Bevel dialog box includes several options for creating extruded 3D objects.
The Diffuse Shading option colors each face a different shade depending on how the light is cast upon the object. For this option, you can specify the Light Intensity, the Ambient Light percentage, the number of Blend Steps to use, and the Shading Color.
The Plastic Shading option colors the object as if the light were shining on an object with the surface made of plastic. Plastic objects are highly reflective and include specular highlights. For this option, you also have settings for the Highlight Intensity and Size.
When either the Diffuse or Plastic Shading options are selected, you can position the precise location of the lights used to illuminate the object by dragging in the Lighting Preview pane. Using the buttons underneath the pane, you can move the selected light to the back of the object so it shines from behind, create new lights, or delete a selected light. Lights are represented by the small white dots, and a single object can have many lights.
The Light Intensity value determines the strength of the light, which is at 100 percent at the center of its highlight. The Ambient Light value determines how much background light is used to light the object. The Blend Steps value defines the number of different colors that are used to blend colors from the highlight to the shadows. The Shading Color is the color reflected off the object away from the highlight.
Within the Extrude & Bevel dialog box, the Map Art button opens another dialog box, shown in Figure 14.13, where you can select a Symbol to map onto the various surfaces of the extruded object.
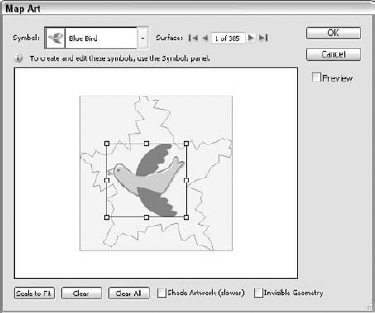
Figure 14.13. The Map Art dialog box lets you add symbols to the surfaces of the selected extruded object.
The Symbol pop-up menu lets you choose a Symbol from the active Symbol palette to apply to the selected surface. The Surface control includes arrows, which let you cycle through all the various surfaces that make up the extruded object. When a surface is selected, it is highlighted red in the art board.
Note
Symbols and the Symbol palette are covered in Chapter 9.
The Scale to Fit button causes the selected symbol to be scaled to fit within the selected surface. The Clear button removes the mapped symbol from the selected surface, and the Clear All button removes all mapped symbols from the entire object. The Shade Artwork option includes the mapped artwork as part of the shading calculations and the Invisible Geometry option may be selected to hide the geometry and show only the mapped artwork. Using the Invisible Geometry option is helpful to warp artwork along a 3D surface.
The Effect
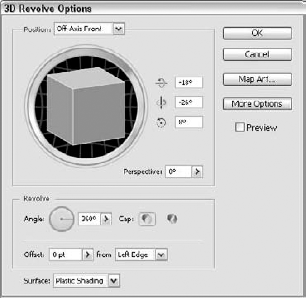
Figure 14.14. The 3D Revolve Options dialog box is similar to the dialog box for the Extrude & Bevel effect.
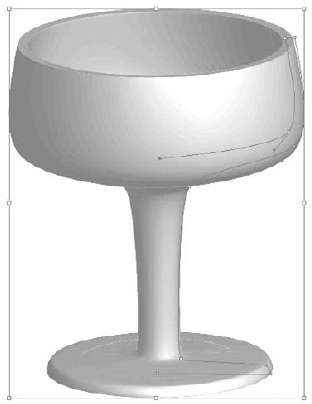
Using the Revolve effect, you can revolve a path about an axis to create a 3D object like the glass shown in Figure 14.15. The 3D Revolve Options dialog box lets you specify how much of an Angle to revolve about and whether the open ends are capped or not.
The Offset lets you specify the location of the center axis about which the selected path is revolved. The Surface options are the same as those for the Extrude & Bevel effect.
You can repurpose documents created in InDesign for use on the Web by exporting for Dreamweaver. This process bundles all the necessary files into a folder that Dreamweaver can use.
A site project includes many Web pages. You can create site projects using Dreamweaver's Site Wizard.
Dreamweaver is a robust editor for creating and designing Web pages. These Web pages can include a myriad of objects. You edit object properties using the Properties palette.
Cascading Style Sheets are an efficient way to apply text styles to a section of text within a Web page and to multiple pages throughout the site.
Dreamweaver includes templates for creating Web pages for mobile devices and features for editing and viewing mobile Web pages using Device Central.