As a professional designer, you wouldn't dream of using Microsoft Office documents for professional output and commercial printing. If all your work is limited to the design pieces you create without using Office documents collected from colleagues or clients, this chapter won't mean much to you. However, if you do receive documents from clients that you need to output to print or to host on Web sites, you'll want to look over some of the more common issues discussed in this chapter that you can potentially face when serving your customers who supply you with Microsoft Office files.
At times, you may need to output an Office file "as is" without reworking the documents by importing text from Word or charts and tables from Excel into InDesign. As stand-alone applications, Microsoft Office programs fall short of features needed for professional output. A book you create in Word can't be printed directly to most high-end devices due to a lack of print controls for screening, printer's marks, and other features needed to print to commercial printing equipment. Excel charts can't be color-separated from Excel. And PowerPoint's Print dialog box lacks attribute settings to successfully print slides to commercial printing devices.
As a design professional or printing technician, you can be certain that on occasion you'll be called upon to take your clients' Office files and prepare them for output to commercial printing devices. In this chapter, you learn how to prepare Office documents for printing on professional equipment.
If Word documents are designed to be taken from your clients without modifying them, you can choose one of two options to prepare the documents for professional output—either import the Word document in InDesign and then print from InDesign or print the Word file via Acrobat. Assuming you have a file like a book, manual, story, or other long publication primarily comprised of text, the labor involved in importing the file in InDesign and formatting pages with proper page breaks is going to take you much more time than if you find a way to print the existing document without reformatting it. The problem you encounter when printing Word files to high-end imaging devices is that the Microsoft Word Print dialog box doesn't give you options for selecting commercial print controls. Options such as printer's marks and setting halftone frequency are not available in the Word Print dialog box.
Note
For more information on controlling halftone frequency, see Chapter 40.
In order to print a Word file utilizing commercial print options, you need to get the Word document into a program capable of printing with these options or convert the file to Adobe PDF where the PDF can be printed from Acrobat. The method requiring the least amount of effort is converting the file to PDF.
For Word documents using standard page sizes, you can simply convert the Word file to PDF without fussing around with special page handling options. Conversion to PDF from all Microsoft Office programs is best achieved with the PDFMaker macro if you're a Windows user. Beginning with Acrobat 9 Pro on the Macintosh the PDF Maker is no longer supported. Mac users need to print to PDF to covert Word files to PDF documents.
When you install Acrobat on Windows, Acrobat tools are added to the Word toolbar. You'll find the PDFMaker tools and an Acrobat menu in Word if you're using MS Word 2003. If using Word 2007 on Windows, you can find the Acrobat tab in the Office Ribbon. On Windows, click Acrobat, and the Ribbon expands to the view you see in Figure 22.1.

Figure 22.1. In MS Word 2007 for Windows, click the Acrobat tab in the Ribbon to view options you have for converting Word documents to PDF.
Conversion to PDF from Word 2007 for Windows is easy. Click the Create PDF tool in the Acrobat tab in the Ribbon, and the Save Adobe PDF File As dialog box opens. Before converting to PDF, you can set some conversion options by clicking the Options button in the Save Adobe PDF File As dialog box. Choosing this action opens the Acrobat PDFMaker dialog box shown in Figure 22.2.
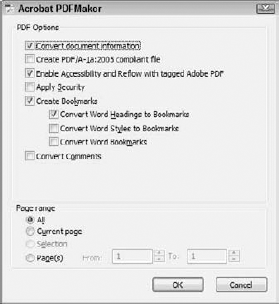
Figure 22.2. Click Options in the Save Adobe PDF File As dialog box to open the Acrobat PDFMaker dialog box.
When converting a Word document to be viewed as a PDF document, you may want to check the Create Bookmarks box and choose options for which styles to convert to Adobe PDF bookmarks. If you are preparing a file for print, you needn't bother with creating bookmarks.
Make your choices in the Acrobat PDFMaker dialog box, and click OK; then click Save when you return to the Save Adobe PDF File As dialog box. Your file is converted to PDF seamlessly and opens in Acrobat by default.
To convert to Adobe PDF on the Mac, choose File
PDF conversion from Microsoft Word using the PDFMaker tool (Windows) or printing to a PDF file (Macintosh) for standard page sizes is straightforward and requires little preparation. For documents that use custom page sizes, you need to prepare your printer driver and create any custom page sizes that are not part of the default set of page sizes.
Creating custom page sizes can be performed on both Mac OS X and Windows. The results are the same, but the means for achieving the results vary a little.
Custom page sizes on the Mac are handled a little different when using Mac OS X Leopard than when using Mac OS X Tiger and below. There have been a few minor changes to dialog boxes when using Page Setup; however, if you haven't upgraded to Mac OS X Leopard, you can follow the steps below and poke around a little in the dialog boxes to figure it out. On Mac OS X Leopard, do the following to create a custom page size in MS Word.
STEPS: Creating Custom Page Sizes in Word on Mac OS X Leopard
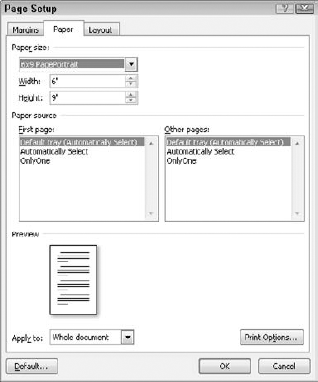
Open the Page Setup dialog box. While in Word, you need to have a document open to access the Page Setup dialog box. You can open a blank document and create a new custom page size or use an existing document to create the custom page size. If using an existing document, the Word file will reform to the new page size after you create it. To begin, open the Page Setup dialog box by choosing File

Set the page size attributes. Type the width and height for your new custom page size in the Width and Height text boxes. Below the Printer Margins pull-down menu, edit the margins in the four text boxes.
Add the new size to the list of available sizes. Click the plus (+) symbol on the left side of the dialog box. The attributes defined in the text boxes are added as a new custom page size.
Name the new custom page size. When you click the plus (+) symbol your new custom page is added with an Untitled label. Double-click Untitled and type a name for your new page size. Use a descriptive name for the page such as simply using the page dimensions as a name. In Figure 22.5, you can see several custom page sizes all labeled with the page dimensions.
Select the page size. Click OK after defining a new custom page size. You are returned to the Page Setup dialog box. Open the Paper Size pull-down menu and select your new custom page size. The size is dynamically added to the menu after creating it in the Custom Page Sizes dialog box. If you have a document open in MS Word, the file reforms to the new page size and margins. You are now ready to create a PDF document suitable for commercial printing.


Warning
If the Word file you use to convert to PDF contains any graphic images, you'll need to lay out the final document in InDesign. Your clients are likely to use graphic formats not suitable for commercial printing. Steps noted here are designed to assist you when needing to print text-only documents.
In some CS4 applications, when you create custom page sizes, it's important to remember to return to the Page Setup dialog box after creating a new custom page size. In programs like Adobe InDesign, custom pages are set up in the InDesign Print dialog box. When you first create the page size, you haven't set the document to the new size. Choose File

If you're using Microsoft Word, your document conforms to the page size. You may need to readjust margins and examine a file if you're changing page sizes in documents that you have created at another page size. After examining the file for correct page setup, print to PDF, and the new PDF document is created with the page margins adhering to the page size you selected in the Page Setup dialog box.
Windows users follow a similar path as Mac users when creating custom page sizes. On Windows, your first task is to go to the Desktop and open the Start menu. Choose Settings
There are several settings you need to make on Windows to create a custom page size for your printer. To understand the process more clearly, Windows users should look over the following steps.
STEPS: Creating Custom Page Sizes in Windows
Open the Adobe PDF Properties. From the Start menu, select Settings
The Adobe PDF Properties dialog box opens, as shown in Figure 22.8, with the General tab selected by default.
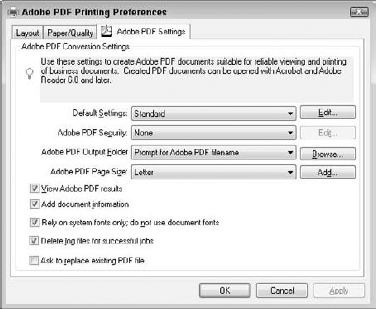
Open the Printing Preferences. In the Adobe PDF Properties dialog box, shown in Figure 22.9, click the Printing Preferences button. The Adobe Printing Preferences dialog box opens. In this dialog box, click Adobe PDF Settings, as shown in Figure 22.9.
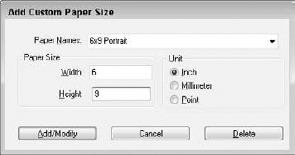
Add a new custom page size. Click the Add button to open the Add Custom Paper Size dialog box, as shown in Figure 22.10.
Edit the Custom Page Size. Type the width and height values in the Width and Height text boxes, and select the unit of measure from the Unit section of the dialog box. Type a name for the custom paper size in the Paper Name text box. Use a name that defines the page size, as shown in Figure 22.10.
Save the new custom page size. Click the Add/Modify button in the Add Custom Paper Size dialog box, and you return to the Adobe PDF Printing Preferences dialog box. Click OK, and your new custom page size is available each time you use the Adobe PDF printer driver.
Set up a Word document with a custom page size. Open Microsoft Word, and open a file or create a new document.
By default Word 2007 doesn't have a Microsoft Menu
Convert to Adobe PDF. Click the Convert to Adobe PDF tool in the Word Toolbar Well. If you enabled the View Adobe PDF result option in the Acrobat PDFMaker Settings tab, the resulting PDF opens in Acrobat.

Note
Creating custom page sizes is particularly important for programs like Photoshop, Illustrator, and the Microsoft Office applications where you want to print oversized color documents for trade-show panels, display prints, and similar output. When converting files to PDF, always be certain you have the proper page size defined for the Adobe PDF Printer before attempting to convert to PDF. Acrobat supports a page size of up to 200 inches by 200 inches.
If you print a lot of Word files with different sizes or you don't want to set up custom pages in Word or any other program, you have an alternative in Acrobat for printing files with trim marks. If a page size large enough to accommodate trim marks using your printer's PPD is not available to you, you can use Acrobat to create a size large enough to print the marks on your output device.
To understand how to apply trim marks and create larger page sizes to accommodate the marks in Acrobat, follow these steps.
STEPS: Applying Trim and Crops in Acrobat
Convert a Word file to PDF. Use a standard letter-size page and convert to PDF using the PDFMaker (Windows) or print to PDF (Mac). Note that the steps here can be applied to any document converted to PDF. If your client sends you files from other programs, you can print using the same steps.
Open the file in Acrobat. After conversion to PDF, launch Acrobat and open the file or open the Bridge and locate the PDF document. Double-click the PDF in the Bridge to open the file in Acrobat.
Adjust the Page Setup. Before opening the Print dialog box, be certain to double-check the Page Setup for page size and orientation. Acrobat has a nasty habit of always defaulting to U.S. letter-size pages with Portrait orientation rather than defaulting to the document's page size and orientation. If printing a landscape page, be certain to make the proper selection in the Page Setup dialog box.
Open the Print Production tools. Open a context menu on the Acrobat Professional Toolbar Well by right-clicking (Windows) or Control + click (Macintosh with a one-button mouse) and select Print Production from the menu commands. Alternately, you can select View
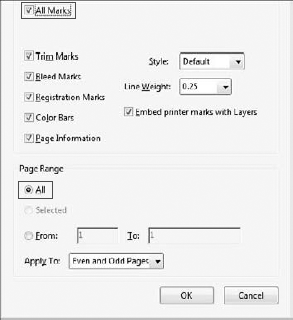
Add printer marks. Click the Add Printer Marks tool in the Print Production toolbar. The Add Printer Marks dialog box appears.
Set the printer marks attributes. If you want all printer marks options provided in Acrobat, select the All Marks check box. If you want selective marks, select the check boxes for the marks you want to appear on the printed page. If you have a multi-page document, be certain to select the check box for All under the Page Range category, as shown in Figure 22.13.
Apply the marks. Click OK in the Add Printer Marks dialog box. The marks are applied to the page. A warning dialog box opens informing you that you may need to expand the crop box using the Crop dialog box. Click OK in the warning dialog box to proceed.
Open the Crop Box. If you applied crops to a page size equal to the page size you have selected in the Page Setup dialog box, you won't see the crop marks on the page in the Document pane. The marks are there, but you need to expand the page size in order to see the marks. To add more page area to accommodate the marks, you begin by opening the Crop Box. Click the Crop Pages tool in the Print Production toolbar and the Crop Pages dialog box opens.
Define a custom size. Select the Custom radio button and add the width and height dimensions to accommodate the trim marks. Add one-half inch to the existing page size in the Width and Height text boxes.
Select the page range. If you want all pages to print with marks, select All in the Page Range area of the Crop Pages dialog box. Custom page ranges can be selected by selecting the From radio button and typing the page ranges in the two adjacent text boxes.
Preview the results. Observe the thumbnail preview and note the new page size reported below the page preview. Adjustments in our example are shown in Figure 22.14 for a custom page cropped to 8 inches x 10 inches. (Note that in Figure 22.11 we started with a page size that was 7 × 9 inches, hence after adding .5 inches to each side we end up with a page size of 8 × 10 inches.)
Apply the crop settings. Click OK to return to the Document pane.
Observe the results. When you return to the Document pane view the current page to be certain all printer marks appear on the page as shown in Figure 22.15. The file is now ready to print.
Adjust the Page Setup. Before opening the Print dialog box, be certain to double-check the Page Setup for page size and orientation. If printing a landscape page, be certain to make the proper selection in the Page Setup dialog box.

Tip
If you want to create client proofs for custom page sizes on your desktop color printer, you can use the same steps outlined here. Crop marks can be added to a PDF file created from any authoring program. Add the printer marks and crop the pages. Print the file to your desktop printer and trim the pages to the crop marks for a client proof. If creating standard U.S. letter or larger pages with bleeds, you can print to oversized paper (like tabloid) and trim to the bleed edges.
These steps work well for preparing a file for print on a desktop printer and when sending a file to a print shop. If your work is finished as a designer, you don't need to bother with any further editing. If you're a technician at a print shop, then you have one other issue to deal with before a file is printed to plate or to press. You need to be concerned about the color. Office applications default colors to RGB. The blacks in a Word file are specified in RGB color. For professional printing you need to convert all RGB blacks to K (or black). In Acrobat Pro 9 and above you have some new tools for color conversion found in the Print Production tools. We explain more in the chapter where we talk about professional printing.
Note
For more information on printing PDF files to commercial printing devices and converting color, see Chapter 40.
In design workflows, it's very common to receive PowerPoint files from clients who want to print to large-format color printers for display posters and trade-show panels. PowerPoint is a primary application used for graphics representations by business workers for everything from slide presentations to large prints. When you need to print slides to desktop color printers, you don't need any CS application interventions. However, when you want to output a PowerPoint slide to large-format devices and commercial printing equipment, you need to get the PowerPoint slides to CS applications to access features such as oversized printing, printing with crop marks, setting halftone frequencies, and so on.
To export a PowerPoint file for oversized printing, you use the Print dialog box and set the page size to your output size in the printer Properties dialog box. To begin setting up an oversized print, choose File

Figure 22.16. In the Print dialog box, you make choices for the printer driver by selecting options from the Name (Windows) pull-down menu.
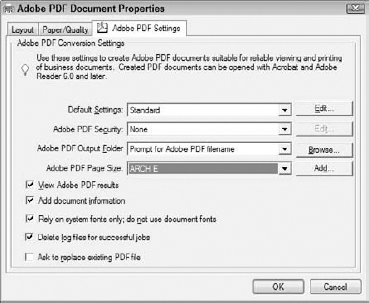
To adjust the page properties, click Properties, and the Adobe PDF Document Properties dialog box opens, as shown in Figure 22.17. From the Adobe PDF Page Size drop-down list, select a fixed page size as close to your final output size as possible. If you try to set up a custom page size, PowerPoint may produce some unexpected results and the actual output size may be clipped.
Click OK after making adjustments, and you're returned to the Print dialog box. Select the Scale to Fit Paper check box and click OK. The Save dialog box opens, prompting you to name the resultant PDF document and target a location on your hard drive. Click Save and the PowerPoint slide is exported to PDF.
If you don't find an exact fit for a page size in the Adobe PDF Document Properties dialog box, you can open the PDF document in Photoshop and size to final dimensions. When you open a PDF document in Photoshop, where the PDF was created from any other source but Photoshop, the Import PDF dialog box opens, as shown in Figure 22.18.
In this dialog box, you can specify the resolution of the file to rasterize it. If you need a file sized 300 percent, be certain to select a resolution that accommodates a 300 percent size at the target resolution for the printing device. For example, suppose you have an 8-x-10-inch document that needs to be sized 400 percent to produce a final image size of 32 inches x 40 inches. If the required resolution for the printing device is 150 dpi, you need to set the resolution in Photoshop's import dialog box to 600 ppi (pixels per inch). As you decrease the resolution, the physical size proportionately changes.

Figure 22.18. Opening PDF files in Photoshop created from any program but Photoshop opens the Import PDF dialog box.
Note
Rasterizing data in Photoshop is the process of converting objects, such as drawing objects and text to pixels. As objects, the elements contain no resolution and always print at the resolution of the printing device. Raster images that are pixel based have fixed resolutions. Through the process of rasterizing vector objects and text, you can determine the resolution you want the final file to be.
To understand more about opening PowerPoint files converted to PDF and rasterizing the file in Adobe Photoshop CS4, follow these steps.
STEPS: Rasterizing PDFs in Adobe Photoshop
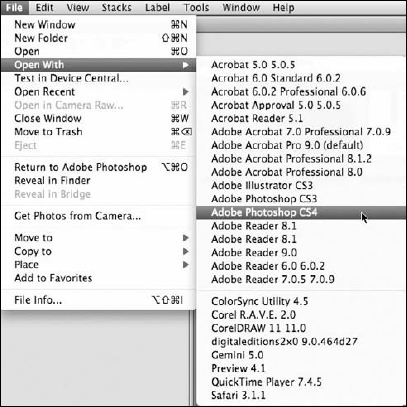
Open a PDF in Photoshop. Open the Bridge and locate the PDF file you want to open in Photoshop. If you need to convert a PowerPoint document to PDF, follow the directions outlined at the beginning of this section. From the Bridge menu, open a context menu on a document thumbnail and select Open With. From the submenu, select Photoshop CS4. Alternately, you can select File
Note
For more information about opening files from Adobe Bridge, see Chapter 6.
Select a page to open. The Import PDF dialog box offers all the options you need to rasterize a PDF in Photoshop in a single dialog box. You have an option for selecting any page in a multi-page PDF document to rasterize. From the Thumbnail Size pull-down menu, select Large if you need to see a larger thumbnail view. Click a page thumbnail to select it to open in Photoshop and click OK. (Refer to Figure 22.18.)
Tip
If you want to rasterize multiple pages, you can Shift+click or

Select the resolution to rasterize the file. Type in the field box the resolution you want for the final file size while considering how much you need to increase or decrease the file dimensions. Where you see Bounding Box selected in the Crop To pull-down menu, be certain to leave the menu choice at the default. A Bounding Box selection opens the file at full size without cropping the page(s).
Warning
If the resolution for images imported into PowerPoint is not sufficiently sized for a larger output size than the image resolution can support, the final file may show significant image degradation. For example, if you import a Photoshop image in PowerPoint at 72 ppi to fit on a 10x7½-inch slide and output the slide for a 40x30-inch print (a 400 percent increase in size), the Photoshop image is reduced to an effective resolution of 18 ppi (25 percent of the original size). If you open the PDF file in Photoshop and add resolution to the file, the resolution is interpolated and will noticeably degrade the image.
Select the color mode. If using the final image for Web use, leave the default selection as sRGB. If using the file for print, select RGB for the color mode. Be aware that if you intend to print the file on large format color printers, the preferred color mode is RGB. Do not use CMYK.
Set the Bit depth and anti-aliasing. Under most circumstances, 8-bit images are fine. You typically won't achieve any better options when rasterizing PowerPoint slides, especially when the slides contain photos. However, if rasterizing vector art, select 16-bit from the Bit Depth pull-down menu. You can make some adjustments in Photoshop in 16-bit mode that won't destroy some precious data. Be certain also to select the Anti-aliased check box especially when you have type on the slides. Anti-aliased type rasterized at the recommended device resolution will print much better.
Open the slide in Photoshop. Click OK, and the slide is rasterized and opens in Photoshop. If you add 300 ppi or more to the resolution, you may need to wait a few minutes for Photoshop to complete its work and open the file.
Change the image size to the desired output size. Choose Image
Add a new layer to the Photoshop file. If you submit files to imaging centers for output to large format devices, the files are typically not printed from a Print dialog box and, as such, won't be printed with trim marks. Quite often, large-format color prints in TIFF format are submitted direct to the device RIP (Raster Image Processor) for output while bypassing printing from an application program. If you have any white space on the image, particularly at any corner, it will be difficult to accurately cut the print to final size. To be certain your file is trimmed properly at a service center, add your own trim marks in Photoshop. To begin, create a new layer in Photoshop by clicking the New Layer tool in Photoshop's Layers palette. Drag the new layer down in the Layers palette so the new layer is behind the image layer.
Change the canvas size. Choose Image
Add a trim color. Click the empty layer (first layer in the Layers palette, as shown in Figure 22.21), and fill the layer with Black. (Press D to return to the default colors of black foreground and white background. Press Option/Alt+Delete/Backspace to fill with the foreground black color.) If the edges or your image area is black, use another color for the trim color. Any contrasting color will work, but don't select white.
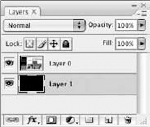
Figure 22.21. Add a new layer below the content layer and fill it with black after resizing the canvas.
Warning
If you have transparency inside the image area, you need to add a white layer between the content layer and the new layer you fill with black.
Flatten and save. Flatten the layers in the Layers palette and choose File
Note
For more information on using Layers in Photoshop, see Chapter 25.


With Microsoft Excel, you find the same lack of support for commercial printing devices as you have with Word and PowerPoint. No support for color separations, printer's marks, or specification of halftone frequency is available in the Microsoft Excel Print dialog box. The process for conversion to PDF is the same in Excel as in Word. Use the PDFMaker in Excel on Windows or the Adobe PDF Printer in the Print dialog box on the Macintosh, and the Excel worksheet is exported to PDF.
Tip
If you want to use more sophisticated typesetting features when formatting tables, import the Excel files in InDesign. InDesign offers you much more advanced type features in a layout view that provides a print preview while laying out the table.
If an Excel chart is something you want to introduce in a design for print, you can import the PDF file in InDesign. If you need to rework the file and make edits to type, you can convert to PDF and use Acrobat's Copy Table command to copy text in a table, then paste the text in InDesign. You can also copy a chart from Excel, paste it into Illustrator, and after saving the Illustrator file, place it into an InDesign layout.
Note
For more information on working with type from Microsoft Excel, see Chapter 30.
If you have charts you want to edit and prepare them for output to commercial printing devices, you copy a chapter in Excel and paste it into Illustrator. This method is shortest and requires the least amount of work to prepare a file for printing.
You can also convert to PDF and open the PDF document in Adobe Illustrator. If you use this option you most likely need to change fonts and re-form paragraphs for editing. Illustrator will open the PDF document generated from Excel and almost every other program with broken lines of text. In Figure 22.23 you can see how Illustrator sees type after opening a PDF file created in a program other than Illustrator. When selecting the type, you can see that each line is broken into separate characters—indicated by the multiple anchor points on each line of type.

Figure 22.23. Illustrator doesn't maintain paragraph formatting when opening PDFs generated from any program but Illustrator.
If you need to re-form a paragraph in Illustrator, select all the text and copy it to the clipboard. Select the Horizontal Type tool and drag a marquee around the area approximately at the same boundaries as the original text occupied. Choose Edit

Figure 22.24. To re-form text into paragraphs, cut the text and paste it back into Illustrator as area type.
Note
For more information on working with type in Illustrator and creating area type, see Chapter 21.
Microsoft Word documents that you want to print to commercial printing should be converted to PDF and edited to support professional printing standards.
You can create PDF documents from Word files with nonstandard page sizes by adding custom page sizes to your printer driver.
You can add printer marks to a PDF document in Acrobat and increase the page size to accommodate the marks.
You can export PowerPoint files to PDFs tor print large display prints. To crop and size files, open the PDFs exported from PowerPoint in Photoshop.
When you open PDF files in Photoshop that were not originally created in Photoshop, all vector objects and type are rasterized.
You can export Excel files as PDFs and edit them in Illustrator.
To reform text blocks to regain paragraph formatting in Illustrator, select text with the Direct Selection tool, cut the text, and paste it back into the document.