After you create a layout, you may need to modify it. For example, embedding all the images you use in your layout in an InDesign document may result in a large, difficult-to-handle file size. However, you can place links to the larger original artwork elements within InDesign to make your file more manageable and embed smaller elements. You also can anchor graphics to a section of text so the graphic moves as the text moves.
This chapter shows you how to access links via the Links palette to see what links you need to relink, move, update, or embed, as well how to update edited image files.
When you place images in an InDesign document, the image file isn't copied into InDesign. Instead, a lower-resolution version of the image displays allowing you to position the image in the layout while maintaining a link to the original image. Using links to the original image helps keep the size of the InDesign document manageable. When you print, package, preflight, or export the document, all the links are followed and the original images are used. The original images also are used when the High Quality Display option is selected.
Note
This chapter mainly focuses on the features found in InDesign, but Illustrator includes a similar manner of using linked artwork.
You place images using the File
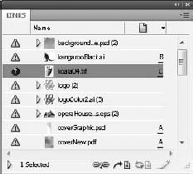
The Links palette, shown in Figure 26.1, lists all placed files in an InDesign document. It also lists the file's location in the document. You open the Links palette by choosing Window
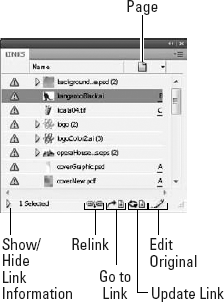
Depending on the state of the linked file, one of the following icons may appear to the right of the file name:
Missing file: A red stop sign icon indicates that the placed file is missing. This means that the defined link is broken and that the file has been moved or renamed or is on a network or CD-ROM that can no longer be found.
Modified link: A yellow triangle icon denotes that a more up-to-date version of the placed file is available and that you need to update the link.
Embedded link: A gray square icon marks any embedded linked files within the current document.
Layer Visibility Override: This icon shows up when the Layer Visibility Override toggle is enabled for the linked file. This uses the layer visibility settings for the InDesign document instead of the native application.
You can sort the placed files listed within the Links palette by Name, Page, Type, or Status using the commands found in the palette menu. You also can change the column arrangement using the Panel Options dialog box.
If you want to pull all of the linked files from their various places on your hard drive to a single folder, you can use the Copy Links to command in the Links palette menu. This is a handy command if you want to bundle the entire document with all its linked files together into a single folder.
All placed files in the Links palette have links that point to the original file location. If you double-click on a placed file in the layout with the Option/Alt key held down, the original file opens within the application originally used to create it. You also can open a file in its original application by selecting the Edit Original palette menu command in the Links palette or by selecting an item in the Links palette and clicking the Edit Original button at the bottom of the palette. Another option is to open the selected object with another application using the Edit With option.
The Links palette also is helpful in locating files placed within InDesign. Selecting a placed file in the Links palette and choosing the Go to Link palette menu command displays the page upon which the placed file is located and selects the placed content. You also can jump to the linked content by clicking the page number shown to the right of the object in the Links panel. Alternatively, you can retrieve information by clicking the Go to Link button at the bottom of the Links palette. If a placed object is selected, then its corresponding link is highlighted in the Links palette.
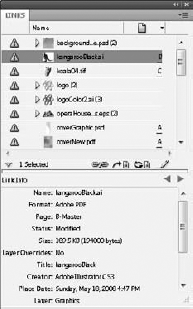
If you click the Show/Hide Link Information button in the Links panel, the lower panel reveals the Link Information for the selected link. This panel, shown in Figure 26.2, shows information about the linked file including its name, the last date it was modified, size, color space, file type, and so on. It also lists the link to the original object with a Relink button.
Clicking Relink in the Link Information dialog box opens a file dialog box that points to the selected placed file. If the linked file displays the Missing Image icon, you can use this button to locate the original file and reestablish the link.
If you do not select objects in the Links palette, selecting the Relink palette menu option or clicking the Relink button at the bottom of the palette causes InDesign to scan for any missing placed files. When a missing placed file is found, a file dialog box opens, allowing you to locate the missing file. When the file is found or when you click the Skip button, the list is scanned again until all the missing files have been relinked.
Any out-of-date placed files may be manually updated using the Update Link palette menu command or by selecting the file link in the Links palette and clicking on the Update Links button at the bottom of the palette. The same tip for scanning the files in the Links palette can be used to update links. If no objects are selected, you can click the Update Link palette and InDesign will scan and present a dialog box for each file that needs to be updated.
STEPS: Relinking Placed Image Files
Open an InDesign document. Choose File

Open the Links palette. Choose Window
Relink missing files. From the palette menu, select the Relink palette menu command. InDesign scans the Links palette and presents a file dialog box, for each image file that is missing. The Links palette displays all missing files at the top of the Links palette for easy reference. Locate the missing file, and click the Open button. Repeat this step for all missing files.
To ensure that images don't end up missing, you can embed them within the InDesign document using the Embed File palette menu command from the Links palette. This action places a small gray square icon next to the image's name in the Links palette and disables the link to the original file. Any future changes made to the original image file do not update in InDesign. In addition, the InDesign file size increases to accommodate the embedded file.
Warning
Embedding images increases the file size of the InDesign document and should be used judiciously.
You unembed embedded files using the Unembed File palette menu command or by relinking the file to its original.
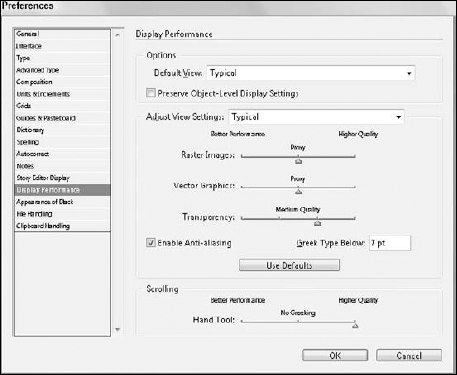
For placed images, you can set the display quality of raster images, vector images, and images that include transparency. The three display options available for placed images include Fast, Typical, and High Quality. Figure 26.4 shows an example of each of these options.

You set the Display Performance level for the selected object by choosing Object
In addition to changing the display quality for the selected object, you can also change it for the entire document. For the current view, you can select each of the following settings by choosing View
Fast: Alt+Ctrl+Shift+Z in Windows; Option+

Typical: Alt+Ctrl+Z in Windows; Option+
High Quality: Alt+Ctrl+H in Windows; Option+
The Preserve Object-Level Display Settings option causes the various display quality settings for all placed images to be remembered after the document is saved, closed, and reopened. This setting is off by default, which causes all objects to use the display settings specified in the View menu to be used when the document is opened again.
The display quality settings are configurable using the InDesign/Edit
Anchored objects, which can include text frames, placed graphics, or even groups, are attached to a section of text. When the text frame moves, the anchored object moves with it. This is convenient for sidebars or inline graphics that highlight some text.
To create an anchored graphic, you need to select a text position with the Type tool, then choose File
Tip
An existing placed graphic can be anchored by cutting the graphic by choosing Edit
Figure 26.6. Anchored graphics are created by placing an image when a text position is selected with the Type tool.
With the anchored graphic selected, choose Object
Inline anchored objects can only be moved up or down within the text object, but custom anchored objects can be positioned anywhere in the layout. For the Inline position, you can set the Y Offset and the Above Line position lets you set the Alignment to Left, Center, Right, Towards Spine, Away from Spine, or according to the Text Alignment. You also can set the Space Before and After the anchored object. The selected anchored object can be moved manually by dragging on the object if the Prevent Manual Positioning option isn't selected.
If you want even more control over the position of the anchored object, you can select the Custom Position setting, which gives you many more options. Custom anchored objects can be positioned with referenced points on either side of the spine by enabling the Relative to Spine option. There are also settings for specifying the reference point for the Anchored Object and the Anchored Position. The X position can be relative and offset from the Anchor Marker, Column Edge, Text Frame, Page Margin, or Page Edge, and the Y position can be positioned relative and offset from the Baseline, Cap Height, Top of Leading, Column Edge, Text Frame, Page Margin, or Page Edge. There is also an option to Keep within Top/Bottom Column Boundaries to insure that the column layout is maintained.

In addition to graphics, you also can anchor text frames or any other frame type. Anchored text frames are created in the same way that graphic anchors are created by selecting a text location with the Type tool and choosing Object
The Insert Anchored Object dialog box lets you select the object type using the Content setting, which can be Text, Graphic, or Unassigned. You also can select an Object and Paragraph Style and the object Height and Width.
To break the link between an anchored object and its text object, select the anchored object and choose Object

STEPS: Anchoring Graphics to Text
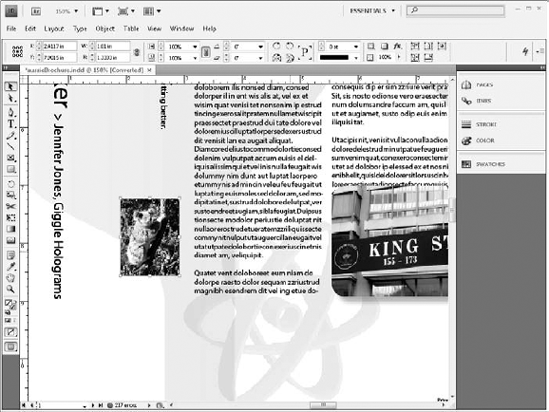
Open a layout file in InDesign. For this layout, you anchor an image of a koala to the third page.
Select the anchoring text. Click the Type tool from the Toolbox, and place the text cursor at the start of the second paragraph on the third page, which is the anchor text for the graphic.
Warning
Don't select any text in the text frame or the placed graphic replaces the selected text.
Create an Anchored Object. With a text position selected within the anchor text frame, choose File
Set the options for the Anchored Object. With the Selection tool, click the anchored graphic and choose Object
Reposition the Text Frame. With the Selection tool, select and drag the text frame to the right. Notice how the anchored graphic moves along with the text frame.