
Now that you know how to enter and run a simple C program on Arduino, let's look at some additional programming constructs. Specifically, you'll see what to do when you want to decide between two instructions to execute and how to execute a set of instructions a number of times.
As you have seen, your programs normally start with the first line of code and then continue executing the next line until your program runs out of code. This is fine, but what if you want to decide between two different courses of action? We can do this in C using an if statement. The following screenshot shows some example code:
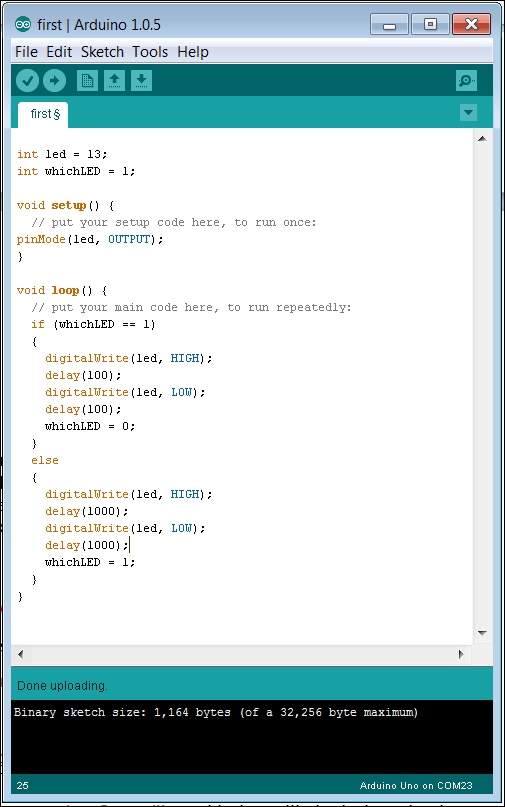
You'll need to make several changes this time. The first is to add another global variable, int whichLED = 1; at the top of your program. Then, you'll need to add several statements to your loop() function. The line-by-line details are as follows:
if (whichLED == 1): This is theifstatement. Theifstatement evaluates the expression inside the parentheses. This is the check statement. If it is true, it executes the next statement or a set of statements enclosed by{}. Note that we use the==operator instead of a single=operator. A single=operator in C is the assignment operator, which means the storage location on the right is assigned the value on the left. The==operator is a comparison operator, and returns true if the two values are equal and false if they are not.{: This begins the set of statements the program will execute if the comparison statement is true.digitalWrite(led, HIGH);: The four statements that turn the LED on and off at a 100 msec rate aredelay(100);,digitalWrite(led, LOW);,delay(100);, andwhichLED = 0;.ThewhichLEDvariable is assigned a value of 0. This will make sure the next time through the loop it will execute the else statement.}: This ends the set of statements that will be executed if the comparison statement is true.else: This statement, which is optional, defines a statement or set of statements that should be executed if the comparison statement is false.{: This begins the set of statements the program will execute if the comparison statement returns false.digitalWrite(led, HIGH);: The four statements that turn the LED on and off at a 1000 msec rate aredelay(1000);,digitalWrite(led, LOW);,delay(1000);, andwhichLED=1;. ThewhichLEDvariable is assigned a value of 1. This will make sure that next time it will execute the if statement through the loop.
When you have this code typed in, you can upload it. When it is uploaded, you should see a short flash of the LED, followed by a longer flash, much like a heartbeat.
Another useful construct is the for construct; it will allow us to execute a set of statements over and over for a specific number of times. The following screenshot shows an example using this construct:
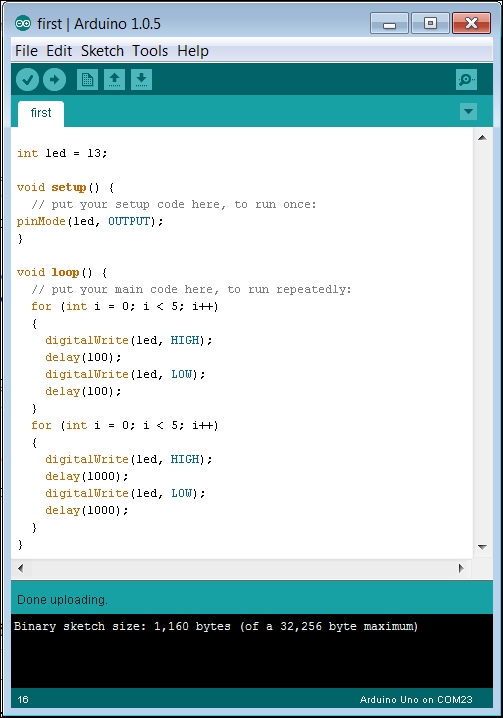
The code in the preceding screenshot looks very similar to the code you've used before, but we've added two examples of the for construct. Some details of the loop() function are as follows:
for (int i = 0; i < 5; i++): This loop consists of three elements. Theint i = 0;is the initializer statement. It is only done once when you first execute the loop. In this case, the initializer statement creates a storage location namediand puts the value of0in it. The second part of the loop statement is the check statement. In this case, the check statement isi < 5. If the statement is true, the loop executes. If it is false, the loop stops and the program goes to the next statement after theforloop. The final part of theforloop is a statement that is executed at the end of each loop. In this case, the statementi++simply means the processor will add one to theivalue at the end of each loop. This will be looped five times foriequals to 0, 1, 2, 3, and 4. The check statement will fail wheniequals 5 and the loop will stop.{: This bracket defines the start of the statements that may be looped.digitalWrite(led, HIGH);: The statements that will be executed each time through the loop and flash the LED light quickly aredelay(100);,digitalWrite(led, LOW);, anddelay(100);.}: This ends the loop. When this statement is reached each time through the loop, the loop statement is executed and the execution goes back to the top of the loop, where the check statement is evaluated. If it is true, the statement is executed again. If it is false, the loop stops and the statement following the loop is executed.for (int i = 0; i < 5; i++): This is another loop, just like the previous one, except it flashes the LED for a long time. Just like the first loop, it is executed five times.{: This bracket defines the start of the statements that may be looped.digitalWrite(led, HIGH);: The statements that will be executed each time through the loop and will flash the LED light quickly aredelay(1000);,digitalWrite(led, LOW);, anddelay(1000);.}: This ends the loop.
Now you can upload the program and see that there are five long flashes of the orange LED followed by five short flashes.