
AutoLISP is a programming language supported by AutoCAD that can greatly enhance your productivity by automating often-used or repetitive tasks. AutoLISP provides a glimpse into the inner workings of AutoCAD and can serve as an excellent steppingstone to learning more advanced automation methods, such as ObjectARX and VBA. An AutoLISP routine gives you complete control over its interaction with the user and what it does after it's loaded.
Note
AutoCAD LT does not support AutoLISP. This entire chapter is for AutoCAD only.
You can type AutoLISP expressions on the command line in response to prompts, or you can save your code to a file that you can load and use when needed. AutoLISP offers wide and varied possibilities for shortcuts. Best of all, you can customize AutoLISP to any level of complexity.
AutoLISP intimidates many AutoCAD users, but the many benefits well justify the time that you invest to learn this full-featured programming language.
You can also find a tremendous number of AutoLISP routines on the Internet. Many CAD Web sites offer huge libraries of AutoLISP routines as free downloads. (For more details, see Appendix B.) Many CAD offices have created AutoLISP routines to expedite some common tasks.
LISP stands for List Processing (not Lists in Silly Parentheses, as some say!). As you see in the next chapter, the understanding of lists is crucial to using AutoLISP.
Most AutoLISP routines define a command name, which you then type at the command line in AutoCAD to run the routine. Some routines include a dialog box to help you choose options and specifications.
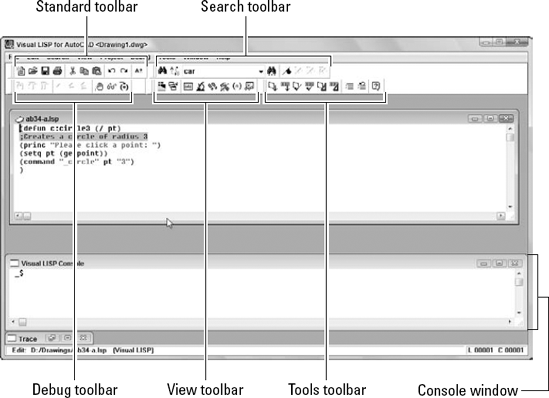
Visual LISP (VLISP) is an integrated development environment (IDE) that provides an easy-to-use editor to help you create code, debug errors, and test programs. You can write AutoLISP code in Notepad or any text editor, but the Visual LISP editor offers many advantages:
Syntax checker, color coding, and highlighting to help correct syntax errors
File compilation for security and faster execution
Debugger, with support for stepping through source code to find errors
Inspect and Watch windows for querying a value or examining a variable during execution
Context-sensitive help
Management of multiple file applications from a project window
Console history, which makes it possible to recall previously entered information
As soon as you're in the Visual LISP environment, you can create a new AutoLISP file or open an existing file. To edit or view a file in the Visual LISP text editor, follow these steps:
Choose File

In the Open File to Edit/View dialog box, locate and choose the file that you want to open.
Click Open. Visual LISP opens the file in its own window, as shown in Figure 34.1.
When you open a file, the title bar of its window displays a blank paper icon to show that the file has not been changed. If you make any changes to the file, Visual LISP adds a pencil to the image to show that you've edited the file.
To use the AutoLISP program in AutoCAD, you must load it. You can load it from within Visual LISP or from within AutoCAD.
If you're in AutoCAD, you can load AutoLISP files into AutoCAD in two main ways. One method is at the command line. To load circle3.lsp from the command line, type (load "circle3")
When you enter the command to load circle3.lsp, AutoCAD searches all the support paths for a file called circle3.lsp. At installation time, AutoCAD automatically configures the support-file search path to include the path of AutoCAD 2010Support. For a full list of folders in thesupport-file search path, choose Application Button
Note
AutoLISP files have the extension of .lsp. However, for security and speed, you can compile AutoLISP routines as .fas or .vlx project application files. AutoCAD loads .vlx first, then .fas, and .lsp files last. For example, if you have both a redline.vlx file and a redline.lsp file, AutoCAD loads the redline.vlx file. If, however, the .lsp file is newer than the .fas file, AutoCAD will load the .lsp file. If an AutoLISP file is associated with a menu, it has a .mnl extension. For more information, see Chapter 33.
If your file is not in a folder in AutoCAD's support-file search path, then you must specify the full path name. To specify the full path to a routine, you would enter:
(load "c:/Program Files/AutoCAD 2010/Support/circle3")
or
(load "c:\Program Files\AutoCAD 2010\Support\circle3")
The backslash () has special meaning in AutoLISP, so you need to use two of them or a regular slash (/) when specifying a path. (The backslash character tells AutoLISP to interpret the following character as a special control code. For example, to use a double quote in an AutoLISP expression, precede it with a backslash.)

If you check the Add to History check box, AutoCAD lists previously loaded applications in the dialog box — just click the History List tab. Locate and choose the file you want to load, and click Load.
Tip
If you want to use a routine regularly, you can add it to the Startup Suite, which loads it whenever you start AutoCAD. Locate the AutoLISP file in the Load/Unload Applications dialog box and drag it to the Startup Suite area of the dialog box.
After you load an AutoLISP routine, you can use it. How you use the routine depends on the routine. If the program creates a function, then you can type the function's name on the command line like any other AutoCAD command. Most routines contain prompts to guide you in their use.
Note
The AutoLISP file used in the following exercise on loading and using an AutoLISP routine, circle3.lsp, is in the Drawings folder on the DVD.
STEPS: Loading and Using an AutoLISP Routine
Use Windows Explorer to copy
circle3.lspfrom the DVD to yourAutoCAD 2010Supportfolder, or to a folder that you added to the support-file search path.Create a new drawing by using any template.

If any AutoLISP files are displayed in the main area, click their Close boxes.
Choose Open on the Standard toolbar. In the Open File to Edit/View dialog box, navigate to the folder where you saved
circle3.lspand double-click it. It appears in a new window within the Visual LISP editor.

Now that
circle3.lsphas been loaded, at the command prompt, type circle3
At the
Please click a point:prompt, pick any point on-screen. You see a 3-unit radius circle with its center at the point that you picked.Save your drawing in your
AutoCAD Biblefolder asab34-01.dwg.
Tip
You can also load AutoLISP routines by dragging and dropping LSP files into the drawing window from Windows Explorer.
To examine the contents of the circle3.lsp file, open it in the Visual LISP editor. Figure 34.3 shows the circle3 routine. At this point, ignore the color formatting, which is discussed later in this chapter.
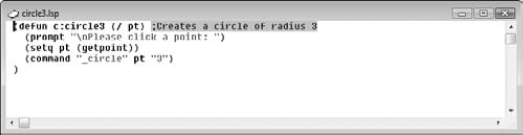
This figure illustrates several general characteristics of AutoLISP routines:
As in many programming languages, indentation is used in AutoLISP to make it easier to read the code. It has no effect on the operation of the routine.
The returns at the end of each line also make it easier to read and understand the code. All five lines could be placed on a single line, and the program would work exactly the same way.
All AutoLISP statements are placed in parentheses. Therefore, whenever you open a parenthesis, you must close it. Every AutoLISP routine must have the same number of left and right parentheses. The physical location of a right parenthesis is not relevant; it can be placed on a new line or positioned several spaces away from the left parenthesis. In both cases, the pair is interpreted the same way.
You interpret AutoLISP from the innermost parenthetical elements first. For example, on line 3 of the code shown in Figure 34.3,
(getpoint)is done first, and then the result is used for the(setq pt (getpoint))expression. This is analogous to mathematics, as in the expression (3 + (5 × 4)), where 5 × 4 is computed first, and the result is added to 3.At the end of the first line is a comment,
;Creates a circle of radius 3. The program ignores any text preceded by a semicolon. Use this technique to place explanations in your routines to help you and others understand what the routine is doing.
The following explains the routine in Figure 34.3 line by line:
Line 1 begins with an open parenthesis that is balanced with the one on line 5. This pair of parentheses delineates the body of the function. The line begins with
defun, which stands for define function, and the function is calledc:circle3. When you prefix the function withc:, you can use it in AutoCAD by just entering circle3 at the command line like any other AutoCAD command. (Thec:stands for command and has no relation to your hard drive, which is also usually calledc:.) You could use justcircle3, but you would have to type (circle3) at the command line to use the routine. The last item on Line 1 is(/ pt). Theptafter the slash means thatptis a local variable. A variable stores a value for later use in the routine. A local variable is used only in its own routine and is not retained for use in other routines. If you replaced(/ pt)with simply( ), theptvariable would be available to other AutoLISP routines as well.Line 2 is the simplest line in this routine. It simply prints the statement
Please click a point:at the command line. Anything in the quotes after PROMPT will be printed on the AutoCAD command line. The statement is used as a prompt to tell the user to pick a point. PuttingLine 3 is typical of AutoLISP routines that contain nested parentheses. Remember to read from the innermost parenthetical element outward. Thus, reading from the innermost parenthetical element, you have first
(getpoint). This means to simply get a point. Any of the AutoCAD input methods work, such as clicking the screen, typing coordinates for a point, or using object snaps. Reading outward you have(setq pt (getpoint)). The statementsetqmeans that the variableptis set to whatever comes back fromgetpoint. Therefore, if you enter the coordinates 2,2 by typing them or selecting them on the screen, the variableptequals 2,2.Line 4 reads
(command "_circle" pt "3"). The COMMAND function in AutoLISP is one of the easier functions to understand. It simply executes whatever AutoCAD command is specified in the quotes that follow, using all subsequent arguments. When the CIRCLE command is invoked in AutoCAD, it asks for the center point first and then the radius. Line 4 starts the CIRCLE command, uses for the center point whatever is assigned to the variablept, and sets the radius to 3 units.
Note
An underscore precedes the CIRCLE command so that it can be translated into other language versions of AutoCAD. Without the underscore, the CIRCLE command will not be recognized by a non-English version of AutoCAD. For example, CIRCLE in the French version is CERCLE. By using the underscore, the French version of AutoCAD will understand the use of the CIRCLE command. It functions as a built-in language translator for AutoCAD.
The Visual LISP editor contains a number of tools that make your programming life simpler. These tools represent the difference from the old way of writing AutoLISP code, which involved creating text files in a text editor. The visual way involves working with tools that help you format and complete your code. Some of the more useful tools include:


Parentheses Matching. The most common error for an AutoLISP programmer is incorrect parentheses matching. Visual LISP enables you to jump between matching parentheses and to quickly check your current nesting level as you develop your application. While you can use the menu items (choose Edit
Tip
You can highlight all the code between matching parentheses. To highlight from left to right, place the cursor in front of a left parenthesis and press Ctrl+Shift+] or simply double-click. To highlight from right to left (backwards), place the cursor after a right parenthesis and press Ctrl+Shift+[ or double-click.


Another feature of Visual LISP is the Console window. The Console window usually resides at the bottom of the Visual LISP window. The Console window is similar to the AutoCAD command line. Just as you can enter AutoLISP expressions on the AutoCAD command line, as explained later in this chapter, you can also enter AutoLISP expressions in the Console window and see the results. Each line uses a _$ prompt.
A nice feature of the Console window is that Visual LISP remembers everything that you enter. You can retrieve it by pressing Tab for a forward history or Shift+Tab for a backward history.
To close a file within Visual LISP, click its Close button. (You can also press Ctrl+F4.) To exit Visual LISP, click its Close button or press Alt+F4. As with AutoCAD, Visual LISP warns you about saving your changes.
Note
The file used in the following exercise on using the Visual LISP editor, ab34-a.lsp, is in the Drawings folder on the DVD.
STEPS: Using the Visual LISP Editor
From AutoCAD, choose Manage tab
Choose Open File on the Standard toolbar, and open
ab34-a.lspfrom the DVD. Save the file asab34-01.lspin yourAutoCAD Biblefolder.
Select the line of the code that reads:
(command "_circle" pt "3")


In the Visual LISP Console window, type (c:circle3) and press Enter. Visual LISP returns you to AutoCAD and starts the routine. Pick a point. When you're done, you're automatically returned to the Visual LISP editor.
Click the text editor window and choose Save File. Click the Close button at the top-right corner of the text editor window to close the AutoLISP file.
Click the Close button at the top-right corner of your screen to close Visual LISP.
Visual LISP offers two ways for you to get help while writing AutoLISP code: context-sensitive help on any term that you select, and the overall Help system.
To open the entire Visual LISP and ActiveX Help system, choose Help
All these help features can be a bit overwhelming, but for AutoLISP and Visual LISP you basically have three choices:
AutoLISP Reference. This guide is equivalent to the Command Reference in AutoCAD's Help system. Here you'll find an alphabetical list of all AutoLISP functions.
AutoLISP Developer's Guide. This guide is equivalent to the AutoCAD User's Guide. It contains all the basic topics that you need to know to program in Visual LISP.
AutoLISP Tutorial. This is a tutorial that creates a garden path.
As with any programming language, AutoLISP has its own functions and syntax. This section explains how to start writing AutoLISP code. One big advantage to AutoLISP is that you can test your code immediately, unlike the case with languages that you need to compile first. For compiled languages, such as ObjectARX, every time a code change is made, the code must be recompiled and re-linked before you can see the changes in AutoCAD.
In AutoLISP's syntax, an operator always comes first, followed by a number of operands. An operator can be thought of as a function that does something, and the operands are the elements on which the function operates. Place a space between each component of the statement.
Another way to describe the syntax of AutoLISP is that, within each set of parentheses, the first item is a function, and what follows are parameters or arguments to that function.
Table 34 lists the basic arithmetic functions. You can use these functions on anything that has a value. For example, if you create a variable with a value of 2, you can use that variable with the arithmetic functions.
Table 34.1. Basic Arithmetic Functions
Function | Description |
|---|---|
| Addition |
| Subtraction |
| Multiplication |
| Division |
| Square root |
Table 34.1 lists only a few fundamental arithmetic operators (or functions). You can find more operators in the AutoLISP Function Synopsis under the Appendixes topic of the AutoLISP Developer's Guide, under Basic Functions
Some fundamental arithmetic operations can provide a feel for the fundamentals. If you type (+ 2 3)
To nest expressions, simply add another set of parentheses to enclose the nested expression. For example, when you enter (* 5 (+ 2 3)), AutoCAD responds with 25. The nested expression is evaluated from the innermost parenthesis pair out; first 2 and 3 are added, and then that sum is multiplied by 5.
Working with floating-point numbers (numbers with decimal points) is as easy as working with integers. If you type (/ 7.3 5.84)
Working with text is as easy as working with numbers. In AutoLISP, a string is simply a series of text characters. Table 34.2 lists some common string functions.
Table 34.2. Basic String Functions
Function | Description |
|---|---|
STRCAT | Concatenates (attaches) strings to one another. |
SUBSTR | Returns (provides you with) a substring (a portion) of a string. The first argument is the string, the second is an integer that specifies the position of the first character that you want, and the third (optional) is the number of characters that you want. |
STRLEN | Calculates string length; returns the number of characters, including spaces in the string. |
Here are two examples:
(strcat "Today is " "a good day" ".")
"Today is a good day."
(substr "Today is a good day." 12 4)
"good"
STRCAT stands for string concatenate and appends one string with another. Any number of strings can come after the STRCAT function. (There are three strings enclosed in quotes in the above STRCAT example.)
SUBSTR stands for substring, and in the above example it returns the four characters starting at position 12.
Note
The first character of the string for SUBSTR is number 1. However, other functions that process elements of a list (such as NTH) count the first element as 0.
Table 34.3 offers you a few more functions that work with numbers and strings.
Table 34.3. AutoLISP Functions for Numbers and Strings
Function | Description |
|---|---|
ABS | Returns the absolute value of the argument. (ABS −76) returns 76. |
ASCII | Returns the ASCII code of a character. (ASCII "B") returns 66. |
CHR | Returns the text string for an ASCII code. (CHR 66) returns "B". (Stands for character.) |
ATOI | Converts a string to an integer. (ATOI "2.7") returns 2. (Stands for ASCII to integer.) |
ATOF | Converts a string to a real number. (ATOF "7.6") returns 7.6. (Stands for ASCII to float, as in floating point — that is, a real number.) |
itoa | Converts an integer to a text string. (ITOA 76) returns "76". (Stands for integer to ASCII.) |
Converts a real number to a text string, enclosed in quotes. You can add a mode (1=scientific, 2=decimal, 3=engineering, 4=architectural, 5=fractional) and a precision. Otherwise, RTOS uses the current settings. (RTOS 87.3 2 2) returns "87.30". (RTOS stands for real to string.) | |
= | Equal to. Returns T for true if all arguments are numerically equal. (= 3 3.0) returns T. If the arguments are not equal, it returns nil. |
/= | Not equal to. Returns T if all arguments are not numerically equal. (/= 5 6) returns T. If they are equal, it returns nil. |
< | Less than. Returns T if each argument is numerically less than the next argument. Otherwise returns nil. |
> | Greater than. Returns T if each argument is numerically greater than the next argument. Otherwise returns nil. |
>= | Greater than or equal to. Returns T if each argument is numerically greater than or equal to the next argument. Otherwise returns nil. |
<= | Less than or equal to. Returns T if each argument is numerically less than or equal to the next argument. Otherwise returns nil. |
You can use AutoLISP on the fly in AutoCAD because it is interpreted. By typing an expression on the command line, you get the result immediately. An interpreted language is one in which a single source statement is translated to machine language and executed, and then each subsequent source statement is operated on in the same way. This enables interactive entry of AutoLISP code into AutoCAD.
The output of an AutoLISP expression can be used in response to AutoCAD prompts as well. For example, you can type (+ 1 7) at the Diameter/<Radius>: prompt of the CIRCLE command for a circle with a radius of 8 units. This capability to place AutoLISP expressions into AutoCAD commands is a very powerful tool.
If you leave out a closing parenthesis, AutoCAD returns (_> when you press Enter. This tells you that one open parenthesis has not been closed. If two open parentheses remain to be closed, AutoCAD responds with ((_>. Just type the correct number of closing parentheses at the command line and press Enter. AutoCAD accepts the expression.
STEPS: Working with Numbers and Text on the Command Line
Open a new drawing by using any template.
Type circle
Specify center point for circle or [3P/2P/Ttr (tan tan radius)]:
Pick any point. Specify radius of circle or [Diameter]:(− 5 3)AutoCAD draws a circle with a radius of 2.
Type (strcat "This is an example of " "regular text.")
Press the up-arrow key. AutoCAD repeats the last line. Press the left-arrow key to move to the right of the last r in regular, and press Backspace to delete the word regular. Type italic
Save the drawing in your
AutoCAD Biblefolder asab34-02.dwg.
Note
When you create AutoLISP expressions on the command line or in the Console window, they aren't saved with the drawing. They have the same status as any input that you type at the command line.
If you want to use your AutoLISP expressions more than a couple of times, you should save them in a file. Create the routine in Visual LISP and choose Save File.
Tip
A common practice is to consolidate all AutoLISP routines in one folder to make it easier to store and find them. To do this, you can create a folder called LISP in any drive or folder where you keep files that you create, and then choose Application Button
Because AutoCAD can open multiple drawings, you need to organize your AutoLISP routines based on whether you want them to apply to all drawings or just the first drawing that you open.
AutoCAD offers two LSP files that you can use for your AutoLISP routines:
acad.lsp. Use this file for routines that customize the initialization of AutoCAD.acad.lspis not automatically loaded for every consecutive drawing. For example, if you want to load a special menu for only a specific drawing, you could put the routine inacad.lsp. (You can choose to loadacad.lspwith every drawing. Choose Application Buttonacaddoc.lsp. Use this file for routines that customize the initialization of individual drawings. This file is loaded every time a drawing is opened. If you have a menu that contains AutoLISP macros that include variables that you want to be available for all your drawings, put the AutoLISP routines used by the menu inacaddoc.lsp.
Each drawing contains its own AutoLISP environment. AutoLISP files that you load in one drawing, along with their variables, won't be accessible to another drawing. To share functions, use (VL-LOAD-ALL "filename") rather than (load "filename"), where filename is the name of the AutoLISP file. This enables you to "populate" every current drawing, as well as any new drawing that you may create. The VL-LOAD-ALL function is equivalent to placing an AutoLISP routine in acaddoc.lsp.
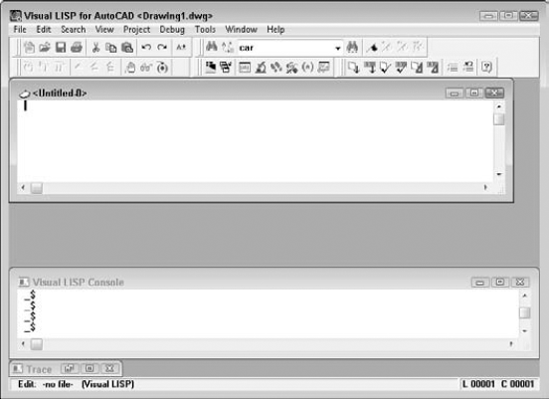
Table 34.4. Visual LISP Editor Coloring System
Color | AutoLISP Syntax Element |
|---|---|
Blue | Built-in functions and protected symbols |
Magenta | Text strings |
Green | Integers |
Teal | Real numbers |
Purple on gray background | Comments |
Red | Parentheses |
Black | Unrecognized items, such as variables that you've created |
If you want, you can customize these colors. From the Visual LISP menu, choose Tools
STEPS: Creating a New Visual LISP File
Start a new drawing by using any template. You shouldn't have any other drawings open.
Choose Manage tab

Type the following:
;draws a horizontal line 3 units long(defun c:line3 (/ pt)(prompt " Please pick a point: ")(setq pt (getpoint))(command "_line" pt "@3,0" ""))Select the first line of text and choose Comment Block from the Tools toolbar.
Choose Format Edit Window from the Tools toolbar to format the code.
Choose Check Edit Window and look at the result in the Build Output window.
Click the Visual LISP Editor to activate it again.
Choose Load Active Edit Window to load the routine.
Choose Activate AutoCAD from the View toolbar.
On the command line or at the dynamic input tooltip, type line3
At the
Please pick a point:prompt, use any method to specify a point. AutoCAD draws a horizontal line 3 units long.Use the Windows task bar to return to the Visual LISP editor.
Click the Visual LISP editor to activate it. Choose Save File on the Standard toolbar. Save the routine as
ab34-02.lspin yourAutoCAD Biblefolder.Close the Visual LISP editor by clicking its Close button. Do not save your drawing.
This chapter covers the fundamentals of AutoLISP programming and the Visual LISP environment. You read about:
How to open the Visual LISP editor and load and use AutoLISP files
How to use AutoLISP on the command line
What AutoLISP routines look like
How to get help in Visual LISP
The basic structure of AutoLISP syntax, as well as how to work with numbers and text
In the next chapter, you examine how to create variables, work with AutoCAD commands and system variables, modify AutoCAD objects (or entities, as they're often still called in AutoLISP), and work with the fundamental units of AutoLISP, known as lists.