
This chapter builds on the previous two chapters and introduces you to a few advanced AutoLISP topics, including global and local variables, ActiveX, and debugging.
Note
AutoCAD LT does not support AutoLISP, so this entire chapter is for AutoCAD only.
In this section, you read how global and local variables are accessed within a function, as well as some common syntax. You also discover what can happen when global variables are not properly documented.
Chapter 35 explained that a variable is a symbolic name that you can use in a given function. An important part of using variables is being able to assign values to them. There are two types of variables, global and local.
A global variable is exposed, or available, to all AutoLISP functions that you've loaded into your drawing. A global variable retains its value after the function that defined it is finished. You use a global variable when you want its value to be available while a drawing is open, as opposed to just one function. This allows you to retain a fixed value that might be used and assigned by different functions, or for debugging. Any variable that you don't specifically define as a local variable is a global variable.
A local variable is temporarily assigned a value during a function's execution. After the function completes executing, the local variable value is discarded. AutoLISP can now use the memory that was taken up by that local variable. You use a local variable when you want to be sure that you don't have variable values floating around and interfering with other functions. Local variables are also easier to debug because they affect only the code within their function. In general, most of your variables should be local. You create a local variable and declare it in the DEFUN statement after the slash and a space, as in this example:
(defun list-objects ( / counter sset)...
Warning
Global variables can be tricky. For example, they can easily cause bugs. This is because their values persist and can be hard to debug because the values are hard to find. A common syntax for global variables is to prefix and suffix the variable with an asterisk, as in *aGlobal*. In this way, you can easily identify global variables in your code. Keep your use of global variables to a minimum, and carefully document those that you do use. Failure to follow these simple rules could result in undesirable and difficult-to-trace bugs.
STEPS: Using Global and Local Variables
Start a new drawing by using the
acad.dwttemplate. You should not have any other drawing open.Open the Visual LISP editor.
In the Console window, type the following line and then press Ctrl+Enter. You use Ctrl+Enter in the Console window to enter in code of more than one line. This line declares one local variable:
(defun local-variable (/ var1)
Type the second line of code in the Console window as follows:
(setq var1 "I'm local"))

This sets the local variable to the string that you typed. The Console returns the name of the function:
LOCAL-VARIABLE
Before you test this function, you can check out the current value of the local variable,
var1. Type var1nil
As you can see, the value is
nil.Test the local-variable function to check the value that it sets to the
var1variable. In the Console window, type (local-variable)"I'm local"
You now know that the local-variable function definitely assigns the value of
"I'm local"to the variablevar1.To create a global variable, type (setq var1 "I'm global")
"I'm global"
You know that the value of
var1is now"I'm global".Test the local variable again by typing (local-variable) in the Console window. The Console returns
"I'm local"because it executes the local-variable function.Test the variable
var1to see what its value is now. In the Console window, type var1
ActiveX is an interface that exposes objects to the user, a programmer, or an application. AutoLISP supports ActiveX, giving you more information and flexibility in working with your drawings. You can also use ActiveX to work with objects in other Windows applications that support ActiveX. ActiveX is a programming interface that is used within a programming language that supports it. For example, you can also use ActiveX with Visual Basic for Applications (see the next chapter), C++, and .NET.
Note
In ActiveX, objects are structured in a hierarchy. You need to understand this structure before working extensively with ActiveX. Chapter 37 covers this hierarchical structure in more detail.
ActiveX enables you to get information about objects (called get functions) and modify them (called put functions). The following section reviews how you can create functions in AutoLISP that emulate the get and put functionality of ActiveX functions.
In this section, you look at developing a small routine, written in AutoLISP, that mimics ActiveX properties and methods. This will help you to compare how AutoLISP works compared to ActiveX.
To understand Visual LISP's ActiveX features, you need to know how AutoCAD exposes an object's properties in AutoLISP. The following examples work with a line that is 10 units long and that was created by using the following AutoLISP function:
;;; This function creates a line using the AutoLISP
;;; command function and returns nil.
(defun make-aLine ()
 (command "_line" "5,5" "15,5" "")
)
Note
The uppercase letter (in the function name) is used for readability, but you can type all lowercase letters if that's easier for you.
After loading it, you can use this function (that is, draw the line) by typing the following in the Visual LISP Console window:
(make-aLine)As explained in Chapter 35, to retrieve the last object that was created (the line), you use ENTLAST, as shown in the following code fragment. The next expression assigns the value of the last created entity, as an entity name, to the variable LineEntity. To try this out, type the following code in the Console window:
(setq LineEntity (entlast))Visual LISP responds with the entity name. As soon as you receive the entity name, you can use ENTGET to retrieve the object property list of the line. The following code fragment places the property list value in the variable LinePropertyList. If you type the following in the Console window and press Enter, Visual LISP responds with the property list:
(setq LinePropertyList (entget LineEntity))Here is an example of a property list, which is formatted for readability:
((−1 . <Entity name: 1456d60>)
 (0 . "LINE")
 (330 . <Entity name: 1456cf8>)
 (5 . "2C")
 (100 . "AcDbEntity")
 (67 . 0)
 (410 . "Model")
 (8 . "0")
 (100 . "AcDbLine")
 (10 5.0 5.0 0.0)
 (11 15.0 5.0 0.0)
 (210 0.0 0.0 1.0))
As you can see, ENTGET returns an entity's properties as a collection of lists, all which have a distinctive number at their first position. Some of these group codes (also commonly known as DXF fields, because you can also find them in DXF files) were listed in Table 35.2 in Chapter 35. For this exercise, you just need to remember that the group 10 code is associated with the start point of a line.
Having the entity list and knowing which values to retrieve, you can use the AutoLISP function ASSOC, which returns an associated item from a property list.
To retrieve the start point of the line, you would use the following code, which you can type in the Console window:
(setq StartofLineList (assoc 10 LinePropertyList))The Console returns the list that is associated with the group 10 code, including the group code and the coordinates:
(10 5.0 5.0 0.0)
Because the only value that you require is the start point of the line object, use the function CDR to remove the first element of the list, as shown in the following code.
(setq StartofLine (cdr (assoc 10 LinePropertyList)))
This code returns only the start point coordinate:
(5.0 5.0 0.0)
This review of how to retrieve a value from an AutoCAD object shows that retrieving information from an associated list is relatively straightforward. But how about retrieving more than one property at a time? As you can see from the preceding example, you'd have to repeat the same body of code many times over to retrieve any information. Knowing this, you could write a simple interface function, putting together all the steps that I have just explained, to retrieve any group code — not just the group 10 code — from an object.
Note
An interface function is a function that hides a complex behavior from the user. The user needs to provide only basic information, but the function uses the information in several steps to obtain the desired result.
An example of an interface function is shown in the following lines:
;;; Returns any group code value if it is present in the entity
;;; the required parameters are an entity name and a group code.
(defun Get-A-Group-Code (EntityName GroupCode)
  (cdr (assoc GroupCode (entget EntityName)))
)
After you create this function and load it, you can test it out in the Console window as follows, using the LineEntity variable that was previously defined:
(Get-A-Group-Code LineEntity 10)(5.0 5.0 0.0)
As you can see, the function returns only the value of the group 10 code.
You can refine this small interface by defining a separate group 10 code function, such as the following. The only required parameter is an entity name. The group code is included in the call to Get-A-Group-Code. You could do the same for a group 11 code, if you want.
(defun Get-Group-10-Code (anEntityName)
  (Get-A-Group-Code anEntityName 10)
)
After loading, test the function, as follows:
(Get-Group-10-Code LineEntity)
Visual LISP returns the start point of the line:
(5.0 5.0 0.0)
These examples summarize how you would create a simple function to get the start point of a line by using AutoLISP. What if you need to change an object's property? You can do this by using the functions CONS, SUBST, and ENTMOD, which Chapter 35 covers.
CONS constructs a list. Use it when you want to create new values for a group code within an entity list, as in the following example, which you can type in the Console window:
(setq NewStartPoint (cons 10 '( 0.0 0.0 0.0 )))
Visual LISP returns the following:
(10 0.0 0.0 0.0)
Using the variables NewStartPoint and LinePropertyList, you can now substitute the newly created group 10 code. You do this by using the SUBST function. The following code substitutes the new group 10 code that is represented by the variable NewStartPoint for the 10 association in LinePropertyList in the list called LinePropertyList.
(Setq LinePropertyList
       (subst NewStartPoint (assoc 10 LinePropertyList)
  LinePropertyList)
  )
To test this out, type the preceding code in the Console window. To see the new start point, you need to scroll all the way to the right. The list (nicely formatted here) now has a new group 10 value (the start point), shown on the third-to-last line that follows:
((−1 . <Entity name: 1456d60>)
  (0 . "LINE")
  (330 . <Entity name: 1456cf8>)
  (5 . "2C")
  (100 . "AcDbEntity")
  (67 . 0)
  (410 . "Model")
  (8 . "0")
  (100 . "AcDbLine")
  (10 0.0 0.0 0.0)
  (11 15.0 5.0 0.0)
  (210 0.0 0.0 1.0))
To reflect the modification of this line in AutoCAD, you can now use the function ENTMOD by typing it in the Console window, as follows. This code actually changes the start point of the line. (You can return to AutoCAD to check it out.)
(entmod LinePropertyList)
As you can see from this example, getting object properties and modifying them can be a tedious and time-consuming process. Here is an example of an interface function that modifies any group code that is contained in any object.
(defun put-group-code-value (Entityname Groupcode Value / PropertyList)
  (setq PropertyList (entget EntityName))
  (setq PropertyList
      (subst
        (cons GroupCode Value)
        (assoc GroupCode PropertyList)
        PropertyList
      )
  )
  (entmod PropertyList)
 )
This function combines all the preceding steps into one function. Here's how it works:
Line 1 defines the function with three arguments: the entity name, a group code, and a new value for the group code. It also declares a local variable,
PropertyList, which is the property list of the object.Line 2 sets the property list equal to the ENTGET of the entity name.
Line 3 starts the process of setting the same property list to the new value.
Lines 4 through 7 execute the substitution. They substitute the new group, created by
(cons GroupCode Value), for the current group value, created with the ASSOC function, in the property list named PropertyList.Line 8 closes the SUBST function.
Line 9 closes the second SETQ function.
Line 10 modifies the drawing database by using ENTMOD.
Line 11 closes the DEFUN function.
Using the preceding function, you now have a much simpler interface for modifying any group code. Next, you use the function Put-Group-Code-Value to modify the group 10 code of the line object.
After entering and loading the preceding function, you can test the function by typing the following in the Console window:
(Put-Group-Code-Value LineEntity 10 '(5.0 5.0 0.0))This function changes the start point of the line to 5,5,0.
Using the same logic to write the GET functions, you can now define a separate group 10 code modifier function. You can do the same for any group code.
(defun Put-Group-10-Code (EntityName Value)
  (Put-Group-Code-Value EntityName 10 Value)
)
After entering and loading this function, type the following in the Console window to change the start point of the line to 15,−5,0.
(Put-Group-10-Code LineEntity '( 15.0 −5.0 0.0))Activate AutoCAD to check that the line has been changed.
ActiveX enables you to retrieve and modify objects similar to the method used in the previous section of this chapter, but it requires some preparation. The following section explains how you can use ActiveX functions to create, retrieve, and modify an object.
Visual LISP enables you to retrieve and modify most AutoCAD objects by using AutoCAD's ActiveX interface. That is to say, AutoCAD exposes most of its objects to ActiveX-enabled applications. This includes Visual LISP as ActiveX objects, which expose their properties, including PUT (modify) and GET (retrieve) functions.
Using Visual LISP to communicate with AutoCAD is very straightforward. You must first load all the ActiveX functions, using the VL-LOAD-COM function within Visual LISP. You need to use the VL-LOAD-COM function only once each time that you open AutoCAD, because VL-LOAD-COM loads the ActiveX functions for the entire drawing session. (However, using VL-LOAD-COM more than once doesn't cause any harm.) To use the ActiveX interface, enter the following in the Visual LISP Console window:
(vl-load-com)
After the ActiveX interface is loaded, you can interrogate the line that you created previously, but first you need to convert the entity name into a vla-object. A vla-object is no different from an entity name, except that the ActiveX object exposes certain properties that its AutoLISP counterpart does not. To convert the entity name into a vla-object, you use the function VLAX-ENAME->VLA-OBJECT, as shown here:
(setq vla-line (vlax-ename->vla-object (entlast)))
Visual LISP returns the following (your object name will be different):
#<VLA-OBJECT IAcadLine 03612b14>
As you can see by the return value of vlax-ename->vla-object, the value of the variable vla-line contains a vla-object. At this point, you can visually inspect the variable by selecting it and choosing View
(vlax-dump-object vla-line)
This causes Visual LISP to display the following:
; IAcadLine: AutoCAD Line Interface
; Property values:
;   Angle (RO) = 1.5708
;   Application (RO) = #<VLA-OBJECT IAcadApplication 00af9594>
;   Delta (RO) = (0.0 10.0 0.0)
;   Document (RO) = #<VLA-OBJECT IAcadDocument 038be900>
;   EndPoint = (15.0 5.0 0.0)
;   Handle (RO) = "89"
;   HasExtensionDictionary (RO) = 0
;   Hyperlinks (RO) = #<VLA-OBJECT IAcadHyperlinks 01011d44>
;   Layer = "0"
;   Length (RO) = 10.0
;   Linetype = "ByLayer"
;   LinetypeScale = 1.0
;   Lineweight = −1
;   Material = "ByLayer"
;   Normal = (0.0 0.0 1.0)
;   ObjectID (RO) = 2130009736
;   ObjectName (RO) = "AcDbLine"
;   OwnerID (RO) = 2130009336
;   PlotStyleName = "ByLayer"
;   StartPoint = (15.0 −5.0 0.0)
;   Thickness = 0.0
;   TrueColor = #<VLA-OBJECT IAcadAcCmColor 01015170>
;   Visible = −1
T
Note
If you are using a 64-bit release of AutoCAD, the ObjectID and OwnerID properties are listed as ObjectID32 and OwnerID32.
You'll probably have to resize the window to see all these properties. Notice the similarities between the named properties shown here, such as EndPoint and StartPoint, and the line's group codes that you retrieved by using AutoLISP. As you can see, one of the advantages of using an ActiveX-enabled object is that ActiveX exposes more information to the programmer than standard AutoLISP does. One of the benefits of using ActiveX is its interface. Previously, you queried and modified a line object's start point and endpoint by using the group 10 and 11 codes. Using ActiveX to query the start point and endpoint is very straightforward. However, ActiveX returns these points in a data type called a variant that you need to convert to the familiar coordinate format.
To get the start point of an object, use the VLA-GET-STARTPOINT function. In the current example, the line has been set to vla-line, so you would type the following expression:
(setq Starting (vla-get-startpoint vla-line))
Visual LISP responds as follows:
#<variant 8197 ...>
To convert the start point from the variant data type to a usable coordinate format, you would type the following line:
(safearray-value (vlax-variant-value Starting))
Visual LISP responds with a coordinate:
(15.0 −5.0 0.0)
To modify the StartPoint property of a line to (0,0,0), you would use the following expression:
(vla-put-startpoint vla-line (vlax-3d-point '(0.0 0.0 0.0)))
You can return to AutoCAD to check out the line. To verify the new StartPoint, you can also use the VLA-GET-STARTPOINT function:
(safearray-value (vlax-variant-value (vla-get-StartPoint vla-line)))
Visual LISP returns the start point of the line:
(0.0 0.0 0.0)
As you can see, this is very similar to the small routine that was developed in AutoLISP earlier in this chapter.
STEPS: Retrieving and Modifying Objects with ActiveX
To start a new drawing session, open AutoCAD. If AutoCAD is already open, close and re-open it.
Start a new drawing by using the
acad.dwttemplate.Draw any line. Neither the start point nor the endpoint should be 0,0,0.
Open the Visual LISP editor.
In the Console window, type (vl-load-com)
To convert the entity name into a
vla-object, type (setq vla-line (vlax-ename->vla-object (entlast)))To view the line's properties, type (vlax-dump-object vla-line)
To get the start point of the line, type (setq Starting (vla-get-startpoint vla-line))
To convert the start point from the variant data type to coordinate format, type (safearray-value (vlax-variant-value Starting))
To change the line's start point to 0,0,0, type (vla-put-startpoint vla-line (vlax-3d-point '(0.0 0.0 0.0 )))
Choose Activate AutoCAD on the Visual LISP View toolbar to check out the line. Its start point is now 0,0,0.
This section looks at functions that create objects. When you work with ActiveX, you need to retrieve objects in their hierarchical order. This hierarchy concept is discussed in more detail in the next chapter. For this chapter, you need to know that before you can retrieve an object, you need to retrieve the following:
Acad-object. Represents the AutoCAD application.
ActiveDocument. Represents the current drawing.
ModelSpace/PaperSpace. Represents the type of space that you want to use within the current drawing.
In AutoLISP, you first retrieve the AutoCAD application, then your drawing, and finally the space (model or paper). Here you take the simple line command used earlier in this chapter and convert it by using ActiveX:
;;; This function creates a line using Visual LISP
;;; ActiveX and returns the line object as a vla-object.
(defun ax-make-aLine ()
  (vla-AddLine
    (vla-get-ModelSpace            ; retrieve the model
                                   ; space object
      (vla-get-ActiveDocument      ; get the current
                                   ; active document
        (vlax-get-acad-object)     ; get the acad object
      )
    )
    (vlax-3d-point '(5 5 0))       ; starting point
    (vlax-3d-point '(15 5 0))      ; ending point
  )
)
You can type this code in the Visual LISP editor and load it. To try it out, type the following in the Console window:
(ax-make-aLine)Visual LISP responds with the following:
#<VLA-OBJECT IAcadLine 03614934>
This might seem a little cumbersome — as if it might be a lot of work to create a line — but it's actually quite flexible.
To locate other ActiveX functions that create objects, you need to look in the AutoCAD ActiveX and VBA Reference. In Visual LISP, choose Help
Tip
You immediately know whether the function is correct, because it turns from black to blue as you enter it.
Because few people can write perfect code on their first try, there's always a need to debug code. Debugging is simply the process of trying to locate and correct mistakes. This section looks at some simple examples, using some of the debugging tools that Visual LISP has to offer.
In the first example, you define a function that is guaranteed to fail. You can type this code in the Visual LISP editor and load it:
;;; The function below will produce an error;;; because strcat concatenates strings.(defun Error-Prone-Code ()(strcat "This will never print the number: " 1))
Before you continue, you need to choose Debug
Using the function Error-Prone-Code produces an error because strcat concatenates strings, as the following demonstrates. You can type this at the Console window:
(Error-Prone-Code)
Visual LISP responds with the following:
; error: bad argument type: stringp 1
How can you find the source of the problem in a routine? To answer this question, you often need to perform some detective work. Visual LISP provides a wealth of debugging tools, which you can leverage when you encounter an unplanned "enhancement" or bug.
STEPS: Finding the Last Break
Start a drawing in AutoCAD by using the
acad.dwttemplate.Start Visual LISP and start a new file.
In the Visual LISP editor, type the following:
;;; The function add-3-numbers will not produce;;; an error if all its arguments are numbers.(defun add-3-numbers (num1 num2 num3)(+ num1 num2 num3))
In the Console window, type the following:
(add-3-numbers 1 2 3)
Visual LISP returns 6.
However, if you substitute a string for one of its arguments, an error occurs. Type the following in the Console window:
(add-3-numbers 1 "a" 3)
Visual LISP returns the following:
;error: bad argument type: numberp: "a"
Choose Debug


To continue after turning on Break on Error, click Reset on the Debug toolbar.
Any time an error occurs, you can use the last break along with the Visual LISP Error Trace window. To display the Error Trace window, choose View
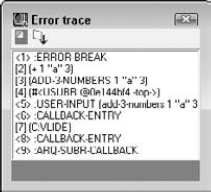
Figure 36.1. To help you debug your code, the Error Trace window displays every function call before the error, as well as where the error occurred.
The item numbered <5> in Figure 36.1 is what you entered in the Console. The item labeled [2] (+ 1 "a" 3) is where the error occurred, while <1> :ERROR-BREAK signaled the function's termination because of the error.
Visual LISP enables you to find the source position (the line of code that produced the error) and the call source point (the position in your code where the function was called) for the error. To find them, right-click the third item in the Error Trace window. From the shortcut menu, you can choose either Source Position or Call Source Point. Jumping to the position in your code where the function was called is extremely handy when debugging a large application.
Sometimes when you choose Last Break to highlight an error, you find that a great deal of code is highlighted, which is not very helpful for finding the error. This is where break points come in handy. Break points are locations in your code, specified by you, that signal Visual LISP to stop and wait until you're ready to continue processing the code. Visual LISP executes your code and stops at each break point to wait for your instructions. Break points enable you to break down your code into smaller pieces and watch what's going on piece by piece so that you can more easily find the error.
To place a break point, position your cursor to the left of an opening parenthesis or to the right of a closing parenthesis, and press F9. Visual LISP places a temporary red mark in your code.
After creating your break points, you need to reload your code to tell Visual LISP about your break points. Then try to execute the function again. Notice that the Debug toolbar buttons become available. Visual LISP executes your code up to the first break point.
You can use the Debug toolbar to help find your error. The first three buttons offer three different ways to move through your code:
To remove break points, choose View
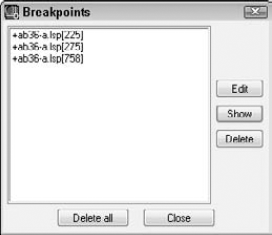
In the Breakpoints dialog box, you can do the following:
Delete all break points by clicking Delete all.
Delete individual break points by choosing a break point and clicking Delete.
Jump to a break point by choosing a break point and clicking Show. Visual LISP places a blinking cursor at the break point.
Edit a break point by choosing a break point and clicking Edit. Visual LISP then lets you disable, delete, or show the break point.
Note
The file used in the following exercise on working with break points, ab36-a.lsp, is in the Drawings folder on the DVD.
STEPS: Working with Break Points
Open AutoCAD and start a drawing by using any template.
Start the Visual LISP editor. Open
ab36-a.lspfrom the DVD. Choose FileChoose Load Active Edit Window from the Visual LISP Tools toolbar.
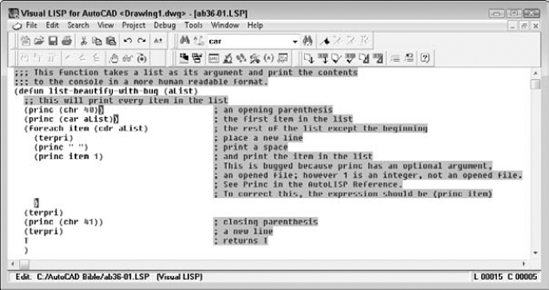
Read through the code. This routine creates a vertical list of numbers. The new FOREACH function steps through each item in a list. The comments explain why it contains a bug.
If you didn't do the previous exercise, choose Debug
Type the following in the Console window:
(list-beautify-with-bug '(1 2 3 4 5))
The Console returns the following:
(1
; error: bad argument type: FILE 1
Choose Last Break on the Visual LISP Debug toolbar to jump to the error in the source code.
To place a break point in the code, place the cursor after
(princ (chr 40)). Press F9. Visual LISP marks the break with a red box.Place another break point after
(princ (car aList)). Finally, place a third break point after the closing parenthesis on the line that follows(princ item 1). Your code should look like Figure 36.3.After the code produces an error, you need to reset. Click Reset on the Visual LISP Debug toolbar.
Click the Visual LISP editor and reload the function into Visual LISP. (Choose Load Active Edit Window on the Visual LISP Tools toolbar.)
Type the same expression that produced the error in the Console window:
(list-beautify-with-bug '(1 2 3 4 5))

Choose Step Into. Now only
(car aList)is highlighted.Choose Step Into until you reach the error,
(princ item 1).Edit
(princ item 1)so that it reads(princ item).Click Reset again.
Choose Debug
Activate the Editor window and reload the function.
In the Console window, type (list-beautify-with-bug '(1 2 3 4 5))
Activate the Editor window and save the file.
Note
If you have difficulty fixing this bug, you can find the "repaired" version in the Results folder on the DVD, with the filename list-beautify-without-bug.lsp.
The Watch window enables you to examine expressions and variable values as they're being evaluated. To watch a variable, select it in the code and choose Debug
If you have a routine with arguments, you can execute the function with various arguments and see the results on your watched expressions and variables in the Watch window.
Furthermore, you can add any expression to the Watch window and alter the contents of any variable while debugging a function.
Note
The file used in the following exercise on using the Watch window, ab36-01.lsp, is in the Results folder on the DVD.
STEPS: Using the Watch Window
Open AutoCAD and start a drawing by using the
acad.dwttemplate.Start the Visual LISP editor. Open
ab36-01.lspfrom theResultsfolder of the DVD. If you did the previous exercise, you can open it from yourAutoCAD Biblefolder.Select the expression
(princ (chr 40)). Choose Debug
Add a break point after
(princ item)by placing the cursor there and pressing F9.
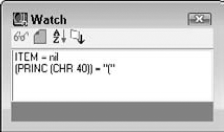
To examine the Watch window display as the function
list-beautify-with-bugis evaluated, type the following in the Console window:(list-beautify-with-bug '(1 2 3 4 5))
The
(princ item)expression should be highlighted. Choose Step Into on the Visual LISP Debug toolbar. Theitemvariable in the Watch window should now display its current value. Continue to click Step Into, watching the value ofitemincrease in the Watch window each time you step through the cycle.In the Console window, type aList
(1 2 3 4 5)
As you can see, you can interrogate any variable while debugging the function.
To add a new expression to the Watch window, select the variable
aListand press Ctrl+W.To change the value of
aList, return to the Console window and type the following:(setq aList (list 6 7 8 9 10))
The Console responds as follows:
(6 7 8 9 10)
Notice the change in the Watch window.
To remove the break point, choose View
Click Reset on the Visual LISP Debug toolbar.
Close the Watch window and the Visual LISP editor without saving the file.
As you can see, Visual LISP is not just an editor; it's a full-featured, integrated development environment for AutoLISP.
In this chapter, you examined some of the advanced features of AutoLISP and Visual LISP. You read about:
Global and local variables
Some of the features of ActiveX
How to use some of Visual LISP's debugging features, including the Error Trace window, break points, and the Watch window
In the next chapter, you read about the basics of Visual Basic for Applications, another programming language that you can use with AutoCAD.