
Making changes to a symbol is easy, but there are a few ways to do it. We will look at them in a moment.
This method will allow you to make changes to a symbol on a page-by-page basis. For example, open project_mockup_1.bmml and double-click on the header.
You should now see a green bar across the top of the canvas, as shown in the following screenshot:
In this state, your symbol is fully editable, but any changes you make will apply only to this particular instance.
Tip
The number in the green bar (#83 in this example), is an ID number that Balsamiq creates automatically. This number becomes part of the page's file data and can be referenced during development, if needed. While developing with Balsamiq is outside the scope of this book, I thought you might want to know.
To change a symbol across multiple pages, you have to look at the other side of the green bar and click on the Edit button, as shown in the following screenshot:
Clicking on Edit brings you to the master page—symbols.bmml where, once again, your symbol is fully editable. However, any changes you make here will cascade throughout your entire project.
Let's try an exercise. Perform the following steps:
- Open
project_mockup_2.bmmland drag the header symbol from the Project Assets bar. Set Pos:79,12. - Return to
symbols.bmmland select the text in the upper-right area of the header, where it says Welcome back George!, as shown in the following screenshot:
- Change George to your name.
If your name happens to be George, well, sorry George. For this exercise, please choose a different name.
- Save your work for the changes to take effect.
- Return to
project_mockup_2.bmmland notice that the name in the header has changed. Notice that it also changed inproject_mockup_1.bmml. - To remove the green bar, double-click anywhere on the page or press the Esc key on your keyboard.
Select the header in project_mockup_2.bmml once more to make the Property Inspector visible. Once there, you will see two buttons at the bottom, Break Apart and Edit Source, within the row labeled Symbol, as shown in the following screenshot:
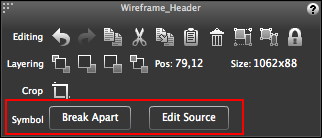
Clicking on the Break Apart button turns a symbol back into a group and essentially disconnects it from the master page. At this point, the only way to turn it back into a symbol is to rename it and create a new symbol or, if you did this by mistake, you can always press Command + Z/Ctrl + Z until it is returned to its original symbol state.
Edit Source
brings you back to the master page—symbols.bmml. From here, you can edit the symbol as before with all changes cascading throughout your project.
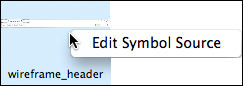
A third way to edit can be found in the UI Library's Project Assets section. Just right-click on the symbol icon and click on Edit Symbol Source. This will take you back to the master page, symbols.bmml, once again.
Before moving on, there is one other useful feature for editing symbols that you should know about as well.
It is easier to show you this one directly using an example. Perform the following steps:
- Open
project_mockup_2.bmmland double-click on the header once again to activate the green bar. - With the green bar visible, make some changes to the header. Any change will do.
- Close the green bar (double-click on the canvas or click Esc).
- Reselect the header.
You should now see something similar to the following screenshot in the Property Inspector:
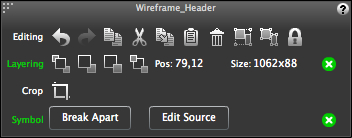
Notice the green x icons on the right side of the Property Inspector. They alert you that something has changed in the symbol on this page that is different from the master page version. Clicking on either of the green x icons will remove any changes you made and return the header to its previous master page version.
On the other hand, if you are happy with your changes, save your work and the green x icons will disappear.